

Vertical Veggie Gardening: Tired of limited space cramping your green thumb dreams? I get it! I used to think a sprawling backyard was the only way to grow my own food. But guess what? You can cultivate a thriving vegetable garden, even on a tiny balcony or patio, with the magic of vertical gardening!
For centuries, cultures around the globe have ingeniously used vertical space for cultivation. From the Hanging Gardens of Babylon (one of the Seven Wonders of the Ancient World!) to the simple, space-saving techniques employed in densely populated areas, the concept is far from new. But today, we’re bringing it into the 21st century with easy, DIY solutions.
Why is vertical veggie gardening so essential now? Well, more and more of us are living in apartments or smaller homes with limited outdoor areas. Plus, the rising cost of fresh produce and the desire to eat healthier, locally grown food are driving a surge in interest. This DIY guide will provide you with simple, cost-effective ways to create your own vertical oasis. Imagine plucking fresh tomatoes, herbs, and leafy greens right from your wall – it’s easier than you think! Let’s dive in and transform your small space into a bountiful garden.

DIY Vertical Veggie Garden: Grow Up, Not Out!
Hey there, fellow gardening enthusiasts! Are you dreaming of fresh veggies but short on space? Don’t worry, I’ve got you covered! I’m going to walk you through building your very own vertical veggie garden. It’s a fantastic way to maximize your yield, add some green to a small balcony or patio, and even create a stunning living wall. Plus, it’s a super fun DIY project!
Here’s what we’ll be creating: a multi-tiered vertical garden using readily available materials. We’ll be focusing on a system that’s easy to build, maintain, and looks great too.
Materials You’ll Need
Before we dive in, let’s gather our supplies. This is crucial for a smooth building process. I’ve tried to keep the list budget-friendly and easily accessible.
* **Wooden Pallet:** Look for a sturdy, untreated pallet. You can often find these for free at local businesses (ask nicely!). Make sure it’s heat-treated (HT) and not chemically treated (look for the IPPC stamp).
* **Heavy-Duty Landscape Fabric:** This will line the pallet and create pockets for your soil.
* **Staple Gun and Staples:** Essential for securing the landscape fabric.
* **Potting Soil:** Choose a high-quality potting mix specifically designed for vegetables.
* **Vegetable Seedlings or Seeds:** Select plants that thrive in containers and your local climate. Think herbs, lettuce, strawberries, spinach, and smaller varieties of tomatoes and peppers.
* **Gloves:** Protect your hands!
* **Scissors or Utility Knife:** For cutting the landscape fabric.
* **Measuring Tape:** To ensure even spacing and pocket sizes.
* **Safety Glasses:** Always a good idea when using power tools.
* **Sandpaper (Optional):** To smooth out any rough edges on the pallet.
* **Exterior Wood Stain or Paint (Optional):** To protect and beautify your pallet.
* **Drill and Screws (Optional):** For extra reinforcement of the pallet structure.
* **Watering Can or Hose:** For watering your plants.
Preparing Your Pallet
This is a crucial step to ensure your garden is safe and long-lasting.
1. **Inspect the Pallet:** Carefully examine the pallet for any loose nails, splinters, or damage. Remove any loose nails with a hammer and pliers. Sand down any rough edges with sandpaper.
2. **Clean the Pallet:** Use a brush and soapy water to clean the pallet thoroughly. Rinse well and allow it to dry completely. This removes any dirt, debris, or potential contaminants.
3. **Reinforce (Optional):** If your pallet seems a bit wobbly, you can reinforce it by adding screws to the joints. Drill pilot holes first to prevent the wood from splitting.
4. **Stain or Paint (Optional):** If you want to protect the pallet from the elements and give it a more polished look, apply an exterior wood stain or paint. Let it dry completely before moving on to the next step. I personally love a natural wood stain to show off the wood grain.
Creating the Planting Pockets
This is where the magic happens! We’ll be transforming the pallet into a series of individual planting containers.
1. **Measure and Cut the Landscape Fabric:** Measure the width and depth of each section of the pallet where you want to create a planting pocket. Add a few extra inches to each measurement to allow for overlap and secure stapling. Cut the landscape fabric into appropriately sized pieces. You’ll need multiple pieces depending on how many pockets you want to create.
2. **Attach the First Layer of Fabric:** Starting at the bottom of the pallet, fold the landscape fabric over the bottom slat and staple it securely to the back of the pallet. Make sure the fabric is taut and wrinkle-free. Use plenty of staples to ensure a strong hold.
3. **Create the Pocket Shape:** Fold the fabric up to create the back of the pocket. Staple the sides of the fabric to the vertical supports of the pallet, forming a pouch. The size of the pocket will depend on the size of the plants you intend to grow. I usually aim for pockets that are at least 6 inches deep and wide.
4. **Repeat for Each Pocket:** Continue this process, working your way up the pallet, creating as many planting pockets as you desire. Overlap the fabric slightly between each pocket to prevent soil from leaking out. Ensure each pocket is securely stapled and can hold the weight of the soil and plants.
5. **Reinforce the Bottom (Important!):** The bottom pockets will bear the most weight, so it’s crucial to reinforce them. You can add an extra layer of landscape fabric or even a piece of sturdy cardboard to the bottom of each pocket for added support.
Planting Your Vertical Garden
Now for the fun part – bringing your garden to life!
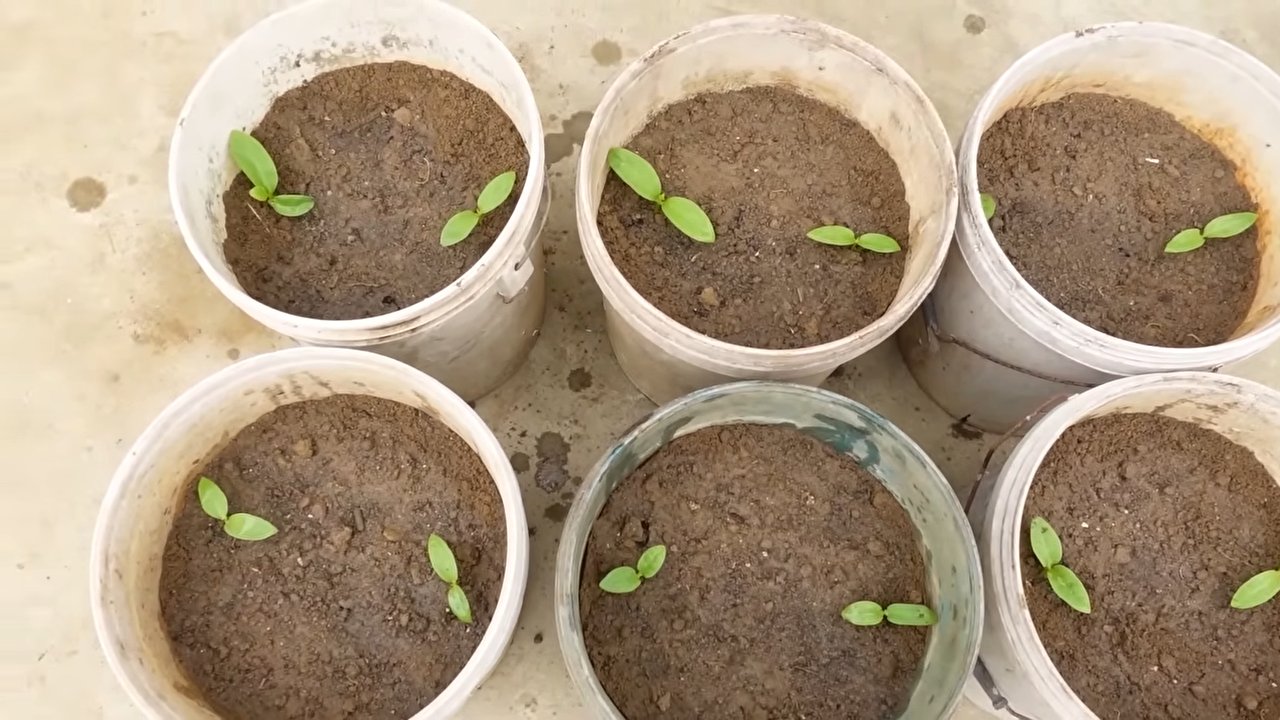
1. **Fill the Pockets with Potting Soil:** Carefully fill each planting pocket with high-quality potting soil. Gently pack the soil down to eliminate air pockets. Leave about an inch of space at the top of each pocket to prevent soil from spilling out when watering.
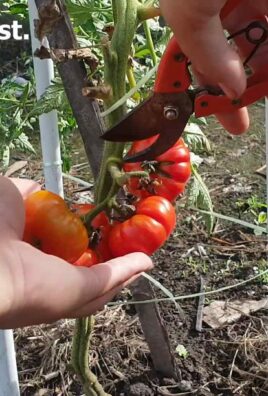
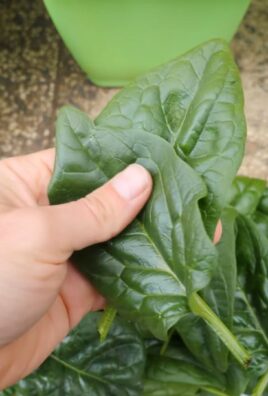
2. **Choose Your Plants:** Select vegetable seedlings or seeds that are well-suited for container gardening and your local climate. Consider factors like sunlight exposure and watering needs. Herbs like basil, oregano, and thyme are excellent choices, as are leafy greens like lettuce and spinach. Strawberries also thrive in vertical gardens. For larger plants like tomatoes and peppers, choose dwarf or compact varieties.
3. **Plant Your Seedlings or Seeds:** Gently remove the seedlings from their containers and loosen the roots slightly. Plant them in the prepared pockets, ensuring the roots are well covered with soil. If planting seeds, follow the instructions on the seed packet.
4. **Water Thoroughly:** Water your newly planted garden thoroughly, allowing the water to drain out of the bottom of the pockets. This will help settle the soil and encourage root growth.
5. **Add Support (If Needed):** For taller plants like tomatoes or peppers, you may need to add support structures, such as small stakes or trellises, to help them grow upright.
Maintaining Your Vertical Garden
Vertical gardens require a bit more attention than traditional gardens, but the rewards are well worth the effort!
1. **Water Regularly:** Vertical gardens tend to dry out more quickly than ground-level gardens, so it’s important to water them regularly, especially during hot weather. Check the soil moisture daily and water when the top inch feels dry to the touch.
2. **Fertilize Regularly:** Because the plants are growing in containers, they will need regular fertilization to provide them with the nutrients they need to thrive. Use a liquid fertilizer specifically formulated for vegetables, following the instructions on the label.
3. **Prune and Trim:** Regularly prune and trim your plants to encourage healthy growth and prevent them from becoming too crowded. Remove any dead or yellowing leaves.
4. **Pest Control:** Keep an eye out for pests and diseases. If you notice any problems, take action immediately to prevent them from spreading. Use organic pest control methods whenever possible.
5. **Sunlight:** Ensure your vertical garden receives adequate sunlight. Most vegetables need at least 6 hours of sunlight per day. If you don’t have enough natural sunlight, you may need to supplement with grow lights.
6. **Rotate Your Crops:** To prevent soil depletion and pest buildup, rotate your crops each season. Plant different types of vegetables in the same pockets each year.
7. **Winter Protection:** In colder climates, you may need to protect your vertical garden from frost and freezing temperatures. You can cover it with a blanket or move it to a sheltered location.
Choosing the Right Plants
Not all vegetables are created equal when it comes to vertical gardening. Here are some of my favorites:
* **Lettuce and Spinach:** These leafy greens are easy to grow and thrive in containers.
* **Herbs:** Basil, oregano, thyme, mint, and parsley are all excellent choices for vertical gardens.
* **Strawberries:** These delicious berries are perfect for hanging baskets or pockets.
* **Tomatoes (Dwarf Varieties):** Choose compact or dwarf varieties of tomatoes that won’t get too large and heavy.
* **Peppers (Small Varieties):** Similar to tomatoes, opt for smaller pepper varieties.
* **Radishes:** These fast-growing root vegetables are a fun and easy addition.
* **Bush Beans:** These compact beans are well-suited for container gardening.
Troubleshooting Tips
Even with the best planning, you might encounter a few challenges. Here are some common issues and how to address them:
* **Soil Drying Out Too Quickly:** Add water-retaining crystals to the potting mix or use a self-watering system.
* **Plants Not Growing Well:** Check the soil pH and nutrient levels. Adjust as needed.
* **Pests:** Identify the pest and use appropriate organic pest control methods.
* **Pallet Rotting:** Ensure the pallet is properly sealed and protected from the elements.
Final Thoughts
Building a vertical veggie garden is a rewarding and sustainable way to grow your own food,
Conclusion
So, there you have it! Transforming your limited space into a thriving, green oasis with vertical veggie gardening is not just a possibility, it’s a surprisingly simple and rewarding reality. We’ve explored the core principles, highlighted the benefits, and offered practical tips to get you started. But why is this DIY trick a must-try?
Firstly, it’s about maximizing space. Whether you have a tiny balcony, a small patio, or even just a sunny wall, vertical gardening allows you to grow a surprising amount of fresh produce in a minimal footprint. Imagine plucking ripe tomatoes, fragrant herbs, or crisp lettuce right outside your door – that’s the power of verticality.
Secondly, it’s about accessibility and ease. Bending over to tend to ground-level gardens can be tough on the back and knees. Vertical gardens bring your plants up to a more comfortable height, making weeding, watering, and harvesting a breeze. This is especially beneficial for those with mobility issues or limited physical strength.
Thirdly, it’s about aesthetics. Let’s face it, a well-designed vertical garden is simply beautiful. It adds a touch of greenery, vibrancy, and life to any space, transforming a dull wall or fence into a living work of art. You can customize your vertical garden to match your personal style, using different containers, plants, and arrangements to create a unique and eye-catching display.
But the benefits don’t stop there. Vertical gardens can also improve air quality, reduce noise pollution, and even insulate your home, helping to keep it cooler in the summer and warmer in the winter. Plus, growing your own food is a fantastic way to reduce your carbon footprint, eat healthier, and connect with nature.
Ready to take your vertical garden to the next level? Consider these variations:
* Hydroponic Vertical Gardens: For a more advanced approach, explore hydroponic systems, which use nutrient-rich water instead of soil. This can lead to faster growth and higher yields.
* Living Walls: Create a stunning living wall by attaching plants directly to a vertical surface using specialized panels or pockets.
* Pallet Gardens: Repurpose old wooden pallets into charming vertical gardens by adding fabric liners and planting pockets.
* Herb Spirals: Build a spiral-shaped vertical garden specifically for herbs, creating a visually appealing and functional feature.
* Strawberry Towers: Construct a tower-like structure with holes for planting strawberries, maximizing space and creating a beautiful display.
Don’t be afraid to experiment and get creative! The possibilities are endless when it comes to vertical veggie gardening.
We encourage you to take the plunge and try this DIY trick for yourself. Start small, learn as you go, and don’t be discouraged by initial setbacks. Gardening is a journey, and every mistake is an opportunity to learn and grow.
Most importantly, we want to hear about your experience! Share your photos, tips, and stories in the comments below. Let’s create a community of vertical gardeners who inspire and support each other. What are you waiting for? Get your hands dirty and start growing your own vertical veggie garden today!
Frequently Asked Questions (FAQ)
What vegetables grow best in a vertical garden?
Many vegetables thrive in vertical gardens, but some are particularly well-suited due to their size, growth habits, and ease of care. Leafy greens like lettuce, spinach, and kale are excellent choices, as they have shallow roots and can be easily harvested. Herbs such as basil, mint, parsley, and thyme also do well in vertical gardens. Smaller fruiting vegetables like strawberries, cherry tomatoes, and peppers are also popular options. Avoid large, heavy vegetables like pumpkins or watermelons, as they may be too heavy for most vertical structures. Consider the amount of sunlight your vertical garden receives when choosing plants. For example, tomatoes and peppers need at least six hours of direct sunlight per day, while leafy greens can tolerate partial shade.
What type of soil should I use for my vertical garden?
The best type of soil for your vertical garden is a lightweight, well-draining potting mix. Avoid using garden soil, as it can be too heavy and compact, which can restrict root growth and drainage. Look for a potting mix that contains ingredients like peat moss, perlite, and vermiculite, which help to retain moisture while providing good aeration. You can also add compost to your potting mix to provide extra nutrients for your plants. If you’re using a hydroponic system, you won’t need soil at all. Instead, you’ll use a nutrient-rich solution to feed your plants.
How often should I water my vertical garden?
The frequency of watering depends on several factors, including the type of plants you’re growing, the type of containers you’re using, the weather conditions, and the drainage of your soil. In general, you should water your vertical garden when the top inch of soil feels dry to the touch. Avoid overwatering, as this can lead to root rot. During hot, dry weather, you may need to water your vertical garden more frequently. Using self-watering containers or a drip irrigation system can help to ensure that your plants receive consistent moisture.
How do I fertilize my vertical garden?
Vertical gardens, especially those in containers, require regular fertilization to provide plants with the nutrients they need to thrive. Use a balanced, water-soluble fertilizer that is specifically formulated for vegetables. Follow the instructions on the fertilizer package for application rates and frequency. You can also use organic fertilizers like compost tea or fish emulsion. Apply fertilizer every two to four weeks during the growing season. Avoid over-fertilizing, as this can burn the roots of your plants.
How do I protect my vertical garden from pests and diseases?
Prevention is key when it comes to protecting your vertical garden from pests and diseases. Start by choosing disease-resistant varieties of plants. Inspect your plants regularly for signs of pests or diseases. Remove any infected leaves or plants immediately. You can also use organic pest control methods like insecticidal soap, neem oil, or diatomaceous earth. Encourage beneficial insects like ladybugs and lacewings to visit your garden by planting flowers that attract them. Ensure good air circulation around your plants to prevent fungal diseases.
What are the best materials to use for building a vertical garden?
There are many different materials you can use to build a vertical garden, depending on your budget, space, and aesthetic preferences. Some popular options include:
* Wooden Pallets: Pallets are a readily available and inexpensive material that can be easily transformed into a vertical garden.
* Plastic Bottles: Repurpose plastic bottles into hanging planters or vertical walls.
* Fabric Pockets: Use fabric pockets or grow bags to create a vertical garden on a wall or fence.
* Metal Trellises: Metal trellises provide support for climbing plants like tomatoes and cucumbers.
* PVC Pipes: PVC pipes can be used to create a hydroponic vertical garden system.
* Stacked Planters: Stacked planters are a simple and easy way to create a vertical garden.
Choose materials that are durable, weather-resistant, and safe for growing food.
How much sunlight does my vertical garden need?
The amount of sunlight your vertical garden needs depends on the type of plants you’re growing. Most vegetables require at least six hours of direct sunlight per day. However, some leafy greens and herbs can tolerate partial shade. Observe your plants closely and adjust their location as needed to ensure they are receiving the appropriate amount of sunlight. If you don’t have enough natural sunlight, you can supplement with grow lights.
Can I grow a vertical garden indoors?
Yes, you can definitely grow a vertical garden indoors! Choose plants that are well-suited to indoor conditions, such as low-light leafy greens, herbs, and succulents. Provide adequate lighting, either with natural sunlight or grow lights. Ensure good air circulation and humidity levels. Water your plants regularly and fertilize as needed. Indoor vertical gardens can be a great way to bring greenery into your home and grow fresh herbs and vegetables year-round.
How do I overwinter my vertical garden?
If you live in a climate with cold winters, you’ll need to take steps to overwinter your vertical garden. Some plants, like herbs, can be brought indoors and grown as houseplants. Other plants, like tomatoes and peppers, are annuals and will need to be replanted each year. You can also protect your vertical garden from frost by covering it with a blanket or tarp. Consider moving your vertical garden to a more sheltered location, such as a garage or shed.
Is vertical veggie gardening expensive?
The cost of vertical veggie gardening can vary greatly depending on the materials you use and the scale of your project. You can create a simple vertical garden using repurposed materials like pallets and plastic bottles, which can be very inexpensive. However, if you opt for more elaborate systems like hydroponic setups or living walls, the cost can be significantly higher. Consider your budget and start small. You can always expand your vertical garden as you gain experience and resources. The long-term benefits of growing your own food, such as saving money on groceries and eating healthier, can outweigh the initial investment.

Leave a Comment