

Vertical garden drip irrigation: the secret weapon to lush, thriving greenery even in the smallest of spaces! Have you ever dreamed of a cascading wall of vibrant flowers or a bountiful herb garden gracing your balcony, but felt limited by space or time? Well, dream no more! This DIY guide is your passport to creating a stunning vertical oasis with a simple, efficient, and cost-effective drip irrigation system.
The concept of vertical gardening, while seemingly modern, has roots stretching back centuries. Think of the Hanging Gardens of Babylon, one of the Seven Wonders of the Ancient World! While we might not be building wonders on that scale, the desire to cultivate plants in innovative ways is deeply ingrained in human history. Today, with urban living on the rise and space at a premium, vertical gardens are experiencing a major resurgence.
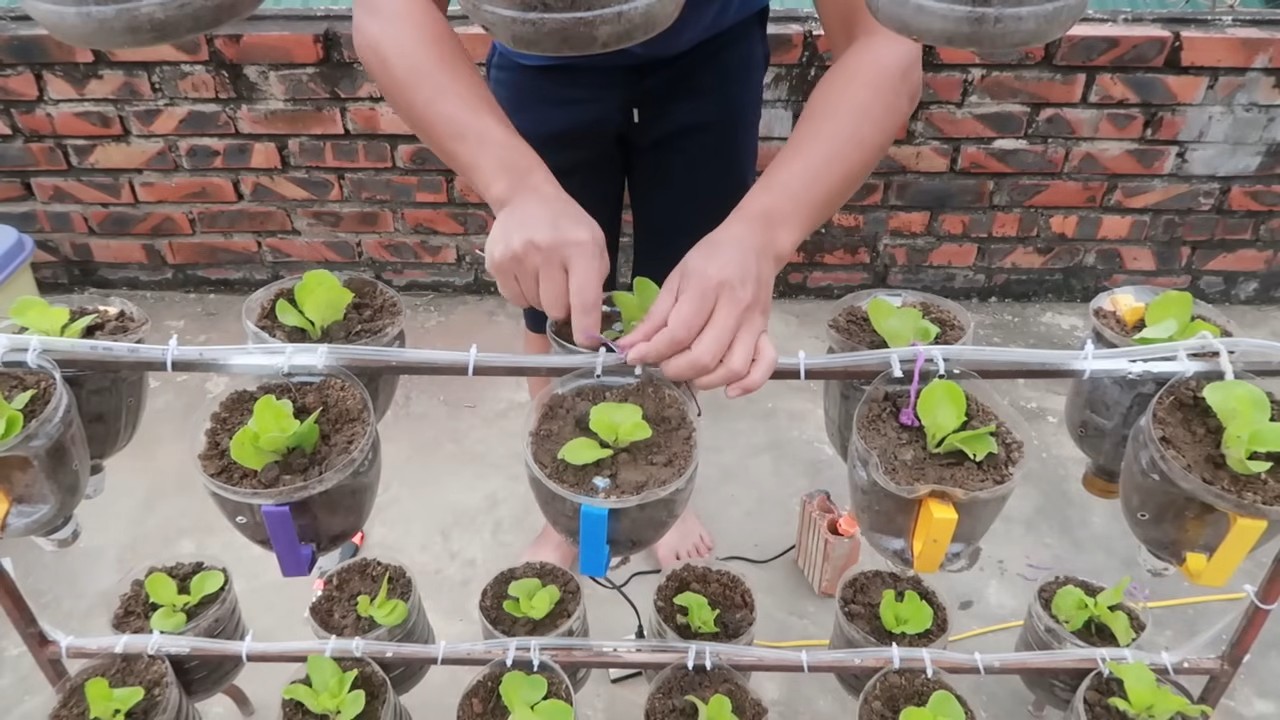
But let’s be honest, keeping a vertical garden properly watered can be a real challenge. Uneven watering, dry spots, and the constant need to manually water each plant can quickly turn your green dream into a brown nightmare. That’s where vertical garden drip irrigation comes to the rescue! This DIY project will show you how to build a system that delivers water precisely where it’s needed, conserving water, saving you time, and ensuring your plants thrive. I’m excited to share this simple yet effective solution that will transform your vertical garden from a chore into a joy!

DIY Vertikale Gartenbewässerung: So baust du dein eigenes Tropfsystem
Hallo Pflanzenfreunde! Habt ihr auch so einen kleinen vertikalen Garten, der euch Freude bereitet, aber das tägliche Gießen zur Last wird? Keine Sorge, ich habe die Lösung! Ich zeige euch, wie ihr ein einfaches, aber effektives Tropfsystem für euren vertikalen Garten selber bauen könnt. Das spart Zeit, Wasser und sorgt für glückliche Pflanzen. Los geht’s!
Was du brauchst: Die Materialliste
Bevor wir loslegen, hier eine Liste aller Materialien, die du für dieses Projekt benötigst. Keine Sorge, die meisten Sachen findest du im Baumarkt oder online.
* Tropfschlauch: Wähle einen Tropfschlauch mit integrierten Tropfern. Die Länge hängt von der Größe deines vertikalen Gartens ab. Ich empfehle, etwas mehr zu kaufen, falls du dich vermisst.
* Hauptzuleitungsschlauch: Ein dickerer Schlauch, der das Wasser vom Wasserhahn zum Tropfschlauch transportiert.
* Verbinder und Adapter:
* Wasserhahnanschluss: Um den Hauptzuleitungsschlauch an den Wasserhahn anzuschließen.
* T-Stücke: Um den Hauptzuleitungsschlauch zu verzweigen, falls du mehrere Reihen im vertikalen Garten hast.
* Endstopfen: Um das Ende des Tropfschlauchs zu verschließen.
* Winkelstücke (optional): Für knifflige Ecken und Wendungen.
* Druckminderer: Sehr wichtig! Ein Druckminderer reduziert den Wasserdruck, damit das Tropfsystem nicht platzt.
* Zeitschaltuhr (optional): Für eine automatische Bewässerung. So musst du dich gar nicht mehr kümmern!
* Schere oder Messer: Zum Zuschneiden der Schläuche.
* Kabelbinder oder Schlauchschellen: Um die Schläuche zu befestigen.
* Bohrmaschine mit kleinem Bohrer (optional): Falls du zusätzliche Tropfer anbringen möchtest.
* Gießkanne (optional): Für den Anfang, um das System zu testen.
Schritt-für-Schritt-Anleitung: So baust du das Tropfsystem
Jetzt geht’s ans Eingemachte! Folge diesen Schritten, um dein eigenes Tropfsystem zu bauen.
1. Planung ist alles:
* Messe deinen vertikalen Garten aus: Bestimme die Länge und Breite deines vertikalen Gartens. Zeichne am besten eine Skizze, um den Verlauf der Schläuche zu planen.
* Bestimme die Anzahl der Tropfer: Überlege, wie viele Tropfer du pro Pflanze benötigst. Das hängt von der Größe und dem Wasserbedarf der Pflanzen ab.
* Plane den Verlauf der Schläuche: Lege fest, wo der Hauptzuleitungsschlauch verlaufen soll und wo die Tropfschläuche abgehen. Berücksichtige dabei die Position des Wasserhahns.
2. Hauptzuleitung installieren:
* Wasserhahnanschluss anbringen: Schraube den Wasserhahnanschluss an den Wasserhahn.
* Druckminderer installieren: Verbinde den Druckminderer mit dem Wasserhahnanschluss. Das ist super wichtig, damit dein System nicht kaputt geht!
* Hauptzuleitungsschlauch anschließen: Verbinde den Hauptzuleitungsschlauch mit dem Druckminderer.
* Hauptzuleitung verlegen: Verlege den Hauptzuleitungsschlauch entlang deines vertikalen Gartens. Befestige ihn mit Kabelbindern oder Schlauchschellen, damit er nicht verrutscht.
3. Tropfschläuche installieren:
* Tropfschläuche zuschneiden: Schneide die Tropfschläuche auf die passende Länge zu. Achte darauf, dass sie bis zu jeder Pflanze reichen.
* T-Stücke anbringen: Schneide den Hauptzuleitungsschlauch an den Stellen ein, wo die Tropfschläuche abgehen sollen. Verbinde die Tropfschläuche mit T-Stücken mit dem Hauptzuleitungsschlauch.
* Tropfschläuche verlegen: Verlege die Tropfschläuche entlang der Pflanzen. Achte darauf, dass die Tropfer in der Nähe der Wurzeln positioniert sind.
* Endstopfen anbringen: Verschließe das Ende jedes Tropfschlauchs mit einem Endstopfen.
4. Optional: Zusätzliche Tropfer anbringen:
* Löcher bohren: Wenn du zusätzliche Tropfer benötigst, bohre mit einer Bohrmaschine und einem kleinen Bohrer Löcher in den Tropfschlauch.
* Tropfer einsetzen: Setze die zusätzlichen Tropfer in die Löcher ein.
5. Zeitschaltuhr installieren (optional):
* Zeitschaltuhr anschließen: Schließe die Zeitschaltuhr zwischen dem Wasserhahnanschluss und dem Druckminderer an.
* Zeitschaltuhr programmieren: Stelle die Zeitschaltuhr so ein, dass sie das Bewässerungssystem zu den gewünschten Zeiten einschaltet.
6. Testlauf:
* Wasser aufdrehen: Drehe den Wasserhahn langsam auf.
* Dichtigkeit prüfen: Überprüfe alle Verbindungen auf Dichtigkeit. Wenn etwas tropft, ziehe die Verbindungen fester oder verwende Teflonband.
* Tropfmenge prüfen: Beobachte die Tropfer und stelle sicher, dass sie gleichmäßig tropfen. Passe die Tropfmenge bei Bedarf an.
Feinjustierung und Tipps für den perfekten vertikalen Garten
Nachdem du dein Tropfsystem installiert hast, gibt es noch ein paar Dinge, die du beachten solltest, um sicherzustellen, dass dein vertikaler Garten optimal bewässert wird.
* Beobachte deine Pflanzen: Achte auf die Anzeichen von Über- oder Unterbewässerung. Gelbe Blätter können ein Zeichen für zu viel Wasser sein, während welkende Blätter auf zu wenig Wasser hindeuten.
* Passe die Bewässerungszeiten an: Die Bewässerungszeiten hängen von verschiedenen Faktoren ab, wie z.B. der Jahreszeit, dem Wetter und den Bedürfnissen deiner Pflanzen. Passe die Bewässerungszeiten entsprechend an.
* Reinige die Tropfer regelmäßig: Verstopfte Tropfer können die Bewässerung beeinträchtigen. Reinige die Tropfer regelmäßig mit einer kleinen Bürste oder einem Nadel.
* Verwende gefiltertes Wasser: Wenn du hartes Wasser hast, kann es sinnvoll sein, einen Wasserfilter zu verwenden, um die Tropfer vor Verkalkung zu schützen.
* Winterfest machen: Im Winter solltest du das Bewässerungssystem entleeren, um Frostschäden zu vermeiden.
Häufige Probleme und Lösungen
Auch beim besten DIY-Projekt können mal Probleme auftreten. Hier sind einige häufige Probleme und wie du sie beheben kannst:
* Tropfer tropfen nicht: Überprüfe, ob die Tropfer verstopft sind. Reinige sie gegebenenfalls. Stelle sicher, dass der Wasserdruck ausreichend ist.
* Schläuche platzen: Der Wasserdruck ist zu hoch. Stelle sicher, dass du einen Druckminderer installiert hast und dass er richtig eingestellt ist.
* Verbindungen sind undicht: Ziehe die Verbindungen fester oder verwende Teflonband. Überprüfe, ob die Schläuche richtig zugeschnitten sind und ob die Verbinder richtig sitzen.
* Pflanzen bekommen zu viel oder zu wenig Wasser: Passe die Bewässerungszeiten und die Tropfmenge an. Überprüfe, ob die Tropfer richtig positioniert sind und ob sie alle Pflanzen erreichen.
Zusätzliche Tipps für einen gesunden vertikalen Garten
Neben der richtigen Bewässerung gibt es noch ein paar andere Dinge, die du beachten solltest, um sicherzustellen, dass dein vertikaler Garten gesund und üppig wächst:
* Wähle die richtigen Pflanzen: Nicht alle Pflanzen eignen sich für einen vertikalen Garten. Wähle Pflanzen, die wenig Platz benötigen und die gut mit den Bedingungen in deinem Garten zurechtkommen.
* Verwende die richtige Erde: Verwende eine hochwertige Blumenerde, die gut drainiert und ausreichend Nährstoffe enthält.
* Dünge regelmäßig: Vertikale Gärten benötigen regel
Conclusion
So, there you have it! Creating your own vertical garden drip irrigation system isn’t just a cost-effective alternative to expensive store-bought options; it’s an empowering way to take control of your garden’s health and tailor it precisely to your plants’ needs. We’ve walked through the process, highlighting the simplicity and adaptability of this DIY project. From choosing the right materials to customizing the water flow, you now possess the knowledge to build a system that will keep your vertical garden thriving.
Why is this a must-try? Because it’s more than just watering plants. It’s about fostering a deeper connection with your garden, understanding its unique requirements, and providing it with the optimal conditions to flourish. It’s about reducing water waste, saving money, and enjoying the satisfaction of creating something functional and beautiful with your own hands. A properly installed drip irrigation system delivers water directly to the roots, minimizing evaporation and runoff, which translates to healthier plants and a more sustainable gardening practice.
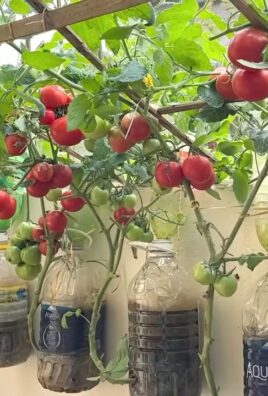
Don’t be afraid to experiment with variations! Consider adding a timer to automate the watering process, freeing you from daily chores. You could also incorporate a fertilizer injector to deliver nutrients directly to the roots along with the water, boosting plant growth and vitality. For larger vertical gardens, explore using multiple drip lines or different emitter types to ensure even water distribution across all levels. Think about using recycled materials like plastic bottles for reservoirs or repurposed tubing for the drip lines – it’s a great way to reduce waste and add a personal touch to your garden.
We understand that embarking on a DIY project can sometimes feel daunting, but we assure you that this vertical garden drip irrigation system is surprisingly easy to build, even for beginners. The steps are straightforward, the materials are readily available, and the rewards are immense. Imagine the lush greenery cascading down your wall, bursting with vibrant colors and healthy growth – all thanks to your ingenuity and a little bit of effort.
We wholeheartedly encourage you to give this DIY trick a try. Not only will you save money and water, but you’ll also gain a sense of accomplishment and a deeper appreciation for the art of gardening. And most importantly, we want to hear about your experience! Share your photos, tips, and challenges in the comments section below. Let’s create a community of DIY gardeners who are passionate about sustainable practices and beautiful vertical gardens. Your insights could inspire others to take the plunge and transform their own spaces into thriving green havens. So, grab your tools, gather your materials, and get ready to create a vertical garden drip irrigation system that will revolutionize the way you water your plants! Let us know how it goes!
Frequently Asked Questions (FAQ)
What are the benefits of using a drip irrigation system for my vertical garden?
Drip irrigation offers several key advantages for vertical gardens. Firstly, it delivers water directly to the roots of the plants, minimizing water waste through evaporation and runoff. This targeted watering ensures that your plants receive the precise amount of moisture they need, promoting healthy growth and preventing overwatering. Secondly, drip irrigation helps to reduce the risk of fungal diseases, as it keeps the foliage dry. Wet foliage can create a breeding ground for harmful fungi, which can quickly spread and damage your plants. Thirdly, drip irrigation is a very efficient way to deliver water, saving you money on your water bill and conserving a valuable resource. Finally, it allows for the easy addition of liquid fertilizers directly to the water stream, ensuring that your plants receive the nutrients they need for optimal growth.
What type of tubing should I use for my vertical garden drip irrigation system?
The best type of tubing for your vertical garden drip irrigation system depends on the size and complexity of your garden. For smaller gardens, ¼-inch micro tubing is a good option. It’s flexible, easy to work with, and readily available at most garden centers. For larger gardens, ½-inch tubing may be a better choice, as it can handle a higher water flow rate. Polyethylene tubing is a durable and affordable option for both sizes. You can also use soaker hoses, which are porous hoses that slowly release water along their entire length. These are particularly useful for densely planted vertical gardens. Consider the pressure rating of the tubing to ensure it can withstand the water pressure in your system.
How do I determine the correct spacing for the emitters in my drip irrigation system?
The spacing of your emitters will depend on the type of plants you are growing and the soil type in your vertical garden. Plants with higher water requirements will need emitters placed closer together, while plants with lower water requirements can have emitters spaced further apart. Sandy soils drain quickly, so you’ll need to place emitters closer together to ensure that the roots receive adequate moisture. Clay soils retain water for longer, so you can space the emitters further apart. As a general rule of thumb, start with emitters spaced 6-12 inches apart for most plants. Monitor your plants closely and adjust the spacing as needed.
How do I prevent clogging in my drip irrigation system?
Clogging is a common problem with drip irrigation systems, but there are several things you can do to prevent it. Firstly, use a filter to remove sediment and debris from the water before it enters the system. A simple inline filter is usually sufficient for most home gardens. Secondly, flush the system regularly to remove any accumulated debris. To do this, simply disconnect the end of the main tubing and let the water run for a few minutes. Thirdly, use high-quality emitters that are less prone to clogging. Some emitters have self-flushing mechanisms that help to keep them clean. Finally, avoid using fertilizers that contain insoluble particles, as these can clog the emitters.
Can I automate my vertical garden drip irrigation system?
Yes, absolutely! Automating your drip irrigation system is a great way to save time and ensure that your plants receive consistent watering, even when you’re away. You can use a simple timer to control the watering schedule. Timers are readily available at most garden centers and home improvement stores. Choose a timer that allows you to set the watering frequency and duration to suit your plants’ needs. You can also use a more sophisticated smart irrigation controller, which can adjust the watering schedule based on weather conditions and soil moisture levels. These controllers can help you to conserve water and prevent overwatering.
What if my water pressure is too high or too low for my drip irrigation system?
If your water pressure is too high, it can damage the tubing and emitters in your drip irrigation system. To reduce the water pressure, you can install a pressure regulator. Pressure regulators are designed to maintain a constant water pressure, regardless of fluctuations in the incoming water pressure. If your water pressure is too low, the emitters may not function properly. To increase the water pressure, you can use a booster pump. Booster pumps are designed to increase the water pressure in low-pressure systems. You can also try using emitters with a lower flow rate, as these will require less water pressure to operate.
How do I winterize my vertical garden drip irrigation system?
Winterizing your drip irrigation system is essential to prevent damage from freezing temperatures. Before the first frost, disconnect the system from the water source and drain all the water from the tubing and emitters. You can use an air compressor to blow out any remaining water. Store the tubing and emitters in a frost-free location, such as a garage or shed. If you live in an area with mild winters, you may be able to leave the system in place, but be sure to protect it from freezing temperatures by wrapping the tubing and emitters with insulation.


Leave a Comment