

Swiss chard container gardening: sounds intimidating, right? Don’t worry, I’m here to tell you it’s surprisingly simple and incredibly rewarding! Forget those sprawling vegetable patches; we’re bringing the farm to your balcony, patio, or even your windowsill. Imagine fresh, vibrant Swiss chard just steps away, ready to add a burst of color and nutrients to your meals.
For centuries, leafy greens like Swiss chard have been a staple in diets around the world, prized for their health benefits and versatility. From ancient Mediterranean cuisine to modern-day health trends, this leafy vegetable has stood the test of time. But let’s be honest, not everyone has the space or time for a traditional garden. That’s where the magic of container gardening comes in!
In this article, I’m going to share my favorite DIY tricks and hacks for successful Swiss chard container gardening. We’ll cover everything from choosing the right container and soil to watering techniques and pest control. Why do you need this? Because growing your own food is empowering, sustainable, and frankly, just plain fun! Plus, you’ll have access to the freshest, most delicious Swiss chard you can imagine, without ever leaving your home. Let’s get our hands dirty!
Growing Swiss Chard in Containers: A Beginner’s Guide
Hey there, fellow gardening enthusiasts! I’m so excited to share my experience with growing Swiss chard in containers. It’s surprisingly easy, even if you’re a complete newbie like I was. Swiss chard is not only beautiful with its vibrant colors, but it’s also incredibly nutritious and versatile in the kitchen. Plus, container gardening makes it accessible to everyone, regardless of space limitations. So, let’s dive in and get our hands dirty!
Choosing the Right Container and Soil
First things first, we need to set the stage for our leafy greens. The right container and soil are crucial for a thriving Swiss chard plant.
* Container Size: Swiss chard needs room to grow, so opt for a container that’s at least 12 inches deep and 12 inches in diameter. A larger container (like a 5-gallon bucket or a wide planter) is even better, especially if you plan on growing multiple plants together. Remember, happy roots mean happy leaves!
* Drainage: This is non-negotiable! Make sure your container has drainage holes at the bottom. Swiss chard hates soggy roots, and poor drainage can lead to root rot, which is a gardener’s worst nightmare. If your container doesn’t have drainage holes, you can drill some yourself.
* Soil: Forget garden soil; it’s too heavy and compacts easily in containers. Instead, use a high-quality potting mix. I prefer a mix that’s specifically formulated for vegetables, as it usually contains added nutrients that Swiss chard will love. You can also amend your potting mix with compost for extra richness and drainage.
Planting Your Swiss Chard
Now for the fun part: getting those seeds or seedlings into the soil!
* Starting from Seeds: You can either start your Swiss chard seeds indoors or directly sow them into your container. I’ve had success with both methods.
* Indoors: Start seeds indoors about 4-6 weeks before the last expected frost. Sow the seeds about ½ inch deep in small pots or seed trays filled with potting mix. Keep the soil moist and warm (around 70-75°F). Once the seedlings have a few true leaves, you can transplant them into your container.
* Direct Sowing: If you’re direct sowing, wait until the soil has warmed up to at least 50°F. Sow the seeds about ½ inch deep and 2-3 inches apart. Thin the seedlings to about 6-8 inches apart once they’re a few inches tall.
* Starting with Seedlings: If you’re using seedlings from a nursery, gently remove them from their pots and loosen the roots a bit. Dig a hole in your container that’s large enough to accommodate the root ball. Place the seedling in the hole and backfill with potting mix, gently firming the soil around the base of the plant.
* Spacing: Whether you’re using seeds or seedlings, space your Swiss chard plants about 6-8 inches apart in the container. This will give them enough room to grow and prevent overcrowding.
Step-by-Step Planting Instructions:
1. Prepare the Container: Fill your chosen container with potting mix, leaving about an inch of space at the top.
2. Moisten the Soil: Water the soil thoroughly until it’s evenly moist but not soggy.
3. Sow Seeds or Transplant Seedlings: Follow the instructions above for your chosen method.
4. Cover the Seeds/Roots: Gently cover the seeds or roots with potting mix.
5. Water Again: Water gently to settle the soil around the seeds or seedlings.
6. Label Your Container: Don’t forget to label your container with the type of Swiss chard you’re growing and the date you planted it. This will help you keep track of your progress.
Caring for Your Swiss Chard
Once your Swiss chard is planted, it’s time to provide it with the TLC it needs to thrive.
* Sunlight: Swiss chard loves sunshine! Aim for at least 6 hours of direct sunlight per day. If you live in a hot climate, some afternoon shade can be beneficial to prevent the leaves from scorching.
* Watering: Keep the soil consistently moist, but not waterlogged. Water deeply whenever the top inch of soil feels dry to the touch. Avoid overhead watering, as this can lead to fungal diseases. I prefer to water at the base of the plant.
* Fertilizing: Swiss chard is a heavy feeder, so regular fertilization is essential. Use a balanced liquid fertilizer (like a 10-10-10) every 2-3 weeks. You can also amend the soil with compost or worm castings for a slow-release source of nutrients.
* Pest Control: Keep an eye out for common pests like aphids, slugs, and snails. You can control aphids with a strong spray of water or insecticidal soap. Slugs and snails can be handpicked or trapped with beer traps.
* Weeding: Regularly remove any weeds that pop up in your container. Weeds compete with your Swiss chard for nutrients and water.
* Mulching: Adding a layer of mulch around your Swiss chard plants can help retain moisture, suppress weeds, and regulate soil temperature. I like to use straw or shredded leaves as mulch.
Harvesting Your Swiss Chard
The best part of growing your own Swiss chard is, of course, harvesting it!
* When to Harvest: You can start harvesting Swiss chard leaves when they’re about 6-8 inches long. The younger leaves are more tender and have a milder flavor.
* How to Harvest: Use a sharp knife or scissors to cut the outer leaves near the base of the plant. Leave the inner leaves intact, as they will continue to grow. This cut-and-come-again method allows you to harvest Swiss chard continuously throughout the growing season.
* Storage: Freshly harvested Swiss chard can be stored in the refrigerator for up to a week. Wrap the leaves in a damp paper towel and place them in a plastic bag.
Step-by-Step Harvesting Instructions:
1. Inspect Your Plants: Check your Swiss chard plants for leaves that are at least 6-8 inches long.
2. Choose Your Leaves: Select the outer leaves that you want to harvest.
3. Cut the Leaves: Use a sharp knife or scissors to cut the leaves near the base of the plant, about an inch above the soil.
4. Wash and Store: Wash the harvested leaves thoroughly and store them in the refrigerator as described above.
Troubleshooting
Even with the best care, you might encounter some challenges along the way. Here are a few common problems and how to address them:
* Yellowing Leaves: This could be a sign of overwatering, underwatering, or nutrient deficiency. Check the soil moisture and adjust your watering accordingly. Fertilize with a balanced fertilizer to provide essential nutrients.
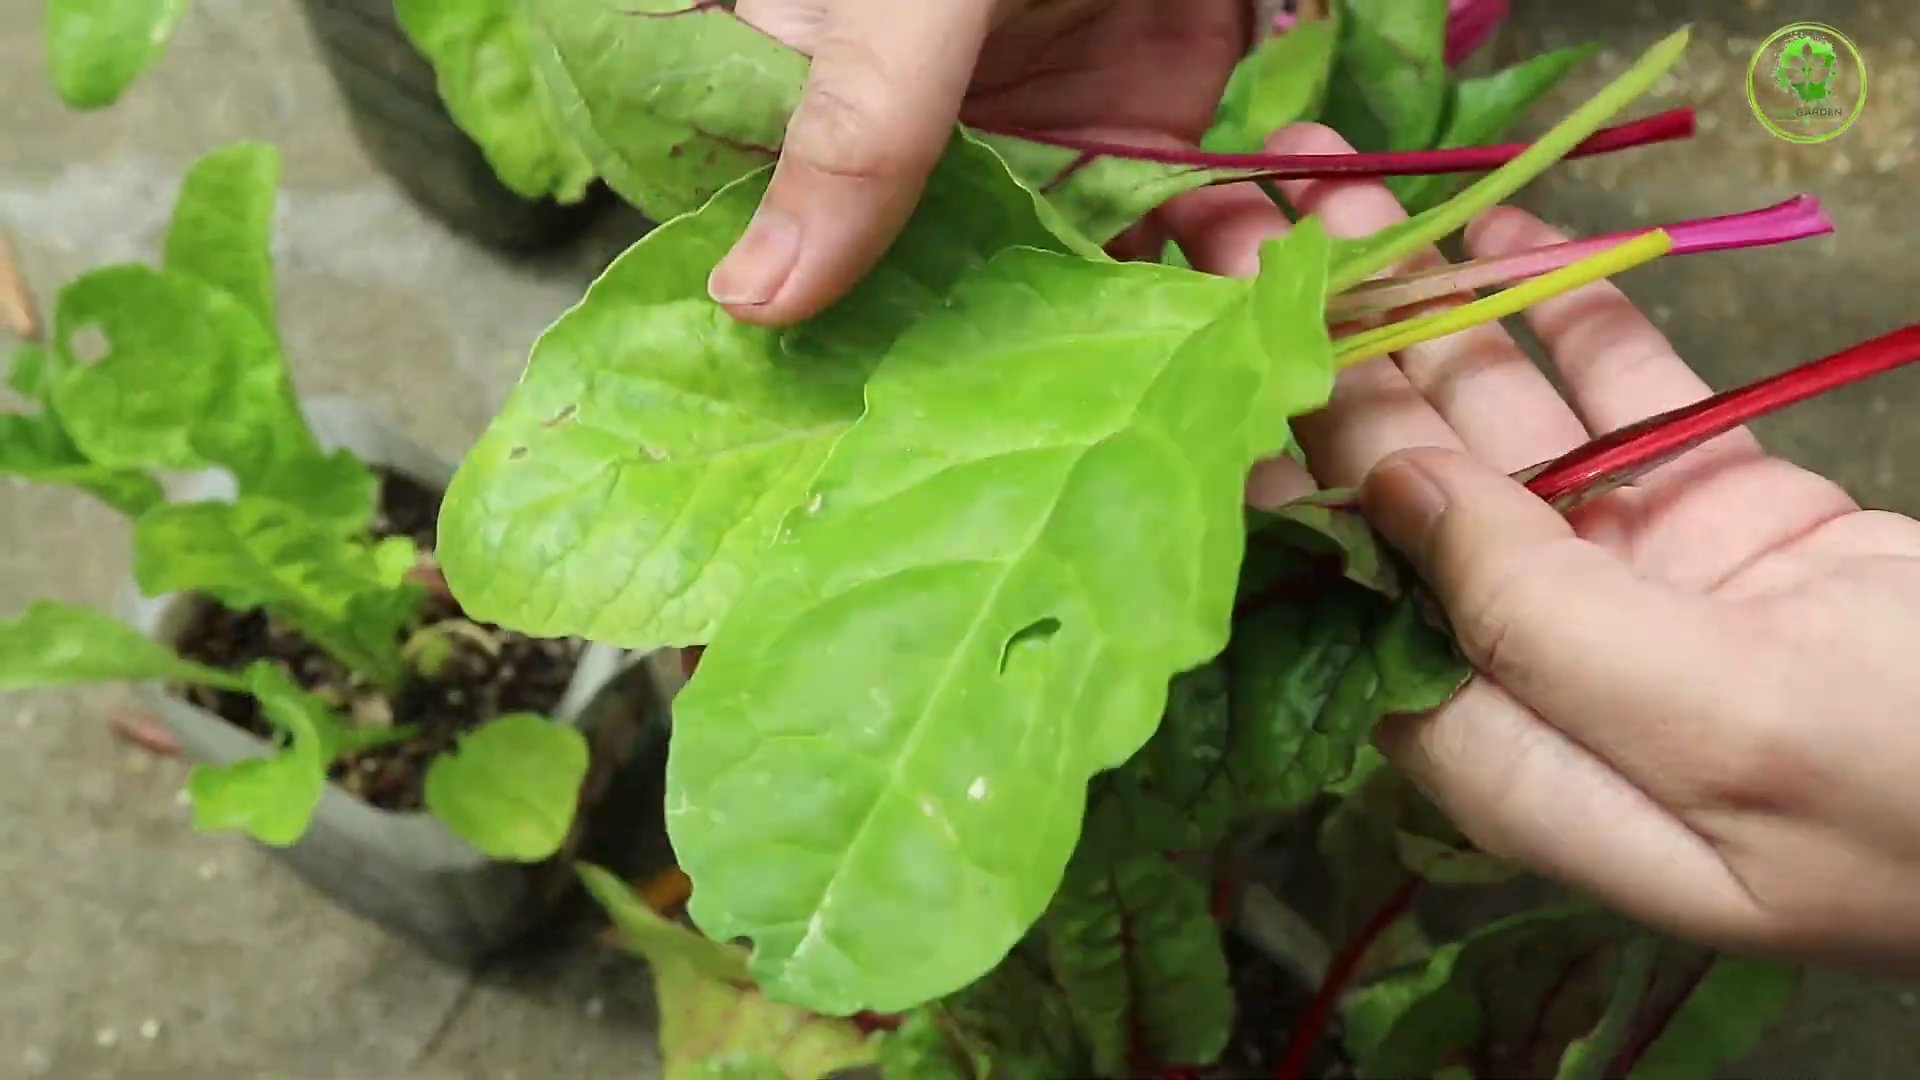
* Holes in Leaves: This is often caused by pests like slugs, snails, or cabbage loopers. Inspect your plants regularly and take appropriate pest control measures.
* Bolting: Bolting (when the plant sends up a flower stalk) can occur in hot weather. Once a plant bolts, the leaves become bitter. To prevent bolting, provide afternoon shade and keep the soil consistently moist. You can also choose bolt-resistant varieties of Swiss chard.
* Root Rot: This is caused by overwatering and poor drainage. Make sure your container has drainage holes and avoid overwatering. If you suspect root rot, you may need to repot your plant in fresh potting mix.
Choosing Swiss Chard Varieties
There are many different varieties of Swiss chard to choose from, each with its own unique characteristics. Here are a few popular options:
* Bright Lights: This variety is known for its vibrant stems in a rainbow of colors, including red, yellow, orange, pink, and white.
* Fordhook Giant: This is a classic variety with dark green leaves and thick white stems.
* Lucullus: This variety has light green leaves and pale green stems. It’s known for its mild flavor.
* Ruby Red: This variety has dark green leaves and bright red stems. It’s a beautiful and flavorful option.
I hope this guide has inspired you to try growing Swiss chard in containers. It’s a rewarding experience that will provide you with fresh, nutritious greens all season long. Happy gardening!

Conclusion
So, there you have it! Growing your own Swiss chard in containers is not only achievable, but it’s also incredibly rewarding. We’ve walked you through the simple steps, from choosing the right container and soil to nurturing your plants and harvesting those vibrant, nutritious leaves. But why is this DIY trick a must-try?
Firstly, consider the freshness. Store-bought Swiss chard, while convenient, can’t compare to the crisp, vibrant flavor of leaves harvested just moments before you use them. Imagine adding freshly picked Swiss chard to your morning smoothie, a hearty soup, or a vibrant stir-fry. The difference in taste is truly remarkable.
Secondly, think about the cost savings. While the initial investment in containers, soil, and seeds might seem like a small expense, it pales in comparison to the ongoing cost of purchasing Swiss chard from the grocery store, especially if you consume it regularly. Over time, you’ll find that your container garden pays for itself, providing you with a continuous supply of fresh, healthy greens.
Thirdly, and perhaps most importantly, growing your own Swiss chard in containers offers a sense of accomplishment and connection to nature. There’s something deeply satisfying about nurturing a plant from seed to harvest, witnessing its growth, and knowing that you’re providing yourself with healthy, homegrown food. It’s a therapeutic and rewarding experience that can bring joy and satisfaction to your life.
But the beauty of container gardening lies in its versatility. Feel free to experiment with different varieties of Swiss chard. ‘Bright Lights’ offers a stunning array of colors, while ‘Fordhook Giant’ provides large, robust leaves. You can also try companion planting, adding herbs like basil or thyme to your container to deter pests and enhance the flavor of your Swiss chard. Consider adding marigolds to your container; their bright blooms not only add visual appeal but also help repel nematodes, common soil pests that can damage your Swiss chard roots.
Another variation to consider is succession planting. By sowing new seeds every few weeks, you can ensure a continuous harvest of Swiss chard throughout the growing season. This is particularly useful if you have a small container garden and want to maximize your yield.
Don’t be afraid to get creative with your container selection. While standard plastic pots are perfectly functional, you can also use repurposed items like old buckets, wooden crates, or even galvanized tubs. Just make sure that your chosen container has adequate drainage holes to prevent waterlogging.
We encourage you to embrace this DIY trick and embark on your own Swiss chard container gardening adventure. It’s a simple, affordable, and rewarding way to enjoy fresh, healthy greens right at your doorstep. Once you’ve harvested your first batch of homegrown Swiss chard, we’d love to hear about your experience! Share your photos, tips, and recipes in the comments below. Let’s build a community of container gardening enthusiasts and inspire others to grow their own food. Remember, even a small container garden can make a big difference in your health, your wallet, and your connection to nature. So, grab your seeds, get your hands dirty, and start growing your own delicious Swiss chard today!
Frequently Asked Questions (FAQ)
What is the best size container for growing Swiss chard?
A container that is at least 12 inches in diameter and 12 inches deep is ideal for growing Swiss chard. This provides enough space for the roots to develop properly and allows the plant to grow to its full potential. You can grow one plant per 12-inch container, or several plants in a larger container, spacing them about 6 inches apart. Remember that adequate drainage is crucial, so ensure your container has drainage holes.
What type of soil should I use for Swiss chard in containers?
Swiss chard thrives in well-draining, nutrient-rich soil. A good quality potting mix is essential. Avoid using garden soil, as it can become compacted in containers and hinder drainage. You can also amend your potting mix with compost or other organic matter to improve its fertility and water retention. A slightly acidic to neutral pH (around 6.0 to 7.0) is optimal for Swiss chard growth.
How often should I water my Swiss chard plants in containers?
Water your Swiss chard plants regularly, especially during hot, dry weather. The soil should be kept consistently moist, but not waterlogged. Check the soil moisture by sticking your finger about an inch deep into the soil. If it feels dry, it’s time to water. Water deeply, allowing the water to drain out of the drainage holes. Avoid overhead watering, as this can promote fungal diseases.
How much sunlight does Swiss chard need?
Swiss chard needs at least 6 hours of sunlight per day to thrive. Choose a location for your container garden that receives plenty of sunlight. If you live in a hot climate, provide some afternoon shade to prevent the leaves from scorching. If you don’t have a sunny spot, you can supplement with grow lights.
What are some common pests and diseases that affect Swiss chard?
Common pests that affect Swiss chard include aphids, flea beetles, and leaf miners. Aphids can be controlled with insecticidal soap or a strong spray of water. Flea beetles can be deterred with row covers or diatomaceous earth. Leaf miners can be controlled by removing and destroying infested leaves. Fungal diseases, such as powdery mildew, can be prevented by providing good air circulation and avoiding overhead watering.
How do I harvest Swiss chard?
You can begin harvesting Swiss chard leaves when they are about 6 inches long. Harvest the outer leaves first, leaving the inner leaves to continue growing. Cut the leaves at the base of the plant with a sharp knife or scissors. Regular harvesting encourages the plant to produce more leaves.
Can I grow Swiss chard indoors?
Yes, you can grow Swiss chard indoors, but it requires a sunny location or supplemental grow lights. Provide at least 6 hours of light per day. Use a well-draining potting mix and water regularly. Indoor-grown Swiss chard may not grow as large as outdoor-grown plants, but you can still enjoy a continuous supply of fresh leaves.
How do I fertilize Swiss chard in containers?
Swiss chard is a heavy feeder and benefits from regular fertilization. Use a balanced fertilizer, such as a 10-10-10, every 2-3 weeks. You can also use a liquid fertilizer, such as fish emulsion or seaweed extract, diluted according to the package directions. Avoid over-fertilizing, as this can lead to excessive leaf growth and reduced flavor.
Can I grow Swiss chard in the winter?
In mild climates, you can grow Swiss chard throughout the winter. In colder climates, you can protect your plants from frost by covering them with a blanket or moving them indoors. Swiss chard is relatively cold-hardy and can tolerate light frosts.
What are some ways to use Swiss chard in cooking?
Swiss chard is a versatile vegetable that can be used in a variety of dishes. It can be sautéed, steamed, boiled, or added to soups, stews, and stir-fries. The leaves can also be eaten raw in salads. Swiss chard is a good source of vitamins A, C, and K, as well as fiber and minerals. The stems can also be cooked and eaten, but they may require a longer cooking time than the leaves.

Leave a Comment