

Soil Free Rosemary Gardening: Imagine fresh, fragrant rosemary sprigs gracing your kitchen counter, ready to elevate your culinary creations, all without a speck of soil! Sounds like a dream, right? Well, it’s a dream you can easily turn into reality with this simple and rewarding DIY guide. For centuries, rosemary has been cherished not only for its culinary uses but also for its medicinal properties and symbolic significance, representing remembrance and love. From ancient Greece, where students wore rosemary garlands to enhance memory, to modern-day kitchens worldwide, this herb has a rich and fascinating history.
But let’s face it, traditional gardening can be messy, time-consuming, and sometimes, downright frustrating. Pests, diseases, and the constant need for watering and fertilizing can quickly turn your green thumb brown. That’s where soil free rosemary gardening comes in! This method is perfect for apartment dwellers, busy individuals, or anyone who wants to enjoy the benefits of fresh herbs without the hassle of traditional soil-based gardening. I’m going to show you how to grow rosemary without soil, offering a clean, efficient, and incredibly satisfying way to cultivate this aromatic herb. Get ready to unlock the secrets of hydroponic rosemary and enjoy a continuous supply of fresh, flavorful rosemary right at your fingertips!
DIY: Grow Rosemary Without Soil – A Beginner’s Guide
Hey there, fellow plant enthusiasts! Have you ever wanted to grow rosemary but struggled with soil issues, pests, or just the general mess? Well, I’ve got a fantastic solution for you: growing rosemary hydroponically! It’s easier than you might think, and it’s a great way to have fresh rosemary on hand year-round. I’m going to walk you through everything you need to know to get started.
What is Hydroponics?
Before we dive in, let’s quickly cover what hydroponics actually is. Simply put, it’s growing plants without soil, using water and nutrient solutions to provide everything the plant needs. This method can be incredibly efficient, allowing you to control the environment and nutrient intake, leading to faster growth and healthier plants.
Why Grow Rosemary Hydroponically?
There are several reasons why I love growing rosemary hydroponically:
* No Soil, No Mess: Say goodbye to dirt under your fingernails! Hydroponics eliminates the need for soil, making it a cleaner and more manageable gardening method.
* Faster Growth: Rosemary grown hydroponically often grows faster than its soil-bound counterpart because the roots have direct access to nutrients.
* Fewer Pests and Diseases: Soil can harbor pests and diseases that can harm your rosemary. Hydroponics reduces the risk of these problems.
* Year-Round Harvest: You can grow rosemary indoors year-round, regardless of the weather outside.
* Space-Saving: Hydroponic systems can be compact, making them ideal for small spaces like apartments or balconies.
Materials You’ll Need
Okay, let’s gather our supplies. Here’s what you’ll need to get your hydroponic rosemary garden up and running:
* Rosemary Cuttings or Seedlings: You can start from cuttings (which I recommend – it’s faster!) or seedlings. If using cuttings, choose healthy stems about 4-6 inches long.
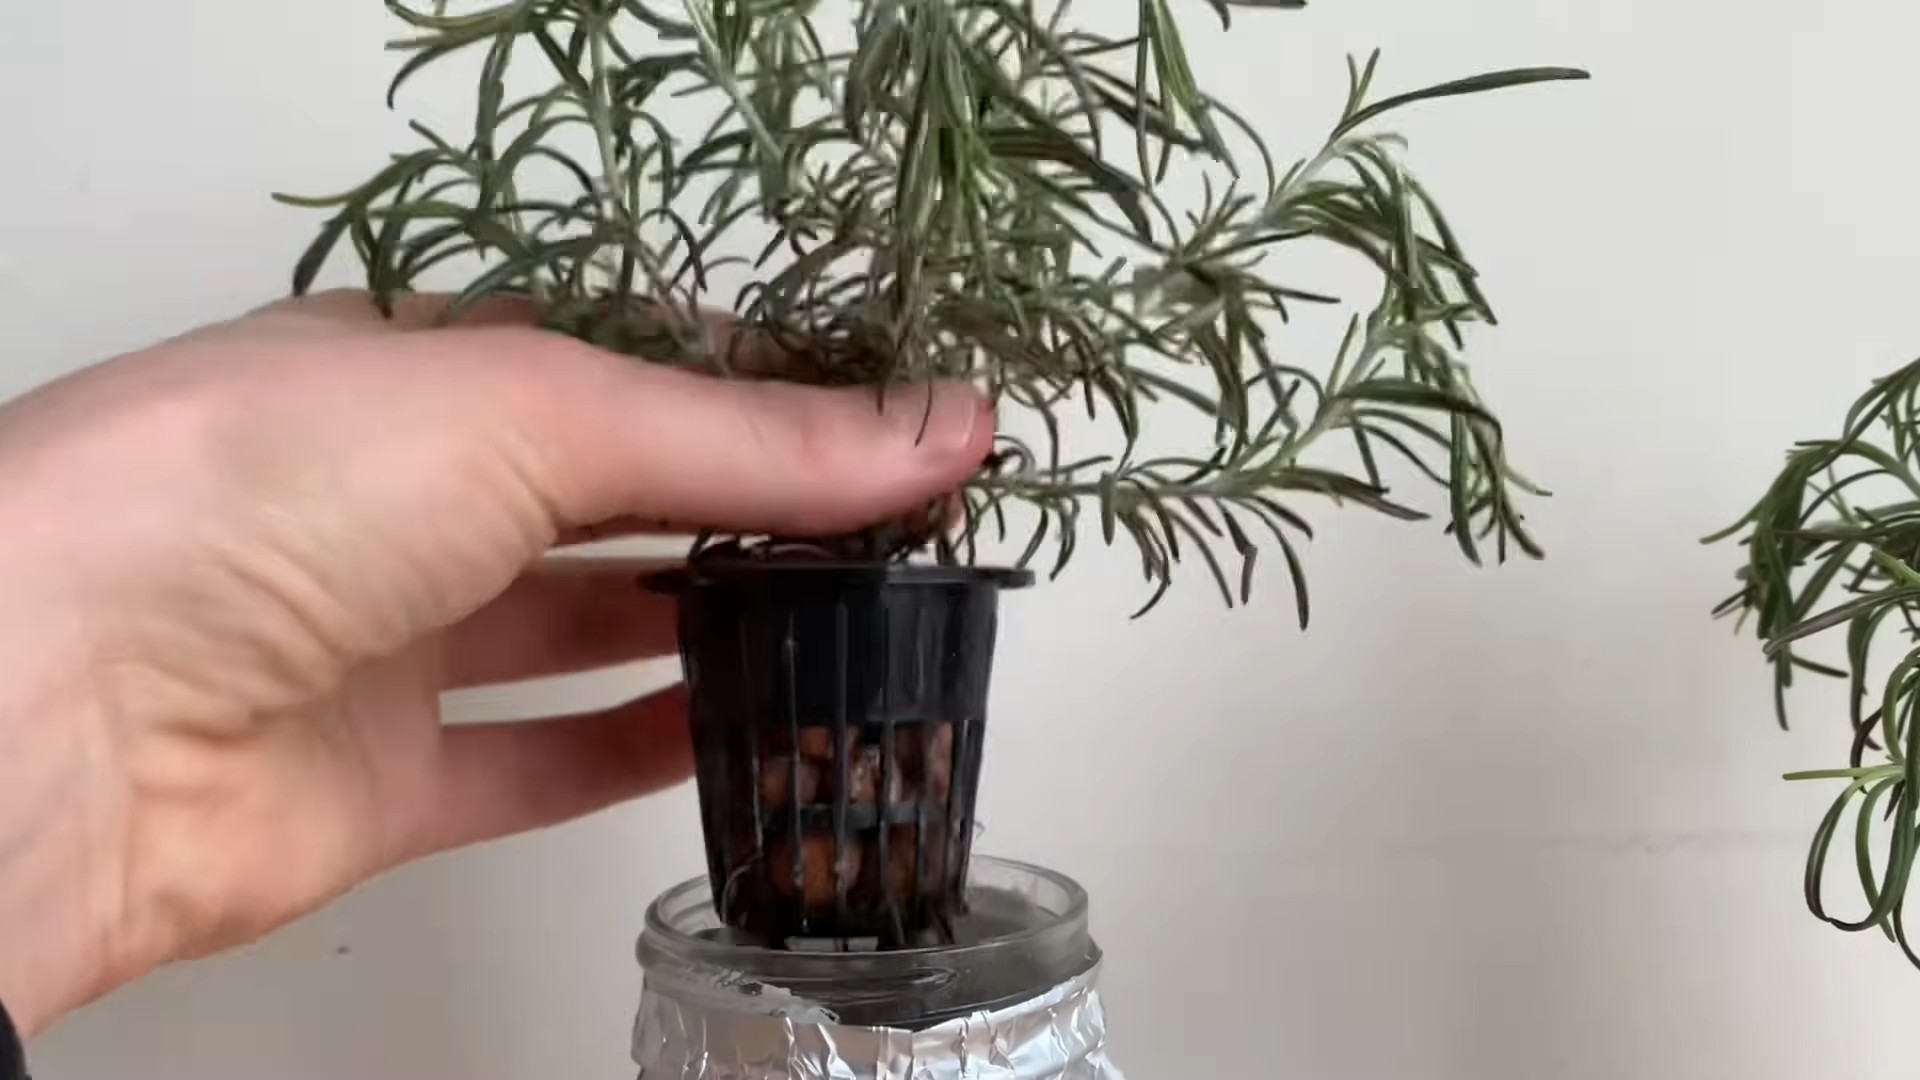
* Net Pots: These are small, plastic pots with holes that allow the roots to grow out and into the nutrient solution. 2-3 inch net pots are ideal.
* Growing Medium: This provides support for the plant and helps retain moisture. I recommend using rockwool cubes, coco coir, or clay pebbles (hydroton).
* Hydroponic Nutrient Solution: This is a specially formulated solution that contains all the essential nutrients rosemary needs to thrive. Make sure to get a solution specifically designed for herbs or leafy greens.
* Water Reservoir: This will hold the nutrient solution. A plastic tub, bucket, or even a large container will work. The size will depend on how many rosemary plants you want to grow.
* Air Pump and Air Stone: These are essential for oxygenating the nutrient solution. Rosemary roots need oxygen to survive.
* pH Meter or pH Test Kit: Maintaining the correct pH level is crucial for nutrient absorption.
* Grow Lights (Optional but Recommended): If you don’t have a sunny spot, grow lights will provide the necessary light for your rosemary. LED grow lights are energy-efficient and work well.
* Timer (for Grow Lights): To automate the light cycle.
* Measuring Cups and Spoons: For accurately measuring the nutrient solution.
* Clean Water: Use filtered or distilled water for the best results.
* Rooting Hormone (Optional): If starting from cuttings, rooting hormone can help encourage root growth.
* Spray Bottle: For misting the cuttings or seedlings.
Step-by-Step Instructions
Alright, let’s get our hands dirty (well, not really, since we’re doing hydroponics!). Here’s a step-by-step guide to growing rosemary hydroponically:
Section 1: Preparing the Rosemary Cuttings (If Starting from Cuttings)
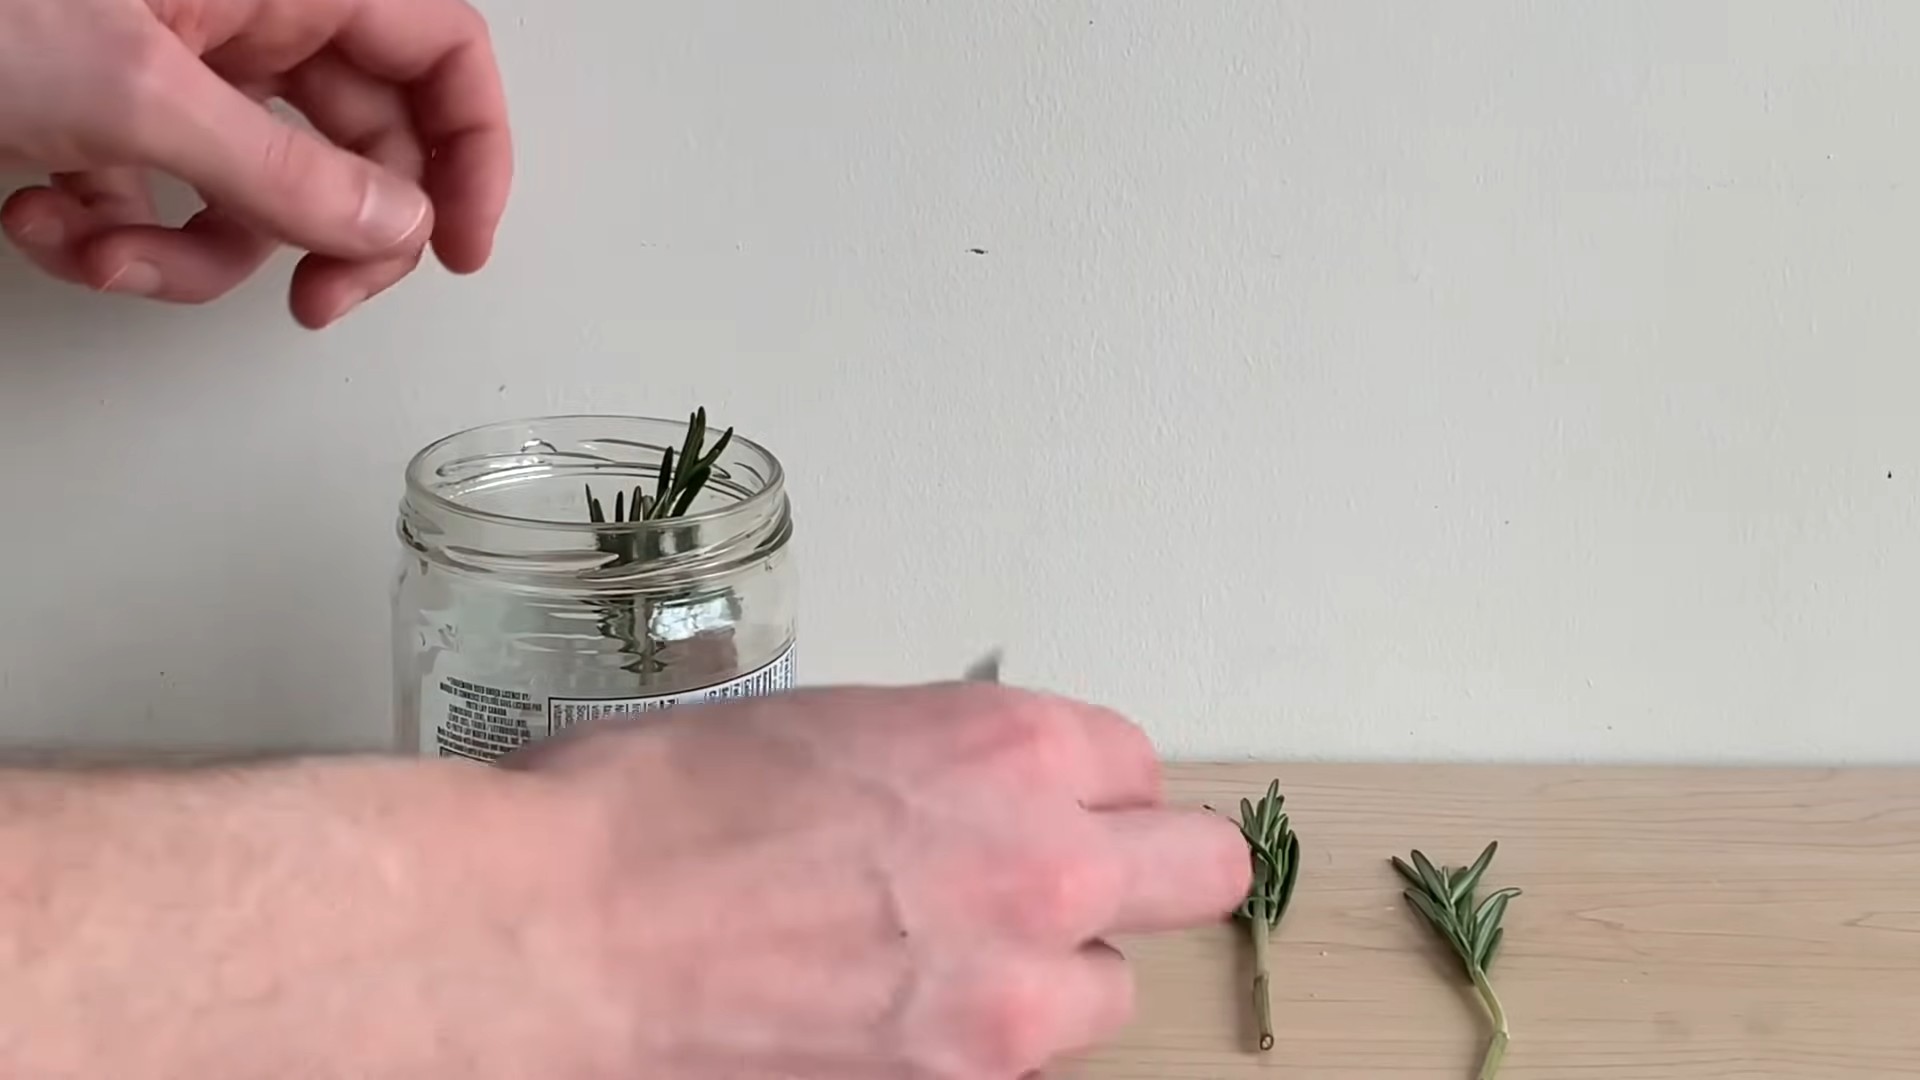
1. Take Cuttings: Using clean, sharp scissors or pruning shears, take cuttings from a healthy rosemary plant. Cut stems that are about 4-6 inches long, just below a node (where leaves grow).
2. Remove Lower Leaves: Remove the leaves from the bottom inch or two of the cutting. This will prevent them from rotting when they’re submerged in water.
3. Apply Rooting Hormone (Optional): Dip the cut end of each cutting into rooting hormone powder or liquid. This will help stimulate root growth.
4. Prepare the Growing Medium: If using rockwool cubes, soak them in water for a few minutes to saturate them. If using coco coir, rinse it thoroughly to remove any excess salts. If using clay pebbles, rinse them well to remove any dust.
5. Insert Cuttings into Growing Medium: Gently insert each cutting into a rockwool cube, coco coir, or a small amount of clay pebbles held within a net pot. Make sure the cutting is firmly supported.
Section 2: Setting Up the Hydroponic System
1. Prepare the Nutrient Solution: Follow the instructions on your hydroponic nutrient solution to mix the correct concentration. It’s crucial to use the right amount, as too much or too little can harm your plants. I usually start with half the recommended strength for young cuttings or seedlings.
2. Check and Adjust pH: Use your pH meter or test kit to check the pH of the nutrient solution. Rosemary prefers a pH between 5.5 and 6.5. Adjust the pH as needed using pH up or pH down solutions.
3. Fill the Reservoir: Pour the nutrient solution into your water reservoir.
4. Place Net Pots in Reservoir: Place the net pots containing the rosemary cuttings or seedlings into the reservoir, ensuring that the bottom of the net pots are submerged in the nutrient solution. The water level should be high enough to keep the growing medium moist, but not so high that the stems are constantly submerged.
5. Install Air Pump and Air Stone: Place the air stone at the bottom of the reservoir and connect it to the air pump. Turn on the air pump to oxygenate the nutrient solution. This is vital for healthy root growth.
Section 3: Providing Light and Care
1. Provide Adequate Light: Rosemary needs at least 6-8 hours of sunlight per day. If you don’t have a sunny spot, use grow lights. Position the grow lights about 6-12 inches above the plants.
2. Set Timer for Grow Lights: If using grow lights, set a timer to provide 14-16 hours of light per day.
3. Monitor Water Level: Check the water level in the reservoir regularly and add more nutrient solution as needed.
4. Change Nutrient Solution: Change the nutrient solution every 1-2 weeks to prevent the buildup of salts and maintain optimal nutrient levels.
5. Monitor pH: Check the pH of the nutrient solution every few days and adjust as needed.
6. Misting (for Cuttings): If you’re starting from cuttings, mist them with water a few times a day to keep them hydrated until they develop roots.
7. Pruning: Once your rosemary plants start to grow, prune them regularly to encourage bushier growth. Simply snip off the tips of the stems.
Troubleshooting
Even with the best care, you might encounter some problems. Here are a few common issues and how to address them:
* Yellowing Leaves: This could be a sign of nutrient deficiency. Make sure you’re using the correct nutrient solution and that the pH is within the optimal range.
* Slow Growth: This could be due to insufficient light, incorrect pH, or nutrient deficiency. Check your lighting, pH, and nutrient levels.
* Root Rot: This is caused by a lack of oxygen in the nutrient solution. Make sure your air pump and air stone are working properly.
* Pests: While hydroponics reduces the risk of pests, they can still occur. Inspect your plants regularly and treat any infestations with an appropriate organic pesticide.
Harvesting Your Rosemary
You can start harvesting rosemary once the plants are about 6-8 inches tall. Simply snip off the stems as needed. Regular harvesting will encourage bushier growth and keep your rosemary plants healthy.
Tips for Success
Here are a few extra tips to help you succeed with hydroponic rosemary:
* Start with Healthy Cuttings or Seedlings: This will give you the best chance of success.
* Use High-Quality Nutrient Solution: Don’t skimp on the nutrient solution. It’s the lifeblood of your plants.
* Maintain the Correct pH: This is crucial for nutrient absorption.
* Provide Adequate Light: Rosemary needs plenty of light to thrive.
* Don’t Overwater: While hydroponics uses water, it’s important not to overwater the plants. The roots need oxygen.
* Be Patient: It takes time for rosemary to grow. Don’t get discouraged if you don’t see results immediately
Conclusion
So, there you have it! Soil-free rosemary gardening, a surprisingly simple and incredibly rewarding way to cultivate this fragrant and useful herb. We’ve walked through the process, highlighting the ease and benefits of bypassing traditional soil methods. From the reduced risk of soilborne diseases to the enhanced control over nutrient delivery, this DIY trick offers a compelling alternative for both seasoned gardeners and those just starting their green journey.
Why is this a must-try? Because it democratizes gardening. No longer are you limited by the quality of your soil, the space you have available, or the fear of overwatering or underwatering. This method allows you to grow healthy, vibrant rosemary even in the smallest apartments or on the most challenging balconies. It’s a fantastic way to bring the fresh, invigorating scent and flavor of rosemary into your home, ready to be used in your favorite culinary creations or aromatic projects.
But the beauty of this method lies in its adaptability. Feel free to experiment with different nutrient solutions. While we’ve suggested a balanced hydroponic fertilizer, you can explore organic options or even create your own nutrient blends. Consider adding a small air pump and air stone to your reservoir to further oxygenate the water, promoting even healthier root growth. You can also play with different types of containers. While a mason jar works perfectly well, you might find that a repurposed plastic bottle or a decorative glass vase adds a touch of personal style to your indoor garden.
Another variation to consider is the lighting. While rosemary thrives in sunlight, you can supplement natural light with a grow light, especially during the darker winter months. This will ensure that your rosemary plant receives the energy it needs to flourish, regardless of the season. You can also experiment with different rosemary varieties. Some varieties are more compact and better suited for indoor growing, while others offer unique flavors and aromas.
The key is to observe your plant closely and adjust your approach as needed. Rosemary is a resilient herb, and it will often tell you what it needs through its leaves and growth patterns. Don’t be afraid to experiment and learn from your experiences.
We are confident that you’ll find this soil-free rosemary gardening method to be both enjoyable and successful. It’s a sustainable, space-saving, and incredibly rewarding way to grow your own herbs. So, gather your supplies, follow our simple steps, and get ready to enjoy the fresh, fragrant bounty of your own homegrown rosemary.
We wholeheartedly encourage you to try this DIY trick and share your experiences with us! Post photos of your soil-free rosemary gardens on social media using #SoilFreeRosemary and tag us so we can see your amazing results. Let’s build a community of soil-free gardeners and inspire others to embrace this innovative and accessible approach to growing herbs. We can’t wait to see what you create!
Frequently Asked Questions (FAQs)
What exactly are the benefits of growing rosemary without soil?
Growing rosemary without soil, often referred to as hydroponics or soilless culture, offers several key advantages. Firstly, it significantly reduces the risk of soilborne diseases and pests that can plague traditional gardening. Secondly, it allows for precise control over nutrient delivery, ensuring that your rosemary plant receives the exact amount of nutrients it needs for optimal growth. Thirdly, it’s a space-saving method, making it ideal for apartment dwellers or those with limited outdoor space. Finally, it can lead to faster growth rates and higher yields compared to soil-based gardening. The absence of soil also eliminates the mess associated with traditional gardening.
What kind of nutrient solution should I use for my soil-free rosemary?
A balanced hydroponic nutrient solution is ideal for soil-free rosemary gardening. Look for a solution that is specifically formulated for herbs or leafy greens. These solutions typically contain the essential macronutrients (nitrogen, phosphorus, and potassium) and micronutrients (iron, manganese, zinc, copper, boron, and molybdenum) that rosemary needs to thrive. Follow the manufacturer’s instructions for dilution and application. You can find these solutions at most garden centers or online retailers. Alternatively, you can explore organic hydroponic nutrient options, but be sure to research their effectiveness and suitability for rosemary.
How often should I change the nutrient solution?
The frequency of changing the nutrient solution depends on several factors, including the size of your reservoir, the growth rate of your rosemary plant, and the type of nutrient solution you’re using. As a general rule, it’s best to change the nutrient solution every 1-2 weeks. This helps to prevent the buildup of salts and other impurities that can harm your plant. When changing the solution, be sure to thoroughly rinse the reservoir and the roots of your rosemary plant to remove any accumulated debris.
How much light does my soil-free rosemary need?
Rosemary thrives in bright, sunny conditions. Ideally, your soil-free rosemary plant should receive at least 6-8 hours of direct sunlight per day. If you’re growing your rosemary indoors, you may need to supplement natural light with a grow light. Choose a grow light that emits a full spectrum of light, including both blue and red wavelengths. Position the grow light about 6-12 inches above the plant and adjust the height as needed to prevent burning.
Can I use tap water for my nutrient solution?
While tap water can be used in some cases, it’s generally recommended to use filtered or distilled water for your nutrient solution. Tap water often contains chlorine, chloramine, and other chemicals that can be harmful to plants. It may also contain high levels of minerals that can interfere with nutrient uptake. If you must use tap water, let it sit out for 24 hours to allow the chlorine to evaporate. However, filtered or distilled water is always the safer and more reliable option.
My rosemary leaves are turning yellow. What could be the problem?
Yellowing leaves can indicate several potential problems. It could be a sign of nutrient deficiency, overwatering, underwatering, or pest infestation. Check the pH of your nutrient solution to ensure it’s within the optimal range (5.5-6.5). Make sure you’re using a balanced nutrient solution and that you’re changing it regularly. Also, inspect your plant for any signs of pests, such as aphids or spider mites. Adjust your watering schedule as needed to avoid overwatering or underwatering. If the problem persists, consult a gardening expert or your local nursery for further assistance.
How do I propagate rosemary from cuttings in a soil-free environment?
Propagating rosemary from cuttings in a soil-free environment is similar to propagating in soil. Take a 4-6 inch cutting from a healthy rosemary plant, removing the lower leaves. Dip the cut end in rooting hormone (optional) and place it in a small container filled with perlite or vermiculite. Keep the perlite or vermiculite moist but not soggy. Place the container in a warm, bright location, but avoid direct sunlight. Once the cuttings have developed roots (usually within 2-4 weeks), you can transplant them into your soil-free setup.
Is soil-free rosemary gardening suitable for beginners?
Yes, absolutely! Soil-free rosemary gardening is a surprisingly accessible method, even for beginners. The controlled environment and simplified nutrient delivery make it easier to manage than traditional soil-based gardening. With a little research and attention to detail, anyone can successfully grow rosemary without soil. The key is to start with a simple setup, follow the instructions carefully, and observe your plant closely. Don’t be afraid to experiment and learn from your mistakes.

Leave a Comment