

Plastic bottle pepper garden: Who knew turning trash into treasure could be so rewarding, and so delicious? I’m so excited to share this incredibly simple and effective DIY project that will have you harvesting fresh, flavorful peppers right from your own backyard (or balcony!) in no time. Forget those expensive gardening setups and complicated instructions – we’re going back to basics with a clever upcycling hack that’s perfect for beginners and seasoned gardeners alike.
The concept of container gardening, using repurposed items, has roots stretching back centuries, with various cultures utilizing readily available materials like gourds and clay pots to cultivate food. Today, the spirit of resourcefulness lives on, and what better way to honor that tradition than by transforming discarded plastic bottles into thriving pepper plants?
Why do you need this DIY trick? Well, imagine having a constant supply of fresh peppers for your favorite dishes, knowing exactly where they came from and how they were grown. Plus, this method is fantastic for small spaces, making it ideal for apartment dwellers or anyone with limited gardening area. Not only is creating a plastic bottle pepper garden incredibly budget-friendly, but it’s also a fantastic way to reduce waste and contribute to a more sustainable lifestyle. Let’s dive in and discover how easy it is to create your own thriving pepper paradise!
DIY Upside-Down Pepper Garden from Plastic Bottles
Hey there, fellow gardening enthusiasts! I’m so excited to share this super cool and budget-friendly DIY project with you: creating an upside-down pepper garden using recycled plastic bottles. Not only is it a fantastic way to reuse those bottles that would otherwise end up in the landfill, but it also allows you to grow delicious peppers in a small space, perfect for balconies, patios, or even just hanging from a sturdy branch. Let’s get started!
What You’ll Need
Before we dive in, let’s gather all the necessary materials. Trust me, having everything ready beforehand will make the process much smoother and more enjoyable.
* Plastic Bottles: You’ll need large plastic bottles, like the ones used for soda or water. 2-liter bottles work great, but larger ones are even better for giving your pepper plants more room to grow. Make sure they’re clean and dry.
* Pepper Seedlings: Choose your favorite pepper varieties! Bell peppers, jalapenos, chili peppers – the choice is yours. You can either start your own seedlings from seeds or purchase them from a local nursery.
* Potting Soil: Use a good quality potting mix that’s well-draining. This is crucial for healthy pepper growth.
* Scissors or Utility Knife: For cutting the plastic bottles. Be careful!
* Drill or Awl: To create drainage holes and hanging holes.
* String, Rope, or Chain: For hanging your upside-down planters.
* Landscape Fabric or Coffee Filter: To prevent soil from falling out of the bottle neck.
* Gloves: To keep your hands clean.
* Watering Can or Hose: For watering your pepper plants.
* Measuring Tape or Ruler: For accurate measurements.
Preparing the Plastic Bottles
Okay, let’s get our hands dirty! This is where we transform those ordinary plastic bottles into awesome upside-down planters.
1. Clean the Bottles: Thoroughly wash the plastic bottles with soap and water to remove any residue. Rinse them well and let them dry completely. This is important to prevent any contamination that could harm your pepper plants.
2. Cut the Bottle: Using your scissors or utility knife, carefully cut off the bottom of the plastic bottle. I usually cut it about 2-3 inches from the bottom, creating a wide opening. Be extra cautious when using the utility knife, and always cut away from yourself.
3. Drill Drainage Holes: Now, we need to create drainage holes in the bottle cap. Use your drill or awl to make several small holes in the cap. These holes will allow excess water to drain out, preventing root rot.
4. Prepare the Bottle Neck: This is where the pepper plant will grow out of. Line the inside of the bottle neck with landscape fabric or a coffee filter. This will prevent the potting soil from falling out when you turn the bottle upside down. Secure the fabric or filter with a rubber band or tape if needed.
5. Drill Hanging Holes: Near the top of the bottle (the part you didn’t cut off), drill two or three holes evenly spaced around the circumference. These holes will be used to hang your upside-down planter. Make sure the holes are large enough to accommodate your chosen string, rope, or chain.
Planting Your Pepper Seedlings
Now for the fun part – planting your pepper seedlings! This is where you bring your garden to life.
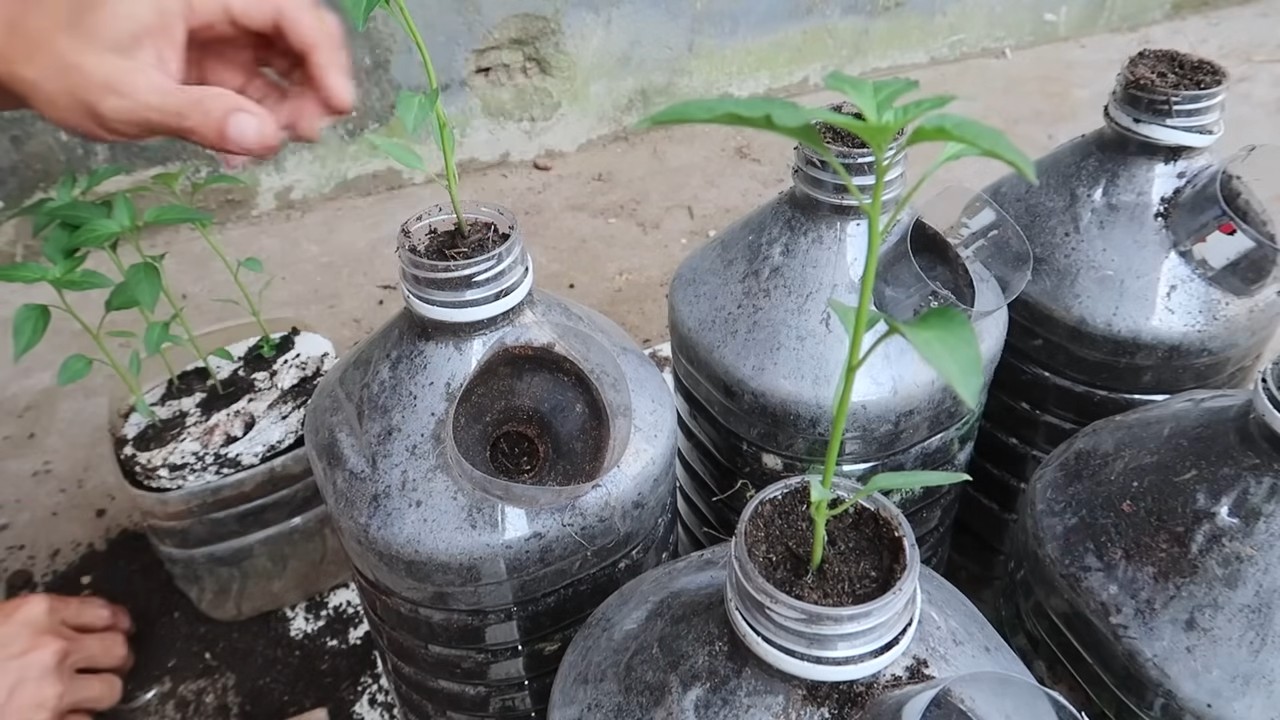
1. Insert the Seedling: Gently turn the plastic bottle upside down. Carefully insert your pepper seedling through the bottle neck, with the leaves and stem pointing downwards. Be very gentle to avoid damaging the plant.
2. Add Potting Soil: While holding the seedling in place, slowly add potting soil to the bottle. Fill it up to just below the hanging holes. Gently tap the bottle to settle the soil and eliminate any air pockets.
3. Water Thoroughly: Once the bottle is filled with soil, water the pepper plant thoroughly. This will help the soil settle and provide the plant with the moisture it needs to get started.
Hanging Your Upside-Down Pepper Garden
Almost there! Now it’s time to hang your beautiful upside-down pepper garden and watch it thrive.
1. Attach Hanging Mechanism: Thread your string, rope, or chain through the hanging holes you drilled earlier. Make sure the hanging mechanism is strong enough to support the weight of the bottle, soil, and plant. I recommend using a sturdy knot or clip to secure the hanging mechanism.
2. Choose a Location: Select a sunny location for your upside-down pepper garden. Peppers need at least 6-8 hours of sunlight per day to thrive. Make sure the location is also sheltered from strong winds, which could damage the plants.
3. Hang the Planter: Carefully hang your upside-down pepper planter from a sturdy branch, hook, or railing. Ensure the planter is securely attached and won’t fall.
Caring for Your Upside-Down Pepper Garden
Congratulations! You’ve successfully created your own upside-down pepper garden. Now, let’s talk about how to care for it so your plants can flourish.
1. Watering: Water your pepper plants regularly, especially during hot and dry weather. Check the soil moisture by sticking your finger into the soil. If the top inch feels dry, it’s time to water. Water thoroughly until water drains out of the drainage holes in the bottle cap.
2. Fertilizing: Feed your pepper plants with a balanced fertilizer every 2-3 weeks. Follow the instructions on the fertilizer package. This will provide your plants with the nutrients they need to grow and produce peppers.
3. Sunlight: Ensure your pepper plants receive at least 6-8 hours of sunlight per day. If you live in a very hot climate, you may need to provide some afternoon shade to prevent the plants from getting scorched.
4. Pest Control: Keep an eye out for pests, such as aphids, whiteflies, and spider mites. If you notice any pests, treat them with an appropriate insecticide or insecticidal soap. You can also try using natural pest control methods, such as introducing beneficial insects like ladybugs.
5. Pruning: Prune your pepper plants regularly to encourage bushier growth and more pepper production. Remove any yellow or dead leaves. You can also pinch off the tips of the branches to encourage branching.
6. Support: As your pepper plants grow and produce peppers, they may become heavy and require additional support. You can use stakes or cages to support the plants and prevent them from falling over.
Troubleshooting
Even with the best care, you might encounter some challenges along the way. Here are a few common problems and how to address them:
* Yellowing Leaves: This could be a sign of overwatering, underwatering, or nutrient deficiency. Check the soil moisture and adjust your watering schedule accordingly. Fertilize your plants with a balanced fertilizer.
* Lack of Peppers: This could be due to insufficient sunlight, poor pollination, or nutrient deficiency. Ensure your plants are getting enough sunlight. You can also hand-pollinate the flowers by gently shaking the plants or using a small brush to transfer pollen from one flower to another. Fertilize your plants with a fertilizer that’s high in phosphorus.
* Pest Infestation: Treat any pest infestations promptly with an appropriate insecticide or insecticidal soap. You can also try using natural pest control methods.
* Root Rot: This is caused by overwatering and poor drainage. Ensure your plastic bottles have adequate drainage holes. Avoid overwatering your plants.
Harvesting Your Peppers
The best part of growing your own peppers is, of course, harvesting them!
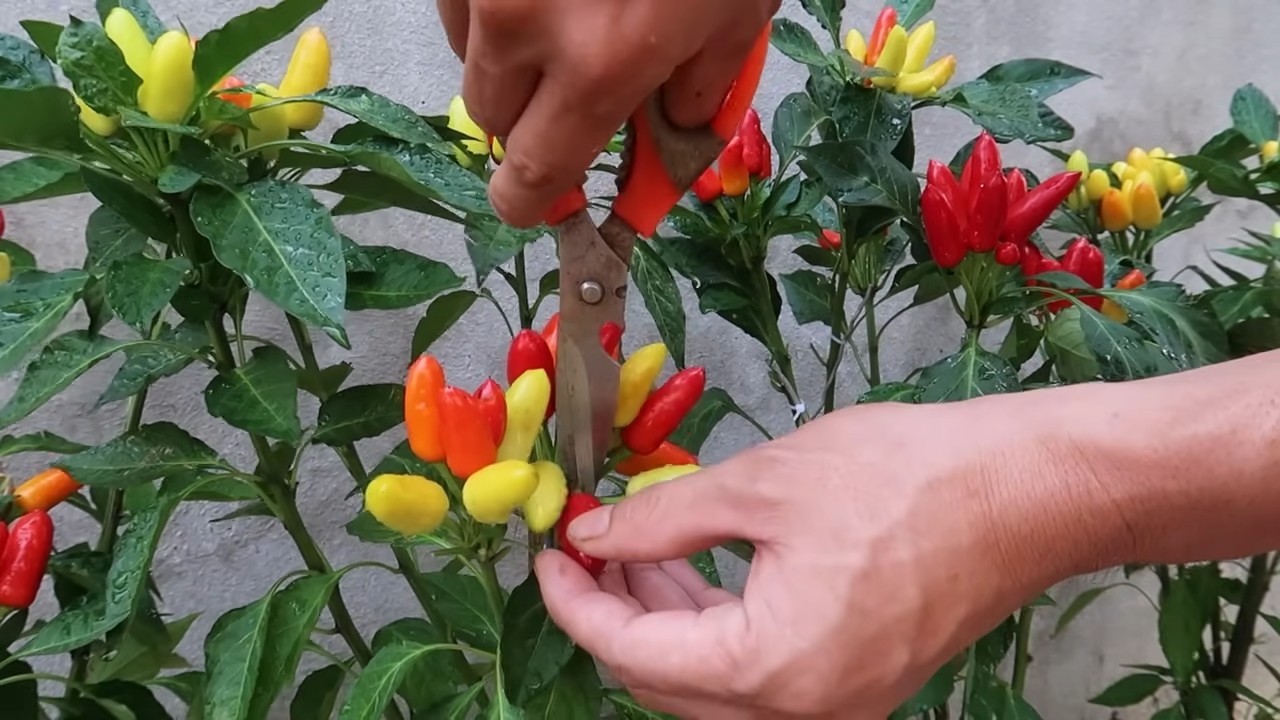
1. When to Harvest: Peppers are typically ready to harvest when they’ve reached their mature size and color. The exact time will depend on the variety of pepper you’re growing.
2. How to Harvest: Use scissors or pruning shears to cut the peppers from the plant. Be careful not to damage the plant.
3. Enjoy Your Harvest: Use your freshly harvested peppers in your favorite recipes! You can also preserve them by pickling, canning, or freezing.
Tips and Tricks for Success
Here are a few extra tips and tricks to help you succeed with your upside-down pepper garden:
* Choose the Right Pepper Variety: Some pepper varieties are better suited for container gardening than others. Look for compact or dwarf varieties that won’t get too large.
* Use High-Quality Potting Soil: Don’t skimp on the potting soil! Use a good quality potting mix that’s well-draining and contains plenty of nutrients.
* Water Regularly: Peppers need consistent moisture to thrive. Water your plants regularly, especially during hot and dry weather.
* Fertilize Regularly: Peppers are heavy feeders and need regular fertilization to produce a good crop.
* Protect from Pests: Keep an eye out for pests and treat them promptly.
* Have Fun
Conclusion
So, there you have it! Transforming a simple plastic bottle into a thriving pepper garden is not just a fun project; it’s a sustainable, space-saving, and incredibly rewarding way to grow your own fresh produce. We’ve walked you through the process, highlighting the ease and accessibility of this DIY trick. Forget expensive gardening equipment or sprawling garden plots. With a few repurposed plastic bottles, some soil, and a handful of pepper seeds, you can cultivate a vibrant mini-garden right on your balcony, patio, or even windowsill.
But why is this DIY pepper garden a must-try? Beyond the obvious cost savings and eco-friendliness, it offers a unique connection to your food. There’s something incredibly satisfying about nurturing a plant from seed to harvest, knowing exactly where your food comes from and how it was grown. Plus, it’s a fantastic educational opportunity for kids (and adults!) to learn about plant life cycles and the importance of sustainable practices.
Don’t be afraid to experiment with different pepper varieties! From sweet bell peppers to fiery habaneros, the possibilities are endless. Consider using different colored plastic bottles to add a visual appeal to your garden. You can also explore vertical gardening techniques by hanging your bottle planters from a fence or railing, maximizing your space even further. Another variation is to create a self-watering system by adding a wick made of cotton rope that draws water from a reservoir at the bottom of the bottle. This is especially helpful if you tend to forget to water your plants regularly.
We encourage you to embrace this DIY pepper garden project and experience the joy of growing your own peppers. It’s a simple, effective, and incredibly satisfying way to bring a little bit of nature into your life. And most importantly, it’s a fantastic way to reduce waste and promote sustainable living.
Now, it’s your turn! Gather your plastic bottles, grab some pepper seeds, and get growing. We’re confident that you’ll be amazed by the results. Don’t forget to share your experiences with us! Post pictures of your bottle pepper gardens on social media using #BottlePepperGarden and let us know what varieties you’re growing and any tips or tricks you’ve discovered along the way. We can’t wait to see your creations and learn from your experiences. Let’s cultivate a community of sustainable gardeners, one plastic bottle at a time! This DIY trick is a game changer for small space gardening.
Frequently Asked Questions (FAQ)
What type of plastic bottles are best for this project?
Ideally, you should use food-grade plastic bottles, such as those that previously contained water, juice, or soda. Avoid using bottles that held harsh chemicals or cleaning products, as these may contaminate the soil and affect the growth of your peppers. PET (polyethylene terephthalate) bottles are commonly used and generally considered safe. Make sure to thoroughly wash and rinse the bottles before using them. The size of the bottle will depend on the pepper variety you choose. Smaller peppers can thrive in smaller bottles, while larger varieties will need more space.
What kind of soil should I use for my bottle pepper garden?
A well-draining potting mix is essential for healthy pepper growth. Avoid using garden soil, as it can be too dense and may not provide adequate drainage. Look for a potting mix that contains ingredients like peat moss, perlite, and vermiculite. You can also create your own potting mix by combining equal parts of these ingredients. Consider adding some compost to the mix for added nutrients. The pH level of the soil should be slightly acidic, around 6.0 to 6.8.
How often should I water my bottle pepper plants?
The frequency of watering will depend on several factors, including the weather, the size of the bottle, and the type of soil you’re using. Generally, you should water your pepper plants when the top inch of soil feels dry to the touch. Avoid overwatering, as this can lead to root rot. Ensure that the bottles have adequate drainage holes to prevent water from accumulating at the bottom. During hot weather, you may need to water your plants more frequently.
Where should I place my bottle pepper garden?
Peppers need plenty of sunlight to thrive, so choose a location that receives at least 6-8 hours of direct sunlight per day. A south-facing balcony or patio is ideal. If you don’t have access to direct sunlight, you can supplement with grow lights. Protect your plants from strong winds, which can damage the stems and leaves. You can also rotate the bottles regularly to ensure that all sides of the plant receive equal sunlight.
How do I fertilize my bottle pepper plants?
Peppers are heavy feeders and require regular fertilization to produce abundant fruit. Use a balanced fertilizer that is specifically formulated for vegetables. Follow the instructions on the fertilizer package carefully. You can also use organic fertilizers, such as compost tea or fish emulsion. Fertilize your plants every 2-3 weeks during the growing season. Avoid over-fertilizing, as this can burn the roots.
How do I protect my bottle pepper plants from pests and diseases?
Regularly inspect your plants for signs of pests or diseases. Common pepper pests include aphids, spider mites, and whiteflies. You can control these pests with insecticidal soap or neem oil. Diseases such as powdery mildew and blossom end rot can also affect pepper plants. Ensure good air circulation around your plants to prevent fungal diseases. Blossom end rot is often caused by calcium deficiency, so you can add calcium to the soil or use a calcium-rich fertilizer.
When can I harvest my peppers?
The time it takes for peppers to mature will depend on the variety. Generally, bell peppers are ready to harvest when they are fully colored and firm to the touch. Hot peppers can be harvested when they reach their desired level of spiciness. Use a sharp knife or scissors to cut the peppers from the plant, leaving a small stem attached. Regular harvesting will encourage the plant to produce more peppers.
Can I grow different types of peppers in the same bottle garden?
While it’s possible to grow different types of peppers in the same bottle garden, it’s generally recommended to keep them separate, especially if you’re growing hot peppers alongside sweet peppers. Cross-pollination can occur, which may affect the flavor and spiciness of the peppers. If you do choose to grow different varieties together, make sure to space them adequately and monitor them closely.
What do I do with my bottle pepper garden in the winter?
If you live in a cold climate, you’ll need to protect your pepper plants from frost. You can bring the bottles indoors and place them in a sunny location. Alternatively, you can cover the plants with a frost blanket or move them to a sheltered area. Pepper plants are perennials in warm climates, but they are typically grown as annuals in colder regions. You can try overwintering your plants indoors, but they may not produce as much fruit the following year.
Can I reuse the plastic bottles for other gardening projects?
Yes, you can definitely reuse the plastic bottles for other gardening projects. After you’ve harvested your peppers, you can clean the bottles thoroughly and use them to start seeds, grow herbs, or even create other types of container gardens. Reusing plastic bottles is a great way to reduce waste and promote sustainable gardening practices. Just make sure to choose appropriate plants for the size and shape of the bottles.

Leave a Comment