

Planting celery on stones? Sounds a little unconventional, right? But trust me, this quirky DIY trick might just revolutionize your home gardening game! For centuries, humans have been finding innovative ways to cultivate food, from ancient terrace farming to modern hydroponics. Now, we’re taking a step towards a simpler, space-saving, and surprisingly effective method.
I know what you’re thinking: why stones? Well, this method offers fantastic drainage, prevents root rot, and can even help regulate soil temperature. Plus, it’s a fantastic way to repurpose those decorative stones you have lying around! In today’s world, where space is a premium and sustainable practices are more important than ever, learning how to optimize your gardening efforts is crucial.
This DIY article will guide you through the process of planting celery on stones, step-by-step. Imagine harvesting fresh, crisp celery right from your windowsill, even if you only have a small balcony or patio. It’s easier than you think, and the results are incredibly rewarding. Get ready to ditch the traditional garden bed and embrace this unique and effective gardening hack!
DIY: Sellerie auf Steinen ziehen – So geht’s!
Hallo liebe Gartenfreunde! Habt ihr schon mal darüber nachgedacht, Sellerie nicht nur im Beet, sondern auch auf Steinen zu ziehen? Klingt verrückt, ist aber ein super spannendes DIY-Projekt, das nicht nur Spaß macht, sondern auch eine tolle Möglichkeit ist, Gemüsereste zu verwerten und frischen Sellerie nachwachsen zu lassen. Ich zeige euch heute, wie ihr das ganz einfach selbst machen könnt.
Was du brauchst:
* Einen Selleriestrunk (am besten mit Wurzelansatz)
* Steine (Kieselsteine, Flusssteine oder ähnliches)
* Ein Gefäß (Glas, Schale, Vase – Hauptsache wasserdicht)
* Wasser
* Optional: Flüssigdünger
Schritt-für-Schritt-Anleitung:
1. Selleriestrunk vorbereiten:
* Kaufe einen frischen Sellerie im Supermarkt oder verwende den Strunk, der beim Kochen übrig geblieben ist. Achte darauf, dass der Strunk noch einen Wurzelansatz hat. Je mehr Wurzeln, desto besser!
* Schneide den Sellerie etwa 5-7 cm über dem Wurzelansatz ab. Du kannst die Selleriestangen natürlich vorher für deine Mahlzeit verwenden.
* Entferne die äußeren, welken Blätter des Strunks. Die inneren, frischen Blätter kannst du dranlassen.
2. Gefäß vorbereiten:
* Wähle ein Gefäß, das groß genug ist, um den Selleriestrunk und die Steine aufzunehmen. Ein Glas oder eine Schale mit einem Durchmesser von etwa 15-20 cm ist ideal.
* Reinige das Gefäß gründlich, um Bakterienwachstum zu vermeiden.
3. Steine einfüllen:
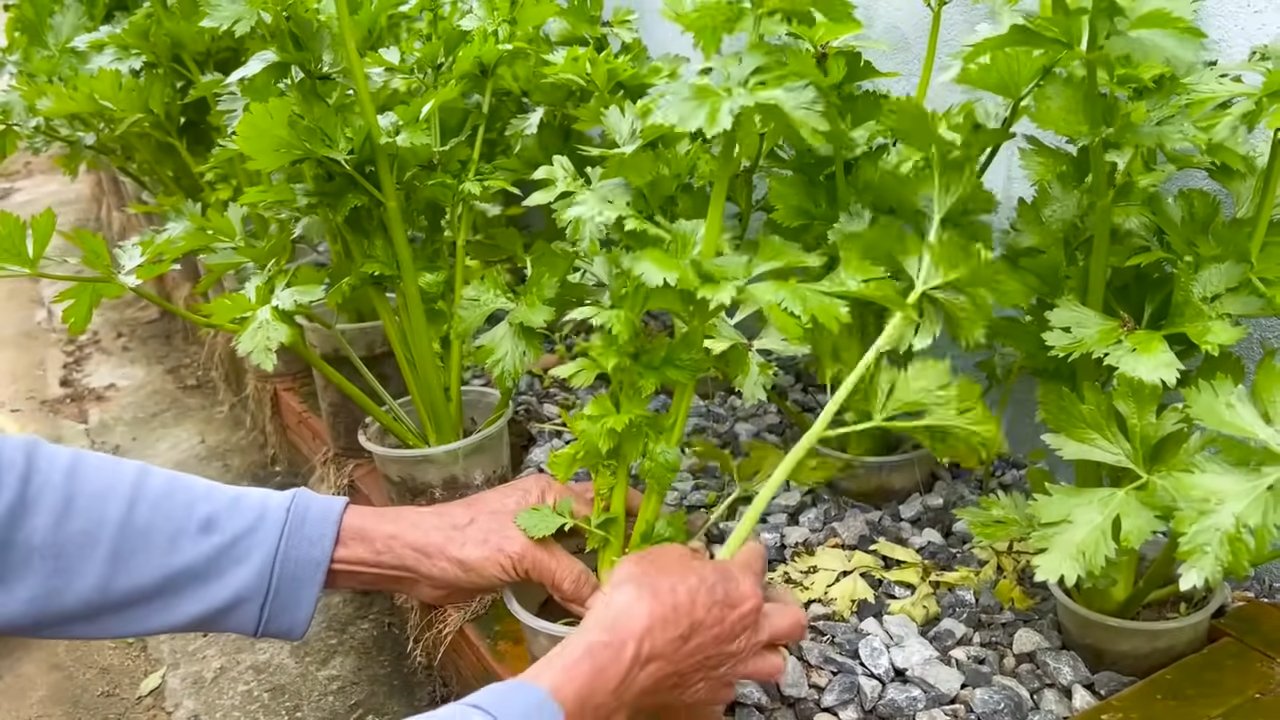
* Fülle das Gefäß mit den Steinen. Die Steine dienen als Stütze für den Selleriestrunk und sorgen dafür, dass er nicht direkt im Wasser liegt. Das ist wichtig, um Fäulnis zu verhindern.
* Achte darauf, dass die Steine den Boden des Gefäßes gut bedecken und eine stabile Basis bilden.
4. Selleriestrunk platzieren:
* Platziere den Selleriestrunk vorsichtig auf den Steinen. Achte darauf, dass der Wurzelansatz nach unten zeigt und die Schnittfläche nach oben.
* Die Steine sollten den Strunk so stützen, dass er nicht umkippt.
5. Wasser hinzufügen:
* Gieße vorsichtig Wasser in das Gefäß, bis der Wurzelansatz des Selleriestrunks gerade so bedeckt ist. Die Schnittfläche sollte nicht im Wasser stehen, da sie sonst faulen kann.
* Achte darauf, dass die Steine den Strunk weiterhin stützen und er nicht im Wasser schwimmt.
6. Standort wählen:
* Stelle das Gefäß an einen hellen, warmen Ort, aber nicht in die pralle Sonne. Ein Fensterbrett ist ideal.
* Vermeide Zugluft, da dies das Wachstum des Selleries beeinträchtigen kann.
7. Pflege:
* Wechsle das Wasser alle 1-2 Tage, um Bakterienwachstum zu verhindern und dem Sellerie frisches Wasser zuzuführen.
* Achte darauf, dass der Wurzelansatz immer leicht feucht ist.
* Optional: Füge dem Wasser alle 2-3 Wochen etwas Flüssigdünger hinzu, um das Wachstum zu fördern.
8. Beobachten und Geduld haben:
* Nach einigen Tagen solltest du sehen, wie neue Wurzeln aus dem Strunk wachsen.
* Auch die inneren Blätter des Selleries werden anfangen, sich zu entfalten und größer zu werden.
* Hab Geduld! Es kann einige Wochen dauern, bis der Sellerie ausreichend gewachsen ist, um ihn zu ernten.
Ernte und Weiterverwendung:
* Sobald der Sellerie ausreichend gewachsen ist, kannst du die äußeren Blätter ernten und für Salate, Suppen oder andere Gerichte verwenden.
* Du kannst den Sellerie auch weiterhin auf den Steinen ziehen und immer wieder Blätter ernten.
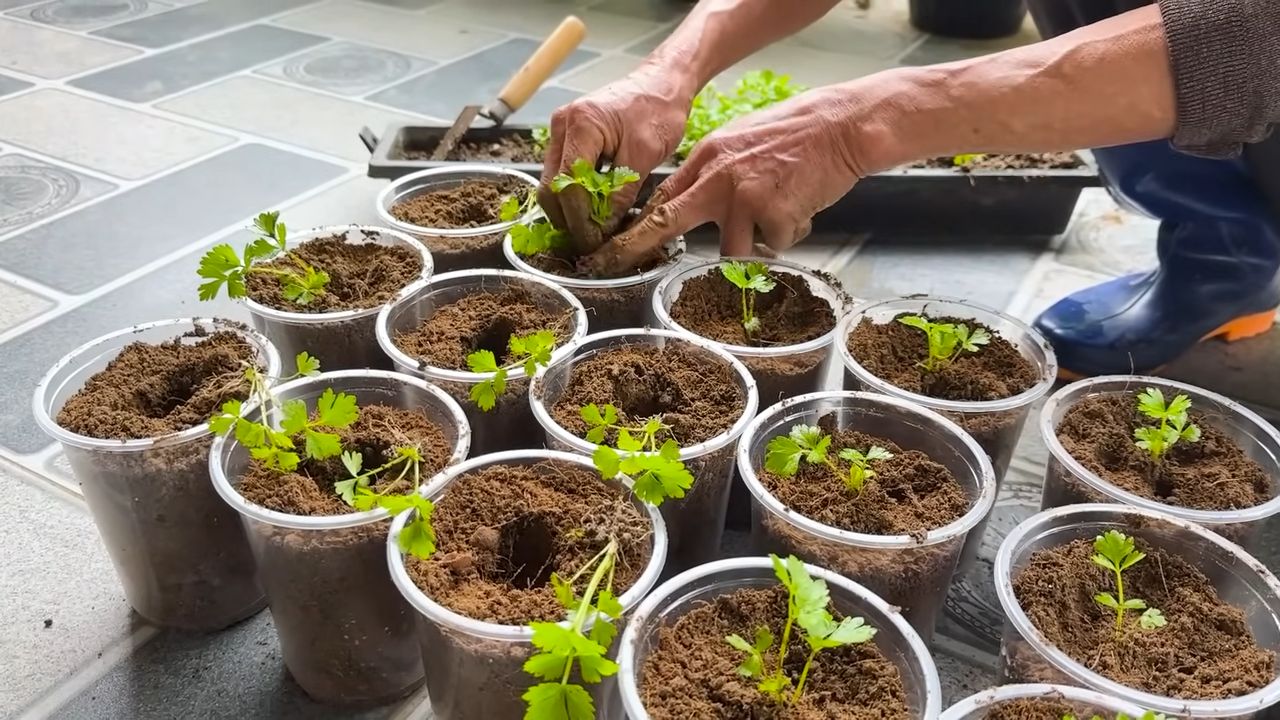
* Wenn du möchtest, kannst du den Sellerie auch in einen Topf mit Erde umpflanzen, sobald er ausreichend Wurzeln gebildet hat.
Häufige Probleme und Lösungen:
* Fäulnis: Wenn der Selleriestrunk fault, liegt das meistens daran, dass er zu viel Wasser abbekommt. Achte darauf, dass die Schnittfläche nicht im Wasser steht und wechsle das Wasser regelmäßig.
* Schimmel: Schimmelbildung kann ebenfalls durch zu viel Feuchtigkeit entstehen. Reinige das Gefäß gründlich und wechsle das Wasser öfter.
* Langsames Wachstum: Wenn der Sellerie nur langsam wächst, kann das an zu wenig Licht oder Nährstoffen liegen. Stelle das Gefäß an einen helleren Ort und füge dem Wasser etwas Flüssigdünger hinzu.
* Gelbe Blätter: Gelbe Blätter können ein Zeichen für Nährstoffmangel sein. Füge dem Wasser etwas Flüssigdünger hinzu.
Zusätzliche Tipps und Tricks:
* Verschiedene Selleriesorten: Du kannst verschiedene Selleriesorten auf diese Weise ziehen, z.B. Stangensellerie oder Knollensellerie.
* Kreative Gefäße: Verwende verschiedene Gefäße, um deinem DIY-Projekt eine persönliche Note zu verleihen. Alte Marmeladengläser, Vasen oder sogar Tassen eignen sich hervorragend.
* Dekoration: Dekoriere das Gefäß mit kleinen Steinen, Muscheln oder anderen Deko-Elementen, um es zu einem echten Hingucker zu machen.
* Kinder einbeziehen: Dieses DIY-Projekt ist auch eine tolle Möglichkeit, Kinder für das Gärtnern zu begeistern. Sie können beim Vorbereiten des Gefäßes, beim Platzieren der Steine und beim Gießen des Wassers helfen.
Warum Sellerie auf Steinen ziehen?
* Nachhaltigkeit: Du verwertest Gemüsereste und vermeidest Lebensmittelverschwendung.
* Frische Kräuter: Du hast immer frischen Sellerie zur Hand, ohne ihn im Supermarkt kaufen zu müssen.
* Dekoration: Das DIY-Projekt ist eine tolle Dekoration für deine Küche oder dein Fensterbrett.
* Entspannung: Das Beobachten des Wachstums des Selleries kann sehr entspannend sein.
* Lernen: Du lernst etwas über Pflanzenwachstum und Nachhaltigkeit.
Noch ein paar abschließende Gedanken:
Ich hoffe, diese Anleitung hat euch inspiriert, Sellerie auf Steinen zu ziehen. Es ist ein wirklich einfaches und lohnendes DIY-Projekt, das nicht nur Spaß macht, sondern auch einen kleinen Beitrag zur Nachhaltigkeit leistet. Probiert es einfach mal aus und lasst mich wissen, wie es euch gefallen hat! Ich bin gespannt auf eure Ergebnisse! Viel Spaß beim Gärtnern!
Conclusion
So, there you have it! Planting celery on stones isn’t just a quirky gardening experiment; it’s a genuinely effective way to propagate celery from kitchen scraps, reduce food waste, and enjoy fresh, homegrown celery without needing a sprawling garden. It’s a testament to the resourcefulness of gardeners and a fun project for anyone, regardless of their gardening experience.
Why is this DIY trick a must-try? Because it’s simple, sustainable, and satisfying. It transforms something destined for the compost bin into a vibrant, living plant. Imagine the pride you’ll feel serving a salad made with celery you regrew yourself! Plus, it’s a fantastic educational opportunity for kids, teaching them about plant life cycles and the importance of reducing waste.
But the benefits don’t stop there. This method is particularly appealing for those with limited space. You don’t need a large garden bed; a sunny windowsill or balcony will do. It’s also a great option for apartment dwellers or anyone looking to add a touch of green to their indoor environment.
Looking for variations? Absolutely! Experiment with different types of celery. Try planting organic celery for the best results. You can also add a diluted liquid fertilizer to the water every couple of weeks to give your celery a boost. Consider using different types of stones – river rocks, pebbles, or even decorative glass stones can add a unique aesthetic touch to your setup. Just ensure the stones are clean and non-toxic. You can even try this method with other vegetables like romaine lettuce or bok choy! The possibilities are endless.
Don’t be afraid to get creative and personalize your celery-growing experience. The key is to provide the celery base with consistent moisture and sunlight. Observe your plant closely and adjust your approach as needed.
We wholeheartedly encourage you to try this DIY trick. It’s a rewarding experience that connects you to the food you eat and promotes sustainable living. Once you’ve successfully regrown your celery, we’d love to hear about your experience! Share your photos, tips, and stories with us in the comments section below. Let’s build a community of resourceful gardeners who are passionate about reducing waste and growing their own food.
Planting celery on stones is more than just a gardening hack; it’s a step towards a more sustainable and fulfilling lifestyle. So, grab a celery stalk, some stones, and a container of water, and get ready to witness the magic of regrowth! Happy gardening!
Frequently Asked Questions (FAQ)
What kind of celery works best for this method?
Ideally, you want to use celery stalks that are fresh and firm, with a healthy-looking base. Organic celery is often recommended because it’s less likely to have been treated with chemicals that could inhibit regrowth. However, conventional celery can also work, just make sure it’s not too old or wilted. Look for stalks with a tight, compact base and minimal browning. Avoid celery that feels soft or mushy.
How much sunlight does the celery need?
Celery thrives in bright, indirect sunlight. A spot near a sunny windowsill is ideal. Avoid placing it in direct sunlight, especially during the hottest part of the day, as this can scorch the leaves. If you don’t have a naturally sunny spot, you can supplement with a grow light. Aim for at least 6 hours of light per day. If your celery starts to look pale or leggy, it’s likely not getting enough light.
How often should I change the water?
It’s important to change the water every 1-2 days to prevent the growth of bacteria and algae. Stagnant water can lead to rot and hinder the celery’s growth. When you change the water, gently rinse the celery base and the stones to remove any debris. Use fresh, clean water each time.
How long does it take for the celery to start regrowing?
You should start to see new growth within a few days to a week. Small, green shoots will emerge from the center of the celery base. The speed of regrowth depends on factors like the quality of the celery, the amount of sunlight it receives, and the water quality. Be patient, and don’t give up if you don’t see immediate results.
Can I plant the regrown celery in soil?
Yes, absolutely! Once the celery has developed a good root system (about 2-3 inches long), you can transplant it into a pot filled with well-draining potting mix or directly into your garden. When transplanting, be careful not to damage the roots. Water thoroughly after planting and keep the soil consistently moist.
What kind of soil is best for planting celery?
Celery prefers rich, well-draining soil with a slightly acidic to neutral pH (around 6.0-7.0). Amend your soil with compost or other organic matter to improve its fertility and drainage. If you’re planting in a pot, use a high-quality potting mix specifically formulated for vegetables.
How do I care for celery planted in soil?
Celery needs consistent moisture, so water regularly, especially during dry periods. Avoid letting the soil dry out completely. Fertilize every few weeks with a balanced fertilizer. You can also mulch around the plants to help retain moisture and suppress weeds.
Can I harvest celery from the regrown plant?
Yes, you can harvest celery from the regrown plant. You can either harvest individual stalks as needed or harvest the entire plant at once. To harvest individual stalks, simply cut them off at the base of the plant. To harvest the entire plant, cut it off at ground level.
What if my celery starts to rot?
If you notice any signs of rot, such as a slimy or foul-smelling base, remove the affected parts immediately. Change the water more frequently and ensure the celery is not sitting in stagnant water. If the rot persists, it’s best to start with a fresh celery stalk.
Is this method only for celery?
While this article focuses on celery, the same method can be used to regrow other vegetables like romaine lettuce, bok choy, and even scallions. The principle is the same: provide the base of the vegetable with consistent moisture and sunlight, and it will often regrow. Experiment with different vegetables and see what works best for you!
What are the benefits of planting celery on stones compared to other methods?
Planting celery on stones offers several advantages. It’s a simple and low-maintenance method that doesn’t require soil or a garden. It’s also a great way to observe the root development process. The stones provide support for the celery base and help to keep it from sitting directly in the water, which can prevent rot. Furthermore, it’s an aesthetically pleasing way to regrow celery, adding a touch of greenery to your home.
How can I prevent algae growth in the water?
Algae growth can be a common problem when regrowing celery in water. To prevent algae growth, try using a dark-colored container or covering the container with a cloth to block out light. Changing the water frequently and rinsing the stones can also help. You can also add a small amount of hydrogen peroxide to the water (about 1 teaspoon per gallon) to inhibit algae growth.
What if my celery doesn’t grow roots?
If your celery isn’t growing roots, there could be several reasons. Make sure the celery base is fresh and healthy. Ensure it’s getting enough light and that the water is being changed regularly. You can also try adding a rooting hormone to the water to stimulate root growth. If you’ve tried all of these things and the celery still isn’t growing roots, it may be that the celery stalk is not viable.
Can I use tap water for this method?
While tap water can be used, it’s best to use filtered or distilled water, especially if your tap water is heavily chlorinated. Chlorine can inhibit root growth. If you do use tap water, let it sit out for 24 hours to allow the chlorine to dissipate.
How long will the regrown celery last?
The lifespan of the regrown celery depends on how well you care for it. If you transplant it into soil and provide it with adequate water, sunlight, and nutrients, it can continue to grow and produce celery stalks for several months. However, keep in mind that regrown celery may not be as robust or flavorful as celery grown from seed.

Leave a Comment