

Patio Summer Squash Growing might seem daunting if you’re short on space, but trust me, it’s totally achievable and incredibly rewarding! Imagine stepping onto your patio and harvesting fresh, vibrant summer squash right at your doorstep. Forget those bland, store-bought veggies; we’re talking about homegrown goodness bursting with flavor!
For centuries, cultivating food in small spaces has been a vital practice. From ancient rooftop gardens in Babylon to the intricate courtyard gardens of the Mediterranean, people have always found ways to connect with nature and nourish themselves, even in urban environments. This tradition continues today, and with a few clever tricks, you can join the ranks of urban gardeners who are enjoying the fruits (and vegetables!) of their labor.
Why should you bother with patio summer squash growing? Well, besides the unparalleled taste of homegrown produce, it’s a fantastic way to reduce your carbon footprint, save money, and connect with nature. Plus, it’s a surprisingly therapeutic hobby! This DIY guide is packed with simple, effective hacks to help you maximize your yield, even if you only have a tiny balcony. I’ll walk you through everything from choosing the right varieties to dealing with common pests, ensuring you have a bountiful harvest of delicious summer squash all season long. Let’s get started!
Growing Summer Squash in Containers: A Patio Gardener’s Guide
Hey there, fellow garden enthusiasts! I’m so excited to share my experience growing summer squash right on my patio. It’s surprisingly easy, even if you don’t have a sprawling backyard. With a little planning and some love, you can enjoy fresh, homegrown squash all summer long. Let’s dive in!
Choosing the Right Squash Variety
Not all squash varieties are created equal, especially when it comes to container gardening. You’ll want to pick bush varieties that stay compact and don’t require a ton of space to sprawl. Here are a few of my favorites:
* ‘Spacemaster’: This zucchini variety is specifically bred for containers and produces dark green, delicious squash.
* ‘Bush Baby’: A yellow summer squash that’s perfect for smaller spaces. It’s known for its early and prolific yields.
* ‘Patio Star’: Another zucchini option that’s compact and disease-resistant.
* ‘Eight Ball’: A round zucchini that’s not only tasty but also adds a fun visual element to your patio garden.
Gathering Your Supplies
Before we get our hands dirty, let’s make sure we have everything we need. Here’s a checklist:
* Large Container: Aim for at least a 20-gallon container. The bigger, the better, as squash plants need plenty of room for their roots to grow.
* High-Quality Potting Mix: Don’t use garden soil! It’s too heavy and won’t drain well in a container. Opt for a lightweight, well-draining potting mix.
* Squash Seeds or Seedlings: Choose your favorite variety from the list above, or experiment with a few different ones!
* Slow-Release Fertilizer: This will provide your squash plants with a steady supply of nutrients throughout the growing season.
* Watering Can or Hose: Essential for keeping your plants hydrated.
* Trowel or Small Shovel: For planting and transplanting.
* Optional:
* Tomato Cage or Stake: To provide support as the plant grows.
* Mulch: To help retain moisture and suppress weeds.
* Gardening Gloves: To keep your hands clean.
Planting Your Squash
Now for the fun part! Here’s how to plant your squash seeds or seedlings:
1. Prepare the Container: Fill your container with potting mix, leaving a few inches of space at the top.
2. Sowing Seeds (if starting from seed):
* Make a small hole about 1 inch deep in the center of the container.
* Drop in 2-3 seeds. This increases the chances of at least one seed germinating.
* Cover the seeds with potting mix and gently water.
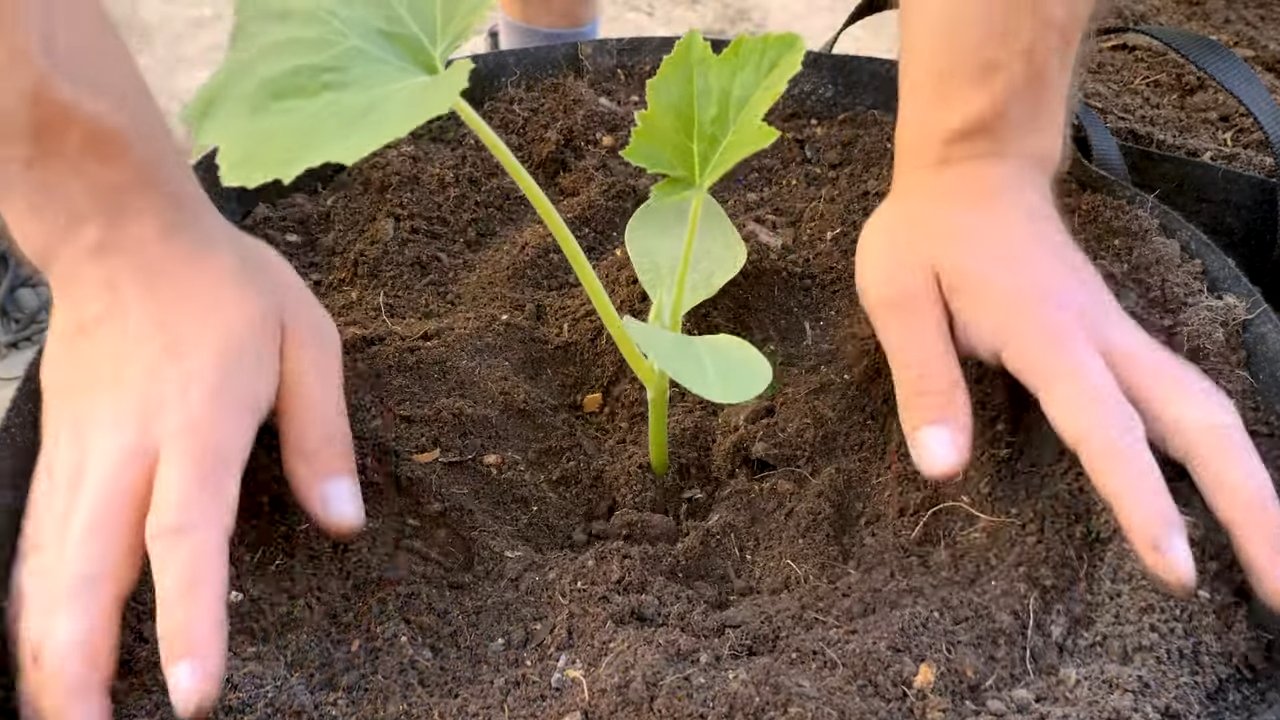
3. Transplanting Seedlings (if using seedlings):
* Dig a hole in the center of the container that’s slightly larger than the root ball of your seedling.
* Gently remove the seedling from its nursery pot, being careful not to damage the roots.
* Place the seedling in the hole and backfill with potting mix.
* Gently pat down the soil around the base of the plant.
4. Water Thoroughly: Water the container deeply until water drains out of the bottom.
5. Add Slow-Release Fertilizer: Sprinkle the slow-release fertilizer around the base of the plant, following the instructions on the package.
6. Mulch (Optional): Add a layer of mulch around the base of the plant to help retain moisture and suppress weeds.
Caring for Your Squash Plants
Once your squash plants are in their new home, it’s important to provide them with the care they need to thrive.
1. Watering: Squash plants need consistent moisture, especially during hot weather. Water deeply whenever the top inch of soil feels dry to the touch. Avoid overhead watering, as this can lead to fungal diseases. I prefer to water early in the morning so the leaves have time to dry before nightfall.
2. Sunlight: Squash plants need at least 6-8 hours of sunlight per day. Place your container in a sunny spot on your patio.
3. Fertilizing: In addition to the slow-release fertilizer you added at planting time, you can also supplement with a liquid fertilizer every 2-3 weeks. Look for a fertilizer that’s high in phosphorus and potassium, which are essential for fruit production.
4. Pollination: Squash plants have separate male and female flowers. The female flowers need to be pollinated in order to produce fruit. If you’re not seeing any fruit develop, you may need to hand-pollinate the flowers.
* How to Hand-Pollinate:
* Identify the male and female flowers. Male flowers have a long, thin stem, while female flowers have a small, immature squash at the base.
* Use a small paintbrush or cotton swab to collect pollen from the male flower.
* Gently transfer the pollen to the stigma (the center part) of the female flower.
* Repeat this process for all the female flowers.
* The best time to hand-pollinate is early in the morning, when the flowers are open.
5. Pest and Disease Control: Keep an eye out for common squash pests like squash bugs, squash vine borers, and aphids. You can control these pests with insecticidal soap or neem oil. Also, watch out for fungal diseases like powdery mildew. Improve air circulation around the plants and avoid overhead watering to prevent these diseases. If you do see signs of disease, treat with a fungicide.
6. Support (Optional): As your squash plant grows, it may need some support. You can use a tomato cage or stake to keep the plant upright and prevent the fruits from touching the ground.
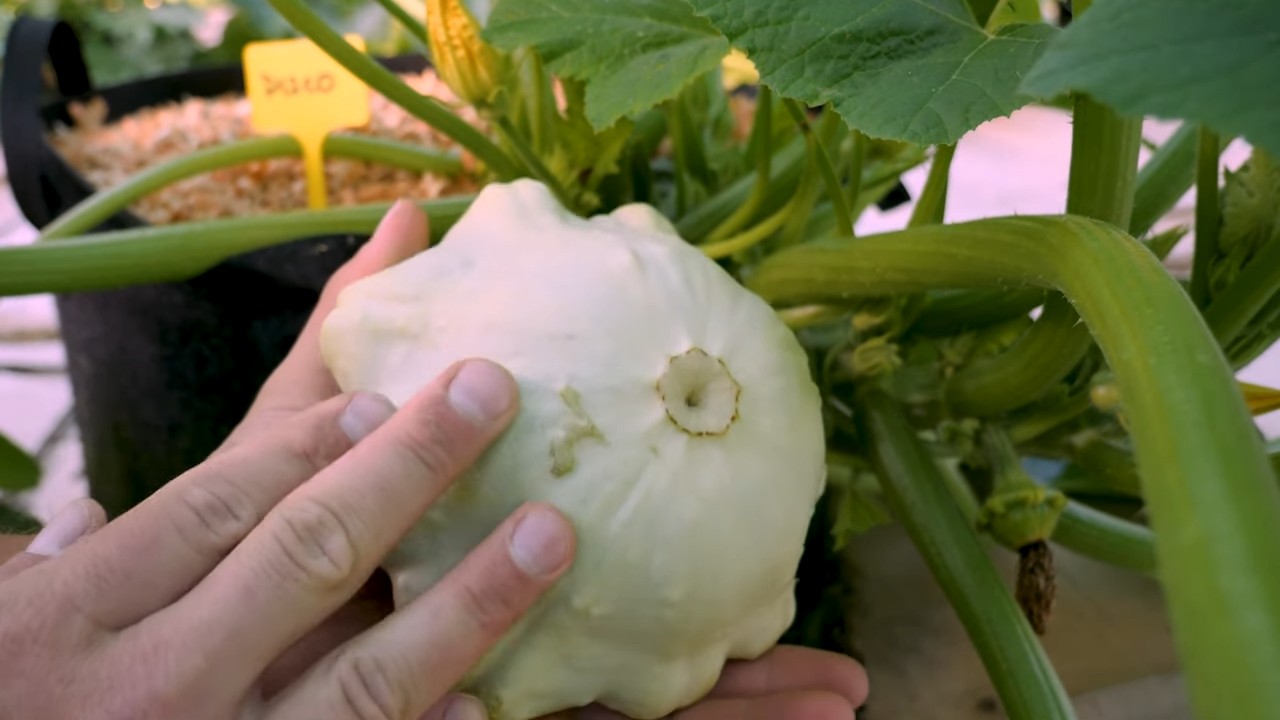
Harvesting Your Squash
The moment we’ve all been waiting for! Harvesting your homegrown squash is so rewarding.
1. Timing: Summer squash is typically ready to harvest about 50-60 days after planting. The exact timing will depend on the variety you’re growing.
2. Size: Harvest your squash when it’s still relatively small and tender. Overripe squash can become tough and seedy. For zucchini, aim for about 6-8 inches in length. For yellow squash, aim for about 4-6 inches in length.
3. Harvesting Technique: Use a sharp knife or pruning shears to cut the squash from the plant. Leave about 2 inches of stem attached.
4. Enjoy! Summer squash is delicious grilled, sautéed, roasted, or even eaten raw in salads.
Troubleshooting Common Problems
Even with the best care, you may encounter some problems while growing squash in containers. Here are a few common issues and how to address them:
* Yellowing Leaves: This could be a sign of overwatering, underwatering, or nutrient deficiency. Check the soil moisture and adjust your watering accordingly. If the soil is consistently wet, improve drainage by adding more perlite or vermiculite to the potting mix. If the soil is dry, water more frequently. You may also need to fertilize your plants with a balanced fertilizer.
* Lack of Fruit Production: This could be due to poor pollination, lack of sunlight, or nutrient deficiency. Make sure your plants are getting at least 6-8 hours of sunlight per day. Hand-pollinate the flowers if necessary. Fertilize your plants with a fertilizer that’s high in phosphorus and potassium.
* Pest Infestations: Regularly inspect your plants for pests like squash bugs, squash vine borers, and aphids. Treat infestations with insecticidal soap or neem oil.
* Fungal Diseases: Improve air circulation around the plants and avoid overhead watering to prevent fungal diseases like powdery mildew. If you do see signs of disease, treat with a fungicide.
Tips for Success
Here are a few extra tips to help you succeed with container squash gardening:
* Choose the Right Container: Make sure your container is large enough to accommodate the plant’s root system. A 20-gallon container is a good starting point.
* Use High-Quality Potting Mix: Don’t use garden soil! It’s too heavy and won’t drain well in a container.
* Water Regularly: Squash plants need consistent moisture, especially during hot weather.
* Fertilize Regularly: Provide your plants with a steady supply of nutrients throughout the growing season.
* Provide Support: Use a tomato cage or stake to keep the plant upright and prevent the fruits from touching the ground.
* Monitor for Pests and Diseases: Regularly inspect your plants for pests and diseases and take action promptly.
* Don’t Give Up! Gardening can be challenging, but it’s also incredibly rewarding. Don’t be discouraged if you encounter some problems along
Conclusion
So, there you have it! Mastering the art of growing summer squash in containers is not only achievable but also incredibly rewarding. We’ve walked through the steps, addressed potential challenges, and armed you with the knowledge to cultivate a thriving mini-garden right on your patio. Why is this DIY trick a must-try? Because it unlocks the joy of fresh, homegrown produce, even if you’re limited by space. Imagine stepping outside and harvesting your own zucchini or yellow squash for a delicious summer meal. It’s a connection to nature, a sustainable practice, and a fantastic way to impress your friends and family with your green thumb.
But the beauty of container gardening lies in its adaptability. Feel free to experiment with different varieties of summer squash. Consider trying bush varieties like ‘Spacemiser’ zucchini or ‘Early Crookneck’ yellow squash, which are specifically bred for compact growth. You can also explore companion planting by adding herbs like basil or marigolds to your container. These not only enhance the flavor of your squash but also help deter pests naturally. Another variation to consider is vertical gardening. If you have a trellis or sturdy support, you can train vining varieties of summer squash to grow upwards, maximizing space and creating a stunning visual display.
Don’t be afraid to get creative with your container choices too. While we recommended specific sizes, you can repurpose large buckets, tubs, or even grow bags. Just ensure they have adequate drainage holes to prevent waterlogging. Remember, the key to successful container gardening is consistent care. Regular watering, fertilization, and pest monitoring are essential for healthy and productive plants.
We are confident that with a little effort and attention, you’ll be enjoying a bountiful harvest of homegrown summer squash in no time. This DIY project is more than just growing vegetables; it’s about creating a sustainable and fulfilling lifestyle. It’s about connecting with nature, learning new skills, and enjoying the fruits (or rather, vegetables) of your labor.
Now, it’s your turn! We encourage you to embark on this exciting gardening adventure and experience the satisfaction of growing your own summer squash. Share your experiences with us! We’d love to hear about your successes, challenges, and any unique tips or tricks you discover along the way. Post photos of your patio gardens, share your favorite summer squash recipes, and let’s build a community of container gardening enthusiasts. Remember, every gardening journey starts with a single seed. So, grab your supplies, get your hands dirty, and let the growing begin! This method of **patio summer squash growing** is sure to bring you joy and delicious produce.
Frequently Asked Questions (FAQ)
What is the best time to start growing summer squash in containers?
The ideal time to start growing summer squash in containers is after the last frost in your area. Summer squash is a warm-season crop and is sensitive to cold temperatures. Starting seeds indoors 3-4 weeks before the last expected frost can give you a head start. You can then transplant the seedlings into your containers once the weather has warmed up and the soil temperature reaches at least 60°F (15°C). If you live in a region with a long growing season, you can also direct sow seeds directly into your containers after the last frost. Check your local weather forecast and planting guides for specific recommendations based on your climate.
How much sunlight do summer squash plants need in containers?
Summer squash plants require at least 6-8 hours of direct sunlight per day to thrive. Choose a location for your containers that receives ample sunlight throughout the day. If you don’t have a spot that gets full sun, you can supplement with grow lights, especially when starting seeds indoors. Insufficient sunlight can lead to leggy growth, reduced fruit production, and increased susceptibility to pests and diseases. Monitor your plants closely and adjust their position as needed to ensure they receive adequate sunlight.
What type of soil is best for growing summer squash in containers?
Summer squash plants prefer well-draining, fertile soil that is rich in organic matter. A good potting mix specifically formulated for vegetables is ideal. Avoid using garden soil, as it can become compacted in containers and hinder drainage. You can also amend your potting mix with compost or other organic materials to improve its fertility and water-holding capacity. Ensure the soil pH is between 6.0 and 7.0 for optimal growth.
How often should I water summer squash plants in containers?
Summer squash plants in containers need consistent watering, especially during hot and dry weather. Water deeply whenever the top inch of soil feels dry to the touch. Avoid overwatering, as this can lead to root rot. The frequency of watering will depend on factors such as the size of your container, the weather conditions, and the type of potting mix you are using. Check the soil moisture regularly and adjust your watering schedule accordingly. Consider using a self-watering container or adding mulch to the soil surface to help retain moisture.
What kind of fertilizer should I use for summer squash plants in containers?
Summer squash plants are heavy feeders and require regular fertilization to produce a bountiful harvest. Use a balanced fertilizer with equal amounts of nitrogen, phosphorus, and potassium (e.g., 10-10-10) or a fertilizer specifically formulated for vegetables. Follow the instructions on the fertilizer package for application rates and frequency. You can also supplement with organic fertilizers such as compost tea or fish emulsion. Avoid over-fertilizing, as this can lead to excessive foliage growth and reduced fruit production.
How do I prevent pests and diseases from affecting my summer squash plants in containers?
Regularly inspect your plants for signs of pests and diseases. Common pests that affect summer squash include squash bugs, squash vine borers, and aphids. Diseases include powdery mildew and blossom end rot. Use organic pest control methods such as insecticidal soap, neem oil, or handpicking pests. Ensure good air circulation around your plants to prevent fungal diseases. Provide adequate watering and fertilization to keep your plants healthy and resistant to pests and diseases. Consider companion planting with herbs like basil or marigolds to deter pests naturally.
How do I harvest summer squash from my container plants?
Harvest summer squash when the fruits are young and tender, typically when they are 6-8 inches long. Use a sharp knife or pruning shears to cut the squash from the plant, leaving a short stem attached. Regular harvesting encourages the plant to produce more fruits. Overripe squash can become tough and seedy. Check your plants frequently and harvest the squash as soon as they reach the desired size.
Can I grow different varieties of summer squash in the same container?
While it’s technically possible to grow different varieties of summer squash in the same large container, it’s generally not recommended. Different varieties may have different growth habits and nutrient requirements, which can lead to competition and reduced yields. It’s best to grow each variety in its own separate container to ensure optimal growth and fruit production. If you do choose to grow multiple varieties in the same container, select varieties with similar growth habits and provide ample space and nutrients.
What do I do if my summer squash plant is producing flowers but no fruit?
This is a common problem known as blossom drop. It can be caused by several factors, including insufficient pollination, extreme temperatures, or nutrient deficiencies. Ensure your plants are receiving adequate sunlight, water, and fertilization. Hand-pollinate the flowers by transferring pollen from the male flowers to the female flowers using a small brush. You can identify female flowers by the small fruit that is already present at the base of the flower. Avoid watering the foliage, especially in the evening, to prevent fungal diseases that can also contribute to blossom drop.
Can I save seeds from my homegrown summer squash for future planting?
Yes, you can save seeds from your homegrown summer squash, but keep in mind that if you grew hybrid varieties, the seeds may not produce plants that are true to type. To save seeds, allow the squash to mature fully on the plant until the skin becomes hard and the seeds inside are fully developed. Scoop out the seeds and rinse them thoroughly to remove any pulp. Spread the seeds out on a paper towel to dry completely. Store the dried seeds in an airtight container in a cool, dark, and dry place. Label the container with the variety and date.
Leave a Comment