

No Water Celery Trick: Are you tired of limp, lifeless celery that seems to wilt the moment you bring it home from the grocery store? I know I am! There’s nothing more disappointing than reaching for a crisp celery stick for a healthy snack or a recipe, only to find it’s gone all floppy. But what if I told you there’s a simple, almost magical trick to revive your celery and keep it fresh for weeks, all without submerging it in water?
Celery, a staple in cuisines worldwide, has a rich history dating back to ancient times. While initially valued for its medicinal properties, it gradually became a beloved culinary ingredient. From the Mediterranean to modern-day kitchens, celery’s crisp texture and subtle flavor have made it a versatile addition to soups, salads, and snacks. However, maintaining its freshness has always been a challenge.
That’s where this DIY trick comes in! We all know the traditional method of storing celery in water, but let’s be honest, it can be messy and doesn’t always guarantee long-lasting freshness. This no water celery trick is a game-changer because it’s incredibly easy, saves space in your refrigerator, and, most importantly, keeps your celery crisp and ready to use for much longer. Say goodbye to soggy celery and hello to a simple, effective way to enjoy this healthy vegetable whenever you want. I’m excited to share this simple yet effective method with you, so let’s dive in!
Revive Limp Celery: The No-Water Miracle!
Okay, let’s be honest. We’ve all been there. You reach into the fridge, ready to whip up a healthy snack or add some crunch to your soup, only to find your celery looking…sad. Limp, lifeless, and definitely not appealing. Usually, the go-to is submerging it in water, but what if I told you there’s an even BETTER way? A no-water way that actually works wonders?
That’s right! I’m going to share my secret weapon for reviving celery: the no-water method. It sounds crazy, I know, but trust me on this one. It’s simple, effective, and uses something you probably already have in your kitchen.
What You’ll Need
Before we dive in, let’s gather our supplies. This is a super low-key project, so you won’t need much:
* Limp celery (obviously!)
* Aluminum foil
* A little bit of patience
That’s it! Seriously. No fancy equipment, no special ingredients. Just celery and foil.
Why This Works (The Science-y Bit)
You might be wondering, “How on earth does this work without water?” Well, celery wilts because it loses moisture. The aluminum foil acts as a barrier, preventing further moisture loss. More importantly, it traps the natural ethylene gas that celery produces. Ethylene gas accelerates ripening and, in this case, wilting. By containing the celery in foil, we’re essentially creating a mini-environment that encourages the celery to rehydrate itself using its own moisture. It’s like a tiny spa day for your veggies!
Step-by-Step Guide to Celery Revival
Alright, let’s get down to business. Here’s how to bring your celery back from the brink:
1. Prepare the Celery: First, give your celery a quick rinse under cool water. This helps remove any surface dirt and adds a tiny bit of initial moisture. Don’t soak it, just a quick rinse will do. Pat it dry with a paper towel. We don’t want it dripping wet, just slightly damp.
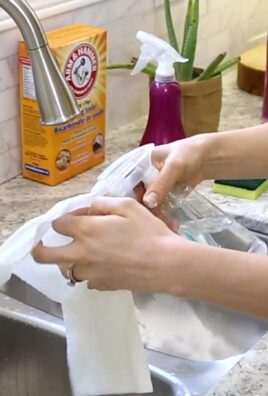
2. Wrap it Up: Now, grab your aluminum foil. You’ll need enough to completely wrap the celery stalk or bunch. I usually tear off a sheet that’s about twice the length of the celery. Lay the celery on the foil and wrap it snugly. Make sure the foil is pressed against the celery as much as possible. We want to create a tight seal to trap that moisture and ethylene gas.
3. The Waiting Game: This is the hardest part – waiting! Place the wrapped celery in the refrigerator. I usually put it in the crisper drawer, but anywhere in the fridge will work.
4. Check for Revival: After about 2-3 hours, check on your celery. Unwrap it carefully and see if it’s starting to firm up. If it’s still a bit limp, re-wrap it and give it a few more hours.
5. The Big Reveal: In most cases, after 4-6 hours, your celery should be noticeably crisper and more vibrant. It might not be quite as perfect as the day you bought it, but it should be significantly improved and perfectly usable.
6. Enjoy! Once your celery is revived, you can use it in your favorite recipes, snack on it with some peanut butter, or add it to a veggie platter.
Troubleshooting and Tips
Even with the best instructions, things don’t always go perfectly. Here are a few common issues and how to address them:
* Celery Still Limp After 6 Hours: If your celery is still limp after 6 hours, it might be extremely dehydrated. In this case, you can try a combination approach. Briefly soak the celery in ice water for about 15-20 minutes, then wrap it in foil as described above. This gives it an extra boost of hydration.
* Celery Feels Slimy: If your celery feels slimy, it’s likely starting to spoil. Unfortunately, this method won’t work on celery that’s already gone bad. It’s best to discard it.
* Foil Tears Easily: If your foil is tearing, try using heavy-duty aluminum foil. It’s more durable and less likely to rip.
* Can I Use Plastic Wrap Instead of Foil? While plastic wrap will help retain moisture, it doesn’t block ethylene gas as effectively as aluminum foil. For best results, stick with foil.
* Storing Revived Celery: Once you’ve revived your celery, store it in the refrigerator wrapped in foil or in an airtight container. This will help it stay crisp for longer.
* Cut Celery: This method works best with whole stalks or bunches of celery. If your celery is already cut, you can still try it, but the results might not be as dramatic. Make sure to wrap the cut pieces tightly in foil.
* Brown Spots: If your celery has brown spots, this is usually a sign of oxidation. While the foil method won’t remove the brown spots, it can still help improve the overall crispness of the celery. You can simply cut off the brown spots before using the celery.
Beyond the Basics: Celery Storage Tips
Prevention is always better than cure, right? Here are a few tips to help keep your celery fresh in the first place:
* Store Celery Whole: Don’t cut your celery until you’re ready to use it. Cutting it exposes more surface area to the air, which can lead to moisture loss and wilting.
* Wrap in Foil: As you’ve learned, aluminum foil is your friend! Wrap your celery in foil before storing it in the refrigerator.
* Store in the Crisper Drawer: The crisper drawer is designed to maintain a higher humidity level, which is ideal for storing vegetables like celery.
* Don’t Store Near Ethylene-Producing Fruits: Some fruits, like apples and bananas, produce a lot of ethylene gas. Storing celery near these fruits can accelerate wilting.
* Use a Vegetable Storage Bag: There are special vegetable storage bags available that are designed to help keep produce fresh for longer. These bags often have vents to allow for air circulation while maintaining humidity.
Other Uses for Aluminum Foil in the Kitchen
While we’re on the subject of aluminum foil, let’s explore some other clever ways to use it in the kitchen:
* Sharpen Scissors: Fold a sheet of aluminum foil several times to create a thick pad. Then, cut through the foil several times with your scissors. This can help sharpen the blades.
* Clean Grill Grates: Crumple up a ball of aluminum foil and use it to scrub your grill grates clean. The foil acts as an abrasive cleaner.
* Polish Silver: Line a bowl with aluminum foil, then fill it with hot water and a tablespoon of baking soda. Place your silver items in the bowl, making sure they touch the foil. The tarnish will transfer to the foil.
* Prevent Oven Splatters: Line the bottom of your oven with aluminum foil to catch drips and splatters. This makes cleanup much easier.
* Make a Makeshift Piping Bag: Roll a sheet of aluminum foil into a cone shape, then fill it with frosting or icing. Snip off the tip to create a piping bag.
* Keep Ice Cream Soft: Place a sheet of aluminum foil over your ice cream container before putting the lid on. This can help prevent ice crystals from forming and keep the ice cream soft.
Final Thoughts
So there you have it! My foolproof method for reviving limp celery without water. It’s a simple, effective, and eco-friendly way to save your veggies and reduce food waste. Give it a try next time your celery is looking a little sad, and I think you’ll be amazed at the results. Happy celery reviving!
Conclusion
So, there you have it! The “No Water Celery Trick” – a simple yet revolutionary method for keeping your celery crisp, crunchy, and ready to enjoy for weeks, not just days. We’ve all been there: buying a beautiful bunch of celery with the best intentions, only to find it limp and sad in the crisper drawer a few days later. This trick eliminates that frustration and food waste, saving you money and ensuring you always have fresh celery on hand for snacking, cooking, or juicing.
But why is this method a must-try? It’s more than just convenience. It’s about maximizing the flavor and nutritional value of your celery. When celery sits in water, it can become waterlogged, diluting its natural taste and potentially leaching out some of its vitamins and minerals. By storing it dry, wrapped tightly in foil, you’re preserving its inherent goodness.
Think about the possibilities! Imagine always having crisp celery sticks ready for a healthy snack with peanut butter or hummus. Envision adding perfectly crunchy celery to your salads, soups, and stir-fries without having to make a last-minute grocery run. And for those who love juicing, this trick ensures you’re getting the most vibrant and nutrient-rich juice possible.
Beyond the Basics: Variations and Suggestions
While the aluminum foil method is incredibly effective, there are a few variations you can experiment with to find what works best for you.
* The Paper Towel Boost: For extra moisture absorption, wrap the celery in a paper towel before encasing it in foil. This is particularly useful if your celery is already slightly damp when you purchase it.
* The Container Option: If you prefer not to use foil, you can also store the celery in an airtight container lined with paper towels. Just be sure to replace the paper towels every few days if they become damp.
* Celery Hearts: This trick works equally well for celery hearts. Simply wrap them tightly in foil or store them in an airtight container with paper towels.
* Pre-Cut Celery: If you prefer to pre-cut your celery for easy snacking, store the cut pieces in an airtight container lined with a paper towel. This will help prevent them from drying out.
We are confident that the “No Water Celery Trick” will transform the way you store and enjoy celery. It’s a game-changer for anyone who values fresh, flavorful, and nutritious food.
So, ditch the water-filled containers and embrace the foil! We urge you to try this simple yet effective method and experience the difference for yourself. And most importantly, we want to hear about your results! Share your experiences, tips, and variations in the comments below. Let’s build a community of celery-loving food savers! Let us know if this **no water celery trick** worked for you.
Frequently Asked Questions (FAQ)
Q: How long will celery last using the “No Water Celery Trick”?
A: When stored properly using this method, celery can last for up to 3-4 weeks in the refrigerator. This is significantly longer than the typical 1-2 weeks when stored in water or loosely in the crisper drawer. The key is to ensure the celery is dry and tightly wrapped in aluminum foil to prevent moisture loss and spoilage.
Q: Why does aluminum foil work better than plastic wrap or a plastic bag?
A: Aluminum foil allows the celery to breathe slightly while still preventing moisture loss. Plastic wrap and plastic bags can trap moisture, which can lead to the celery becoming slimy and spoiling faster. The foil helps to maintain a balance of humidity that keeps the celery crisp.
Q: Can I use this trick for pre-cut celery sticks?
A: Yes, you can use a modified version of this trick for pre-cut celery sticks. Instead of wrapping the whole stalk in foil, store the cut sticks in an airtight container lined with a paper towel. The paper towel will absorb any excess moisture and help keep the celery crisp. Replace the paper towel every few days if it becomes damp.
Q: What if my celery is already a little limp when I buy it? Will this trick still work?
A: While this trick is most effective when used with fresh, crisp celery, it can still help revive slightly limp celery. Before wrapping the celery in foil, soak it in a bowl of ice water for about 30 minutes. This will help rehydrate the celery. Then, dry it thoroughly before wrapping it in foil and storing it in the refrigerator.
Q: Is it necessary to wash the celery before storing it using this method?
A: It’s generally recommended to wash celery just before you plan to use it, rather than before storing it. Washing celery before storing it can introduce excess moisture, which can lead to spoilage. If you do wash the celery before storing it, be sure to dry it thoroughly before wrapping it in foil.
Q: Can I reuse the aluminum foil?
A: Yes, you can reuse the aluminum foil as long as it’s not torn or damaged. Simply wipe it clean and store it for future use. Reusing the foil is an environmentally friendly way to reduce waste.
Q: What are some signs that my celery has gone bad, even if I’ve used this trick?
A: Signs that celery has gone bad include a slimy texture, a strong or unpleasant odor, and discoloration (such as yellowing or browning). If you notice any of these signs, it’s best to discard the celery.
Q: Does this trick work for other vegetables besides celery?
A: While this trick is specifically designed for celery, it can also be effective for other vegetables that tend to wilt quickly, such as carrots and broccoli. The key is to ensure the vegetables are dry and tightly wrapped to prevent moisture loss.
Q: I don’t have aluminum foil. Can I use something else?
A: If you don’t have aluminum foil, you can use an airtight container lined with paper towels as an alternative. However, the foil method is generally more effective at preserving the celery’s crispness for a longer period.
Q: My celery is still getting soft after a week. What am I doing wrong?
A: Make sure the celery is completely dry before wrapping it in foil. Any excess moisture will accelerate spoilage. Also, ensure the foil is tightly wrapped around the celery to prevent air exposure. If you’re still experiencing issues, try adding a layer of paper towel between the celery and the foil to absorb any excess moisture. Finally, check the temperature of your refrigerator to ensure it’s set to the optimal temperature for food storage (around 35-40°F or 2-4°C).

Leave a Comment