

Nail polish hacks – bet you’re thinking, “What could I possibly *not* know about nail polish?” Well, prepare to be amazed! Forget just painting your nails; we’re diving deep into a world where that little bottle of color becomes your secret weapon for solving everyday problems and unleashing your inner DIY guru.
From mending runs in your stockings to sealing envelopes with a touch of flair, nail polish has a surprisingly versatile history beyond just beautifying our fingertips. Think back to the early 20th century when car paint innovations paved the way for the vibrant, long-lasting nail lacquers we adore today. It’s a story of ingenuity and a constant quest for perfection, and now, we’re taking that innovation a step further!
Let’s face it, life is full of little annoyances. That tiny screw in your glasses constantly coming loose? The frayed ends of your shoelaces driving you crazy? These seemingly insignificant problems can disrupt your day and cost you time and money. That’s where these nail polish hacks come in! I’m going to show you how to use this common household item to tackle these everyday challenges with ease and style. Get ready to unlock the hidden potential of your nail polish collection and become a master of quick fixes and clever solutions!
Nail Polish Hacks You Never Heard Of (But Will Absolutely Love!)
Okay, let’s be real. We all have a drawer overflowing with nail polish bottles, some barely used, some gloopy and ancient, and some that we swear we’ll use “someday.” But nail polish isn’t just for your nails! I’m about to blow your mind with some seriously cool and unexpected ways to use this colorful liquid gold. Get ready to unleash your inner DIY genius!
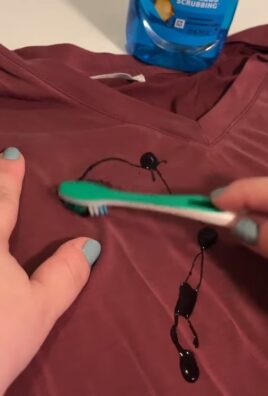
Hack #1: Taming Those Pesky Thread Ends
Have you ever finished a sewing project, only to be plagued by fraying thread ends that just won’t stay put? I know I have! This hack is a lifesaver.
* The Problem: Fraying thread ends on clothing, embroidery, or any sewing project.
* The Solution: A tiny dab of clear nail polish.
* Why it Works: The nail polish acts as a sealant, binding the threads together and preventing them from unraveling.
Step-by-Step Instructions:
1. Trim the Thread: First, trim the thread ends as close to the fabric as possible. You don’t want long, unsightly strands sticking out.
2. Apply the Polish: Carefully apply a *very* small amount of clear nail polish to the very tip of the thread end. I mean, *tiny*. You don’t want to saturate the fabric.
3. Let it Dry: Allow the nail polish to dry completely. This usually takes just a few minutes.
4. Admire Your Work: That’s it! No more fraying. The thread ends are now neatly sealed.
Hack #2: Color-Coding Your Keys (and More!)
Struggling to tell your house key from your mailbox key from your… well, you get the idea. This hack is a game-changer for organization.
* The Problem: Confusing keys that all look the same.
* The Solution: Color-coding them with different shades of nail polish.
* Why it Works: It’s a visual cue that makes identifying keys quick and easy.
Step-by-Step Instructions:
1. Choose Your Colors: Select a variety of nail polish colors. I like to use bright, contrasting shades for maximum visibility.
2. Clean the Key: Wipe the head of the key clean with a bit of rubbing alcohol to remove any dirt or grease. This will help the nail polish adhere better.
3. Apply the First Coat: Apply a thin coat of nail polish to one side of the key head. Be careful not to get polish on the teeth of the key.
4. Let it Dry: Allow the first coat to dry completely.
5. Apply a Second Coat (Optional): For added durability and color intensity, apply a second coat of nail polish.
6. Repeat on the Other Side: Once the first side is completely dry, flip the key over and repeat the process on the other side.
7. Let it Dry Completely: Make sure both sides are completely dry before using the key.
8. Bonus Tip: You can also use this method to color-code other small items, like USB drives, charging cables, or even the ends of your paintbrushes!
Hack #3: Repairing a Run in Your Nylons (Emergency Fix!)
Oh no! You’re about to head out the door, and you notice a dreaded run in your nylons. Don’t panic! Nail polish to the rescue!
* The Problem: A run in your nylons or stockings.
* The Solution: A dab of clear nail polish to stop the run from spreading.
* Why it Works: The nail polish acts as a glue, preventing the fibers from unraveling further.
Step-by-Step Instructions:
1. Stop the Run: As soon as you notice the run, carefully stretch the nylon slightly to expose the end of the run.
2. Apply the Polish: Apply a small dab of clear nail polish directly to the end of the run. Make sure to cover all the frayed edges.
3. Let it Dry: Allow the nail polish to dry completely.
4. Repeat (If Necessary): If the run is particularly long or fragile, you may want to apply a second coat of nail polish for extra security.
5. Important Note: This is a temporary fix. It will prevent the run from getting worse, but it’s not a permanent solution. It’s best to replace the nylons as soon as possible.
Hack #4: Waterproofing Shoelaces (Goodbye, Frayed Ends!)
Frayed shoelaces are annoying and can make your shoes look old and worn. This hack will keep your shoelaces looking new for longer.
* The Problem: Frayed shoelace ends.
* The Solution: Dip the ends of your shoelaces in clear nail polish.
* Why it Works: The nail polish hardens and seals the ends, preventing them from fraying. It also adds a bit of water resistance.
Step-by-Step Instructions:
1. Prepare the Shoelaces: Make sure the ends of your shoelaces are clean and dry. Trim any existing frayed ends.
2. Choose Your Polish: Clear nail polish is the best option for this hack.
3. Dip the Ends: Dip the ends of your shoelaces into the nail polish, coating them completely. You can dip them about 1/2 inch to 1 inch deep.
4. Remove Excess Polish: Gently wipe off any excess nail polish with a paper towel.
5. Shape the Ends: While the nail polish is still wet, use your fingers to shape the ends of the shoelaces into a point. This will make them easier to thread through the eyelets of your shoes.
6. Let it Dry: Allow the nail polish to dry completely. You can hang the shoelaces up to dry or lay them flat on a piece of paper.
7. Enjoy Your New Shoelaces: That’s it! Your shoelaces are now waterproofed and protected from fraying.
Hack #5: Sealing Envelopes (When You’re Out of Glue)
Running late to mail that important letter and realized you’re out of envelope glue? Don’t fret! Nail polish to the rescue!
* The Problem: No envelope glue.
* The Solution: A thin line of clear nail polish along the envelope flap.
* Why it Works: The nail polish acts as an adhesive, sealing the envelope securely.
Step-by-Step Instructions:
1. Prepare the Envelope: Fold down the envelope flap.
2. Apply the Polish: Apply a thin, even line of clear nail polish along the inside of the envelope flap, where the glue would normally be.
3. Seal the Envelope: Immediately press the flap down firmly onto the envelope.
4. Hold for a Few Seconds: Hold the flap in place for a few seconds to allow the nail polish to adhere.
5. Let it Dry: Allow the nail polish to dry completely before mailing the envelope.
Hack #6: Preventing Jewelry Tarnish (Protect Your Bling!)
Do your favorite pieces of costume jewelry tarnish quickly? This hack will help keep them looking shiny and new for longer.
* The Problem: Costume jewelry tarnishing.
* The Solution: A thin coat of clear nail polish on the inside of the jewelry.
* Why it Works: The nail polish creates a barrier between the jewelry and your skin, preventing the oils and sweat from causing tarnish.
Step-by-Step Instructions:
1. Clean the Jewelry: Make sure the jewelry is clean and dry before applying the nail polish.
2. Apply the Polish: Apply a thin coat of clear nail polish to the *inside* of the jewelry, where it comes into contact with your skin. Avoid getting polish on any gemstones or decorative elements.
3. Let it Dry: Allow the nail polish to dry completely before wearing the jewelry.
4. Reapply as Needed: The nail polish coating will eventually wear off, so you may need to reapply it every few months.
Hack #7: Tightening Loose Screws (The Quick Fix)
Got a loose screw in your glasses, a drawer pull, or anything else? This is a temporary fix that can buy you some time.
* The Problem: Loose screws.
* The Solution: A dab of nail polish on the screw threads.
* Why it Works: The nail polish acts as a thread locker, providing extra grip and preventing the screw from loosening further.
Step-by-Step Instructions:
1. Tighten the
Conclusion
So, there you have it! These nail polish hacks, far from being just quirky tips, are genuine game-changers for your at-home manicure routine. We’ve explored how to revive thickened polish, create stunning marble effects, achieve perfect gradients, and even craft custom colors, all with the humble bottle of nail polish you probably already own.
Why is mastering these DIY tricks a must-try? Because they empower you to take control of your nail game. No longer are you beholden to expensive salon visits or limited by the colors and textures available at the store. You become the artist, the innovator, the master of your own manicure destiny. Think of the money you’ll save, the creative possibilities you’ll unlock, and the sheer satisfaction of knowing you achieved a professional-looking result with your own two hands.
But the benefits extend beyond mere aesthetics and cost savings. These hacks encourage experimentation and creativity. They transform a mundane task into a fun and engaging activity. They offer a chance to de-stress, unwind, and express your unique personality through your fingertips.
Ready to take your nail game to the next level?
Consider these variations to further personalize your experience:
* **Reviving Thickened Polish:** Instead of just thinner, try adding a drop or two of clear polish to restore the consistency. This can sometimes work wonders, especially for polishes that have only slightly thickened. Experiment with different thinners and clear polishes to find the perfect combination for your specific brand.
* **Marble Effects:** Don’t limit yourself to just two colors! Try swirling three or even four complementary shades for a more complex and eye-catching marble design. Use a toothpick or orange wood stick to create even more intricate patterns. For a bolder look, try using contrasting colors like black and white or neon shades.
* **Gradient Nails:** Use a makeup sponge for a softer, more diffused gradient effect. Apply the colors directly to the sponge and then dab it onto your nails. This technique is especially effective for creating subtle, ombre-style gradients. You can also try using glitter polishes to add a touch of sparkle to your gradient design.
* **Custom Colors:** Mix different shades of nail polish to create your own unique colors. Start with small amounts and gradually add more until you achieve the desired hue. Keep a notebook to record your recipes so you can recreate your favorite custom colors later. You can even add glitter, shimmer, or other special effects to your custom creations.
We wholeheartedly encourage you to try these nail polish hacks and discover the magic for yourself. Don’t be afraid to experiment, get creative, and have fun! The beauty of these techniques is that they are forgiving and adaptable. There’s no right or wrong way to do them, so let your imagination run wild.
And most importantly, we want to hear about your experiences! Share your photos, tips, and tricks in the comments below. Let us know which hacks worked best for you, what variations you tried, and any other insights you have to offer. Together, we can create a community of nail polish enthusiasts who are constantly learning, sharing, and inspiring each other. So go ahead, unleash your inner nail artist and show us what you’ve got! Let’s make the world a more colorful and creative place, one manicure at a time. Remember, mastering these **nail polish hacks** is not just about beautiful nails; it’s about embracing your creativity and expressing yourself.
FAQ
Frequently Asked Questions About Nail Polish Hacks
Q: My nail polish is really thick and goopy. Will nail polish thinner really work, or is it just a waste of money?
A: Nail polish thinner is absolutely worth trying! It’s specifically designed to restore the consistency of thickened nail polish without damaging the formula. However, it’s crucial to use *actual* nail polish thinner, not acetone or nail polish remover. Acetone can break down the polish and make it even worse. Add a few drops of thinner at a time, shake well, and repeat until you reach the desired consistency. If your polish is extremely thick, it might take a few tries, but patience is key. If the polish is beyond saving, it might be time to let it go, but thinner is almost always worth a shot.
Q: I’m nervous about trying the marble effect. It looks complicated. Is it really as easy as it sounds?
A: The water marble technique can seem intimidating, but with a little practice, it’s surprisingly easy! The key is to work quickly and use room temperature water. The polish should spread easily on the surface of the water. If it sinks or clumps, the water might be too cold or the polish might be too old. Don’t be discouraged if your first few attempts aren’t perfect. It takes a bit of trial and error to get the hang of it. Watch a few video tutorials to get a visual guide, and remember to protect your skin around your nails with tape or petroleum jelly for easy cleanup.
Q: What kind of sponge should I use for gradient nails?
A: A makeup sponge is ideal for creating gradient nails. You can use a wedge-shaped sponge or a blending sponge. The key is to use a sponge with a fine texture to avoid creating a textured or bubbly effect on your nails. You can find inexpensive makeup sponges at most drugstores or beauty supply stores. Before using the sponge, dampen it slightly to prevent it from absorbing too much polish.
Q: Can I mix gel nail polish to create custom colors?
A: While it’s technically possible to mix gel polishes, it’s generally not recommended. Gel polishes are formulated with specific photoinitiators that react to UV or LED light. Mixing different brands or types of gel polish can affect the curing process and result in a sticky, uneven, or even uncured finish. It’s best to stick to mixing regular nail polishes for custom colors.
Q: How can I prevent bubbles from forming in my nail polish?
A: Bubbles in nail polish can be frustrating, but there are a few things you can do to prevent them. First, avoid shaking the bottle vigorously. Instead, gently roll it between your hands to mix the polish. Second, apply thin coats of polish. Thick coats are more likely to trap air and create bubbles. Third, make sure your nails are clean and dry before applying polish. Oil or moisture on your nails can also contribute to bubbles. Finally, use a good quality top coat to seal the polish and help smooth out any minor imperfections.
Q: I tried the nail polish thinner, but my polish is still thick. What should I do?
A: If the nail polish thinner didn’t completely restore your polish, try adding a few more drops, one at a time, and shaking well after each addition. Be careful not to add too much, as this can make the polish too thin and runny. If the polish is still thick after several attempts, it might be too far gone. Another possibility is that you’re not using a true nail polish thinner. Ensure the product specifically states “nail polish thinner” on the label. Avoid using acetone or nail polish remover as a substitute, as these can damage the polish.
Q: Are there any safety precautions I should take when working with nail polish and nail polish thinner?
A: Yes, it’s important to take certain safety precautions when working with nail polish and nail polish thinner. Always work in a well-ventilated area to avoid inhaling the fumes. Avoid getting nail polish or thinner on your skin or in your eyes. If contact occurs, rinse immediately with plenty of water. Keep nail polish and thinner away from heat, sparks, and open flames, as they are flammable. Store them in a cool, dry place out of reach of children and pets.
Q: Can I use these hacks on acrylic or gel nails?
A: Some of these hacks can be adapted for acrylic or gel nails, but with caution. For example, you can create marble effects or gradients on top of a cured gel base coat using regular nail polish. However, you’ll need to seal it with a gel top coat and cure it under a UV or LED lamp. Avoid using nail polish thinner on acrylic nails, as it can damage the acrylic. Always test any new technique on a small, inconspicuous area first to ensure it doesn’t damage your nails.
Q: What are some other creative things I can do with nail polish besides painting my nails?
A: Nail polish is surprisingly versatile! You can use it to add color and shine to jewelry, personalize phone cases, decorate household items, and even create abstract art. Just be sure to use a sealant or top coat to protect the polish and prevent it from chipping or fading. The possibilities are endless!
Leave a Comment