

Monthly Strawberry Harvest: Imagine baskets overflowing with juicy, red strawberries, not just once a year, but every single month! Sounds like a dream, right? Well, it doesn’t have to be! For centuries, gardeners have sought ways to extend the growing season and maximize their yields. From ancient Roman greenhouses to modern-day hydroponics, the quest for a continuous harvest has always been a driving force.
But what if I told you that achieving a near-constant monthly strawberry harvest is within your reach, even in a small backyard or balcony garden? This isn’t some complicated, high-tech operation. It’s about understanding a few key tricks and DIY hacks that can transform your strawberry patch into a year-round delight.
In today’s world, where fresh, locally sourced produce is more valued than ever, knowing how to extend your harvest is a game-changer. Not only will you save money at the grocery store, but you’ll also enjoy the unparalleled flavor of homegrown strawberries, bursting with sunshine and sweetness. Plus, there’s nothing quite like the satisfaction of sharing your bounty with friends and family. So, let’s dive in and unlock the secrets to a continuous strawberry supply!
DIY Strawberry Tower for a Bountiful Monthly Harvest
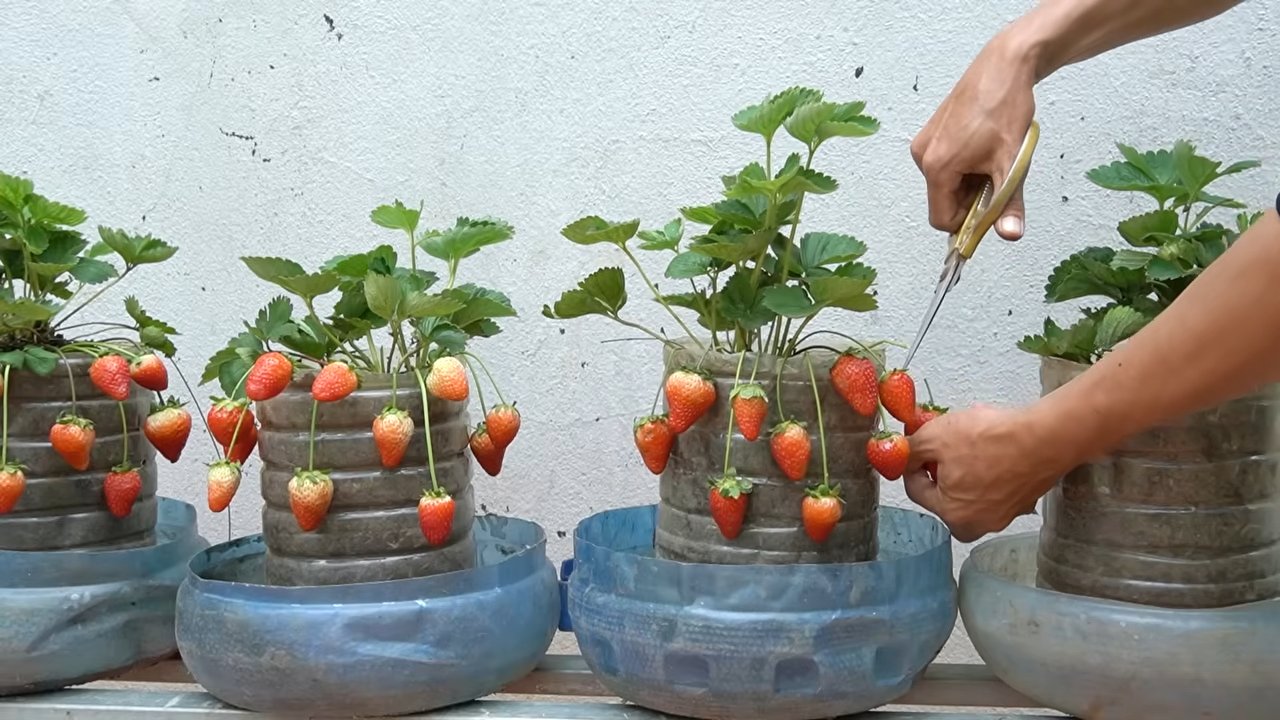
Okay, strawberry lovers, gather ’round! I’m going to show you how to build a strawberry tower that will give you a fantastic, almost monthly, harvest of delicious, juicy strawberries. Forget bending over and battling slugs – this vertical garden is a game-changer! This project is perfect for small spaces, balconies, or anyone who wants to maximize their strawberry yield.
Materials You’ll Need
Before we dive in, let’s make sure you have everything you need. This is crucial for a smooth and enjoyable building experience.
* PVC Pipe: One large diameter PVC pipe (approximately 6-8 inches in diameter and 5-6 feet long). This will be the main structure of your tower.
* Smaller PVC Pipe: One smaller diameter PVC pipe (approximately 1-2 inches in diameter and the same length as the larger pipe). This will be used for watering.
* Drill: With various sized drill bits.
* Hole Saw: A hole saw attachment for your drill, sized appropriately for your strawberry plants (usually 2-3 inches in diameter).
* Measuring Tape or Ruler: For accurate measurements.
* Marker or Pen: For marking cutting and drilling locations.
* Landscaping Fabric or Burlap: To line the inside of the larger PVC pipe.
* Zip Ties or Twine: To secure the landscaping fabric.
* Potting Soil: High-quality potting soil specifically formulated for fruits and vegetables.
* Gravel or Small Stones: For drainage at the bottom of the tower.
* Strawberry Plants: Everbearing varieties are best for a continuous harvest. I recommend about 15-20 plants, depending on the size of your tower.
* PVC Pipe Cement (Optional): If you want to permanently seal the bottom of the large PVC pipe.
* End Cap for Smaller PVC Pipe (Optional): To prevent soil from entering the watering pipe.
* Safety Glasses: Always protect your eyes!
* Gloves: To protect your hands.
Planning and Preparation
This step is all about setting yourself up for success. A little planning goes a long way!
* Choose Your Location: Strawberries need at least 6-8 hours of sunlight per day. Pick a sunny spot for your tower.
* Measure and Mark: Decide how tall you want your tower to be. I recommend 5-6 feet for easy access. Mark the cutting locations on both PVC pipes.
* Plan Your Planting Holes: Space the holes evenly around the larger PVC pipe, staggering them vertically. I usually leave about 6-8 inches between holes. Mark the hole locations with your marker.
* Gather Your Tools: Make sure your drill is charged and all your tools are within easy reach.
Building Your Strawberry Tower: Step-by-Step
Alright, let’s get our hands dirty! Follow these steps carefully, and you’ll have your strawberry tower built in no time.
1. Cut the PVC Pipes: Using a saw, carefully cut both the large and small PVC pipes to the desired length. Make sure the cuts are clean and straight.
2. Drill the Planting Holes: Attach the hole saw to your drill. Carefully drill holes at each of the marked locations on the larger PVC pipe. Take your time and apply even pressure.
3. Drill Watering Holes: On the smaller PVC pipe, drill small holes (about ¼ inch in diameter) every few inches along the entire length. These holes will allow water to seep out and irrigate the soil.
4. Prepare the Large PVC Pipe: If you want a closed bottom, apply PVC pipe cement to an end cap and attach it to the bottom of the large PVC pipe. Let it dry completely according to the manufacturer’s instructions. This will prevent soil from leaking out. If you prefer an open bottom for drainage, skip this step.
5. Line the Inside: Cut the landscaping fabric or burlap to a size slightly larger than the inside of the large PVC pipe. This will help retain moisture and prevent soil from washing out through the planting holes.
6. Secure the Liner: Insert the landscaping fabric into the large PVC pipe, making sure it covers the entire inside surface. Use zip ties or twine to secure the fabric to the top edge of the pipe. You can also make small slits in the fabric where the planting holes are to allow the plants to grow through.
7. Add Drainage: Pour a layer of gravel or small stones into the bottom of the large PVC pipe. This will improve drainage and prevent the soil from becoming waterlogged.
8. Insert the Watering Pipe: Place the smaller PVC pipe (with the drilled holes) inside the center of the larger PVC pipe. If you’re using an end cap, attach it to the bottom of the smaller pipe to prevent soil from entering.
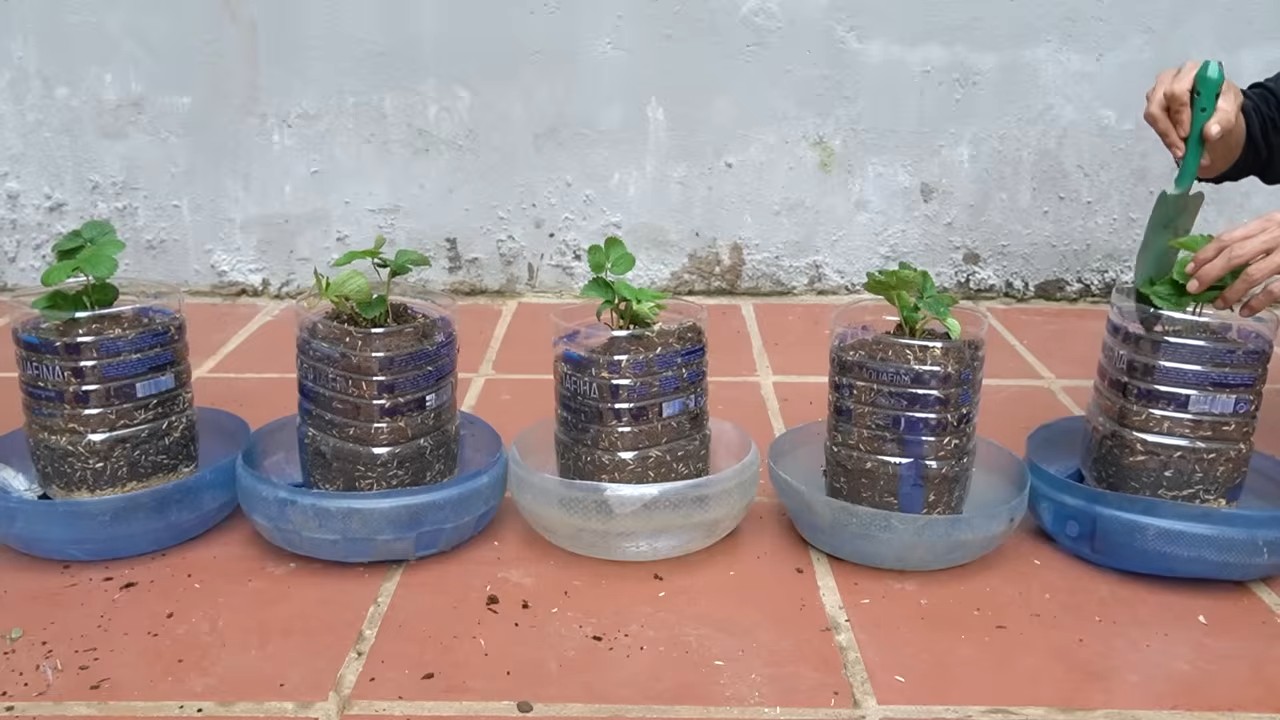
9. Fill with Soil: Slowly fill the space between the two PVC pipes with potting soil. As you fill, gently pack the soil down to eliminate air pockets.
10. Plant Your Strawberries: Carefully insert your strawberry plants into the holes you drilled earlier. Gently spread out the roots and cover them with soil.
11. Water Thoroughly: Water the tower thoroughly, pouring water into the top of the smaller PVC pipe. This will ensure that the soil is evenly moistened.
Maintaining Your Strawberry Tower
Now that your tower is built, it’s time to keep those strawberries happy and producing!
* Watering: Water your strawberry tower regularly, especially during hot, dry weather. Check the soil moisture by sticking your finger into the soil. If it feels dry, it’s time to water. Pour water into the top of the smaller PVC pipe to distribute it evenly.
* Fertilizing: Feed your strawberry plants with a balanced fertilizer every few weeks. Follow the instructions on the fertilizer package. I like to use a liquid fertilizer diluted in water.
* Sunlight: Make sure your strawberry tower receives at least 6-8 hours of sunlight per day. If you live in a particularly hot climate, you may need to provide some afternoon shade to prevent the plants from scorching.
* Pest Control: Keep an eye out for pests such as aphids, slugs, and snails. Handpick them off the plants or use an organic pest control spray.
* Pruning: Remove any dead or yellowing leaves to encourage new growth. You can also prune the runners (the long stems that the p
Okay, strawberry lovers, gather ’round! I’m going to show you how to build a strawberry tower that will give you a fantastic, almost monthly, harvest of delicious, juicy strawberries. Forget bending over and battling slugs – this vertical garden is a game-changer! This project is perfect for small spaces, balconies, or anyone who wants to maximize their strawberry yield.
Materials You’ll Need
Before we dive in, let’s make sure you have everything you need. This is crucial for a smooth and enjoyable building experience.
* PVC Pipe: One large diameter PVC pipe (approximately 6-8 inches in diameter and 5-6 feet long). This will be the main structure of your tower.
* Smaller PVC Pipe: One smaller diameter PVC pipe (approximately 1-2 inches in diameter and the same length as the larger pipe). This will be used for watering.
* Drill: With various sized drill bits.
* Hole Saw: A hole saw attachment for your drill, sized appropriately for your strawberry plants (usually 2-3 inches in diameter).
* Measuring Tape or Ruler: For accurate measurements.
* Marker or Pen: For marking cutting and drilling locations.
* Landscaping Fabric or Burlap: To line the inside of the larger PVC pipe.
* Zip Ties or Twine: To secure the landscaping fabric.
* Potting Soil: High-quality potting soil specifically formulated for fruits and vegetables.
* Gravel or Small Stones: For drainage at the bottom of the tower.
* Strawberry Plants: Everbearing varieties are best for a continuous harvest. I recommend about 15-20 plants, depending on the size of your tower.
* PVC Pipe Cement (Optional): If you want to permanently seal the bottom of the large PVC pipe.
* End Cap for Smaller PVC Pipe (Optional): To prevent soil from entering the watering pipe.
* Safety Glasses: Always protect your eyes!
* Gloves: To protect your hands.
Planning and Preparation
This step is all about setting yourself up for success. A little planning goes a long way!
* Choose Your Location: Strawberries need at least 6-8 hours of sunlight per day. Pick a sunny spot for your tower.
* Measure and Mark: Decide how tall you want your tower to be. I recommend 5-6 feet for easy access. Mark the cutting locations on both PVC pipes.
* Plan Your Planting Holes: Space the holes evenly around the larger PVC pipe, staggering them vertically. I usually leave about 6-8 inches between holes. Mark the hole locations with your marker.
* Gather Your Tools: Make sure your drill is charged and all your tools are within easy reach.
Building Your Strawberry Tower: Step-by-Step
Alright, let’s get our hands dirty! Follow these steps carefully, and you’ll have your strawberry tower built in no time.
1. Cut the PVC Pipes: Using a saw, carefully cut both the large and small PVC pipes to the desired length. Make sure the cuts are clean and straight.
2. Drill the Planting Holes: Attach the hole saw to your drill. Carefully drill holes at each of the marked locations on the larger PVC pipe. Take your time and apply even pressure.
3. Drill Watering Holes: On the smaller PVC pipe, drill small holes (about ¼ inch in diameter) every few inches along the entire length. These holes will allow water to seep out and irrigate the soil.
4. Prepare the Large PVC Pipe: If you want a closed bottom, apply PVC pipe cement to an end cap and attach it to the bottom of the large PVC pipe. Let it dry completely according to the manufacturer’s instructions. This will prevent soil from leaking out. If you prefer an open bottom for drainage, skip this step.
5. Line the Inside: Cut the landscaping fabric or burlap to a size slightly larger than the inside of the large PVC pipe. This will help retain moisture and prevent soil from washing out through the planting holes.
6. Secure the Liner: Insert the landscaping fabric into the large PVC pipe, making sure it covers the entire inside surface. Use zip ties or twine to secure the fabric to the top edge of the pipe. You can also make small slits in the fabric where the planting holes are to allow the plants to grow through.
7. Add Drainage: Pour a layer of gravel or small stones into the bottom of the large PVC pipe. This will improve drainage and prevent the soil from becoming waterlogged.
8. Insert the Watering Pipe: Place the smaller PVC pipe (with the drilled holes) inside the center of the larger PVC pipe. If you’re using an end cap, attach it to the bottom of the smaller pipe to prevent soil from entering.
9. Fill with Soil: Slowly fill the space between the two PVC pipes with potting soil. As you fill, gently pack the soil down to eliminate air pockets.
10. Plant Your Strawberries: Carefully insert your strawberry plants into the holes you drilled earlier. Gently spread out the roots and cover them with soil.
11. Water Thoroughly: Water the tower thoroughly, pouring water into the top of the smaller PVC pipe. This will ensure that the soil is evenly moistened.
Maintaining Your Strawberry Tower
Now that your tower is built, it’s time to keep those strawberries happy and producing!
* Watering: Water your strawberry tower regularly, especially during hot, dry weather. Check the soil moisture by sticking your finger into the soil. If it feels dry, it’s time to water. Pour water into the top of the smaller PVC pipe to distribute it evenly.
* Fertilizing: Feed your strawberry plants with a balanced fertilizer every few weeks. Follow the instructions on the fertilizer package. I like to use a liquid fertilizer diluted in water.
* Sunlight: Make sure your strawberry tower receives at least 6-8 hours of sunlight per day. If you live in a particularly hot climate, you may need to provide some afternoon shade to prevent the plants from scorching.
* Pest Control: Keep an eye out for pests such as aphids, slugs, and snails. Handpick them off the plants or use an organic pest control spray.
* Pruning: Remove any dead or yellowing leaves to encourage new growth. You can also prune the runners (the long stems that the plants send out) to encourage the plants to focus on producing fruit.
* Harvesting: Harvest your strawberries when they are fully ripe and red. Gently twist the berries off the plant. The more you harvest, the more the plants will produce!
Troubleshooting
Even with the best planning, sometimes things don’t go exactly as expected. Here are a few common problems and how to fix them:
* Soil Drying Out Too Quickly: If the soil in your tower is drying out too quickly, you may need to add more organic matter to the soil to help it retain moisture. You can also try mulching around the plants with straw or wood chips.
* Plants Not Producing Fruit: If your strawberry plants are not producing fruit, they may not be getting enough sunlight or nutrients. Make sure they are in a sunny location and fertilize them regularly.
* Pest Infestation: If you have a pest infestation, try using an organic pest control spray or handpicking the pests off the plants. You can also try introducing beneficial insects, such as ladybugs, to your garden.
* Tower Tipping Over: If your strawberry tower is tipping over, make sure it is placed on a stable surface. You can also try adding weight to the bottom of the tower by placing rocks or bricks inside the large PVC pipe.
Tips for Success
Here are a few extra tips to help you get the most out of your strawberry tower:
* Choose the Right Strawberry Variety: Everbearing varieties are best for a continuous harvest. Day-neutral varieties are also a good choice.
* Use High-Quality Potting Soil: Don’t skimp on the soil! Use a high-quality potting soil specifically formulated for fruits and vegetables.
* Water Regularly: Strawberries need consistent moisture to thrive. Water your tower regularly, especially during hot, dry weather.
* Fertilize Regularly: Feed your strawberry plants with a balanced fertilizer every few weeks.
* Protect from Pests: Keep an eye out for pests and take action to control them as soon as you see them.
* Enjoy Your Harvest! The best part of building a strawberry tower is enjoying the delicious, juicy strawberries you harvest.
I hope you found this guide helpful! Building a strawberry tower is a fun and rewarding project that will provide you with a bountiful harvest of delicious strawberries for months to come. Happy gardening!
Conclusion
So, there you have it! Transforming your monthly strawberry harvest into delectable, long-lasting strawberry jam is not only achievable but incredibly rewarding. We’ve walked you through the process, highlighting the simplicity and satisfaction of creating something truly special from your own garden bounty. This isn’t just about preserving fruit; it’s about capturing the essence of summer, bottling the sweet aroma and vibrant flavor of your hard-earned strawberries for enjoyment throughout the year.
Why is this DIY strawberry jam trick a must-try? Because it empowers you to take control of your food, reduce waste, and savor the unparalleled taste of homemade goodness. Store-bought jams simply can’t compare to the fresh, intense flavor that comes from using your own, perfectly ripe strawberries. Plus, you know exactly what’s going into your jam – no artificial colors, flavors, or preservatives. It’s pure, unadulterated strawberry bliss.
But the fun doesn’t stop there! Feel free to experiment with variations to personalize your jam. Want a hint of citrus? Add a tablespoon or two of lemon or lime juice during the cooking process. Craving a touch of spice? A pinch of ground cinnamon or a sliver of fresh ginger can add a delightful warmth. For a more sophisticated flavor profile, consider incorporating a splash of balsamic vinegar or a few sprigs of fresh rosemary. The possibilities are endless! You can even try combining your strawberries with other fruits like raspberries or blueberries for a mixed berry jam.
Remember, the key to successful jam-making is patience and attention to detail. Don’t rush the cooking process, and be sure to test for proper gelling. And most importantly, have fun! This is a chance to connect with your food, unleash your creativity, and create something truly special.
We are confident that once you experience the joy of making your own strawberry jam, you’ll never go back to store-bought. It’s a simple, satisfying, and delicious way to preserve your monthly strawberry harvest and enjoy the taste of summer all year round.
So, what are you waiting for? Gather your strawberries, dust off your canning equipment, and get ready to embark on a jam-making adventure! We encourage you to try this DIY trick and share your experience with us. Let us know what variations you tried, what challenges you faced, and most importantly, how delicious your homemade strawberry jam turned out! Share your photos and stories in the comments below – we can’t wait to hear from you! Happy jamming!
Frequently Asked Questions (FAQ)
What kind of strawberries are best for making jam?
The best strawberries for jam are those that are fully ripe and bursting with flavor. Varieties like Chandler, Sequoia, and Albion are known for their sweetness and firmness, making them ideal for jam-making. However, any variety of strawberry can be used, as long as they are ripe and free from blemishes. Remember that the sweeter the strawberries, the less sugar you’ll need to add to your jam. If your strawberries are a bit tart, you may need to adjust the sugar accordingly.
Do I need to use pectin when making strawberry jam?
Pectin is a naturally occurring substance in fruits that helps them to gel. Strawberries are relatively low in pectin, so adding commercial pectin is often recommended to ensure a good set. However, you can make jam without added pectin by using slightly underripe strawberries (which have more pectin) and cooking the jam for a longer period of time to concentrate the natural pectin. If you choose to use commercial pectin, be sure to follow the instructions on the package carefully. There are different types of pectin available, so choose the one that is best suited for your recipe.
How do I know when my strawberry jam is ready?
There are several ways to test for proper gelling. One common method is the “cold plate test.” Place a small plate in the freezer before you start making the jam. When you think the jam is ready, spoon a small amount onto the cold plate and return it to the freezer for a minute or two. Then, push the jam with your finger. If it wrinkles and forms a skin, it’s ready. Another method is to use a candy thermometer. The jam should reach a temperature of 220°F (104°C) for proper gelling. Keep in mind that the jam will thicken further as it cools.
What is the best way to sterilize my jars and lids?
Sterilizing your jars and lids is crucial for preventing spoilage and ensuring the safety of your jam. There are several methods you can use. One common method is to boil the jars and lids in a large pot of water for 10 minutes. Make sure the jars are completely submerged. Another method is to wash the jars and lids in a dishwasher on the sanitize cycle. You can also sterilize the jars in the oven by heating them to 250°F (120°C) for 10 minutes. Always keep the jars hot until you are ready to fill them with jam.
How long will homemade strawberry jam last?
Properly canned and sealed strawberry jam can last for up to two years in a cool, dark place. Once opened, the jam should be stored in the refrigerator and consumed within a few weeks. Be sure to check the seal of the jar before opening it. If the lid is bulging or there are any signs of spoilage, discard the jam.
Can I reduce the amount of sugar in the recipe?
While you can reduce the amount of sugar in the recipe, it’s important to understand that sugar plays a crucial role in preserving the jam and ensuring proper gelling. Reducing the sugar too much can result in a jam that is too runny or prone to spoilage. If you want to reduce the sugar, consider using a low-sugar pectin or adding a natural sweetener like honey or maple syrup. However, be aware that these sweeteners may alter the flavor of the jam.
What can I do if my jam doesn’t set properly?
If your jam doesn’t set properly, don’t despair! There are a few things you can try. One option is to recook the jam with additional pectin. Follow the instructions on the pectin package for recooking instructions. Another option is to add a small amount of lemon juice, which can help to increase the acidity and promote gelling. You can also try cooking the jam for a longer period of time to concentrate the natural pectin. If all else fails, you can still use the runny jam as a topping for ice cream, pancakes, or yogurt.
Can I use frozen strawberries to make jam?
Yes, you can use frozen strawberries to make jam. However, keep in mind that frozen strawberries may release more liquid than fresh strawberries, so you may need to adjust the cooking time accordingly. Be sure to thaw the strawberries completely before using them. You can also drain off some of the excess liquid to prevent the jam from being too runny.
What are some creative ways to use homemade strawberry jam?
Besides spreading it on toast or biscuits, there are many creative ways to use homemade strawberry jam. You can use it as a filling for cakes, pastries, or cookies. You can also swirl it into yogurt or oatmeal for a delicious breakfast. Try using it as a glaze for grilled chicken or pork. Or, mix it with cream cheese for a flavorful dip for crackers or vegetables. The possibilities are endless!
Is it safe to can jam at home?
Yes, it is safe to can jam at home, as long as you follow proper canning procedures. This includes sterilizing your jars and lids, using a boiling water bath canner, and ensuring that the jars are properly sealed. Always follow a tested and reliable recipe, and be sure to check the seal of the jars after processing. If you are new to canning, it’s a good idea to consult a canning guide or take a canning class to learn the basics.

Leave a Comment