

Harvesting mushrooms at home might sound like something reserved for seasoned foragers, but I’m here to tell you it’s surprisingly achievable, even for beginners like you and me! Forget trekking through damp forests; imagine the satisfaction of cultivating your own delicious, gourmet mushrooms right in your kitchen.
For centuries, mushroom cultivation has been revered in various cultures, particularly in East Asia, where it’s considered both an art and a science. From ancient medicinal practices to culinary delicacies, mushrooms hold a special place in human history. Now, you can tap into that rich tradition without leaving your home.
Why should you consider harvesting mushrooms at home? Well, for starters, it’s incredibly rewarding! Plus, store-bought mushrooms can be expensive and lack the freshness and unique varieties you can grow yourself. More importantly, you’ll know exactly what’s gone into growing them, ensuring a healthy and organic addition to your meals. This DIY guide will provide you with simple, step-by-step instructions and clever hacks to successfully grow and harvest your own mushrooms, regardless of your experience level. Get ready to embark on a fun and flavorful journey into the world of home mycology!
Pilzzucht für Anfänger: Dein eigenes Pilzparadies zu Hause erschaffen!
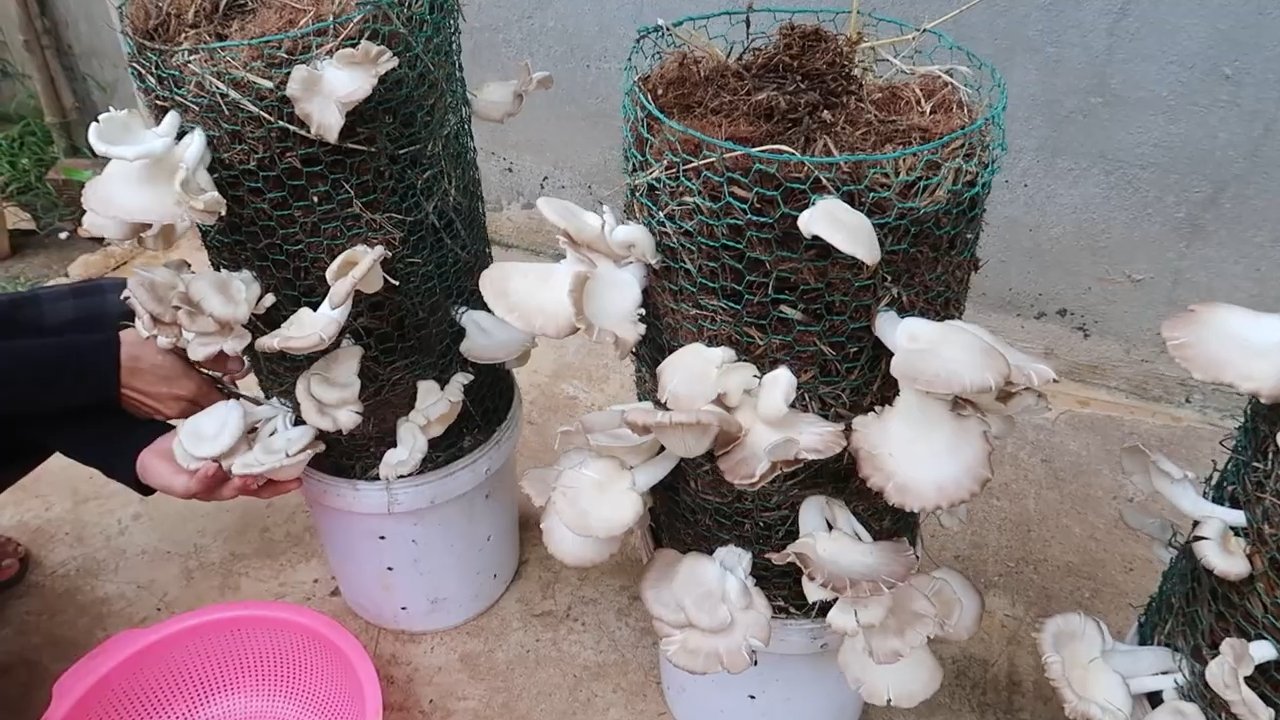
Hallo liebe Pilzfreunde! Habt ihr euch jemals gefragt, wie es wäre, eure eigenen, frischen Pilze zu Hause zu züchten? Ich kann euch sagen, es ist einfacher als ihr denkt und unglaublich befriedigend! In diesem Artikel zeige ich euch, wie ihr mit einfachen Mitteln und etwas Geduld euer eigenes kleines Pilzparadies erschaffen könnt. Wir konzentrieren uns auf Austernpilze (Pleurotus ostreatus), da diese relativ einfach zu züchten sind und auch für Anfänger gut geeignet. Los geht’s!
Was du brauchst: Deine Einkaufsliste für die Pilzzucht
Bevor wir loslegen, brauchen wir natürlich ein paar Zutaten und Materialien. Keine Sorge, das meiste davon ist leicht zu bekommen oder habt ihr vielleicht sogar schon zu Hause!
* Pilzbrut (Austernpilz): Das ist das A und O! Ihr bekommt sie online oder in spezialisierten Gartencentern. Achtet darauf, dass die Brut frisch und von guter Qualität ist.
* Substrat: Hier gibt es verschiedene Möglichkeiten. Stroh, Kaffeesatz oder Sägemehl sind beliebte Optionen. Ich empfehle Stroh für den Anfang, da es leicht zu handhaben ist.
* Beutel oder Behälter: Ihr braucht einen Behälter, in dem die Pilze wachsen können. Plastiktüten, Eimer oder sogar alte Jutesäcke eignen sich gut.
* Sprühflasche: Um das Substrat feucht zu halten.
* Desinfektionsmittel: Um alles sauber zu halten und Kontaminationen zu vermeiden.
* Handschuhe: Zum Schutz eurer Hände und zur Vermeidung von Verunreinigungen.
* Optional: Eine Spritze (ohne Nadel) zum Injizieren der Pilzbrut in das Substrat.
Schritt-für-Schritt Anleitung: So züchtest du deine eigenen Austernpilze
Jetzt geht’s ans Eingemachte! Folgt diesen Schritten, und bald könnt ihr eure eigenen, frischen Austernpilze ernten.
1. Substrat vorbereiten:
* Stroh pasteurisieren: Das Stroh muss pasteurisiert werden, um unerwünschte Mikroorganismen abzutöten. Das geht am einfachsten, indem ihr das Stroh in einen großen Topf gebt und mit kochendem Wasser übergießt. Lasst es mindestens eine Stunde ziehen.
* Abkühlen lassen: Lasst das Stroh abkühlen, bis ihr es anfassen könnt, ohne euch zu verbrennen. Es sollte feucht, aber nicht tropfnass sein.
* Alternative: Kaffeesatz verwenden: Wenn ihr Kaffeesatz verwendet, müsst ihr ihn nicht pasteurisieren, da er bereits durch den Brühvorgang sterilisiert wurde. Achtet aber darauf, dass er nicht schimmelt.
2. Behälter vorbereiten:
* Reinigen und desinfizieren: Reinigt euren Behälter gründlich mit Wasser und Seife. Desinfiziert ihn anschließend mit einem Desinfektionsmittel. Das ist wichtig, um Kontaminationen zu vermeiden.
* Löcher bohren (optional): Wenn ihr einen Eimer oder eine Tüte verwendet, bohrt ein paar kleine Löcher hinein, damit die Pilze später herauswachsen können.
3. Substrat und Pilzbrut mischen:
* Schichtweise vorgehen: Gebt eine Schicht Substrat in den Behälter, dann eine Schicht Pilzbrut. Wiederholt diesen Vorgang, bis der Behälter voll ist. Die letzte Schicht sollte aus Substrat bestehen.
* Verhältnis beachten: Das Verhältnis von Substrat zu Pilzbrut sollte etwa 10:1 betragen. Das bedeutet, auf 10 Teile Substrat kommt 1 Teil Pilzbrut.
* Alternative: Injizieren: Wenn ihr eine Spritze verwendet, könnt ihr die Pilzbrut direkt in das Substrat injizieren. Verteilt die Brut gleichmäßig im Behälter.
4. Behälter verschließen und lagern:
* Verschließen: Verschließt den Behälter locker, damit Luft zirkulieren kann. Wenn ihr eine Tüte verwendet, könnt ihr sie mit einem Gummiband verschließen.
* Lagern: Lagert den Behälter an einem dunklen, kühlen und feuchten Ort. Eine Temperatur zwischen 20 und 25 Grad Celsius ist ideal.
5. Inkubationsphase:
* Warten und beobachten: Jetzt heißt es warten! Die Pilzbrut wird das Substrat besiedeln. Das dauert in der Regel 2-3 Wochen.
* Regelmäßig kontrollieren: Kontrolliert den Behälter regelmäßig auf Schimmel. Wenn ihr Schimmel entdeckt, müsst ihr den Behälter leider entsorgen.
* Myzelwachstum: Ihr werdet sehen, wie sich ein weißes, flaumiges Myzel auf dem Substrat ausbreitet. Das ist ein gutes Zeichen!
6. Fruiting Phase:
* Licht und Feuchtigkeit: Sobald das Substrat vollständig mit Myzel besiedelt ist, ist es Zeit für die Fruiting Phase. Stellt den Behälter an einen helleren Ort, aber vermeidet direkte Sonneneinstrahlung.
* Luftfeuchtigkeit erhöhen: Die Luftfeuchtigkeit sollte hoch sein, idealerweise über 80%. Besprüht das Substrat regelmäßig mit Wasser, um es feucht zu halten.
* Pilze wachsen: Nach ein paar Tagen werdet ihr die ersten kleinen Pilze sehen, die aus den Löchern oder der Oberfläche des Substrats wachsen.
7. Ernte:
* Ernten: Wenn die Pilze ihre volle Größe erreicht haben, könnt ihr sie ernten. Dreht die Pilze vorsichtig ab oder schneidet sie mit einem Messer ab.
* Mehrere Ernten: Ihr könnt in der Regel mehrere Ernten von einem Behälter bekommen. Besprüht das Substrat nach jeder Ernte mit Wasser, um es feucht zu halten.
Häufige Probleme und Lösungen: Was tun, wenn etwas schief geht?
Auch bei der Pilzzucht kann es mal zu Problemen kommen. Hier sind ein paar häufige Probleme und wie ihr sie lösen könnt:
* Schimmel: Schimmel ist der häufigste Feind der Pilzzucht. Wenn ihr Schimmel entdeckt, müsst ihr den Behälter leider entsorgen. Achtet darauf, dass ihr alles sauber haltet und das Substrat richtig pasteurisiert, um Schimmel vorzubeugen.
* Keine Pilze: Wenn nach einiger Zeit keine Pilze wachsen, kann das verschiedene Ursachen haben. Vielleicht ist die Temperatur zu niedrig oder die Luftfeuchtigkeit zu gering. Überprüft die Bedingungen und passt sie gegebenenfalls an. Es kann auch sein, dass die Pilzbrut nicht mehr vital war.
* Kleine Pilze: Wenn die Pilze klein bleiben, kann das an mangelndem Licht oder Nährstoffen liegen. Stellt den Behälter an einen helleren Ort und gebt dem Substrat eventuell etwas Dünger hinzu.
Zusätzliche Tipps und Tricks: So wird deine Pilzzucht noch erfolgreicher
Hier sind noch ein paar zusätzliche Tipps, die euch helfen können, eure Pilzzucht noch erfolgreicher zu machen:
* Verschiedene Substrate ausprobieren: Experimentiert mit verschiedenen Substraten, um herauszufinden, welches für euch am besten funktioniert. Kaffeesatz, Stroh, Sägemehl, Pappe – es gibt viele Möglichkeiten!
* Verschiedene Pilzarten züchten: Wenn ihr den Dreh raus habt, könnt ihr auch andere Pilzarten züchten, wie z.B. Shiitake oder Kräuterseitlinge.
* Pilzzucht im Garten: Wenn ihr einen Garten habt, könnt ihr eure Pilze auch im Freien züchten. Sucht euch einen schattigen, feuchten Platz und legt dort ein Pilzbeet an.
* Hygiene ist das A und O: Achtet immer auf Sauberkeit und Hygiene, um Kontaminationen zu vermeiden.
Fazit: Dein eigenes Pilzparadies ist zum Greifen nah!
Ich hoffe, dieser Artikel hat euch Mut gemacht, eure eigenen Pilze zu Hause zu züchten. Es ist ein spannendes und lohnendes Hobby, das euch mit frischen, köstlichen Pilzen belohnt. Also, worauf wartet ihr noch? Legt los und erschafft euer eigenes Pilzparadies! Viel Erfolg!

Conclusion
So, there you have it! Harvesting mushrooms at home is not only achievable but also incredibly rewarding. Imagine the satisfaction of nurturing these fascinating fungi from spore to plate, knowing exactly where your food comes from and the care that went into its cultivation. This DIY trick transforms your kitchen into a mini-farm, offering a sustainable and delicious alternative to store-bought mushrooms.
Why is this a must-try? Because it’s more than just growing food; it’s an experience. It’s a connection to nature, a learning opportunity, and a chance to impress your friends and family with your culinary prowess. Forget the bland, mass-produced mushrooms from the supermarket. Home-grown mushrooms boast a superior flavor profile, bursting with earthy notes and a freshness you simply can’t replicate. Plus, you get to choose the varieties you love most!
Looking for variations? Experiment with different substrates like straw, coffee grounds, or even hardwood sawdust, depending on the mushroom species you’re cultivating. Try growing different types of mushrooms, from the classic oyster mushroom to the more exotic shiitake or lion’s mane. Each variety offers a unique flavor and texture, opening up a world of culinary possibilities. Consider adding companion plants to your growing area, such as herbs like basil or parsley, which can help deter pests and create a more balanced ecosystem. You can even explore different growing methods, such as using a monotub or a fruiting chamber, to optimize your yields.
Don’t be intimidated by the process. While it may seem complex at first, harvesting mushrooms at home is surprisingly straightforward with the right guidance and a little patience. The initial setup requires some effort, but the ongoing maintenance is minimal, making it a perfect project for busy individuals.
We wholeheartedly encourage you to embark on this mushroom-growing adventure. It’s a journey of discovery, a chance to connect with nature, and a way to elevate your culinary creations. The benefits are numerous, from the satisfaction of growing your own food to the superior flavor and freshness of home-grown mushrooms.
So, grab your spores, prepare your substrate, and get ready to witness the magic of mushroom cultivation. We’re confident that you’ll be amazed by the results. And most importantly, don’t forget to share your experiences with us! We’d love to hear about your successes, your challenges, and your favorite ways to enjoy your home-grown mushrooms. Share your photos, recipes, and tips in the comments below. Let’s build a community of home mushroom growers and inspire others to embrace this rewarding DIY trick. Happy growing!
Frequently Asked Questions (FAQ)
What are the easiest types of mushrooms to grow at home for beginners?
Oyster mushrooms are generally considered the easiest for beginners. They are fast-growing, relatively forgiving of environmental fluctuations, and can thrive on a variety of substrates like straw or coffee grounds. Shiitake mushrooms are another good option, although they require a bit more patience as they take longer to fruit. Avoid more demanding varieties like morels or truffles until you have some experience under your belt. Start with oyster mushrooms to build your confidence and learn the basics of mushroom cultivation.
What kind of substrate should I use for growing mushrooms at home?
The best substrate depends on the type of mushroom you’re growing. Oyster mushrooms thrive on straw, coffee grounds, or even cardboard. Shiitake mushrooms prefer hardwood sawdust or logs. Button mushrooms typically require a composted manure-based substrate. Research the specific needs of the mushroom variety you’re interested in growing to determine the most suitable substrate. Ensure the substrate is properly pasteurized or sterilized to eliminate competing organisms before introducing your mushroom spawn.
How long does it take to grow mushrooms at home?
The time it takes to grow mushrooms varies depending on the species and growing conditions. Oyster mushrooms can fruit in as little as a few weeks, while shiitake mushrooms may take several months. The incubation period, during which the mycelium colonizes the substrate, is typically the longest phase. Once the substrate is fully colonized, fruiting can be triggered by providing the right temperature, humidity, and light conditions. Be patient and monitor your mushrooms closely for signs of growth and development.
What are the ideal temperature and humidity conditions for growing mushrooms?
Each mushroom species has its own preferred temperature and humidity range. Oyster mushrooms generally prefer cooler temperatures (around 60-70°F) and high humidity (80-90%). Shiitake mushrooms also prefer cooler temperatures but can tolerate slightly lower humidity. Button mushrooms require a more specific temperature range (around 65-75°F) and high humidity. Maintaining the correct temperature and humidity is crucial for successful mushroom cultivation. Use a thermometer and hygrometer to monitor your growing environment and adjust as needed.
How do I prevent contamination when growing mushrooms at home?
Contamination is a common challenge in mushroom cultivation. To minimize the risk of contamination, start with a clean and sterile environment. Pasteurize or sterilize your substrate thoroughly before inoculation. Use sterile techniques when handling spawn and substrate. Maintain good air circulation to prevent the buildup of mold and bacteria. Regularly inspect your mushrooms for signs of contamination, such as unusual colors or odors. If you detect contamination, remove the affected area immediately to prevent it from spreading.
What are some common problems I might encounter when growing mushrooms at home?
Some common problems include contamination, slow growth, and lack of fruiting. Contamination can be caused by bacteria, mold, or other fungi. Slow growth can be due to insufficient humidity, temperature, or nutrients. Lack of fruiting can be caused by improper lighting, ventilation, or substrate conditions. Research the specific needs of your mushroom variety and troubleshoot any problems that arise by adjusting your growing conditions accordingly.
How do I know when my mushrooms are ready to harvest?
Mushrooms are typically ready to harvest when the caps have fully opened but before they start to flatten out or drop spores. The exact timing depends on the species. Oyster mushrooms are ready when the caps are fully expanded and the edges are slightly curled upwards. Shiitake mushrooms are ready when the caps have opened and the gills are visible. Harvest your mushrooms by gently twisting or cutting them off at the base of the stem.
Can I grow mushrooms indoors without any special equipment?
Yes, you can grow mushrooms indoors without any special equipment, especially oyster mushrooms. A simple setup can involve a plastic tub or bag, a suitable substrate, and a spray bottle for maintaining humidity. You can use a windowsill or a shaded area for lighting. While specialized equipment like fruiting chambers and humidity controllers can improve your yields, they are not essential for beginners. Start with a basic setup and gradually upgrade your equipment as you gain experience.
Are there any safety precautions I should take when growing mushrooms at home?
Always wash your hands thoroughly before and after handling mushrooms and substrate. Avoid inhaling spores, as they can cause allergic reactions in some individuals. Cook your mushrooms thoroughly before eating them to kill any potential bacteria or toxins. Never consume wild mushrooms unless you are absolutely certain of their identification, as some species are poisonous. When using chemicals for sterilization or cleaning, follow the manufacturer’s instructions carefully.
Where can I find reliable information and resources about growing mushrooms at home?
There are many excellent resources available online and in print. Look for books, articles, and videos from reputable sources, such as universities, mycological societies, and experienced mushroom growers. Online forums and communities can also be a valuable source of information and support. Be wary of unverified information and always cross-reference your sources to ensure accuracy.


Leave a Comment