

Hanging Sweet Melon Growing: Imagine plucking a perfectly ripe, juicy sweet melon right from your own backyard, without even bending over! Sounds like a dream, right? Well, it doesn’t have to be! I’m so excited to share some amazing DIY tricks and tips that will have you growing sweet melons vertically, saving space, and adding a touch of whimsical charm to your garden.
For centuries, gardeners have been finding creative ways to maximize their yields, and vertical gardening, including techniques for hanging sweet melon growing, is a testament to that ingenuity. While the exact origins of hanging melons are hard to pinpoint, the concept of training plants upwards dates back to ancient civilizations, where limited space and a desire for abundant harvests drove innovation. Think of the Hanging Gardens of Babylon – a legendary example of human ingenuity in cultivating plants in unconventional ways!
But why should *you* try hanging your sweet melons? Well, for starters, it’s a fantastic solution for small gardens, balconies, or even patios. Plus, it helps to keep your precious melons off the ground, protecting them from pests, diseases, and rot. Let’s be honest, nobody wants a slug-nibbled melon! This DIY guide will walk you through everything you need to know, from choosing the right melon varieties to building a simple support system. Get ready to impress your friends and family with your unique and delicious homegrown harvest!
Hängende Zuckermelonen: Dein DIY-Guide für eine vertikale Ernte
Hey Gartenfreunde! Habt ihr schon mal darüber nachgedacht, eure Zuckermelonen nicht am Boden, sondern in der Luft wachsen zu lassen? Klingt verrückt, ist aber machbar! Und es spart Platz, schützt die Früchte vor Schädlingen und sieht einfach super cool aus. Ich zeige euch, wie ihr eure eigenen hängenden Zuckermelonen züchten könnt. Los geht’s!
Warum hängende Zuckermelonen?
Bevor wir loslegen, kurz ein paar Vorteile, die mich überzeugt haben:
* Platzsparend: Perfekt für kleine Gärten, Balkone oder Terrassen.
* Schädlingsbekämpfung: Weniger Kontakt zum Boden bedeutet weniger Schnecken und andere Krabbeltiere.
* Bessere Belüftung: Verhindert Fäulnis und fördert gesundes Wachstum.
* Einfachere Ernte: Kein Bücken mehr, um die reifen Melonen zu pflücken.
* Optischer Hingucker: Eine hängende Melone ist definitiv ein Blickfang!
Was du brauchst: Die Materialliste
Damit dein Projekt ein Erfolg wird, brauchst du folgende Dinge:
* Zuckermelonensamen: Wähle eine Sorte, die nicht zu groß wird. ‘Sugar Baby’ oder ‘Minnesota Midget’ sind gute Optionen.
* Anzuchttöpfe: Kleine Töpfe oder Anzuchtschalen für die Voranzucht.
* Anzuchterde: Spezielle Erde für die Anzucht von Sämlingen.
* Große Töpfe oder Hängekörbe: Mindestens 30 cm Durchmesser, idealerweise mit guter Drainage.
* Hochwertige Blumenerde: Eine Mischung aus Gartenerde, Kompost und etwas Sand.
* Dünger: Langzeitdünger oder Flüssigdünger für Gemüse.
* Stabile Aufhängung: Ketten, Seile oder Haken, die das Gewicht der Melone tragen können.
* Stütznetz oder Stoffwindel: Um die wachsende Melone zu stützen.
* Gießkanne oder Schlauch: Für die Bewässerung.
* Gartenschere: Zum Beschneiden der Pflanze.
* Handschuhe: Zum Schutz deiner Hände.
* Optional: Mulchmaterial (z.B. Stroh oder Holzhackschnitzel) zur Feuchtigkeitsspeicherung.
Phase 1: Die Anzucht der Zuckermelonen
Die Anzucht ist der erste wichtige Schritt. Hier legst du den Grundstein für eine erfolgreiche Ernte.
1. Samen vorbereiten: Lege die Zuckermelonensamen für etwa 24 Stunden in lauwarmes Wasser. Das beschleunigt die Keimung.
2. Aussaat: Fülle die Anzuchttöpfe mit Anzuchterde. Drücke die Erde leicht an und säe pro Topf 2-3 Samen etwa 1-2 cm tief.
3. Bewässerung: Gieße die Erde vorsichtig an, sodass sie feucht, aber nicht nass ist.
4. Standort: Stelle die Anzuchttöpfe an einen warmen und hellen Ort. Eine Temperatur von 20-25°C ist ideal. Ein Mini-Gewächshaus oder eine Abdeckung mit Frischhaltefolie kann helfen, die Feuchtigkeit zu halten.
5. Keimung: Die Samen keimen in der Regel innerhalb von 7-14 Tagen. Halte die Erde während dieser Zeit feucht.
6. Pikieren: Sobald die Sämlinge 2-3 echte Blätter haben, kannst du sie pikieren. Das bedeutet, du wählst den stärksten Sämling pro Topf aus und entfernst die anderen. Sei dabei vorsichtig, um die Wurzeln nicht zu beschädigen.
Phase 2: Die Vorbereitung der Hängekörbe oder Töpfe
Jetzt machen wir die Behälter fertig, in denen die Melonen später wachsen werden.
1. Topf oder Hängekorb auswählen: Wähle einen Topf oder Hängekorb mit ausreichend Volumen (mindestens 30 cm Durchmesser). Achte auf eine gute Drainage, damit das Wasser ablaufen kann.
2. Drainage verbessern: Lege eine Schicht Kies oder Tonscherben auf den Boden des Topfes, um die Drainage zu verbessern.
3. Erde vorbereiten: Mische hochwertige Blumenerde mit Kompost und etwas Sand. Das sorgt für eine gute Nährstoffversorgung und Drainage.
4. Dünger hinzufügen: Mische Langzeitdünger unter die Erde. Alternativ kannst du später regelmäßig Flüssigdünger verwenden.
5. Aufhängung vorbereiten: Befestige die Aufhängung (Ketten, Seile oder Haken) am Topf oder Hängekorb. Achte darauf, dass die Aufhängung stabil genug ist, um das Gewicht der Melone zu tragen.
Phase 3: Das Umpflanzen der Sämlinge
Wenn die Sämlinge stark genug sind, können sie in ihre endgültigen Behälter umziehen.
1. Zeitpunkt: Warte, bis die Sämlinge etwa 15-20 cm groß sind und das Wetter warm genug ist (keine Frostgefahr mehr!).
2. Vorbereitung: Gieße die Sämlinge vor dem Umpflanzen gut an.
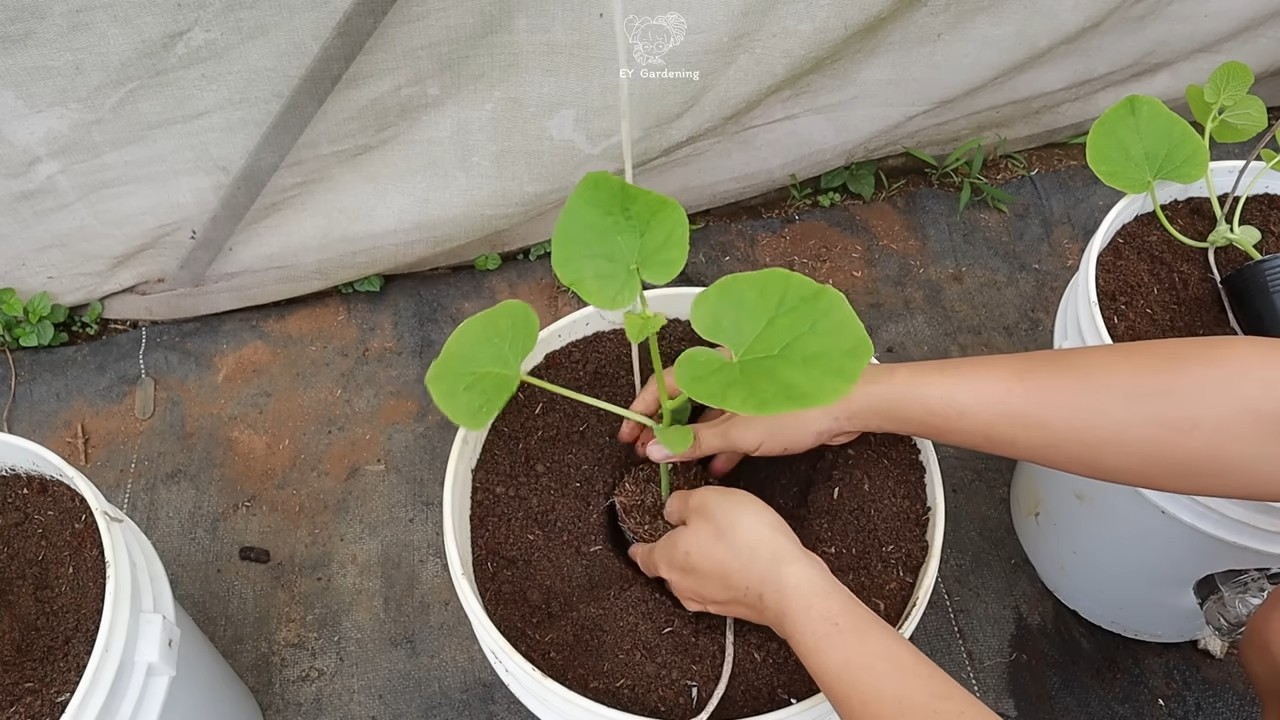
3. Umpflanzen: Hebe die Sämlinge vorsichtig aus den Anzuchttöpfen und setze sie in die vorbereiteten Töpfe oder Hängekörbe. Achte darauf, dass die Wurzeln nicht beschädigt werden.
4. Einsetzen: Fülle die Töpfe mit Erde auf und drücke sie leicht an. Lasse einen Gießrand frei.
5. Bewässerung: Gieße die Pflanzen nach dem Umpflanzen gründlich an.
6. Standort: Stelle die Töpfe oder Hängekörbe an einen sonnigen und windgeschützten Ort. Zuckermelonen brauchen mindestens 6-8 Stunden Sonne pro Tag.
Phase 4: Die Pflege der hängenden Zuckermelonen
Die richtige Pflege ist entscheidend für eine reiche Ernte.
1. Bewässerung: Gieße die Pflanzen regelmäßig, besonders an heißen Tagen. Die Erde sollte immer feucht, aber nicht nass sein. Vermeide Staunässe.
2. Düngung: Dünge die Pflanzen regelmäßig mit Flüssigdünger für Gemüse. Befolge dabei die Anweisungen auf der Verpackung.
3. Beschneiden: Entferne regelmäßig Seitentriebe, um die Bildung von Früchten zu fördern. Lasse nur die Haupttriebe wachsen.
4. Bestäubung: Zuckermelonen sind auf die Bestäubung durch Bienen und andere Insekten angewiesen. Wenn es wenig Insekten gibt, kannst du die Blüten auch von Hand bestäuben. Übertrage dazu mit einem Pinsel Pollen von den männlichen auf die weiblichen Blüten. Die weiblichen Blüten erkennst du an dem kleinen Fruchtansatz unterhalb der Blüte.
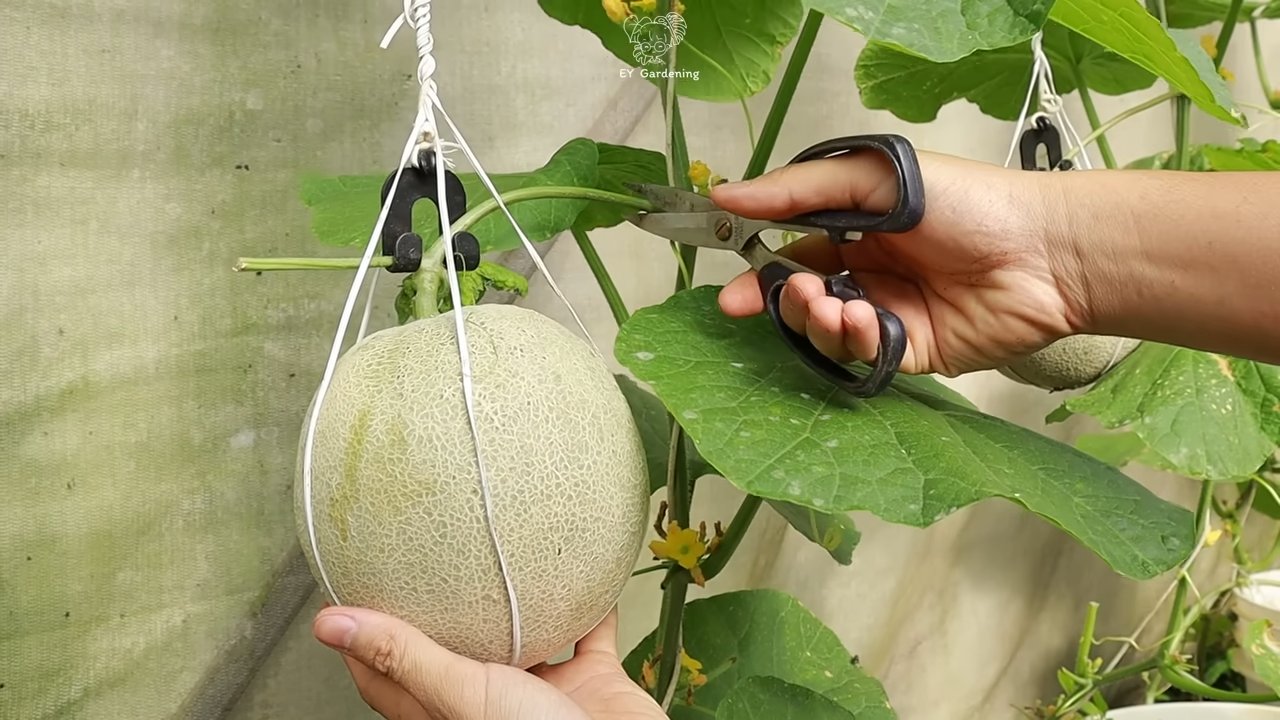
5. Stützung der Früchte: Wenn die Melonen größer werden, brauchen sie Unterstützung. Verwende ein Stütznetz oder eine Stoffwindel, um die Früchte zu stützen und zu verhindern, dass sie abbrechen. Befestige das Netz oder die Windel an der Aufhängung.
6. Schädlingskontrolle: Kontrolliere die Pflanzen regelmäßig auf Schädlinge und Krankheiten. Bei Bedarf kannst du biologische Schädlingsbekämpfungsmittel einsetzen.
7. Mulchen: Bedecke die Erde mit Mulchmaterial (z.B. Stroh oder Holzhackschnitzel), um die Feuchtigkeit zu speichern und Unkraut zu unterdrücken.
Phase 5: Die Ernte der Zuckermelonen
Der schönste Teil: Die Ernte!
1. Reife erkennen: Eine reife Zuckermelone duftet aromatisch und gibt bei leichtem Klopfen einen dumpfen Ton von sich. Die Schale sollte sich leicht eindrücken lassen. Die Stelle, an der die Melone am Stiel befestigt ist, sollte leicht rissig sein.
2. Ernten: Schneide die Melone mit einer Gartenschere vom Stiel ab. Lasse dabei einen kleinen Stielansatz an der Melone.
3. Lagerung: Lagere die geernteten Melonen an einem kühlen und trockenen Ort
Conclusion
So, there you have it! Transforming your melon patch with this simple hanging trick isn’t just about aesthetics; it’s about giving your precious sweet melons the support they need to thrive, maximizing your yield, and protecting them from ground-dwelling pests and diseases. It’s a game-changer for anyone serious about growing healthy, delicious melons, especially in smaller gardens or areas prone to humidity.
Think about it: no more worrying about melons rotting on damp soil, no more battling slugs and squash bugs feasting on your ripening fruit. Instead, you’ll have a beautiful display of suspended sweetness, ripening evenly in the sun and air. The visual appeal alone is worth the effort, turning your garden into a conversation starter and a source of pride.
But the benefits extend beyond just visual appeal. By lifting your melons off the ground, you’re significantly improving air circulation around the fruit. This helps to prevent fungal diseases like powdery mildew and blossom end rot, which can decimate a melon crop. You’re also making it harder for pests to reach your developing melons, reducing the need for pesticides and ensuring a healthier harvest.
And the best part? This DIY hanging method is incredibly versatile. You can adapt it to suit your specific needs and resources. Experiment with different types of support materials, from repurposed pantyhose and burlap sacks to macrame hangers and even old t-shirts. Consider the size and weight of your melon variety when choosing your support system. Smaller melon varieties like cantaloupe or personal-sized watermelons will require less robust support than larger heirloom varieties.
For an extra touch of personalization, consider decorating your melon hangers with paint, beads, or other embellishments. This is a great way to add a touch of whimsy to your garden and make your hanging melons even more visually appealing. You could even create different hangers for different melon varieties, using color-coding to easily identify them.
Don’t be afraid to get creative and experiment with different techniques. The key is to provide adequate support for your melons as they grow, ensuring that they are protected from the ground and have ample access to sunlight and air.
We encourage you to try this simple yet effective DIY trick for hanging sweet melons this growing season. It’s a small investment of time and effort that can yield big rewards in terms of healthier plants, higher yields, and more delicious melons.
Once you’ve tried it, we’d love to hear about your experience! Share your photos, tips, and tricks in the comments section below. Let’s create a community of melon growers who are passionate about maximizing their harvests and enjoying the fruits (literally!) of their labor. Did you find a particularly effective material for your slings? Did you encounter any challenges and how did you overcome them? Your insights can help other gardeners achieve success with this method.
Remember, gardening is all about experimentation and learning. So, don’t be afraid to try new things and see what works best for you. With a little bit of creativity and effort, you can transform your melon patch into a thriving oasis of sweetness. Happy growing! This method of hanging sweet melons is a surefire way to improve your harvest.
Frequently Asked Questions (FAQ)
What types of melons are best suited for hanging?
While this method works well for many melon varieties, smaller to medium-sized melons like cantaloupe, honeydew, and personal-sized watermelons are particularly well-suited. Larger watermelon varieties can be hung, but you’ll need to ensure that your support system is strong enough to handle the weight. Consider using heavier-duty materials like strong rope or reinforced fabric for larger melons. Also, be mindful of the vine’s ability to support the weight, even with external support. If the vine seems strained, it might be best to harvest the melon early.
How early in the melon’s development should I start hanging it?
It’s best to start supporting the melon when it’s about the size of a softball or slightly larger. This gives the melon ample time to adjust to the support and prevents it from becoming too heavy for the vine before it’s properly secured. Waiting too long can make it difficult to maneuver the melon into the support without damaging the vine or the fruit itself. Regularly check your melon patch and be proactive in providing support as the melons develop.
What materials are best for creating the hanging support?
The best materials are strong, breathable, and gentle on the melon’s skin. Repurposed pantyhose, burlap sacks, old t-shirts, and macrame hangers are all excellent options. Avoid using materials that are too abrasive or that could trap moisture, as this can lead to rot. Ensure that the material is clean and free of any sharp edges that could damage the melon. You can also purchase commercially available melon supports online or at your local garden center.
How do I ensure the hanging support is strong enough?
Test the strength of your support system before entrusting it with a developing melon. Gently tug on the hanger to ensure that it’s securely attached to the trellis or support structure. If you’re using repurposed materials, double-check for any weak spots or tears. For larger melons, consider using multiple support points to distribute the weight more evenly. Regularly inspect the support system throughout the growing season and make any necessary repairs or adjustments.
Will hanging the melons affect their flavor or ripening process?
In most cases, hanging melons will actually improve their flavor and ripening process. By providing better air circulation and sun exposure, hanging helps the melons ripen more evenly and develop a sweeter, more intense flavor. However, it’s important to monitor the melons closely and harvest them when they’re ripe, as overripe melons can become mushy or develop an off-flavor. Look for signs of ripeness such as a change in color, a softening of the skin, and a sweet aroma.
How do I protect the hanging melons from pests?
Hanging melons can help to deter ground-dwelling pests, but it’s still important to take other precautions to protect your crop. Consider using organic pest control methods such as insecticidal soap or neem oil to control aphids, squash bugs, and other common melon pests. You can also use netting or row covers to protect the melons from birds and other larger pests. Regularly inspect your melon patch for signs of pest damage and take action promptly to prevent infestations from spreading.
Can I use this method for other types of fruits and vegetables?
Yes, the hanging method can be adapted for other types of fruits and vegetables that tend to sprawl or are susceptible to ground-dwelling pests. Cucumbers, small pumpkins, and even some types of squash can benefit from being hung. Just be sure to choose a support system that is appropriate for the size and weight of the fruit or vegetable you’re growing.
What if my melon vine isn’t strong enough to support the weight of the hanging melon, even with support?
This is a valid concern, especially with larger melon varieties. If you notice the vine straining significantly, it’s best to harvest the melon a bit early. You can still allow it to ripen further off the vine in a warm, sunny location. While it might not reach its full potential sweetness, it’s better than losing the melon entirely due to a broken vine. You can also try pruning some of the leaves around the melon to reduce the plant’s overall energy expenditure.
Is there a specific type of knot that is best for securing the melon support?
A bowline knot is a great choice for securing the melon support to the trellis or support structure. It’s a strong, reliable knot that won’t slip or come undone easily. Another good option is a clove hitch, which is easy to tie and adjust. Whichever knot you choose, make sure it’s tied securely and that the support is firmly attached to the trellis.
What do I do if the melon starts to rot while hanging?
If you notice signs of rot, such as soft spots or discoloration, remove the melon immediately to prevent the rot from spreading to other melons. Dispose of the rotten melon properly to avoid attracting pests or diseases. Inspect the remaining melons closely and take steps to improve air circulation and reduce moisture levels. This might involve pruning some of the leaves around the melons or adjusting the hanging supports to allow for better airflow.


Leave a Comment