

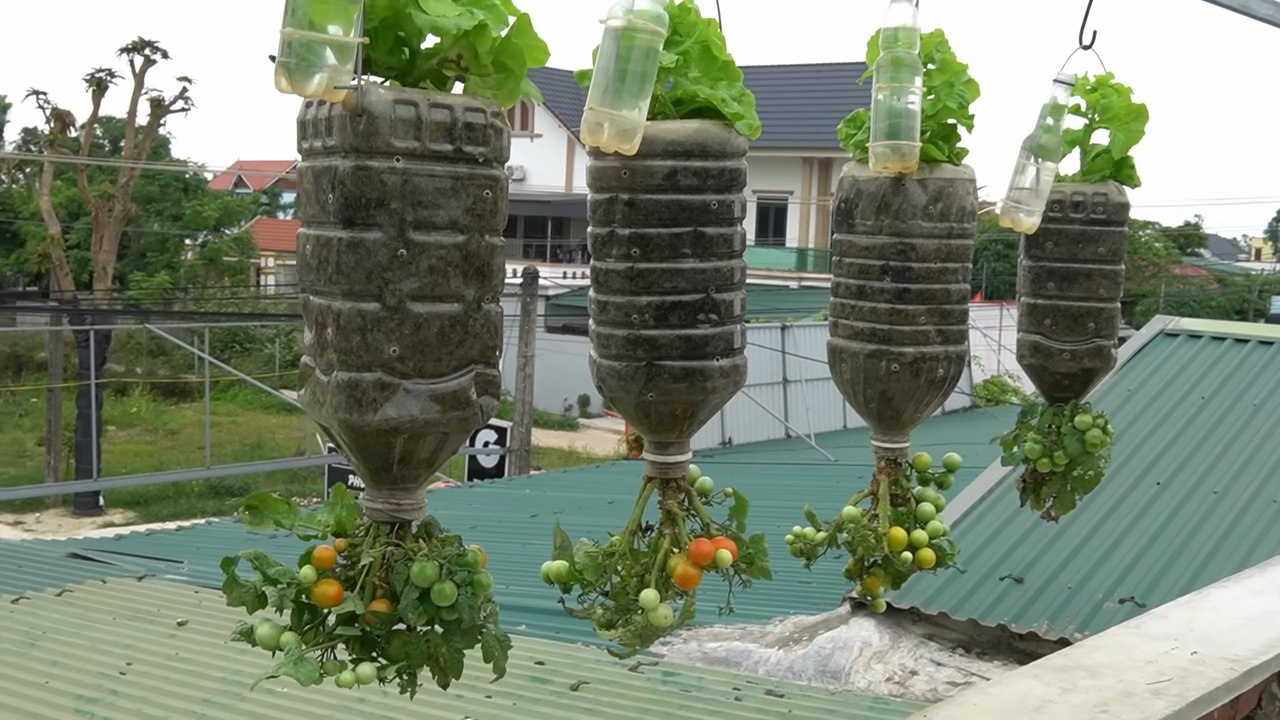
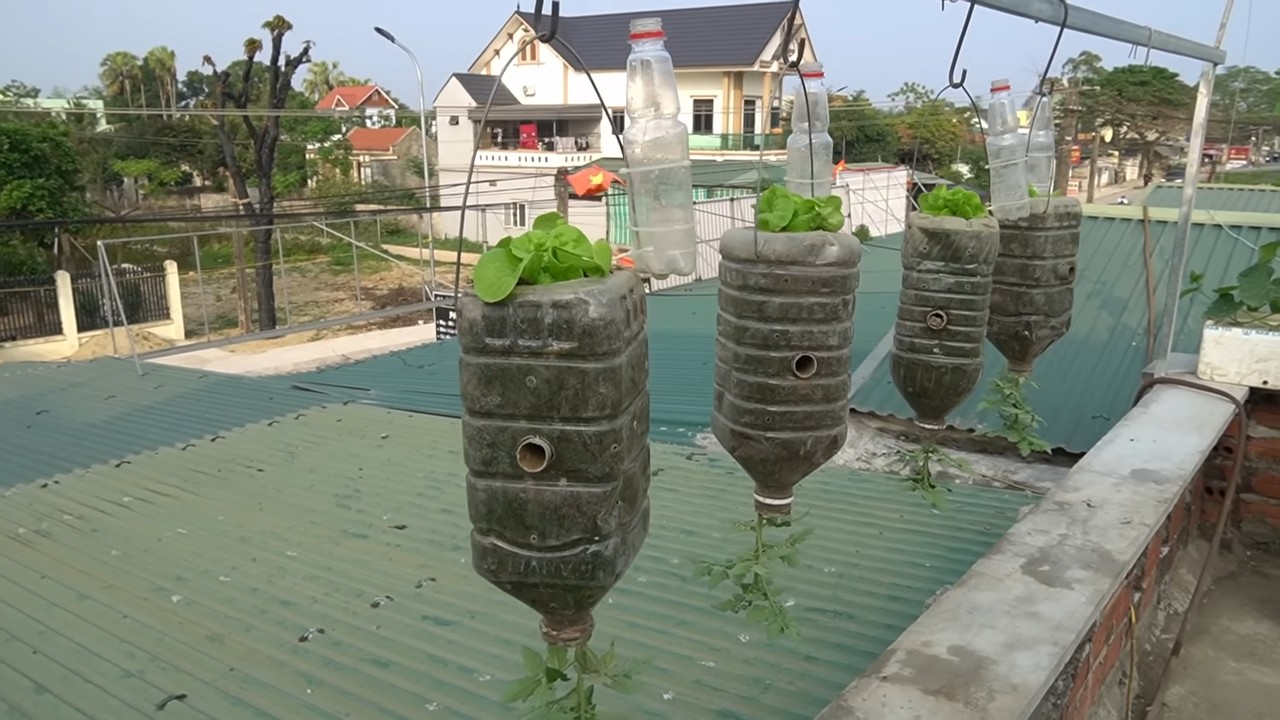
Hanging gardens for lettuce tomatoes are not just a trendy aesthetic; they’re a practical solution for maximizing your harvest, especially if you’re short on space! Imagine stepping onto your balcony or into your backyard and being greeted by a cascade of vibrant green lettuce and juicy red tomatoes, all within arm’s reach. Sounds dreamy, right? Well, it’s totally achievable, and I’m here to show you how with some easy DIY tricks.
The concept of vertical gardening, while seemingly modern, actually has roots stretching back centuries. Think of the legendary Hanging Gardens of Babylon, one of the Seven Wonders of the Ancient World! While we might not be building anything quite that grand, we can certainly draw inspiration from the ingenuity of creating lush, thriving gardens in unconventional spaces.
In today’s world, where urban living often means limited garden space, hanging gardens for lettuce tomatoes offer a fantastic way to enjoy fresh, homegrown produce. Plus, they can be a real lifesaver for those of us with back problems, making gardening more accessible and enjoyable. Forget bending over and weeding for hours! With these DIY hacks, you’ll be harvesting delicious lettuce and tomatoes in no time, all while adding a touch of beauty and charm to your home. Let’s get started!
DIY Hängegarten für Salat und Tomaten: So baust du ihn selbst!
Hallo liebe Gartenfreunde! Ich zeige euch heute, wie ihr einen fantastischen Hängegarten für Salat und Tomaten selber bauen könnt. Das ist nicht nur platzsparend, sondern sieht auch super aus und hält Schädlinge fern. Los geht’s!
Was du brauchst:
* Mehrere stabile Kunststoffbehälter (z.B. alte Eimer, Pflanzkübel oder große Joghurtbecher – je nach gewünschter Größe)
* Bohrmaschine mit verschiedenen Bohrern (für Abflusslöcher und Aufhängungen)
* Starkes Seil oder Kette (wetterfest!)
* Erde (am besten spezielle Gemüseerde)
* Salat- und Tomatenpflanzen (Setzlinge sind ideal)
* Optional: Kokosfaser oder Vlies für die Behälterböden
* Optional: Dünger (organisch oder mineralisch, je nach Vorliebe)
* Optional: Haken oder Karabinerhaken zum Aufhängen
* Optional: Wasserwaage
* Optional: Handschuhe
Die Vorbereitung:
Bevor wir loslegen, ist es wichtig, alles vorzubereiten. Das spart Zeit und Nerven!
1. Behälter reinigen: Reinige deine Behälter gründlich mit Wasser und eventuell etwas Spülmittel. Achte darauf, dass keine Rückstände bleiben.
2. Abflusslöcher bohren: Bohre mit der Bohrmaschine mehrere Löcher in den Boden jedes Behälters. Diese Löcher sind wichtig, damit überschüssiges Wasser ablaufen kann und Staunässe vermieden wird. Staunässe ist der Feind jeder Pflanze!
3. Aufhängungslöcher bohren: Bohre nun Löcher für die Aufhängung. Die Anzahl und Position der Löcher hängt von der Form deiner Behälter und der Art der Aufhängung ab. Ich empfehle, mindestens drei Löcher gleichmäßig verteilt am oberen Rand jedes Behälters zu bohren. Achte darauf, dass die Löcher groß genug für dein Seil oder deine Kette sind.
4. Optional: Behälter auskleiden: Lege den Boden der Behälter mit Kokosfaser oder Vlies aus. Das verhindert, dass Erde durch die Abflusslöcher gespült wird und hält die Erde länger feucht.
Der Aufbau des Hängegartens:
Jetzt kommt der spannende Teil: Wir bauen unseren Hängegarten zusammen!
1. Seil/Kette vorbereiten: Schneide das Seil oder die Kette in gleich lange Stücke. Die Länge hängt davon ab, wie tief dein Hängegarten hängen soll. Bedenke, dass du noch etwas Spielraum zum Knoten oder Befestigen brauchst.
2. Seil/Kette befestigen: Führe die Seilstücke durch die Aufhängungslöcher in den Behältern und verknote sie fest. Achte darauf, dass die Knoten sicher sind und sich nicht lösen können. Wenn du Ketten verwendest, kannst du Karabinerhaken verwenden, um die Ketten an den Behältern zu befestigen.
3. Behälter aufhängen: Suche dir einen geeigneten Platz für deinen Hängegarten. Das kann ein Balkon, eine Terrasse oder ein Garten sein. Wichtig ist, dass der Platz sonnig ist und die Pflanzen genügend Licht bekommen. Befestige Haken oder Karabinerhaken an der Decke oder einem stabilen Gestell. Hänge die Behälter an den Haken auf.
4. Wasserwaage benutzen: Überprüfe mit einer Wasserwaage, ob die Behälter gerade hängen. Passe die Länge der Seile oder Ketten gegebenenfalls an, um ein gleichmäßiges Bild zu erhalten.
Das Bepflanzen:
Endlich können wir unsere Pflanzen einsetzen!
1. Erde einfüllen: Fülle die Behälter mit Erde. Lass oben noch etwas Platz, damit die Erde beim Gießen nicht überläuft.
2. Pflanzen einsetzen: Setze die Salat- und Tomatenpflanzen in die Erde. Achte darauf, dass die Wurzeln genügend Platz haben und die Pflanzen nicht zu eng stehen.
3. Angießen: Gieße die Pflanzen nach dem Einsetzen gründlich an. Das hilft ihnen, sich an ihren neuen Standort zu gewöhnen.
4. Optional: Düngen: Dünge die Pflanzen nach Bedarf. Verwende am besten einen organischen oder mineralischen Dünger, der für Gemüse geeignet ist. Beachte die Anweisungen auf der Verpackung.
Die Pflege:
Damit dein Hängegarten lange Freude bereitet, ist die richtige Pflege wichtig.
1. Regelmäßiges Gießen: Gieße die Pflanzen regelmäßig, besonders an heißen Tagen. Achte darauf, dass die Erde immer leicht feucht ist, aber nicht nass.
2. Düngen: Dünge die Pflanzen regelmäßig, um sie mit ausreichend Nährstoffen zu versorgen.
3. Schädlinge kontrollieren: Kontrolliere die Pflanzen regelmäßig auf Schädlinge. Bei Bedarf kannst du biologische Schädlingsbekämpfungsmittel einsetzen.
4. Ausgeizen (bei Tomaten): Geize die Tomatenpflanzen regelmäßig aus. Das bedeutet, dass du die Seitentriebe entfernst, die in den Blattachseln wachsen. Das fördert das Wachstum der Haupttriebe und sorgt für eine bessere Ernte.
5. Stützen (bei Tomaten): Tomatenpflanzen brauchen Unterstützung, wenn sie größer werden. Du kannst sie an Stäben oder Schnüren festbinden.
6. Ernten: Ernte den Salat und die Tomaten, sobald sie reif sind. Das fördert die Bildung neuer Früchte.
Zusätzliche Tipps und Tricks:
* Sonnenschutz: An sehr heißen Tagen kann es sinnvoll sein, den Hängegarten mit einem Sonnensegel oder ähnlichem zu beschatten.
* Windschutz: Wenn dein Hängegarten an einem windigen Ort steht, solltest du ihn mit einem Windschutz schützen.
* Verschiedene Pflanzen: Du kannst deinen Hängegarten auch mit anderen Pflanzen bepflanzen, z.B. Kräutern, Erdbeeren oder Paprika.
* Upcycling: Verwende alte Gegenstände als Behälter für deinen Hängegarten. Das ist nicht nur nachhaltig, sondern auch kreativ. Alte Gießkannen, Blecheimer oder sogar Schuhe können zu originellen Pflanzgefäßen umfunktioniert werden.
* Beschriftung: Beschrifte die Behälter, damit du weißt, welche Pflanzen darin wachsen. Das ist besonders hilfreich, wenn du verschiedene Sorten anbaust.
* Drainage: Um Staunässe zu vermeiden, kannst du eine Drainageschicht aus Kies oder Blähton auf den Boden der Behälter geben, bevor du die Erde einfüllst.
* Mulchen: Mulche die Erde mit Stroh oder Rindenmulch. Das hält die Erde feucht und unterdrückt Unkraut.
* Bewässerungssystem: Wenn du keine Zeit zum regelmäßigen Gießen hast, kannst du ein automatisches Bewässerungssystem installieren.
Hängegarten für Tomaten optimieren:
Tomaten sind etwas anspruchsvoller als Salat, daher hier ein paar spezielle Tipps:
* Größere Behälter: Tomaten brauchen mehr Platz als Salat. Verwende daher größere Behälter mit einem Volumen von mindestens 10 Litern.
* Tomatensorte wählen: Wähle eine Tomatensorte, die für den Anbau im Topf geeignet ist. Buschtomaten oder Hängetomaten sind ideal.
* Stabiles Seil/Kette: Tomatenpflanzen können schwer werden. Verwende daher ein besonders stabiles Seil oder eine Kette für die Aufhängung.
* Regelmäßiges Ausgeizen: Geize die Tomatenpflanzen regelmäßig aus, um das Wachstum der Haupttriebe zu fördern.
* Stützen: Biete den Tomatenpflanzen ausreichend Unterstützung, z.B. durch Stäbe oder Schnüre.
* Sonniger Standort: Tomaten brauchen viel Sonne. Wähle daher einen sonnigen Standort für deinen Hängegarten.
Ich hoffe, diese Anleitung hilft dir dabei, deinen eigenen Hängegarten für Salat und Tomaten zu bauen. Viel Spaß beim Gärtnern! Und denk dran: Geduld und Liebe sind die besten Zutaten für eine reiche Ernte!
Conclusion
So, there you have it! Creating your own DIY hanging garden for lettuce and tomatoes isn’t just a fun project; it’s a game-changer for anyone looking to maximize space, enjoy fresh produce, and add a touch of green elegance to their home. We’ve walked you through the process, highlighting the simplicity and affordability of this fantastic gardening method.
Why is this a must-try? Because it offers a multitude of benefits. Imagine stepping outside your door and harvesting ripe, juicy tomatoes or crisp, vibrant lettuce leaves, all grown organically and without the back-breaking labor of traditional gardening. Think about the space you’ll save, especially if you’re living in an apartment or have a small yard. And consider the aesthetic appeal – a cascading curtain of greenery, bursting with color and life, transforming your balcony, patio, or even a sunny indoor spot into a miniature Eden.
But the advantages don’t stop there. Hanging gardens are naturally more resistant to ground-dwelling pests and diseases, reducing the need for harmful pesticides. They also offer better air circulation, promoting healthier plant growth. Plus, they’re incredibly easy to maintain, requiring less weeding and watering than conventional gardens.
Feeling adventurous? Let’s talk variations! Instead of just lettuce and tomatoes, consider adding other herbs and vegetables to your hanging garden. Strawberries, peppers, spinach, and even dwarf varieties of cucumbers can thrive in hanging baskets. Experiment with different types of containers – repurposed plastic bottles, woven baskets, or even old tires can be transformed into charming planters. Get creative with your hanging arrangements, creating vertical walls of greenery or cascading tiers of edible delights. You can also explore different soil mixes to optimize growth for specific plants. For example, tomatoes benefit from a slightly acidic soil, while lettuce prefers a more neutral pH.
Don’t be afraid to personalize your hanging garden to reflect your own style and preferences. Add decorative elements like colorful ribbons, painted pots, or whimsical garden ornaments. Incorporate companion planting techniques, pairing plants that benefit each other, such as basil and tomatoes, to enhance flavor and deter pests.
The possibilities are endless! The key is to start small, experiment, and learn as you go. Gardening is a journey, not a destination, and every mistake is an opportunity to grow (pun intended!).
We are confident that once you experience the joy and satisfaction of growing your own food in a DIY hanging garden, you’ll be hooked. It’s a rewarding, sustainable, and incredibly enjoyable way to connect with nature and nourish your body and soul.
So, what are you waiting for? Gather your supplies, roll up your sleeves, and get ready to create your own little slice of paradise. And most importantly, don’t forget to share your experiences with us! We’d love to see your creations, hear your tips and tricks, and learn from your successes (and even your failures!). Share your photos and stories on our social media channels using #DIYHangingGarden. Let’s inspire each other to grow more, eat healthier, and live more sustainably. Embrace the joy of **DIY hanging garden** creation and watch your space transform into a vibrant, edible oasis.
Frequently Asked Questions (FAQ)
What kind of containers are best for a DIY hanging garden?
The best containers for a DIY hanging garden are those that are lightweight, durable, and have good drainage. Plastic pots, hanging baskets lined with coco coir, and even repurposed items like plastic bottles or old buckets can work well. Ensure the containers have drainage holes to prevent waterlogging, which can lead to root rot. Consider the size of the plants you intend to grow when choosing your containers. Lettuce, with its shallow root system, can thrive in smaller containers, while tomatoes, which have deeper roots, will require larger pots.
What type of soil should I use for my hanging garden?
A well-draining potting mix is essential for a successful hanging garden. Avoid using garden soil, as it can become compacted and heavy in containers, hindering root growth. Look for a potting mix that contains ingredients like peat moss, perlite, and vermiculite, which provide good aeration and drainage. You can also amend your potting mix with compost or other organic matter to improve its fertility. For tomatoes, consider adding a slow-release fertilizer to the soil to provide them with the nutrients they need to produce abundant fruit.
How often should I water my hanging garden?
Hanging gardens tend to dry out more quickly than traditional gardens, so regular watering is crucial. The frequency of watering will depend on factors like the weather, the type of plants you’re growing, and the size of your containers. Check the soil moisture regularly by sticking your finger into the soil. If the top inch feels dry, it’s time to water. Water thoroughly until water drains out of the drainage holes. Avoid overwatering, as this can lead to root rot. During hot, dry weather, you may need to water your hanging garden daily, or even twice a day.
How much sunlight do lettuce and tomatoes need in a hanging garden?
Lettuce and tomatoes have different sunlight requirements. Lettuce prefers partial shade, especially during the hottest part of the day. Aim for at least 4-6 hours of sunlight per day for lettuce. Tomatoes, on the other hand, are sun-loving plants and need at least 6-8 hours of direct sunlight per day to thrive and produce abundant fruit. Choose a location for your hanging garden that provides adequate sunlight for both lettuce and tomatoes. If you’re growing them together, consider placing the lettuce in a spot that receives some afternoon shade to protect it from scorching.
How do I fertilize my hanging garden?
Regular fertilization is essential for maintaining healthy plants and maximizing yields in a hanging garden. Use a balanced liquid fertilizer diluted to half strength every 2-3 weeks. You can also use a slow-release fertilizer incorporated into the soil at planting time. For tomatoes, choose a fertilizer that is high in phosphorus and potassium, which are essential for fruit production. Avoid over-fertilizing, as this can lead to nutrient imbalances and plant damage.
How do I protect my hanging garden from pests and diseases?
Hanging gardens are generally less susceptible to pests and diseases than traditional gardens, but it’s still important to take precautions. Inspect your plants regularly for signs of pests or diseases. Remove any infected leaves or plants immediately. Use organic pest control methods, such as insecticidal soap or neem oil, to control pests. Ensure good air circulation around your plants to prevent fungal diseases. You can also use companion planting techniques to deter pests and attract beneficial insects. For example, planting basil near tomatoes can help repel tomato hornworms.
Can I grow other plants besides lettuce and tomatoes in my hanging garden?
Absolutely! Hanging gardens are versatile and can be used to grow a wide variety of herbs, vegetables, and flowers. Some other good choices for hanging gardens include strawberries, peppers, spinach, herbs like basil, oregano, and thyme, and trailing flowers like petunias and impatiens. Consider the sunlight and water requirements of each plant when choosing what to grow in your hanging garden.
How do I prevent my hanging baskets from drying out too quickly?
There are several things you can do to prevent your hanging baskets from drying out too quickly. Use a potting mix that retains moisture well. Add water-retaining crystals to the soil. Mulch the top of the soil with straw or shredded bark to help retain moisture. Water your hanging baskets deeply and thoroughly, ensuring that the water reaches the roots. Group your hanging baskets together to create a microclimate that helps retain moisture. And consider using self-watering hanging baskets, which have a built-in reservoir that provides a constant supply of water to the plants.
How do I support tomato plants in a hanging garden?
Tomato plants, especially indeterminate varieties, can become quite heavy and require support in a hanging garden. Use tomato cages or stakes to support the plants as they grow. You can also use twine to tie the plants to the hanging basket or a nearby support structure. Prune the tomato plants regularly to remove suckers and excess foliage, which can help reduce the weight of the plants and improve air circulation.
What do I do with my hanging garden in the winter?
The fate of your hanging garden in the winter depends on your climate and the types of plants you’re growing. In mild climates, you may be able to overwinter some of your plants by bringing them indoors or protecting them from frost. In colder climates, you may need to dismantle your hanging garden and start fresh in the spring. You can compost the old plants and reuse the soil for other gardening projects. Alternatively, you can grow cold-hardy vegetables like kale and spinach in your hanging garden during the winter months.


Leave a Comment