

Growing Tomatoes in your Kitchen Garden: Imagine plucking a sun-ripened, juicy tomato straight from your own kitchen garden and using it in your salad – the taste is simply unmatched! For centuries, cultivating food close to home has been a cornerstone of self-sufficiency and a connection to nature. From ancient Roman courtyards overflowing with herbs to the victory gardens of the World Wars, the desire to nurture our own food source is deeply ingrained in us.
But let’s face it, not everyone has acres of land or the time for extensive gardening. That’s where the magic of kitchen gardening comes in! And specifically, growing tomatoes in your kitchen garden is a rewarding project that even beginners can master. I’m going to share some simple, yet effective DIY tricks and hacks that will help you cultivate a thriving tomato patch, even in the smallest of spaces.
Why tomatoes, you ask? Well, besides being incredibly delicious and versatile in the kitchen, they’re packed with nutrients and relatively easy to grow with the right know-how. Plus, store-bought tomatoes often lack the flavor and vibrancy of homegrown ones. So, if you’re ready to ditch the bland supermarket varieties and experience the joy of harvesting your own delicious tomatoes, keep reading! I’m excited to guide you through the process and help you create a flourishing tomato oasis right in your kitchen.

Tomatenanbau im eigenen Küchengarten: So geht’s!
Hey Leute, ich zeige euch heute, wie ihr eure eigenen, saftigen Tomaten direkt in eurem Küchengarten anbauen könnt! Es ist einfacher als ihr denkt und das Ergebnis ist einfach unschlagbar. Frische, aromatische Tomaten, wann immer ihr sie braucht – klingt gut, oder? Los geht’s!
Was ihr für den Tomatenanbau braucht:
* Tomatensamen oder Jungpflanzen: Ich empfehle, mit Jungpflanzen zu beginnen, besonders wenn ihr Anfänger seid. Es spart Zeit und Mühe. Achtet auf robuste Sorten, die für euer Klima geeignet sind.
* Anzuchttöpfe oder -schalen: Für die Voranzucht, falls ihr mit Samen startet.
* Anzuchterde: Spezielle Erde für die Anzucht, die nährstoffarm und locker ist.
* Pflanztöpfe oder ein Beet: Je nachdem, wo ihr eure Tomaten anbauen wollt. Töpfe sollten mindestens 10 Liter Fassungsvermögen haben.
* Tomatenerde: Nährstoffreiche Erde, die speziell für Tomaten entwickelt wurde.
* Pflanzstäbe oder Rankgitter: Tomatenpflanzen brauchen Unterstützung, um nicht umzuknicken.
* Gießkanne oder Gartenschlauch: Zum regelmäßigen Gießen.
* Tomatendünger: Für eine reiche Ernte.
* Gartenschere oder Messer: Zum Ausgeizen und Ernten.
* Handschuhe: Um eure Hände sauber zu halten.
Die Vorbereitung: Der Grundstein für eine erfolgreiche Ernte
Bevor wir loslegen, ist eine gute Vorbereitung das A und O. Hier sind die Schritte, die ihr beachten solltet:
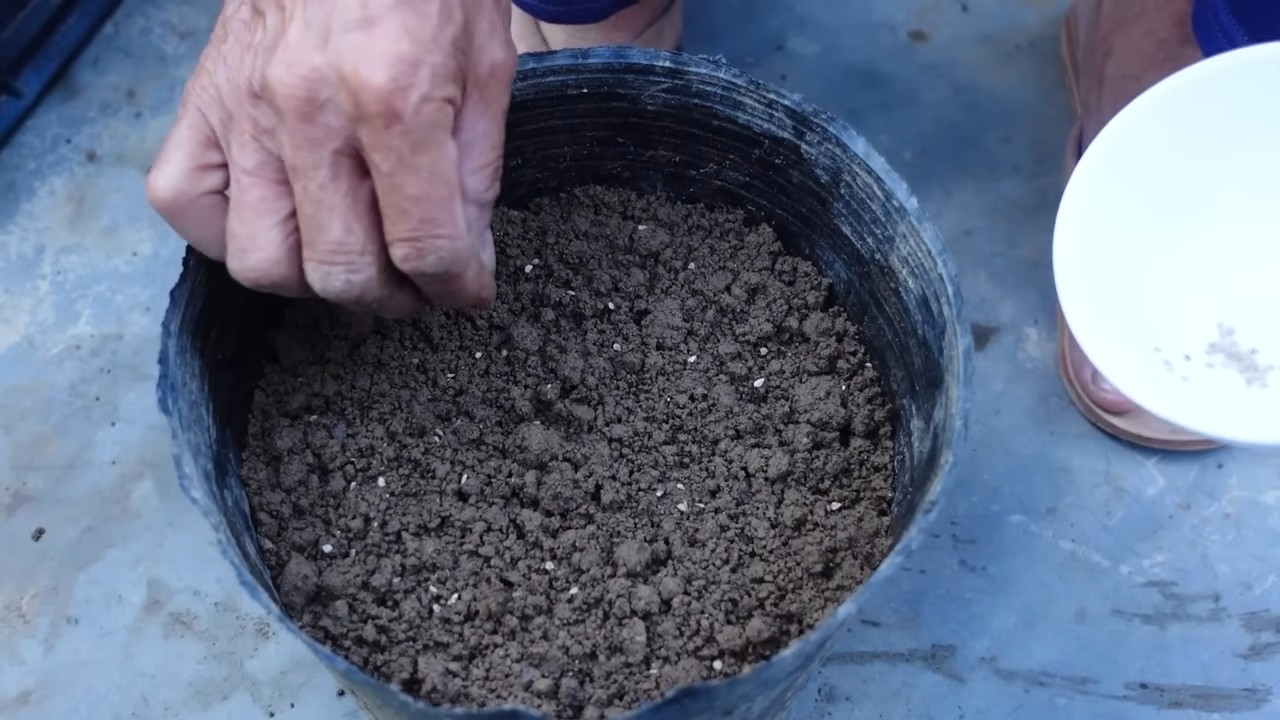
1. Samen vorziehen (optional): Wenn ihr mit Samen startet, solltet ihr diese etwa 6-8 Wochen vor dem letzten Frost im Haus vorziehen. Füllt eure Anzuchttöpfe mit Anzuchterde, drückt die Erde leicht an und legt 1-2 Samen pro Topf hinein. Bedeckt die Samen leicht mit Erde und befeuchtet sie mit einer Sprühflasche. Stellt die Töpfe an einen warmen, hellen Ort (z.B. auf eine Fensterbank) und haltet die Erde feucht.
2. Jungpflanzen auswählen: Wenn ihr Jungpflanzen kauft, achtet darauf, dass sie gesund aussehen, kräftige Stängel haben und keine gelben oder braunen Blätter aufweisen. Vermeidet Pflanzen, die bereits Blüten tragen, da sie beim Umpflanzen gestresst werden könnten.
3. Den richtigen Standort wählen: Tomaten lieben die Sonne! Wählt einen sonnigen Standort, der mindestens 6-8 Stunden Sonnenlicht pro Tag bekommt. Der Boden sollte locker, gut durchlässig und nährstoffreich sein.
4. Den Boden vorbereiten: Wenn ihr eure Tomaten ins Beet pflanzt, lockert den Boden gründlich auf und entfernt Unkraut. Mischt Kompost oder gut verrotteten Mist unter, um den Boden mit Nährstoffen anzureichern. Wenn ihr Töpfe verwendet, füllt diese mit Tomatenerde.
Das Einpflanzen: Der Start ins Tomatenleben
Jetzt kommt der spannende Teil: das Einpflanzen eurer Tomaten!
1. Jungpflanzen abhärten: Bevor ihr eure Jungpflanzen ins Freie pflanzt, solltet ihr sie einige Tage lang abhärten. Stellt sie tagsüber für ein paar Stunden nach draußen und holt sie abends wieder rein. So gewöhnen sie sich langsam an die äußeren Bedingungen.
2. Pflanzlöcher ausheben: Grabt Pflanzlöcher, die etwas größer sind als die Wurzelballen eurer Jungpflanzen.
3. Tomaten einsetzen: Nehmt die Jungpflanzen vorsichtig aus ihren Töpfen und setzt sie in die Pflanzlöcher. Achtet darauf, dass der Wurzelballen nicht beschädigt wird. Setzt die Pflanzen etwas tiefer, als sie vorher im Topf standen. Das fördert die Wurzelbildung.
4. Löcher auffüllen: Füllt die Pflanzlöcher mit Erde auf und drückt sie leicht an.
5. Angießen: Gießt die Pflanzen gründlich an.
Die Pflege: Damit eure Tomaten prächtig gedeihen
Die richtige Pflege ist entscheidend für eine reiche Tomatenernte. Hier sind die wichtigsten Punkte:
1. Gießen: Tomaten brauchen regelmäßig Wasser, besonders während der Blütezeit und der Fruchtbildung. Gießt am besten morgens, damit die Blätter über den Tag abtrocknen können. Vermeidet es, die Blätter direkt zu gießen, da dies Pilzkrankheiten fördern kann. Achtet darauf, dass die Erde immer leicht feucht ist, aber nicht nass.
2. Düngen: Tomaten sind Starkzehrer und brauchen viele Nährstoffe. Düngt eure Pflanzen regelmäßig mit einem speziellen Tomatendünger. Beginnt etwa 2-3 Wochen nach dem Einpflanzen und wiederholt die Düngung alle 2-3 Wochen.
3. Ausgeizen: Das Ausgeizen ist ein wichtiger Schritt, um eine reiche Ernte zu erzielen. Dabei werden die Seitentriebe (Geiztriebe) entfernt, die sich in den Blattachseln bilden. Diese Triebe nehmen der Pflanze unnötig Kraft und Energie, die sie besser in die Fruchtbildung stecken kann. Brecht die Geiztriebe einfach mit den Fingern ab, solange sie noch klein sind.
4. Stützen: Tomatenpflanzen brauchen Unterstützung, um nicht umzuknicken. Verwendet Pflanzstäbe oder Rankgitter, an denen ihr die Pflanzen festbinden könnt.
5. Schutz vor Krankheiten und Schädlingen: Tomaten sind anfällig für verschiedene Krankheiten und Schädlinge. Achtet auf Anzeichen wie gelbe oder braune Blätter, Flecken oder Befall mit Läusen. Bei Bedarf könnt ihr biologische Pflanzenschutzmittel einsetzen. Eine gute Belüftung und ein sonniger Standort helfen, Krankheiten vorzubeugen.
Die Ernte: Der Lohn eurer Mühe
Endlich ist es soweit: Die Tomaten sind reif und können geerntet werden!
1. Reife erkennen: Reife Tomaten haben eine intensive Farbe (je nach Sorte rot, gelb, orange oder braun) und geben auf leichten Druck nach.
2. Ernten: Schneidet die Tomaten mit einer Gartenschere oder einem Messer ab. Lasst dabei ein kleines Stück des Stiels an der Tomate.
3. Lagerung: Lagert die Tomaten an einem kühlen, dunklen Ort. Vermeidet es, sie im Kühlschrank aufzubewahren, da sie sonst an Aroma verlieren.
Zusätzliche Tipps für eine noch bessere Ernte:
* Mulchen: Bedeckt den Boden um die Tomatenpflanzen mit Mulch (z.B. Stroh oder Rasenschnitt). Das hält die Feuchtigkeit im Boden, unterdrückt Unkraut und schützt die Früchte vor Schmutz.
* Regenschutz: Wenn ihr in einer Region mit viel Regen wohnt, solltet ihr eure Tomaten mit einem Regenschutz versehen. Das verhindert, dass die Blätter zu lange feucht bleiben und Pilzkrankheiten entstehen.
* Sortenwahl: Experimentiert mit verschiedenen Tomatensorten, um herauszufinden, welche euch am besten schmecken und in eurem Klima am besten gedeihen. Es gibt unzählige Sorten, von kleinen Cherrytomaten bis hin zu großen Fleischtomaten.
* Nachbarn: Pflanzt Basilikum neben eure Tomaten. Es soll Schädlinge fernhalten und das Aroma der Tomaten verbessern.
Häufige Probleme und Lösungen:
* Blütenendfäule: Braune, ledrige Flecken am Blütenende der Tomaten. Ursache ist meist ein Calciummangel. Lösung: Regelmäßig mit einem calciumhaltigen Dünger düngen und auf eine gleichmäßige Wasserversorgung achten.
* Kraut- und Braunfäule: Braune Flecken auf Blättern und Früchten. Ursache ist ein Pilz. Lösung: Befallene Blätter und Früchte entfernen und die Pflanzen mit einem Fungizid behandeln. Auf eine gute Belüftung achten und die Blätter nicht direkt gießen.
* Blattläuse: Kleine, grüne oder schwarze Insekten, die an den Blättern saugen. Lösung: Blattläuse mit einem Wasserstrahl abspritzen oder mit einem biologischen Insekt
Conclusion
So, there you have it! Transforming your kitchen scraps into a thriving tomato patch is not only incredibly rewarding but also surprisingly simple. We’ve walked you through the process of nurturing your own tomato plants from seed to harvest, all within the cozy confines of your kitchen garden. This isn’t just about saving money; it’s about connecting with the food you eat, reducing waste, and experiencing the pure joy of watching life spring from something you might have otherwise discarded.
Why is this DIY trick a must-try? Because it’s a sustainable, cost-effective, and deeply satisfying way to enjoy fresh, flavorful tomatoes. Imagine the pride you’ll feel serving a salad made with tomatoes you grew yourself, knowing you played a direct role in bringing that deliciousness to your table. Plus, it’s a fantastic learning experience for the whole family, teaching valuable lessons about resourcefulness, patience, and the wonders of nature.
But the fun doesn’t stop there! Feel free to experiment with different tomato varieties. Cherry tomatoes, Roma tomatoes, beefsteak tomatoes – the possibilities are endless! You can also explore companion planting in your kitchen garden. Basil, for example, is a classic companion for tomatoes, known to improve their flavor and deter pests. Marigolds are another excellent choice, adding a splash of color while also repelling unwanted insects. Consider adding some chives or parsley to your tomato patch for a truly aromatic and productive kitchen garden.
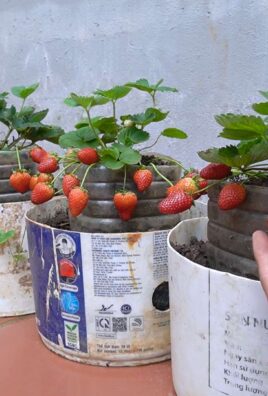
Don’t be afraid to get creative with your containers, too. While we’ve focused on using readily available items like repurposed plastic containers, you can also use terracotta pots, hanging baskets, or even old buckets. Just make sure your chosen container has adequate drainage to prevent waterlogging.
We understand that growing tomatoes can sometimes feel daunting, especially for beginners. But trust us, with a little patience and attention, you’ll be amazed at what you can achieve. Remember to provide your tomato plants with plenty of sunlight, water them regularly, and fertilize them as needed. And don’t forget to prune them to encourage healthy growth and abundant fruit production.
The key to successful tomato growing is observation. Pay close attention to your plants and learn to recognize the signs of stress or disease. Early detection is crucial for preventing problems from escalating. If you notice any yellowing leaves, spots, or pests, take action immediately. There are many organic pest control methods you can use to protect your tomato plants without resorting to harmful chemicals.
So, what are you waiting for? Roll up your sleeves, gather your supplies, and embark on your own tomato-growing adventure. We’re confident that you’ll find it to be a rewarding and enriching experience. And most importantly, don’t forget to share your journey with us! We’d love to hear about your successes, your challenges, and any tips or tricks you discover along the way. Share your photos and stories on our social media channels using #KitchenGardenTomatoes. Let’s build a community of passionate tomato growers and inspire others to embrace the joys of homegrown goodness. This **growing tomatoes** method is a game changer!
Now, let’s address some of the most frequently asked questions about growing tomatoes in your kitchen garden.
Frequently Asked Questions (FAQ)
What kind of soil is best for growing tomatoes in a kitchen garden?
Tomatoes thrive in well-draining, nutrient-rich soil. A good starting point is a mix of potting soil, compost, and perlite or vermiculite. The potting soil provides a base, the compost adds essential nutrients, and the perlite or vermiculite improves drainage and aeration. Avoid using garden soil directly in containers, as it can become compacted and hinder root growth. You can also amend your soil with organic fertilizers like bone meal or blood meal to provide additional nutrients. Aim for a soil pH between 6.0 and 6.8 for optimal tomato growth.
How much sunlight do tomato plants need?
Tomato plants are sun-loving creatures and require at least 6-8 hours of direct sunlight per day to produce abundant fruit. Choose a location in your kitchen garden that receives ample sunlight throughout the day. If you’re growing tomatoes indoors, you may need to supplement with grow lights, especially during the winter months. Rotate your plants regularly to ensure even light exposure on all sides.
How often should I water my tomato plants?
Watering frequency depends on several factors, including the size of your container, the type of soil, and the weather conditions. As a general rule, water your tomato plants deeply whenever the top inch of soil feels dry to the touch. Avoid overwatering, as this can lead to root rot. When watering, aim to water the soil directly, avoiding wetting the foliage, which can increase the risk of fungal diseases. Mulching around your tomato plants can help retain moisture and reduce the need for frequent watering.
How do I fertilize my tomato plants?
Tomatoes are heavy feeders and require regular fertilization to produce a bountiful harvest. Start fertilizing your tomato plants a few weeks after transplanting them into their final containers. Use a balanced fertilizer with an NPK ratio (nitrogen, phosphorus, potassium) of around 10-10-10 or 14-14-14. Follow the instructions on the fertilizer packaging for application rates. You can also use organic fertilizers like compost tea, fish emulsion, or seaweed extract. Fertilize your tomato plants every 2-3 weeks throughout the growing season.
How do I prune my tomato plants?
Pruning is essential for maintaining healthy tomato plants and maximizing fruit production. The main goal of pruning is to remove suckers, which are small shoots that grow in the crotch between the main stem and the branches. Suckers can divert energy away from fruit production and make the plant more susceptible to diseases. Use clean pruning shears to remove suckers when they are small, ideally less than 2 inches long. You can also remove any yellowing or diseased leaves to improve air circulation and prevent the spread of disease.
What are some common tomato pests and diseases, and how can I prevent them?
Tomato plants are susceptible to a variety of pests and diseases, including aphids, whiteflies, tomato hornworms, blossom end rot, and early blight. To prevent these problems, start by choosing disease-resistant tomato varieties. Practice good sanitation by removing any fallen leaves or debris from around your plants. Water your plants at the base to avoid wetting the foliage. Use organic pest control methods like insecticidal soap or neem oil to control pests. Ensure proper air circulation around your plants by spacing them adequately and pruning them regularly. For blossom end rot, ensure consistent watering and add calcium to the soil.
Can I grow tomatoes indoors year-round?
Yes, you can grow tomatoes indoors year-round, but it requires some extra effort. You’ll need to provide your tomato plants with adequate light, either through a sunny window or with grow lights. You’ll also need to pollinate the flowers manually, as there won’t be any bees or other pollinators indoors. Use a small paintbrush to transfer pollen from one flower to another. Finally, you’ll need to provide your tomato plants with proper ventilation and humidity to prevent diseases.
How long does it take for tomatoes to mature?
The time it takes for tomatoes to mature depends on the variety. Some early-maturing varieties can produce fruit in as little as 50-60 days, while later-maturing varieties may take 80-90 days or more. Check the seed packet or plant label for specific information about the maturity time of your chosen tomato variety.
How do I know when my tomatoes are ripe?
Tomatoes are ripe when they have reached their full color and are slightly soft to the touch. The color will vary depending on the variety, but generally, ripe tomatoes will be red, pink, yellow, or orange. Gently squeeze the tomato; if it gives slightly, it’s ready to be harvested.
What can I do with my homegrown tomatoes?
The possibilities are endless! You can use your homegrown tomatoes in salads, sauces, soups, stews, sandwiches, and more. You can also can or freeze your tomatoes to enjoy them throughout the year. And of course, you can simply slice them up and eat them fresh off the vine!

Leave a Comment