

Growing Purple Kohlrabi might sound intimidating, but trust me, it’s a surprisingly rewarding experience! Have you ever walked through a farmers market and been captivated by those alien-looking, vibrant purple orbs with leafy greens sprouting from them? That’s kohlrabi, and you can absolutely grow it in your own backyard – no green thumb wizardry required!
Kohlrabi, sometimes called a German turnip, has a fascinating history. Originating in Northern Europe, it’s been a staple in German cuisine for centuries. Think of hearty stews and vibrant slaws! But beyond its culinary roots, kohlrabi is packed with nutrients and offers a unique flavor profile – a delightful cross between a turnip and a cabbage, with a hint of sweetness.
So, why should you try growing purple kohlrabi? Well, for starters, it’s relatively easy to grow, even for beginner gardeners. Plus, it’s a fantastic way to add a pop of color and unique flavor to your meals. Imagine impressing your friends and family with a dish featuring homegrown purple kohlrabi! But more importantly, in a world where we’re increasingly conscious of where our food comes from, growing your own kohlrabi allows you to control the process, ensuring you’re eating fresh, healthy, and pesticide-free produce. This DIY guide will provide you with simple tricks and hacks to ensure a bountiful harvest. Let’s get started!
Lila Kohlrabi selber ziehen: Ein umfassender DIY-Leitfaden
Hallo Gartenfreunde! Ich liebe es, mein eigenes Gemüse anzubauen, und lila Kohlrabi ist einer meiner Favoriten. Er ist nicht nur super lecker, sondern auch wunderschön anzusehen. In diesem Artikel zeige ich euch Schritt für Schritt, wie ihr euren eigenen lila Kohlrabi erfolgreich anbauen könnt. Keine Angst, es ist einfacher als ihr denkt!
Was du für den Anbau von lila Kohlrabi brauchst
Bevor wir loslegen, hier eine Liste der Dinge, die du benötigst:
* Kohlrabisamen (lila Sorte): Achte darauf, dass du hochwertiges Saatgut kaufst.
* Anzuchterde: Diese ist nährstoffarm und ideal für die Keimung.
* Anzuchttöpfe oder -schalen: Kleine Töpfe oder Schalen sind perfekt für die Voranzucht.
* Pflanzerde: Diese ist nährstoffreicher und für das Auspflanzen geeignet.
* Kompost oder organischer Dünger: Für eine gute Nährstoffversorgung.
* Gießkanne oder Sprühflasche: Zum Bewässern der Pflanzen.
* Gartenwerkzeug: Spaten, Schaufel, Hacke (je nach Bedarf).
* Pflanzschilder und Stift: Zum Beschriften der Sorten.
* Ein sonniger Standort: Kohlrabi braucht viel Sonne.
Aussaat und Voranzucht
Die Voranzucht ist der Schlüssel zum Erfolg, besonders wenn du in einer Region mit kürzeren Sommern lebst.
1. Aussaatzeitpunkt bestimmen: Ich beginne in der Regel etwa 4-6 Wochen vor dem letzten erwarteten Frost mit der Aussaat. Das ist meistens im März oder April.
2. Anzuchttöpfe vorbereiten: Fülle die Anzuchttöpfe oder -schalen mit Anzuchterde. Drücke die Erde leicht an.
3. Samen aussäen: Lege 1-2 Samen pro Topf etwa 0,5-1 cm tief in die Erde.
4. Bedecken und gießen: Bedecke die Samen leicht mit Erde und befeuchte sie vorsichtig mit einer Sprühflasche. Vermeide Staunässe!
5. Warm und hell stellen: Stelle die Töpfe an einen warmen und hellen Ort. Eine Temperatur von 18-22°C ist ideal. Ein Mini-Gewächshaus oder eine Fensterbank sind gute Optionen.
6. Feucht halten: Halte die Erde gleichmäßig feucht, aber nicht nass.
7. Keimung beobachten: Die Keimung dauert in der Regel 5-10 Tage.
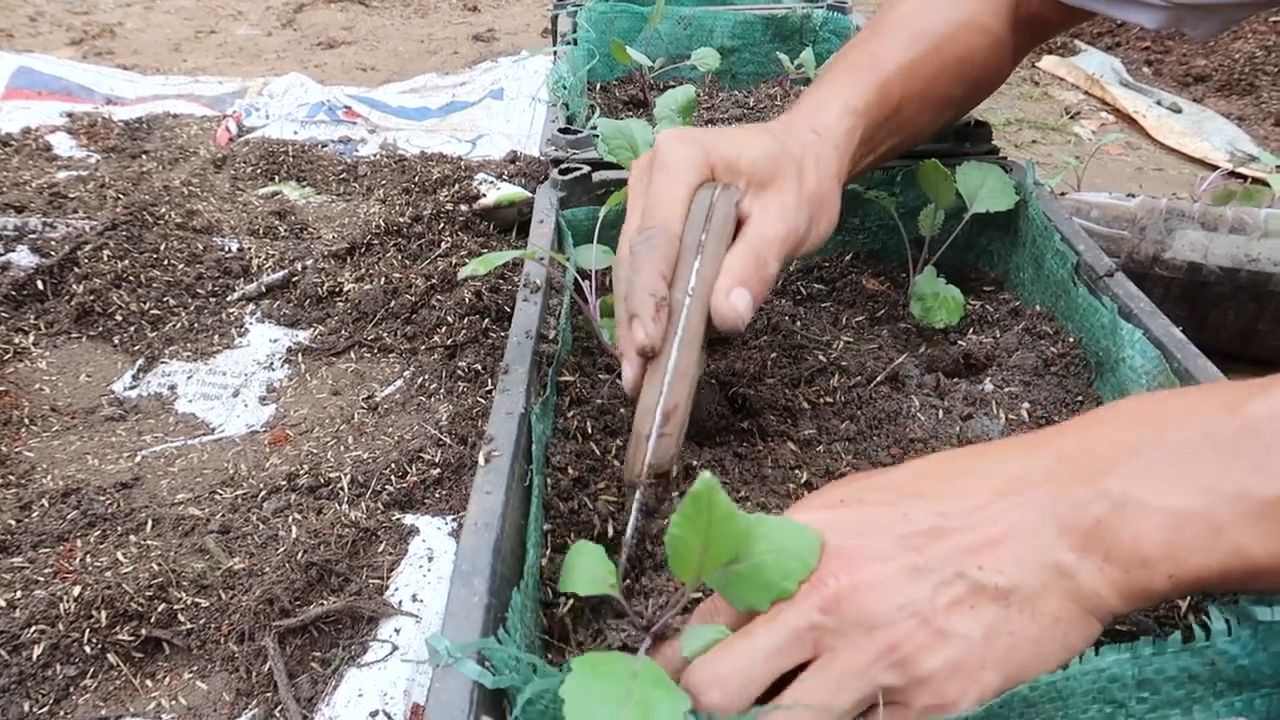
8. Pikieren (vereinzeln): Sobald die Sämlinge ihre ersten richtigen Blätter (nach den Keimblättern) entwickelt haben, kannst du sie pikieren. Das bedeutet, dass du die schwächeren Pflanzen entfernst, sodass nur noch eine kräftige Pflanze pro Topf übrig bleibt. Sei dabei vorsichtig, um die Wurzeln nicht zu beschädigen.
Vorbereitung des Beetes
Ein gut vorbereitetes Beet ist die halbe Miete!
1. Standort wählen: Wähle einen sonnigen Standort für deinen Kohlrabi. Er braucht mindestens 6 Stunden Sonne pro Tag.
2. Boden vorbereiten: Lockere den Boden gründlich auf und entferne Unkraut, Steine und Wurzeln.
3. Boden verbessern: Kohlrabi bevorzugt einen nährstoffreichen, humosen Boden. Arbeite Kompost oder organischen Dünger in den Boden ein. Das verbessert die Bodenstruktur und versorgt die Pflanzen mit wichtigen Nährstoffen.
4. pH-Wert prüfen: Der ideale pH-Wert für Kohlrabi liegt zwischen 6,0 und 7,5. Du kannst den pH-Wert mit einem Bodentest überprüfen und gegebenenfalls anpassen.
Auspflanzen der Jungpflanzen
Jetzt geht es ans Eingemachte!
1. Abhärten: Bevor du die Jungpflanzen ins Freie pflanzt, solltest du sie abhärten. Das bedeutet, dass du sie für etwa eine Woche tagsüber stundenweise ins Freie stellst, um sie an die Bedingungen zu gewöhnen.
2. Pflanzzeitpunkt wählen: Pflanze die Jungpflanzen aus, sobald keine Frostgefahr mehr besteht. Das ist in der Regel Mitte Mai.
3. Pflanzabstand beachten: Halte einen Pflanzabstand von etwa 25-30 cm zwischen den Pflanzen und 30-40 cm zwischen den Reihen ein.
4. Pflanzlöcher ausheben: Hebe Pflanzlöcher aus, die etwas größer sind als die Wurzelballen der Jungpflanzen.
5. Pflanzen einsetzen: Setze die Jungpflanzen vorsichtig in die Pflanzlöcher und fülle sie mit Erde auf. Drücke die Erde leicht an.
6. Angießen: Gieße die Pflanzen nach dem Einsetzen gründlich an.
Pflege des Kohlrabis
Damit dein lila Kohlrabi prächtig gedeiht, ist regelmäßige Pflege wichtig.
1. Bewässerung: Kohlrabi braucht eine gleichmäßige Bewässerung, besonders während der Knollenbildung. Achte darauf, dass der Boden immer leicht feucht ist, aber vermeide Staunässe.
2. Unkrautbekämpfung: Halte das Beet unkrautfrei, indem du regelmäßig Unkraut jätest. Unkraut konkurriert mit dem Kohlrabi um Nährstoffe und Wasser.
3. Düngung: Dünge den Kohlrabi regelmäßig mit Kompost oder organischem Dünger. Eine zusätzliche Düngung mit Brennnesseljauche ist ebenfalls empfehlenswert.
4. Schutz vor Schädlingen: Kohlrabi kann von verschiedenen Schädlingen befallen werden, wie z.B. Kohlweißling, Erdflöhe oder Kohlfliegen. Kontrolliere die Pflanzen regelmäßig und bekämpfe Schädlinge bei Bedarf mit geeigneten Mitteln. Ein Kulturschutznetz kann ebenfalls helfen, Schädlinge fernzuhalten.
5. Bodenlockerung: Lockere den Boden regelmäßig auf, um die Belüftung zu verbessern und die Wasseraufnahme zu fördern.
Ernte des lila Kohlrabis
Der Moment, auf den du gewartet hast!
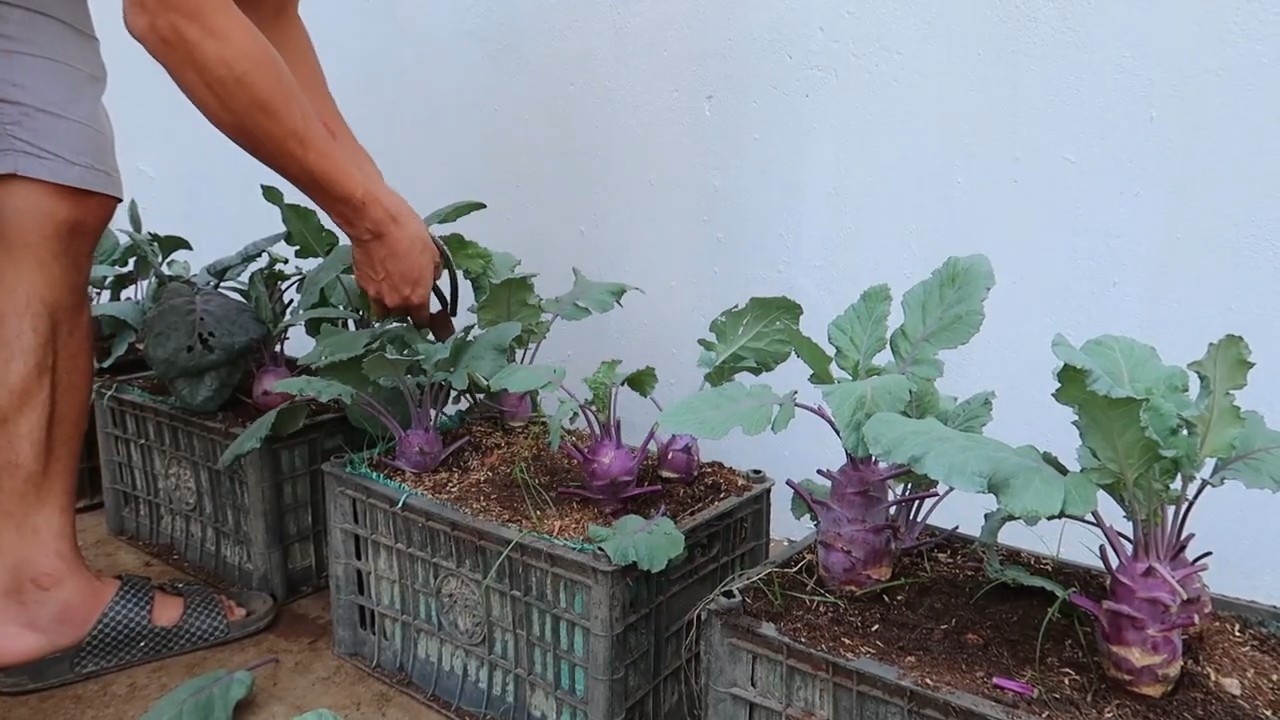
1. Erntezeitpunkt bestimmen: Der lila Kohlrabi ist erntereif, wenn die Knollen einen Durchmesser von etwa 8-10 cm haben. Sie sollten sich fest anfühlen.
2. Ernten: Schneide die Knollen mit einem scharfen Messer knapp über dem Boden ab.
3. Lagerung: Du kannst den lila Kohlrabi im Kühlschrank für einige Tage lagern. Wickle ihn am besten in ein feuchtes Tuch ein.
Häufige Probleme und Lösungen
Auch beim Kohlrabianbau können Probleme auftreten. Hier sind einige häufige Probleme und wie du sie lösen kannst:
* Kohlfliege: Die Larven der Kohlfliege fressen an den Wurzeln der Pflanzen. Du kannst Kohlfliegen mit Kulturschutznetzen oder Nematoden bekämpfen.
* Erdflöhe: Erdflöhe fressen kleine Löcher in die Blätter. Du kannst Erdflöhe mit Kulturschutznetzen oder durch regelmäßiges Gießen bekämpfen.
* Kohlweißling: Die Raupen des Kohlweißlings fressen an den Blättern. Du kannst Kohlweißlinge absammeln oder mit biologischen Insektiziden bekämpfen.
* Knollen platzen: Wenn die Knollen zu schnell wachsen, können sie platzen. Das kann durch unregelmäßige Bewässerung oder zu viel Dünger verursacht werden. Achte auf eine gleichmäßige Bewässerung und dünge sparsam.
* Holzige Knollen: Wenn die Knollen zu lange im Beet bleiben, können sie holzig werden. Ernte den Kohlrabi rechtzeitig.
Zusätzliche Tipps für den erfolgreichen Anbau
* Fruchtfolge beachten: Baue Kohlrabi nicht jedes Jahr am selben Standort an, um Krankheiten und Schädlingen vorzubeugen.
* Mischkultur: Pflanze Kohlrabi in Mischkultur mit anderen Pflanzen, wie z.B. Salat, Radieschen oder Ringelblumen. Das kann Schädlinge abwehren und das Wachstum fördern.
* Sortenwahl: Es gibt verschiedene Sorten von lila Kohl
Conclusion
Growing your own purple kohlrabi isn’t just about adding another vegetable to your garden; it’s about unlocking a world of culinary possibilities and experiencing the satisfaction of nurturing something from seed to table. This DIY trick, focusing on optimizing soil conditions and providing consistent care, is a game-changer for anyone who’s struggled with kohlrabi in the past or simply wants to maximize their yield and flavor. The vibrant purple hue of homegrown kohlrabi is a visual delight, and the crisp, slightly sweet taste is far superior to anything you’ll find in the grocery store.
But the benefits extend beyond just taste and aesthetics. By controlling the growing environment, you can ensure your kohlrabi is free from harmful pesticides and herbicides, providing your family with a healthy and nutritious vegetable. Plus, the process of gardening itself is incredibly rewarding, offering a chance to connect with nature and de-stress.
Don’t be afraid to experiment with variations on this DIY trick. Consider companion planting with herbs like dill or chamomile, which are known to deter pests and attract beneficial insects. You could also try succession planting, sowing seeds every few weeks to ensure a continuous harvest throughout the growing season. For those in warmer climates, providing afternoon shade can prevent the kohlrabi from bolting (going to seed prematurely).
And remember, the key to success with purple kohlrabi lies in consistent watering and fertilization. Monitor your plants regularly and adjust your care routine as needed. Don’t be discouraged if your first attempt isn’t perfect – gardening is a learning process, and every season brings new opportunities to improve.
We wholeheartedly encourage you to try this DIY trick for growing purple kohlrabi. It’s a simple, effective way to elevate your gardening game and enjoy the delicious rewards of your labor. Once you’ve harvested your first crop, we’d love to hear about your experience! Share your photos, tips, and recipes in the comments below. Let’s build a community of kohlrabi enthusiasts and inspire others to embrace the joy of homegrown goodness. Your insights could be invaluable to fellow gardeners, and together, we can unlock the full potential of this amazing vegetable. So, grab your seeds, get your hands dirty, and prepare to be amazed by the vibrant beauty and delicious flavor of your own homegrown purple kohlrabi!
Frequently Asked Questions (FAQ)
What exactly *is* purple kohlrabi?
Purple kohlrabi is a member of the Brassica family, related to cabbage, broccoli, and kale. It’s characterized by its bulbous stem that grows above ground and its distinctive purple skin. The flesh inside is typically pale green or white and has a mild, slightly sweet flavor, often compared to a turnip or radish but much milder. It can be eaten raw or cooked.
What are the ideal growing conditions for purple kohlrabi?
Purple kohlrabi thrives in cool weather, ideally between 60°F and 70°F (15°C and 21°C). It prefers well-drained soil that is rich in organic matter. Full sun is best, but it can tolerate partial shade, especially in hotter climates. Consistent moisture is crucial, so regular watering is essential.
How do I prepare the soil for planting purple kohlrabi?
Before planting, amend the soil with plenty of compost or well-rotted manure. This will improve drainage, add nutrients, and help retain moisture. A slightly acidic to neutral soil pH (around 6.0 to 7.0) is ideal. You can test your soil pH with a home testing kit or by sending a sample to your local agricultural extension office.
When is the best time to plant purple kohlrabi?
The best time to plant purple kohlrabi depends on your climate. In cooler regions, start seeds indoors 4-6 weeks before the last expected frost. Transplant seedlings outdoors after the danger of frost has passed. In warmer regions, you can plant seeds directly in the ground in early spring or late summer for a fall harvest.
How far apart should I space purple kohlrabi plants?
Space plants 6-8 inches apart in rows that are 12-18 inches apart. This will allow them enough room to grow and prevent overcrowding, which can lead to smaller bulbs and increased susceptibility to pests and diseases.
How often should I water purple kohlrabi?
Water regularly, especially during dry periods. Aim to keep the soil consistently moist but not waterlogged. A good rule of thumb is to water deeply once or twice a week, depending on the weather. Mulching around the plants can help retain moisture and suppress weeds.
What are some common pests and diseases that affect purple kohlrabi?
Common pests include cabbage worms, aphids, and flea beetles. These can be controlled with insecticidal soap, neem oil, or by handpicking them off the plants. Diseases include clubroot and downy mildew. Prevent these by ensuring good soil drainage, practicing crop rotation, and using disease-resistant varieties.
How do I know when my purple kohlrabi is ready to harvest?
Purple kohlrabi is typically ready to harvest when the bulb is about 2-3 inches in diameter. The exact size will depend on the variety. The bulb should feel firm to the touch. Don’t let it grow too large, as it can become tough and woody.
How do I harvest purple kohlrabi?
To harvest, simply cut the bulb from the root system just above the soil line. You can also harvest the leaves, which are edible and can be cooked like kale or spinach.
How do I store purple kohlrabi?
Store unwashed kohlrabi bulbs in the refrigerator for up to several weeks. Remove the leaves before storing, as they will draw moisture from the bulb. You can also freeze kohlrabi after blanching it for a few minutes.
Can I eat the leaves of purple kohlrabi?
Yes, the leaves of purple kohlrabi are edible and nutritious. They can be cooked like kale or spinach and have a similar flavor. Choose young, tender leaves for the best taste and texture.
What are some ways to use purple kohlrabi in cooking?
Purple kohlrabi can be eaten raw or cooked. Raw, it can be grated into salads or used as a crudité with dips. Cooked, it can be steamed, roasted, stir-fried, or added to soups and stews. It pairs well with herbs like dill, parsley, and thyme.
Is purple kohlrabi more nutritious than green kohlrabi?
While both purple and green kohlrabi are nutritious, purple kohlrabi contains anthocyanins, which are powerful antioxidants that give it its vibrant color. These antioxidants have been linked to various health benefits, including reducing the risk of heart disease and cancer.
Can I grow purple kohlrabi in containers?
Yes, purple kohlrabi can be grown in containers. Choose a container that is at least 12 inches deep and wide. Use a well-draining potting mix and provide regular watering and fertilization.
What are some good companion plants for purple kohlrabi?
Good companion plants for purple kohlrabi include dill, chamomile, onions, garlic, and rosemary. These plants can help deter pests, attract beneficial insects, and improve the overall health of your kohlrabi plants. Avoid planting kohlrabi near strawberries or tomatoes, as they can inhibit its growth.
Leave a Comment