

Growing Potatoes in Buckets: Imagine harvesting a bounty of fresh, homegrown potatoes right from your patio or balcony! No sprawling garden needed. This isn’t just a dream; it’s a deliciously achievable reality with a simple DIY trick that’s been gaining popularity for years.
The concept of container gardening, including growing potatoes in buckets, isn’t entirely new. Throughout history, resourceful gardeners have utilized limited spaces to cultivate food. From ancient rooftop gardens to modern urban farming initiatives, the desire to connect with nature and grow our own food has always been strong. But the beauty of this particular method lies in its accessibility and ease.
Why should you try this? Well, for starters, it’s perfect for those with limited space. Apartment dwellers, balcony gardeners, and anyone with a small yard can enjoy the satisfaction of harvesting their own potatoes. But beyond space constraints, growing potatoes in buckets offers incredible control over soil quality, watering, and pest management. Plus, the harvest is incredibly easy – no digging required! I’m excited to share this simple yet effective method with you, so you can enjoy fresh, homegrown potatoes all season long.
Growing Potatoes in Buckets: A Beginner’s Guide
Hey there, fellow gardening enthusiasts! I’m so excited to share one of my favorite gardening hacks with you: growing potatoes in buckets! It’s a fantastic way to enjoy fresh, homegrown potatoes even if you don’t have a lot of space. Plus, it’s super rewarding and surprisingly easy. Let’s dive in!
Why Grow Potatoes in Buckets?
Before we get started, you might be wondering why you should even bother growing potatoes in buckets. Well, here are a few compelling reasons:
* Space-Saving: Perfect for balconies, patios, or small gardens. You don’t need a huge plot of land to grow a decent potato crop.
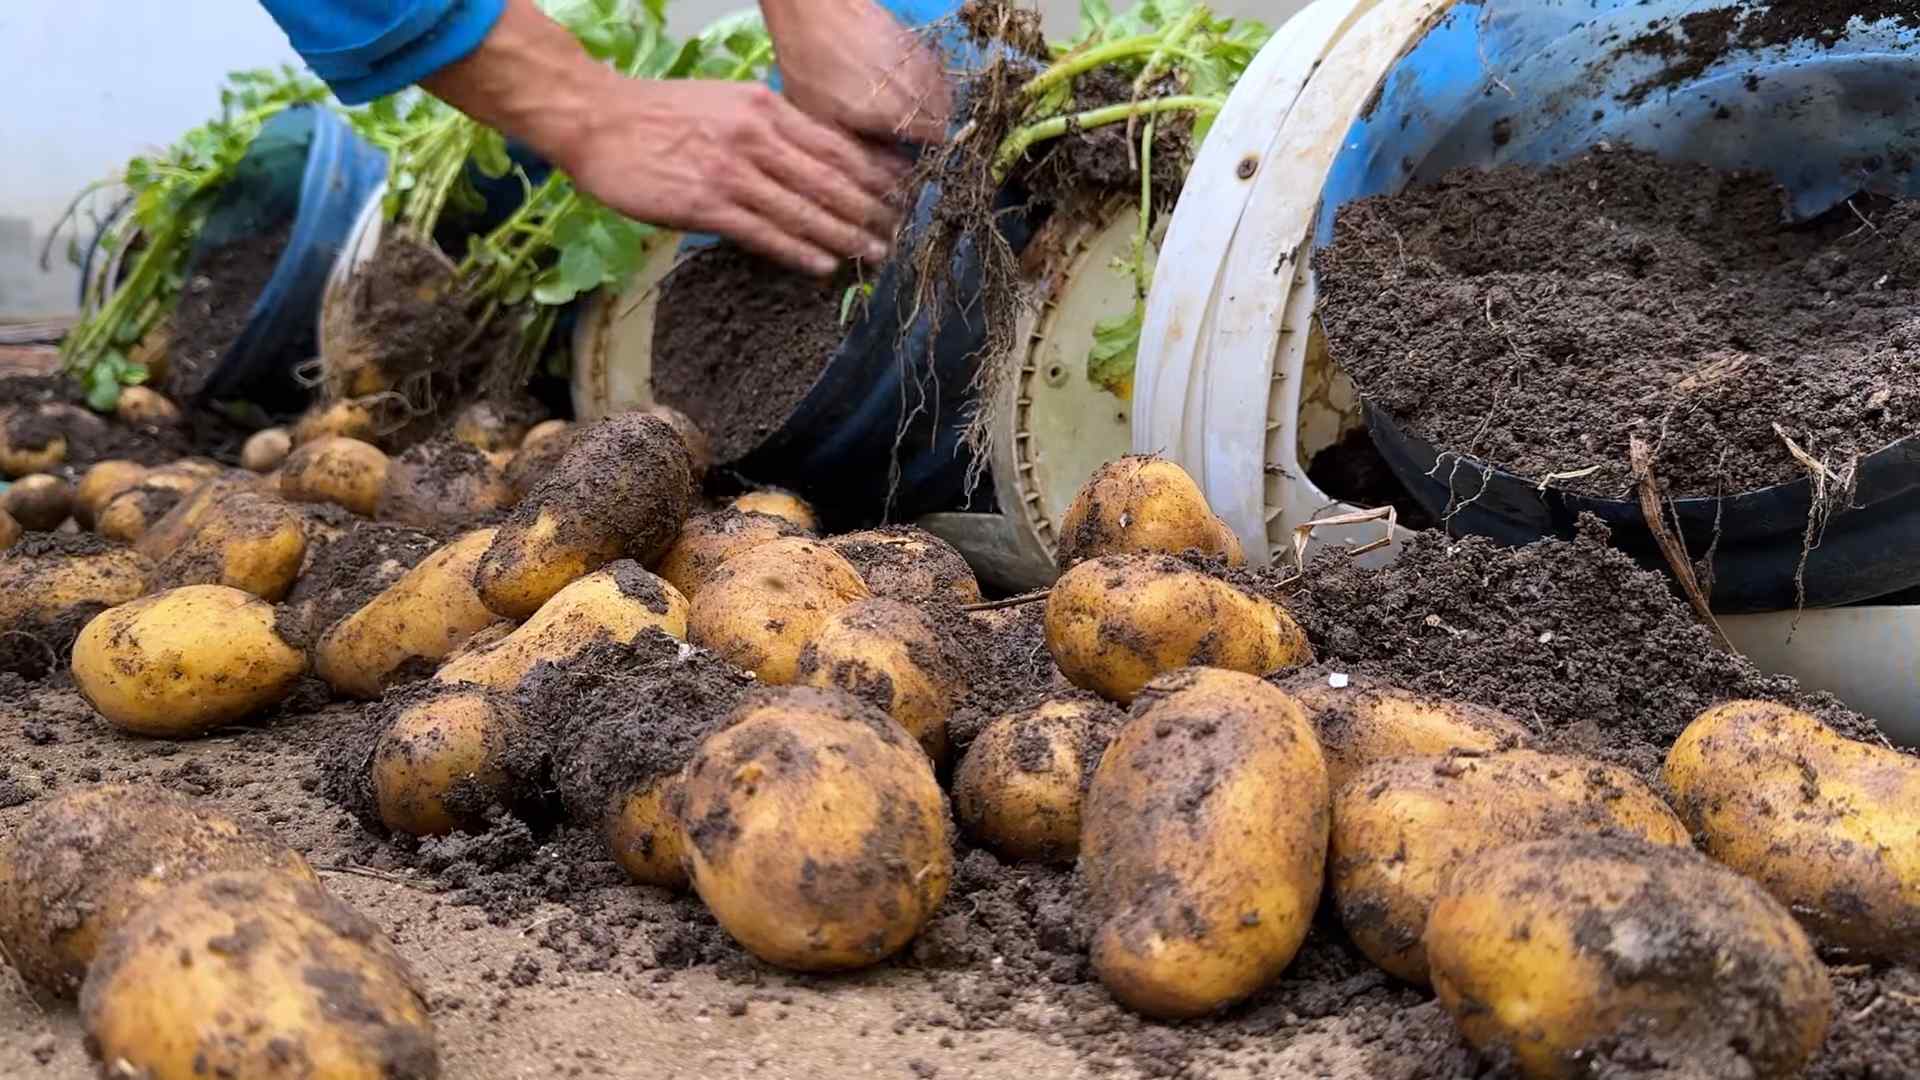
* Easy Harvesting: Forget digging around in the dirt! Harvesting potatoes from a bucket is a breeze. Just tip the bucket over and collect your bounty.
* Pest Control: Buckets can help protect your potatoes from soil-borne pests and diseases.
* Portability: You can easily move your potato plants to follow the sun or protect them from harsh weather.
* Fun and Educational: It’s a great project for kids and adults alike, teaching you about plant growth and where your food comes from.
What You’ll Need
Okay, let’s gather our supplies. Here’s what you’ll need to get started:
* Buckets: 5-gallon buckets are ideal, but you can use larger ones if you prefer. Make sure they’re clean and have drainage holes drilled in the bottom. I usually drill about 4-5 holes.
* Seed Potatoes: These are potatoes specifically grown for planting. You can find them at your local garden center or online. Choose a variety that suits your taste and climate. I personally love Yukon Gold for their creamy texture.
* Potting Mix: Use a high-quality potting mix that drains well. Avoid using garden soil, as it can become compacted in a bucket.
* Compost: Compost adds nutrients and improves soil structure. I like to mix it with my potting mix.
* Water: Essential for keeping your potato plants hydrated.
* Fertilizer (Optional): A balanced fertilizer can help boost growth and yield. I use a slow-release fertilizer.
* Trowel or Shovel: For planting and adding soil.
* Gloves: To keep your hands clean.
Preparing Your Seed Potatoes
This step is crucial for getting a good start. You need to “chit” your seed potatoes, which means encouraging them to sprout before planting.
1. Inspect Your Seed Potatoes: Look for potatoes that are firm and healthy. Discard any that are soft, rotten, or diseased.
2. Cut Large Seed Potatoes (If Necessary): If your seed potatoes are large (bigger than an egg), you can cut them into smaller pieces. Make sure each piece has at least one or two “eyes” (the little buds where sprouts will emerge). Let the cut pieces dry for a day or two to prevent rotting.
3. Chitting: Place the seed potatoes in a cool, bright location (but not in direct sunlight). An egg carton or a shallow tray works well. The “eyes” should be facing upwards.
4. Wait for Sprouts: Over the next few weeks, you’ll see sprouts emerging from the eyes. This process can take anywhere from 2 to 4 weeks. The sprouts should be about 1/2 to 1 inch long before planting.
Planting Your Potatoes
Now for the fun part! Let’s get those potatoes in the buckets.
1. Prepare the Bucket: Place a layer of gravel or small stones at the bottom of the bucket to improve drainage. This is optional, but I find it helps.
2. Add Soil: Fill the bucket with about 4-6 inches of potting mix and compost. Mix them well.
3. Plant the Seed Potatoes: Place the seed potatoes on top of the soil, with the sprouts facing upwards. Space them evenly if you’re planting multiple pieces in one bucket. I usually plant 2-3 pieces in a 5-gallon bucket.
4. Cover with Soil: Cover the seed potatoes with another 3-4 inches of potting mix and compost.
5. Water Thoroughly: Water the soil until it’s moist but not soggy.
The “Hilling” Process
This is where the magic happens! “Hilling” is the process of adding more soil to the bucket as the potato plants grow. This encourages the plants to produce more potatoes along the stem.
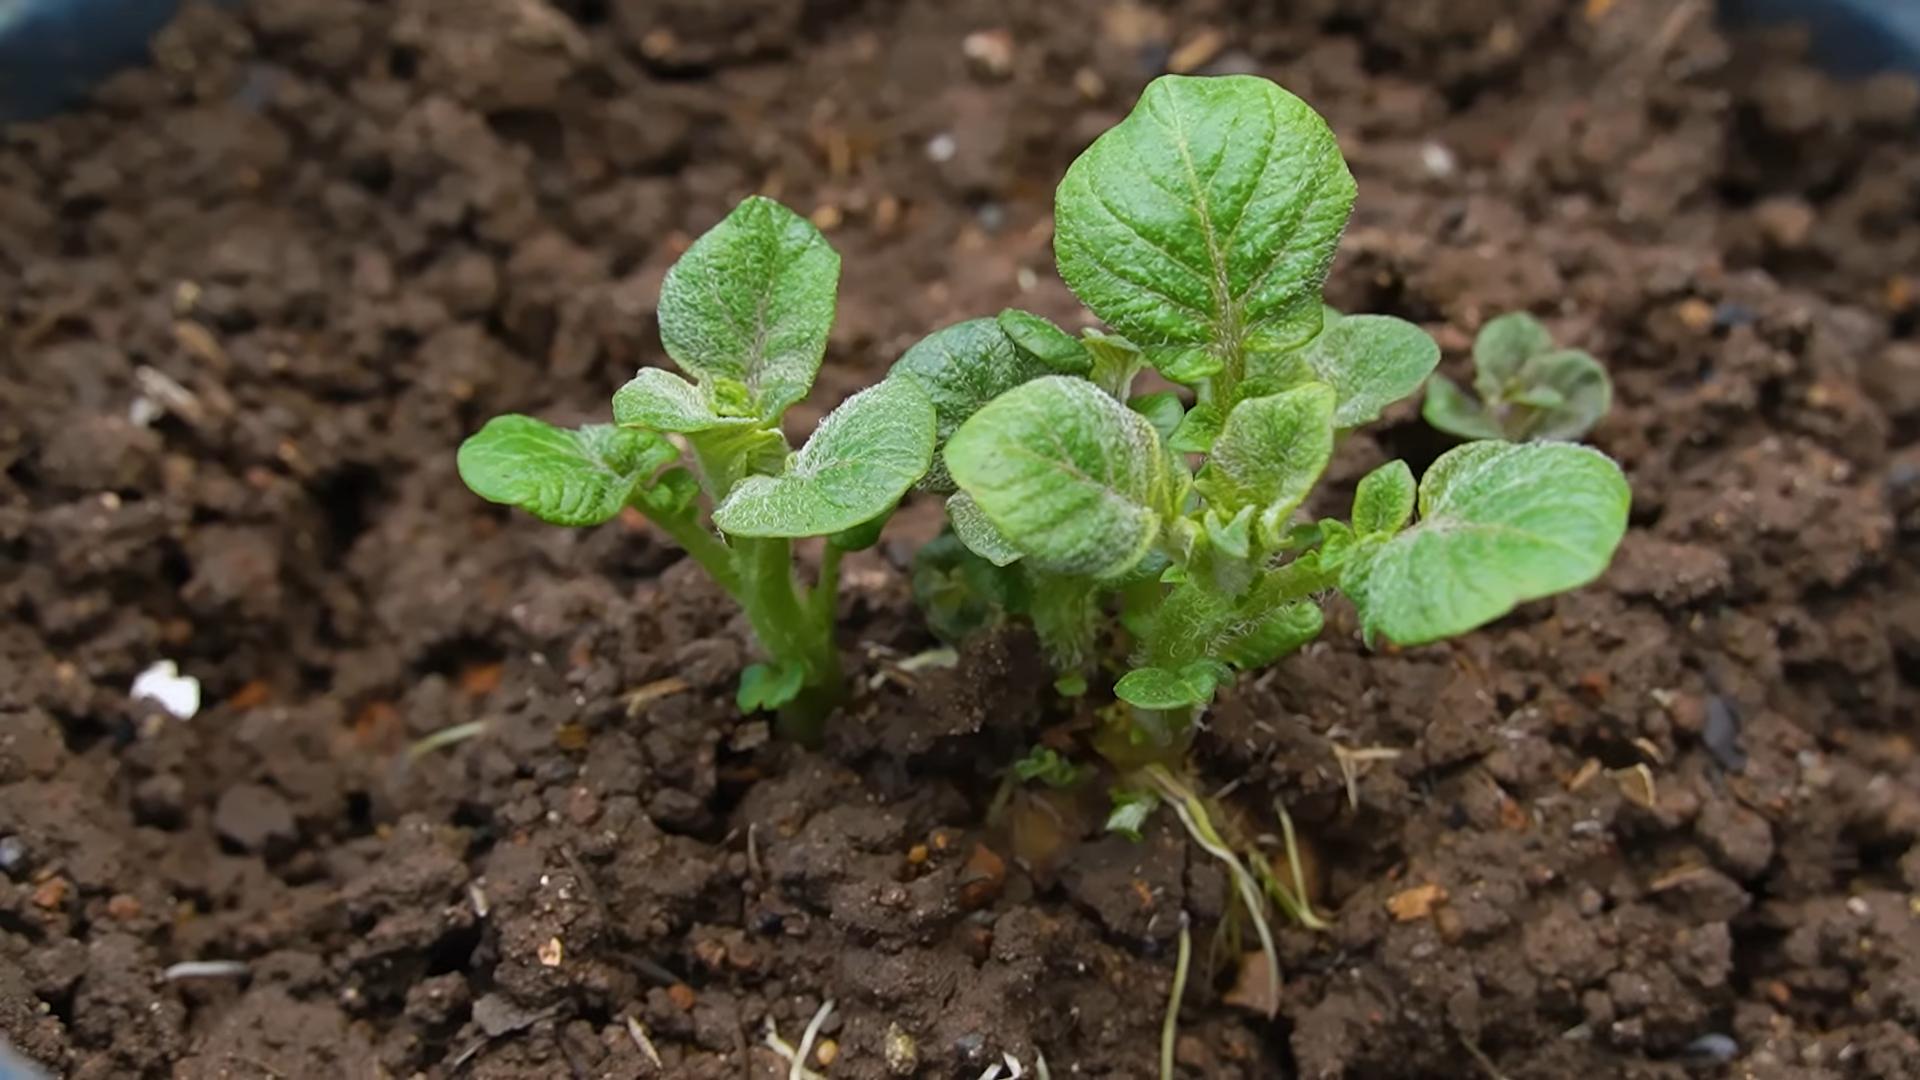
1. Wait for Growth: Once the potato plants have grown about 6-8 inches tall, it’s time to start hilling.
2. Add More Soil: Add a few inches of potting mix and compost to the bucket, covering the lower part of the stems. Leave the top few inches of the plant exposed.
3. Repeat: Continue hilling every few weeks as the plants grow taller. You’ll eventually fill the bucket almost to the top.
4. Water Regularly: Keep the soil consistently moist, especially during hot weather.
Caring for Your Potato Plants
Here are a few tips for keeping your potato plants healthy and productive:
* Sunlight: Potatoes need at least 6-8 hours of sunlight per day. Place your buckets in a sunny location.
* Watering: Water deeply whenever the top inch of soil feels dry. Avoid overwatering, as this can lead to root rot.
* Fertilizing: If you’re not using a slow-release fertilizer, you can fertilize your potato plants every few weeks with a balanced liquid fertilizer.
* Pest Control: Keep an eye out for pests like aphids, potato beetles, and flea beetles. You can control them with insecticidal soap or neem oil. I prefer organic methods whenever possible.
* Disease Prevention: Good air circulation can help prevent fungal diseases. Avoid overcrowding your plants and water in the morning so the foliage has time to dry before nightfall.
Harvesting Your Potatoes
The moment you’ve been waiting for! Here’s how to harvest your bucket-grown potatoes:
1. Wait for the Right Time: Potatoes are usually ready to harvest about 70-90 days after planting, depending on the variety. The foliage will start to turn yellow and die back.
2. Stop Watering: A week or two before harvesting, stop watering the plants. This will help the potatoes to cure and store better.
3. Harvesting: The easiest way to harvest is to simply tip the bucket over and gently sift through the soil to find the potatoes. You can also reach into the bucket and carefully pull them out.
4. Curing: After harvesting, let the potatoes dry in a cool, dark place for a few days. This will help them to develop a thicker skin and prevent rotting.
5. Storing: Store your potatoes in a cool, dark, and well-ventilated place. A root cellar is ideal, but a basement or garage will also work. Avoid storing them in the refrigerator, as this can cause them to become sweet.
Troubleshooting
Even with the best care, you might encounter some problems along the way. Here are a few common issues and how to deal with them:
* Yellowing Leaves: This could be a sign of overwatering, underwatering, nutrient deficiency, or disease. Check the soil moisture and adjust your watering accordingly. Fertilize if necessary.
* Potato Beetles: These pests can quickly defoliate your potato plants. Handpick them off the plants or use insecticidal soap.
* Fungal Diseases: Fungal diseases like early blight and late blight can cause spots on the leaves and stems. Improve air circulation and use a fungicide if necessary.
* Small Potatoes: This could be due to insufficient sunlight, water, or nutrients. Make sure your plants are getting enough of all three.
Choosing the Right Potato Variety
Selecting the right potato variety is crucial for success. Here are a few popular choices for bucket gardening:
* Yukon Gold: A classic all-purpose potato with a creamy texture and buttery flavor.
* Red Pontiac: A red-skinned potato that’s great for boiling and salads.
* fingerling Potatoes: These small, elongated potatoes have a unique flavor and texture.
* Irish Cobbler: An early-maturing potato that’s perfect for small spaces.
Tips for Success
Here are a few extra tips to help you grow the best potatoes possible:
* Use High-Quality Potting Mix: Don’t skimp on the potting mix. A good-quality mix will provide the drainage and nutrients your potatoes need.
* Don’t Overwater: Overwatering is a common mistake that can lead to root rot. Let the soil dry out slightly between waterings.
* Rotate Your Crops:
Conclusion
So, there you have it! Growing potatoes in buckets isn’t just a gardening trend; it’s a game-changer for anyone looking to enjoy fresh, homegrown potatoes, regardless of space limitations. We’ve walked through the process, from selecting the right seed potatoes and preparing your buckets to nurturing your plants and harvesting your bounty. The beauty of this method lies in its simplicity, accessibility, and the sheer satisfaction of watching those spuds develop right before your eyes.
Why is this DIY trick a must-try? Because it democratizes potato cultivation. No sprawling garden? No problem! A sunny balcony, a patio, or even a well-lit deck can become your personal potato patch. It’s also incredibly rewarding. There’s something deeply satisfying about harvesting your own food, knowing exactly where it came from and how it was grown. Plus, the “treasure hunt” aspect of digging through the soil to uncover those hidden potatoes is undeniably fun, especially if you involve kids!
But the adventure doesn’t stop here. Feel free to experiment with different potato varieties. Russets, Yukon Golds, red potatoes – each offers a unique flavor and texture that will elevate your culinary creations. Consider adding companion plants like marigolds or basil to your buckets to deter pests and attract beneficial insects. You can also explore different soil amendments to optimize drainage and nutrient availability. Some gardeners swear by adding compost tea to their watering routine, while others prefer a slow-release fertilizer specifically formulated for vegetables.
Don’t be afraid to get creative! Perhaps you want to try a tiered bucket system to maximize space or decorate your buckets with colorful paint to add a touch of personality to your garden. The possibilities are endless.
The most important thing is to give it a try. Growing potatoes in buckets is an incredibly accessible and rewarding experience, and we’re confident that you’ll be thrilled with the results. Imagine the taste of freshly dug, homegrown potatoes, roasted to perfection or mashed with butter and herbs. It’s a flavor that simply can’t be replicated with store-bought varieties.
We encourage you to embark on this gardening adventure and share your experiences with us. What potato varieties did you choose? What challenges did you encounter? What tips and tricks did you discover along the way? Share your photos, stories, and insights in the comments below. Let’s build a community of bucket potato growers and inspire others to embrace the joy of homegrown food! Happy growing!
Frequently Asked Questions (FAQ)
What kind of potatoes are best for growing in buckets?
The best potato varieties for bucket growing are generally those that are compact and produce well in confined spaces. Some excellent choices include:
* **Yukon Gold:** These potatoes are known for their creamy texture and buttery flavor. They are relatively early maturing and produce a good yield in buckets.
* **Red Potatoes (e.g., Red Pontiac, Red Norland):** Red potatoes are waxy and hold their shape well when cooked. They are also relatively early maturing and well-suited for bucket growing.
* **Fingerling Potatoes:** These long, slender potatoes are prized for their unique shape and nutty flavor. They can be grown in buckets, but may require slightly larger containers.
* **Irish Cobbler:** An early-season variety that is known for its excellent flavor and texture. It is a reliable producer and adapts well to container growing.
* **Determinate vs. Indeterminate:** While not a variety, understanding the growth habit is crucial. Determinate potatoes produce one layer of potatoes, while indeterminate varieties produce potatoes along the stem as it grows. Indeterminate varieties are generally better suited for bucket growing as you can “hill” them (add more soil) as they grow, encouraging more potato production.
Ultimately, the best variety for you will depend on your personal preferences and local climate. Experiment with different varieties to see which ones thrive in your specific growing conditions.
How big of a bucket do I need for growing potatoes?
The ideal bucket size for growing potatoes is typically between 5 and 10 gallons. A 5-gallon bucket is a good starting point, but a 10-gallon bucket will provide more room for the roots to develop and potentially result in a larger yield. The depth of the bucket is also important, as potatoes develop along the stem as it grows. A bucket that is at least 12 inches deep is recommended, but deeper is better.
Consider using food-grade buckets to ensure that no harmful chemicals leach into the soil. You can often find these at bakeries, restaurants, or online retailers. Make sure the bucket has drainage holes to prevent waterlogging.
How often should I water my potato plants in buckets?
Watering frequency will depend on several factors, including the weather, the size of the bucket, and the type of soil you are using. Generally, you should water your potato plants when the top inch of soil feels dry to the touch. During hot, dry weather, you may need to water daily. In cooler, wetter weather, you may only need to water every few days.
Avoid overwatering, as this can lead to root rot. Make sure the bucket has adequate drainage to allow excess water to escape. When watering, water deeply, ensuring that the entire root zone is moistened.
What kind of soil should I use for growing potatoes in buckets?
The ideal soil for growing potatoes in buckets is a well-draining, nutrient-rich potting mix. Avoid using garden soil, as it can be too heavy and compact, which can hinder root development. A good potting mix will contain a blend of peat moss, perlite, and vermiculite.
You can also amend your potting mix with compost or other organic matter to improve its fertility and drainage. Consider adding a slow-release fertilizer to provide your potato plants with a steady supply of nutrients throughout the growing season.
How much sunlight do potato plants need?
Potato plants need at least 6-8 hours of direct sunlight per day to thrive. Choose a location for your buckets that receives plenty of sunlight throughout the day. If you live in a particularly hot climate, you may need to provide some afternoon shade to prevent the plants from overheating.
If you don’t have access to a sunny location, you can supplement with grow lights. Place the grow lights a few inches above the plants and provide them with 12-16 hours of light per day.
How do I “hill” my potato plants in buckets?
“Hilling” is the process of adding more soil to the bucket as the potato plants grow. This encourages the plants to produce more potatoes along the stem. When you first plant your seed potatoes, fill the bucket with about 4-6 inches of soil. As the plants grow, gradually add more soil, covering the lower portion of the stem. Continue hilling until the bucket is nearly full.
When do I harvest my potatoes?
You can begin harvesting “new potatoes” (small, immature potatoes) about 2-3 weeks after the plants flower. To harvest new potatoes, carefully dig around the base of the plant and remove a few potatoes. Be careful not to disturb the remaining roots.
For mature potatoes, wait until the foliage begins to die back and turn yellow. This typically occurs about 80-100 days after planting. Once the foliage has died back, stop watering the plants and allow the soil to dry out slightly. Then, carefully dump the contents of the bucket onto a tarp or other surface and harvest your potatoes.
How do I store my harvested potatoes?
Store your harvested potatoes in a cool, dark, and dry place. The ideal storage temperature is between 40-50°F (4-10°C). Avoid storing potatoes in the refrigerator, as this can cause them to develop a sweet taste.
Store potatoes in a well-ventilated container, such as a burlap sack or a wire basket. Do not wash the potatoes before storing them, as this can promote rot. Check the potatoes regularly and remove any that are showing signs of spoilage.
What are some common pests and diseases that affect potato plants?
Some common pests that affect potato plants include aphids, potato beetles, and flea beetles. Diseases that can affect potato plants include early blight, late blight, and potato scab.
To prevent pests and diseases, choose disease-resistant potato varieties, practice good sanitation, and monitor your plants regularly. If you notice any signs of pests or diseases, take action promptly. You can use organic pesticides or fungicides to control pests and diseases.
Can I reuse the soil from my potato buckets?
It is generally not recommended to reuse the soil from your potato buckets for growing potatoes again in the same season. Potatoes can deplete the soil of nutrients, and the soil may also harbor pests or diseases.
However, you can reuse the soil for other plants that are not susceptible to the same pests and diseases. You can also amend the soil with compost or other organic matter to replenish its nutrients.
Leave a Comment