

Growing Peppers at Home can seem daunting, especially if you’re new to gardening. But trust me, with a few simple tricks and a little DIY magic, you can be harvesting a vibrant bounty of peppers right from your own backyard (or balcony!) in no time. I remember when I first started, I thought I needed acres of land and a green thumb blessed by the gardening gods. Turns out, that’s not the case at all!
Peppers have a rich history, dating back thousands of years to South America, where they were not only a food source but also held cultural and medicinal significance. From the fiery chilies used in ancient rituals to the sweet bell peppers enjoyed in modern cuisine, these versatile fruits have captivated palates and cultures worldwide.
Why should you bother with these DIY tricks for growing peppers at home? Well, for starters, homegrown peppers taste infinitely better than anything you’ll find at the grocery store. Plus, you have complete control over what goes into your plants, ensuring they’re free from harmful pesticides and chemicals. But most importantly, it’s incredibly rewarding to nurture a plant from seed to harvest, knowing you created something delicious and beautiful with your own two hands. So, let’s dive into some easy-to-follow DIY hacks that will have you enjoying a pepper paradise in no time!
Growing Peppers Like a Pro: My DIY Guide to a Bountiful Harvest
Okay, pepper lovers, gather ’round! I’m going to share my secrets to growing amazing peppers right in your own backyard (or even on your balcony!). I’ve experimented with different techniques over the years, and this method has consistently given me the best results. Get ready for a pepper explosion!
Choosing Your Pepper Varieties
Before we dive into the nitty-gritty, let’s talk peppers! The world of peppers is vast and exciting, so choosing the right varieties is crucial. Here’s what I consider:
* Heat Level: Are you a mild-mannered bell pepper enthusiast or a fire-breathing habanero fanatic? Knowing your spice tolerance is key. Scoville Heat Units (SHU) are your friend here. Look for SHU ratings on seed packets or plant labels.
* Pepper Type: Bell peppers, jalapeños, cayenne, habaneros, sweet banana peppers – the options are endless! Think about how you plan to use your peppers.
* Growing Conditions: Some peppers thrive in cooler climates, while others need scorching heat. Check the seed packet for specific requirements.
* Space: Consider the size of your garden or container. Some pepper plants can get quite large!
I personally love growing a mix of bell peppers (for everyday cooking), jalapeños (for a little kick), and a few hotter varieties like cayenne or serrano (for making hot sauce).
Starting Your Peppers from Seed (My Preferred Method!)
Starting from seed gives you the most control over the entire process, and it’s surprisingly rewarding!
1. Gather Your Supplies: You’ll need:
* Pepper seeds (obviously!)
* Seed starting trays or small pots
* Seed starting mix (this is different from regular potting soil – it’s lighter and sterile)
* A spray bottle filled with water
* A heat mat (optional, but highly recommended)
* A grow light (also optional, but helps prevent leggy seedlings)
* A humidity dome or plastic wrap (to create a mini-greenhouse)
2. Sow the Seeds: Fill your seed starting trays or pots with seed starting mix. Moisten the mix thoroughly with your spray bottle. Plant 2-3 seeds per cell or pot, about ¼ inch deep. Gently cover the seeds with more mix.
3. Create a Warm and Humid Environment: Cover the trays or pots with a humidity dome or plastic wrap. Place them on a heat mat (if using) and under a grow light (if using). The ideal temperature for germination is around 80-85°F (27-29°C).
4. Keep the Soil Moist: Check the soil moisture daily. Use your spray bottle to keep the soil consistently moist, but not soggy.
5. Wait for Germination: Pepper seeds can be a bit slow to germinate, so be patient! It can take anywhere from 7-21 days, depending on the variety and temperature.
6. Remove the Dome and Provide Light: Once the seedlings emerge, remove the humidity dome or plastic wrap. If you’re using a grow light, position it a few inches above the seedlings.
7. Thin the Seedlings: Once the seedlings have their first true leaves (the second set of leaves that appear after the initial seed leaves), thin them to one seedling per cell or pot. Choose the strongest, healthiest-looking seedling and snip off the others at the soil line. Don’t pull them out, as this can disturb the roots of the remaining seedling.
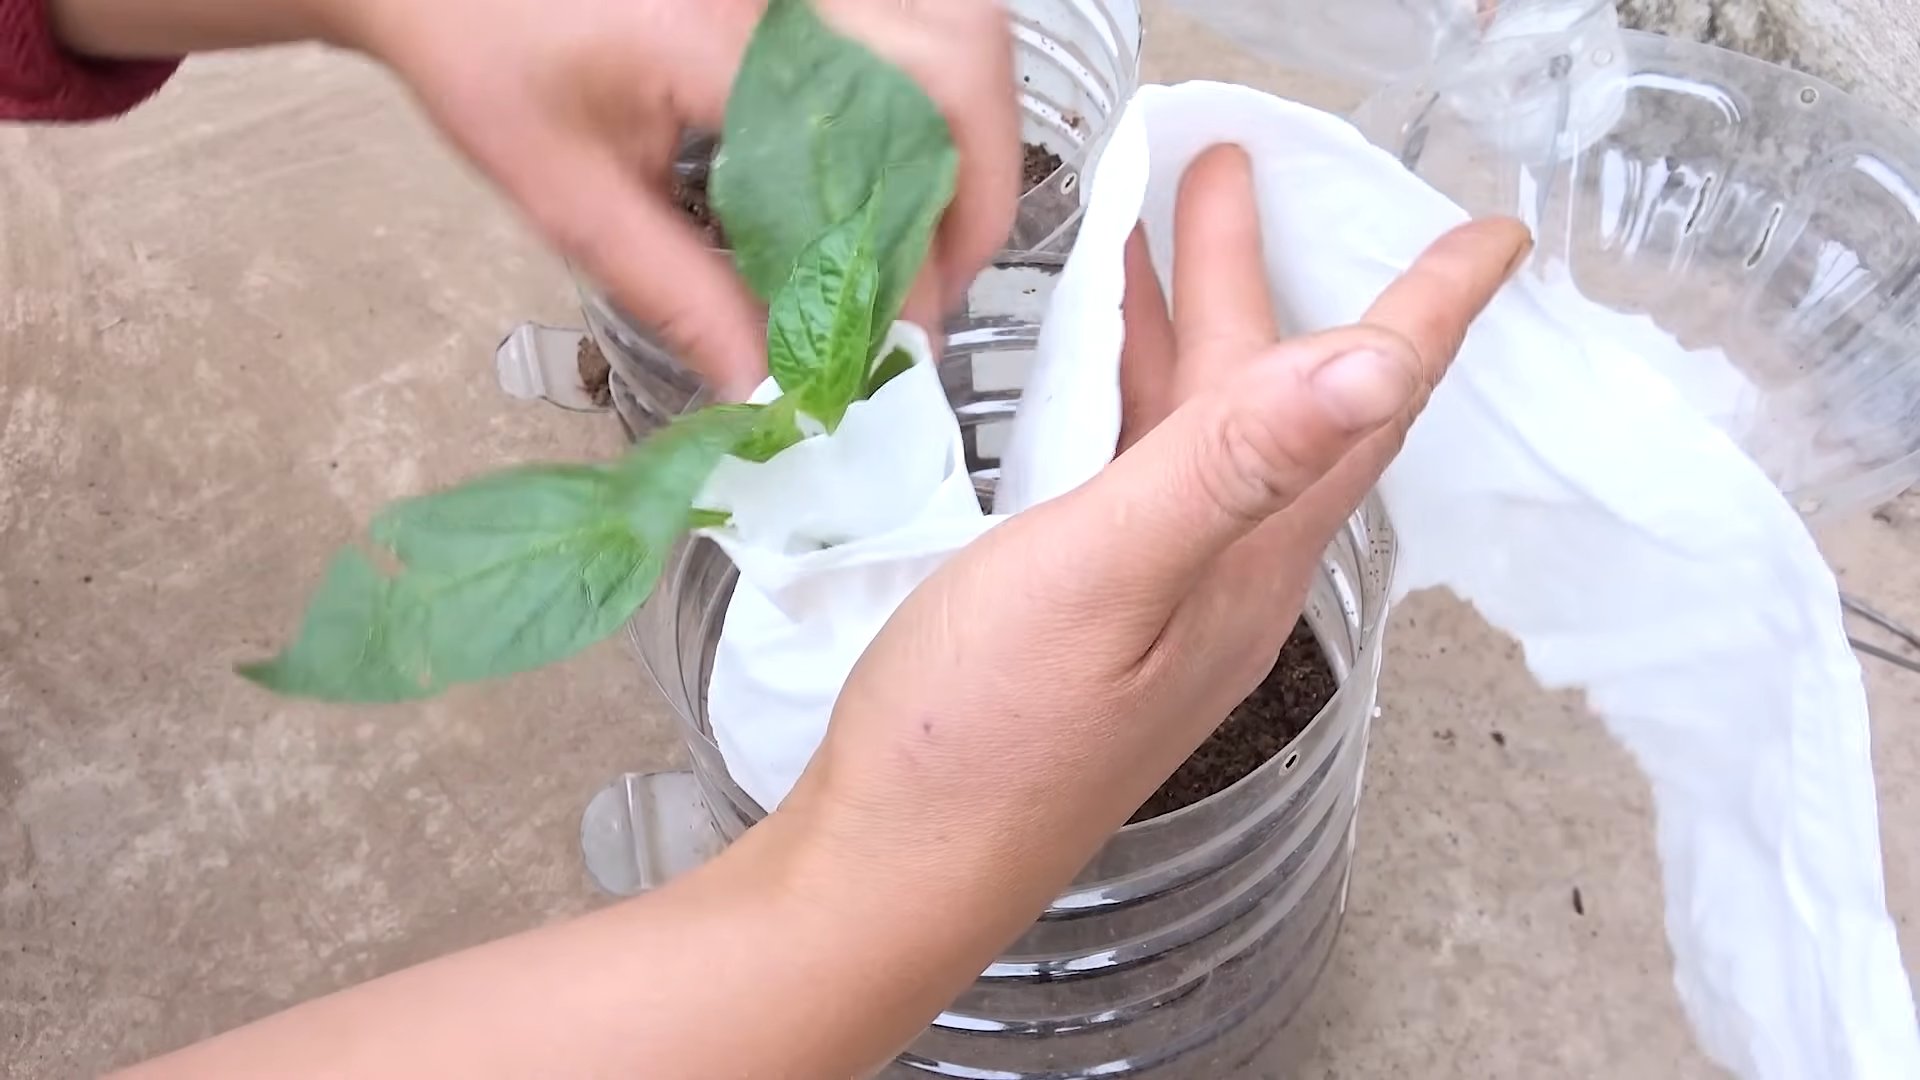
8. Harden Off the Seedlings: Before transplanting your seedlings outdoors, you need to “harden them off.” This process gradually acclimates them to the outdoor environment. Start by placing the seedlings outdoors in a sheltered location for an hour or two each day, gradually increasing the amount of time they spend outside over the course of a week or two. Protect them from direct sunlight and strong winds.
Transplanting Your Pepper Seedlings
Now for the exciting part – getting those little guys into their permanent homes!
1. Choose the Right Location: Peppers need at least 6-8 hours of sunlight per day. Choose a location with well-drained soil.
2. Prepare the Soil: Amend the soil with compost or other organic matter to improve drainage and fertility. Peppers prefer slightly acidic soil (pH 6.0-6.8).
3. Dig the Holes: Dig holes that are slightly larger than the root balls of your seedlings. Space the holes according to the mature size of the pepper variety you’re growing. Check the seed packet for spacing recommendations.
4. Transplant the Seedlings: Gently remove the seedlings from their pots or trays. Loosen the roots slightly. Place the seedlings in the holes and backfill with soil. Water thoroughly.
5. Add Support (Optional): For taller pepper varieties, you may want to provide support with stakes or cages. This will help prevent the plants from toppling over in strong winds or when they’re laden with fruit. I usually use tomato cages, they work great.
Caring for Your Pepper Plants
Okay, they’re in the ground! Now, let’s keep them happy and healthy.
* Watering: Water your pepper plants regularly, especially during hot, dry weather. Aim to keep the soil consistently moist, but not waterlogged. I usually water deeply a couple of times a week, rather than shallowly every day.
* Fertilizing: Peppers are heavy feeders, so they need regular fertilization. Use a balanced fertilizer (e.g., 10-10-10) or a fertilizer specifically formulated for vegetables. Follow the instructions on the fertilizer label. I like to side-dress my pepper plants with compost every few weeks as well.
* Mulching: Apply a layer of mulch around your pepper plants to help retain moisture, suppress weeds, and regulate soil temperature. Straw, wood chips, or shredded leaves are all good options.
* Pruning: Pruning isn’t strictly necessary for pepper plants, but it can help improve air circulation and encourage bushier growth. I usually remove any suckers (small shoots that grow from the base of the plant) to direct more energy to fruit production.
* Pest and Disease Control: Keep an eye out for common pepper pests like aphids, flea beetles, and spider mites. Treat infestations promptly with insecticidal soap or neem oil. Prevent fungal diseases by providing good air circulation and avoiding overhead watering.
Dealing with Common Pepper Problems
Even with the best care, you might encounter a few challenges along the way. Here are some common pepper problems and how to address them:
* Blossom End Rot: This is a common problem that causes the bottom of the pepper to rot. It’s usually caused by calcium deficiency, which can be due to inconsistent watering or poor soil pH. To prevent blossom end rot, ensure consistent watering and amend the soil with lime if necessary.
* Sunscald: This occurs when peppers are exposed to too much direct sunlight, causing them to develop white or tan patches. To prevent sunscald, provide shade during the hottest part of the day or choose pepper varieties that are more resistant to sunscald.
* Pepper Maggots: These are small, white larvae that burrow into peppers, causing them to rot. To prevent pepper maggots, use row covers to protect your plants from egg-laying flies.
* Aphids: These tiny pests suck sap from pepper plants, causing them to weaken and become distorted. To control aphids, spray your plants with insecticidal soap or neem oil.
Harvesting Your Peppers
The moment you’ve been waiting for! Knowing when to harvest your peppers is key to getting the best flavor and texture.
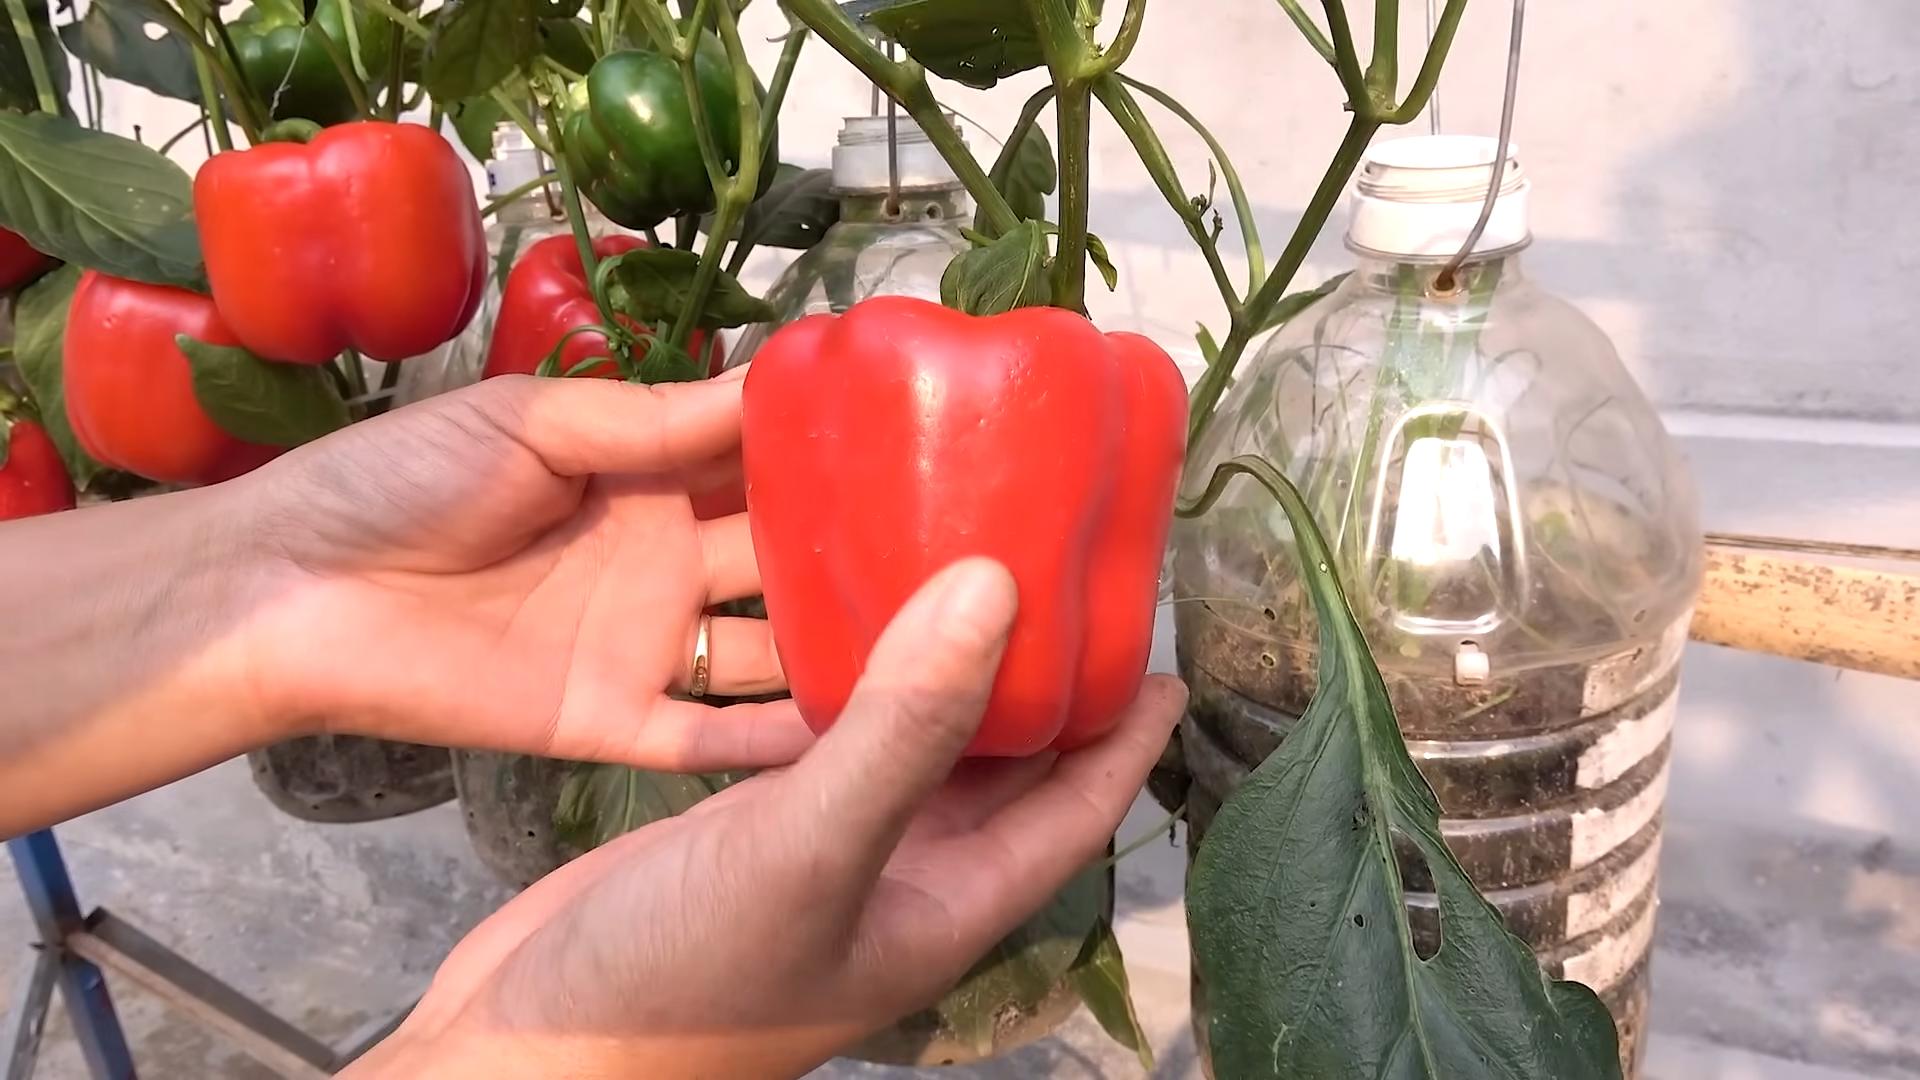
* Bell Peppers: Harvest bell peppers when they are fully colored and firm to the touch. Green bell peppers are less ripe than red, yellow, or orange bell peppers.
* Jalapeños: Harvest jalapeños when they are dark green and about 3-4 inches long. You can also let them turn red for a sweeter, milder flavor.
* Cayenne Peppers: Harvest cayenne peppers when they are bright red and about 4-6 inches long.
* Habaneros: Harvest habaneros when they are fully colored (usually orange or red) and have a slightly wrinkled appearance. Be careful when handling habaneros, as they are very hot! Wear gloves to protect your skin.
To harvest your peppers, use a sharp knife or pruning shears to cut the stem just above the pepper.
Enjoying Your Pepper Harvest
Now that you’ve harvested your peppers, it’s time to enjoy them! Here are just a few ideas:
* Eat them fresh: Bell peppers are great in salads, sandwiches, and stir-fries. Jalapeños add a kick to nachos, tacos, and salsas.
* Roast them: Roasting peppers brings out their sweetness and smoky flavor.
*
Conclusion
So, there you have it! Growing peppers at home, especially with these simple DIY tricks, is not just a rewarding experience; it’s a gateway to fresher, tastier, and more vibrant meals. Forget those bland, store-bought peppers that lack the punch and personality of homegrown varieties. With a little effort and these easy-to-follow techniques, you can cultivate a thriving pepper patch right in your backyard, balcony, or even on a sunny windowsill.
The beauty of this DIY approach lies in its simplicity and adaptability. You don’t need a green thumb or acres of land to succeed. Whether you’re a seasoned gardener or a complete beginner, these methods are designed to be accessible and effective. Imagine the satisfaction of harvesting your own spicy jalapeños for homemade salsa, sweet bell peppers for colorful stir-fries, or fiery habaneros to add a kick to your favorite dishes. The possibilities are endless!
But the benefits extend beyond just flavor. Growing your own peppers allows you to control the entire process, from seed to table. You can choose organic methods, avoid harmful pesticides, and ensure that your peppers are bursting with nutrients. Plus, there’s something incredibly therapeutic about nurturing a plant from a tiny seed to a bountiful harvest. It’s a connection to nature that can be both grounding and inspiring.
Don’t be afraid to experiment with different varieties and techniques. Try growing your peppers in raised beds for better drainage, or use companion planting to deter pests and attract beneficial insects. Consider adding a layer of mulch to retain moisture and suppress weeds. And if you’re feeling adventurous, why not try fermenting your peppers to create your own unique hot sauces?
This DIY guide to growing peppers at home is more than just a set of instructions; it’s an invitation to embark on a culinary adventure. It’s a chance to connect with nature, enhance your cooking, and enjoy the satisfaction of growing your own food. So, grab some seeds, gather your supplies, and get ready to experience the joy of homegrown peppers.
We encourage you to try these DIY tricks and share your experiences with us. Let us know what varieties you’re growing, what challenges you’ve faced, and what successes you’ve achieved. Your feedback will help us improve this guide and inspire others to join the growing revolution. Share your photos and stories on social media using #HomegrownPeppers and let’s create a community of passionate pepper growers!
Remember, the key to success is patience, persistence, and a willingness to learn. Don’t be discouraged if your first attempt isn’t perfect. Every gardener faces challenges, and every mistake is an opportunity to learn and grow. With a little dedication, you’ll be harvesting a bountiful crop of delicious peppers in no time. So, what are you waiting for? Get growing!
Frequently Asked Questions (FAQ)
What is the best time to start growing peppers from seed?
The ideal time to start growing peppers from seed depends on your climate and the specific variety of pepper you’re growing. In general, you should start your seeds indoors 6-8 weeks before the last expected frost. This gives the seedlings enough time to develop a strong root system before being transplanted outdoors. If you live in a warmer climate with a longer growing season, you can start your seeds later. Check your local frost dates and the specific recommendations for your chosen pepper varieties to determine the optimal timing. Starting early indoors gives you a head start and ensures a longer growing season, especially for hotter varieties that require more time to mature.
What kind of soil is best for growing peppers?
Peppers thrive in well-draining, fertile soil that is rich in organic matter. A slightly acidic soil pH of around 6.0 to 6.8 is ideal. You can amend your soil with compost, aged manure, or other organic materials to improve its drainage, fertility, and water-holding capacity. Avoid heavy clay soils, as they can become waterlogged and suffocate the roots. If you have clay soil, consider growing your peppers in raised beds or containers with a well-draining potting mix. A good potting mix for peppers should contain a blend of peat moss, perlite, and vermiculite.
How much sunlight do peppers need?
Peppers are sun-loving plants and require at least 6-8 hours of direct sunlight per day to thrive. The more sunlight they receive, the more peppers they will produce. Choose a location in your garden that receives full sun throughout the day. If you’re growing peppers indoors, place them near a sunny window or use grow lights to supplement natural light. Insufficient sunlight can lead to leggy growth, reduced flowering, and smaller pepper yields.
How often should I water my pepper plants?
Water your pepper plants regularly, especially during hot, dry weather. The frequency of watering will depend on the weather, soil type, and size of your plants. In general, aim to keep the soil consistently moist but not waterlogged. Water deeply and thoroughly, allowing the water to penetrate the root zone. Avoid overhead watering, as this can promote fungal diseases. Use a soaker hose or drip irrigation system to deliver water directly to the roots. Check the soil moisture regularly by sticking your finger into the soil. If the top inch of soil feels dry, it’s time to water.
What are some common pests and diseases that affect pepper plants?
Pepper plants can be susceptible to a variety of pests and diseases, including aphids, spider mites, whiteflies, blossom end rot, and fungal diseases. Regularly inspect your plants for signs of pests or diseases. If you detect any problems, take action immediately to prevent them from spreading. Use organic pest control methods, such as insecticidal soap or neem oil, to control aphids, spider mites, and whiteflies. To prevent blossom end rot, ensure that your plants receive consistent watering and adequate calcium. Improve air circulation around your plants to prevent fungal diseases.
How do I fertilize my pepper plants?
Peppers are heavy feeders and benefit from regular fertilization. Use a balanced fertilizer with a ratio of 5-10-10 or 10-10-10. Apply fertilizer at planting time and then every 2-3 weeks throughout the growing season. You can also use organic fertilizers, such as compost tea or fish emulsion. Avoid over-fertilizing, as this can lead to excessive foliage growth and reduced pepper production.
When should I harvest my peppers?
The timing of harvest depends on the variety of pepper and your personal preference. Bell peppers are typically harvested when they are fully colored and firm to the touch. Hot peppers can be harvested when they are green or red, depending on the variety. Use a sharp knife or scissors to cut the peppers from the plant, leaving a small stem attached. Harvesting peppers regularly will encourage the plant to produce more peppers.
Can I grow peppers in containers?
Yes, peppers can be successfully grown in containers. Choose a container that is at least 12 inches in diameter and has drainage holes. Use a well-draining potting mix and provide your plants with plenty of sunlight and water. Container-grown peppers may require more frequent watering and fertilization than those grown in the ground.
How do I overwinter my pepper plants?
In colder climates, you can overwinter your pepper plants indoors to save them for the next growing season. Before the first frost, prune your plants back to about 6 inches tall and dig them up carefully. Pot them in containers with fresh potting mix and bring them indoors. Place them near a sunny window or use grow lights to provide them with adequate light. Water them sparingly throughout the winter and fertilize them occasionally. In the spring, after the last frost, you can transplant them back into your garden.
What are some good companion plants for peppers?
Companion planting can help to improve the growth and health of your pepper plants. Some good companion plants for peppers include basil, tomatoes, carrots, onions, and garlic. Basil helps to repel pests, while tomatoes provide shade and support. Carrots and onions deter nematodes, and garlic helps to prevent fungal diseases. Avoid planting peppers near fennel or brassicas, as they can inhibit their growth.
Leave a Comment