

Growing peanuts without a garden? Absolutely! Forget the sprawling fields and rural landscapes you might picture. I’m here to tell you that you can cultivate these delicious legumes right in your own home, no matter how small your space.
For centuries, peanuts have been a staple food in many cultures, from South America, where they originated, to Asia and Africa. They’re packed with protein, healthy fats, and essential nutrients. But did you know that growing peanuts was once considered a sign of good luck and prosperity in some cultures? Now, you can bring that good fortune (and tasty snacks!) into your own life.
Let’s face it, not everyone has access to a traditional garden. Apartment dwellers, city residents, and those with limited mobility often miss out on the joy of growing their own food. That’s where this DIY guide comes in! I’m going to show you simple, effective tricks and hacks that make growing peanuts without a garden not only possible but also incredibly rewarding. Imagine the satisfaction of harvesting your own homegrown peanuts, knowing you nurtured them from seed to snack, all within the comfort of your home. Get ready to unleash your inner urban farmer!
Growing Peanuts Indoors: From Seed to Snack!
Hey there, fellow gardening enthusiasts! Ever dreamt of harvesting your own peanuts but lack the garden space? Well, dream no more! I’m going to walk you through a super fun and surprisingly easy project: growing peanuts indoors. Yes, you read that right! We’re bringing the peanut patch inside.
This guide will break down everything you need to know, from choosing the right peanuts to harvesting your homegrown goodies. Get ready to impress your friends and family with your indoor peanut-growing prowess!
What You’ll Need: The Peanut Power Starter Pack
Before we dive in, let’s gather our supplies. Don’t worry, you probably have a lot of this stuff lying around already!
* Raw, Unsalted Peanuts in Shells: This is crucial! You need raw peanuts, not roasted or boiled. Look for them at health food stores or online. Make sure they are unsalted, as salt can inhibit germination.
* Large Containers: We’re talking big! Each container should be at least 12 inches in diameter and 12 inches deep. Peanuts need room to spread their roots and form those delicious pods. Think large pots, buckets, or even repurposed storage containers (with drainage holes, of course!).
* Well-Draining Potting Mix: This is key to healthy peanut growth. A mix of peat moss, perlite, and vermiculite works wonders. You can also use a commercial potting mix specifically designed for vegetables. Avoid using garden soil, as it can be too heavy and compact.
* Grow Lights (Optional but Recommended): While peanuts can grow indoors with natural sunlight, grow lights will significantly boost their growth and yield, especially during the shorter days of winter.
* Watering Can or Hose: For keeping your peanut plants happy and hydrated.
* Spray Bottle: For misting the leaves, which helps maintain humidity.
* Small Shovel or Trowel: For planting and transplanting.
* Heat Mat (Optional): Peanuts love warmth, so a heat mat can speed up germination, especially in cooler climates.
* pH Meter (Optional): While not essential, a pH meter can help you ensure your soil is in the ideal range (around 6.0 to 6.5) for peanut growth.
* Fertilizer: A balanced liquid fertilizer (like 10-10-10) will provide your peanut plants with the nutrients they need to thrive.
Getting Started: Preparing Your Peanuts for Planting
This is where the magic begins! We need to wake up those dormant peanut seeds and get them ready to sprout.
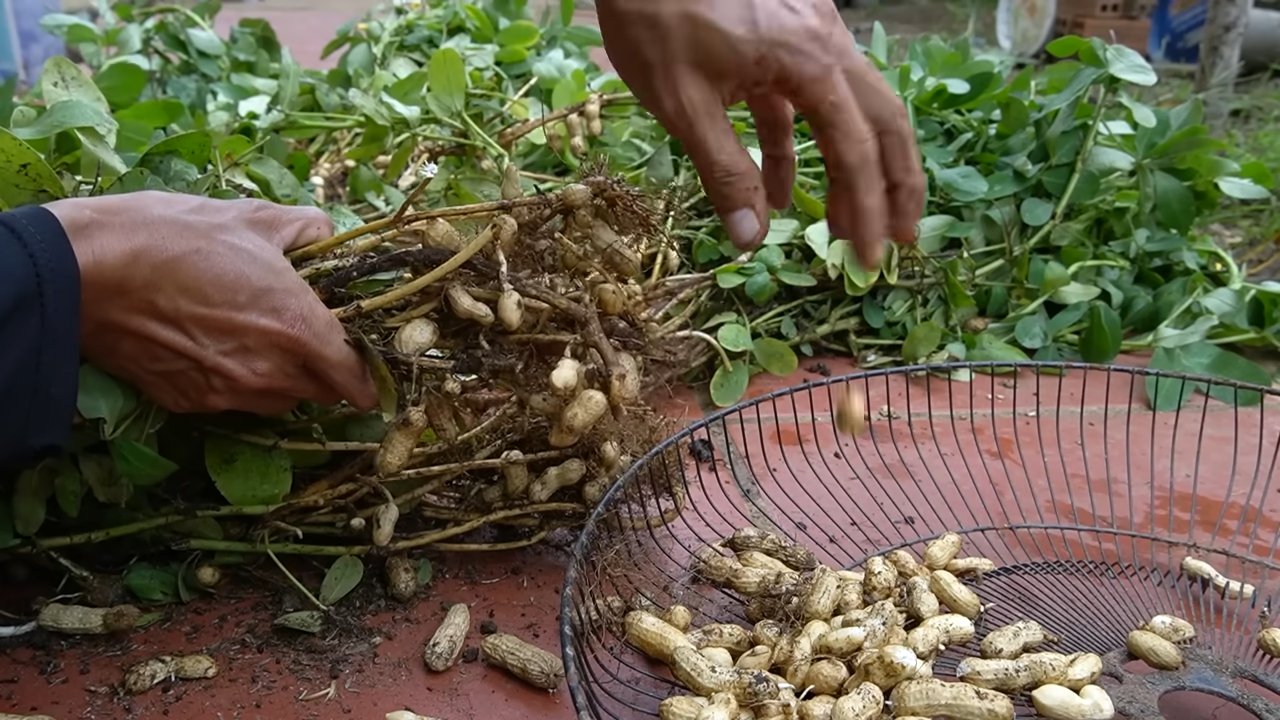
1. Shelling the Peanuts: Gently crack open the peanut shells and remove the peanuts inside. Be careful not to damage the delicate skin of the peanuts.
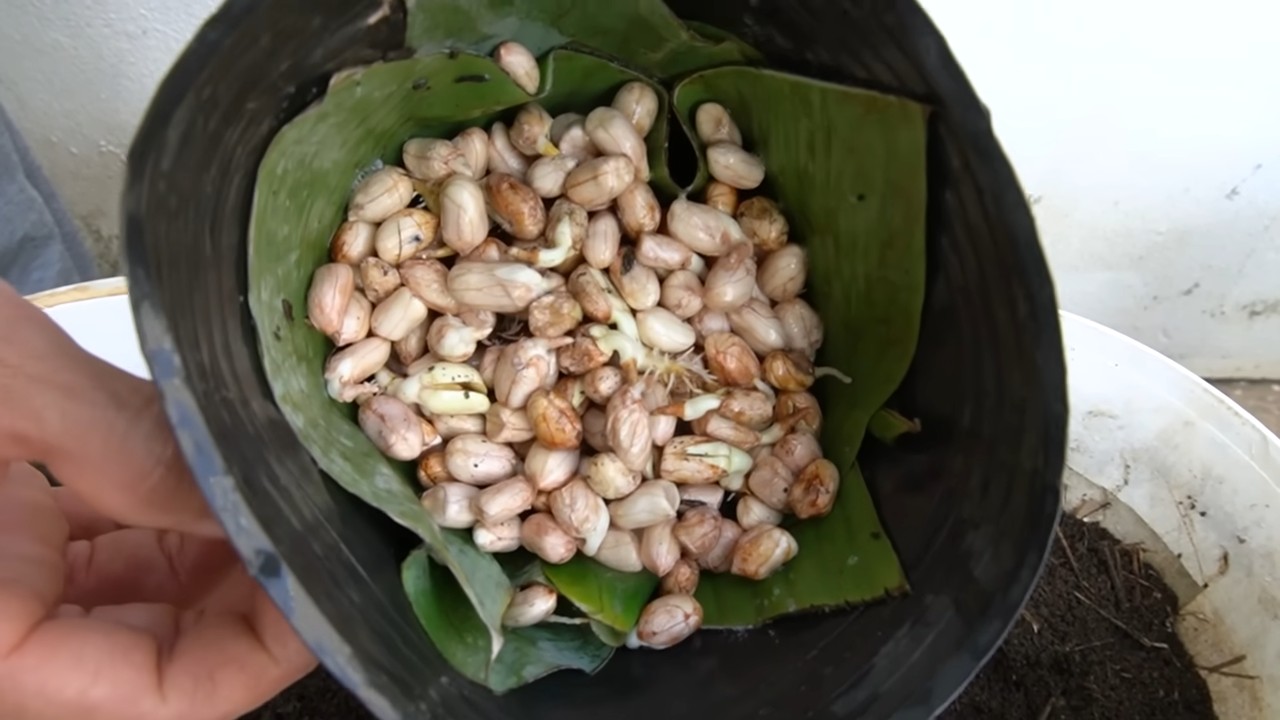
2. Soaking the Peanuts: Place the shelled peanuts in a bowl of lukewarm water and let them soak for 12-24 hours. This will help soften the seed coat and encourage germination. I usually soak mine overnight.
3. Choosing the Best Seeds: After soaking, inspect the peanuts. Discard any that are discolored, shriveled, or damaged. We want only the plumpest, healthiest-looking peanuts for planting.
Planting Your Peanut Seeds: From Seed to Sprout
Now for the fun part: getting those peanuts into the soil!
1. Preparing the Containers: Fill your large containers with the well-draining potting mix, leaving about an inch of space at the top.
2. Planting the Seeds: Make small holes in the soil, about 1-2 inches deep and 4-6 inches apart. Place one peanut in each hole, and gently cover with soil.
3. Watering: Water the soil thoroughly until it is evenly moist but not soggy.
4. Providing Warmth: If you’re using a heat mat, place the containers on the mat. Otherwise, find a warm spot in your home (around 70-80掳F) for the containers.
5. Patience is Key: It can take anywhere from 7 to 14 days for the peanuts to germinate, so be patient! Keep the soil consistently moist but not waterlogged.
Nurturing Your Peanut Plants: From Sprout to Bloom
Once your peanut seedlings emerge, it’s time to provide them with the care they need to flourish.
1. Light: Peanut plants need plenty of light, at least 6-8 hours per day. If you’re using grow lights, position them about 6-12 inches above the plants. If you’re relying on natural sunlight, place the containers in a sunny window. Rotate the containers regularly to ensure even light exposure.
2. Watering: Water your peanut plants regularly, keeping the soil consistently moist but not soggy. Check the soil moisture by sticking your finger into the soil. If the top inch feels dry, it’s time to water. Avoid overwatering, as this can lead to root rot.
3. Fertilizing: Once your peanut plants are a few inches tall, start fertilizing them every 2-3 weeks with a balanced liquid fertilizer. Follow the instructions on the fertilizer label.
4. Humidity: Peanut plants appreciate humidity, so mist the leaves regularly with a spray bottle. You can also place a tray of water near the plants to increase humidity.
5. “Hilling” the Plants: This is a crucial step for peanut production. As the peanut plants grow, they will produce small yellow flowers. After the flowers are pollinated, they will form “pegs” that grow downwards into the soil. These pegs are what develop into peanuts. To encourage peanut production, gently mound soil around the base of the plants, covering the pegs as they grow. This process is called “hilling.” Repeat this process every few weeks as the plants grow.
6. Pest Control: Keep an eye out for pests like aphids, spider mites, and whiteflies. If you spot any pests, treat them with an insecticidal soap or neem oil.
Harvesting Your Peanuts: From Plant to Plate
The moment we’ve all been waiting for! Harvesting your homegrown peanuts is a rewarding experience.
1. Knowing When to Harvest: Peanuts are typically ready to harvest about 120-150 days after planting. The leaves will start to turn yellow and brown, and the plants will begin to look tired. This is a sign that the peanuts are mature.
2. Harvesting: Gently dig up the entire plant, being careful not to damage the peanuts. Shake off any excess soil.
3. Curing the Peanuts: This is an important step to ensure the peanuts are properly dried and stored. Hang the entire plant upside down in a warm, dry, well-ventilated place for 2-4 weeks. This allows the peanuts to dry and cure.
4. Separating the Peanuts: Once the plants are cured, you can separate the peanuts from the roots.
5. Storing the Peanuts: Store the peanuts in a cool, dry place in airtight containers. You can store them in the shell or shelled.
Troubleshooting: Common Peanut Growing Problems
Even with the best care, you might encounter some challenges along the way. Here are some common problems and how to address them:
* Poor Germination: If your peanuts aren’t germinating, make sure they are raw and unsalted, and that the soil is warm and moist. You can also try scarifying the peanut seeds by gently rubbing them with sandpaper before soaking.
* Yellowing Leaves: Yellowing leaves can be a sign of nutrient deficiency. Try fertilizing your plants with a balanced liquid fertilizer.
* Lack of Peanut Production: If your plants are growing well but not producing peanuts, make sure you are “hilling” the plants regularly to cover the pegs. Also, ensure the soil is well-draining and that the plants are getting enough light.
* Pest Infestations: Regularly inspect your plants for pests and treat them promptly with an insecticidal soap or neem oil.
Extra Tips for Peanut-Growing Success
* Choose the Right Variety: Some peanut varieties are better suited for indoor growing than others. Look for varieties that are compact and early-maturing.
* Provide Support: As the peanut plants grow, they may need some support to prevent them from falling over. You can use stakes or a trellis to provide support.
* Experiment with Different Soil Mixes: Don’t be afraid to experiment with different soil mixes to find what works best for your growing conditions.
* Have Fun! Growing peanuts indoors is a fun and rewarding experience. Don’t be afraid to experiment and learn along the way.
So there you have it! Everything you need to know to grow your own peanuts indoors. With a little patience and care, you’ll be enjoying homegrown peanuts in no time. Happy gardening!
Conclusion
So, there you have it! Growing peanuts without a garden is not only possible, but it can be a surprisingly rewarding and educational experience. We’ve walked you through the process, from selecting the right peanuts to ensuring proper drainage and sunlight, all within the confines of a container. But why should you even bother trying this DIY trick?
Firstly, it’s an incredible way to connect with your food. In a world of pre-packaged goods, nurturing a peanut plant from seed to harvest offers a tangible link to the natural world. Watching those delicate seedlings emerge, observing the unique flowering process, and finally unearthing your very own homegrown peanuts is an unparalleled feeling of accomplishment.
Secondly, growing peanuts in containers opens up the possibility of enjoying fresh, homegrown peanuts even if you lack traditional garden space. Apartment dwellers, balcony enthusiasts, and anyone with limited yard access can now partake in the joy of cultivating their own delicious snacks. This is especially appealing for those who value fresh, organic produce and want to avoid the chemicals and preservatives often found in commercially grown peanuts.
Thirdly, it’s a fantastic learning opportunity, especially for families with children. Growing peanuts provides a hands-on lesson in botany, agriculture, and the importance of sustainable food practices. It’s a chance to teach kids about the life cycle of a plant, the role of sunlight and water, and the satisfaction of reaping the rewards of their hard work.
But the benefits don’t stop there. Container gardening allows for greater control over the growing environment. You can easily move your peanut plants to optimize sunlight exposure, protect them from harsh weather conditions, and monitor soil moisture levels. This level of control can lead to a healthier, more productive crop compared to growing peanuts directly in the ground.
Now, let’s talk about variations. While we’ve focused on the basic method, there are plenty of ways to customize your peanut-growing experience. Consider experimenting with different peanut varieties, such as Virginia, Spanish, or Runner peanuts, to discover your favorite flavor profile. You can also try adding companion plants to your container, such as marigolds or basil, to deter pests and attract beneficial insects. Another variation is to use different types of containers, such as fabric pots or self-watering planters, to see which works best for your needs. You can even try growing peanuts indoors under grow lights, although this requires careful attention to temperature and humidity.
Don’t be afraid to get creative and adapt the process to suit your specific circumstances and preferences. The key is to experiment, learn from your mistakes, and most importantly, have fun!
So, are you ready to embark on your peanut-growing adventure? We wholeheartedly encourage you to give this DIY trick a try. It’s a simple, affordable, and incredibly rewarding way to enjoy fresh, homegrown peanuts, regardless of your living situation.
Once you’ve harvested your peanuts, be sure to share your experience with us! We’d love to hear about your successes, challenges, and any tips or tricks you’ve discovered along the way. Share your photos and stories on social media using #ContainerPeanuts or leave a comment below. Let’s build a community of peanut-growing enthusiasts and inspire others to discover the joy of cultivating their own food.
Remember, growing peanuts without a garden is more than just a DIY project; it’s a connection to nature, a learning opportunity, and a chance to enjoy the delicious taste of homegrown goodness. So, grab a bag of raw peanuts, a container, and some soil, and get ready to experience the magic of growing your own peanuts!
FAQ
Frequently Asked Questions About Growing Peanuts in Containers
1. What kind of peanuts should I use to start growing?
The best peanuts to use for starting are raw, unsalted peanuts in their shells. Roasted or salted peanuts will not germinate. Look for peanuts specifically labeled for planting, as these are more likely to sprout. Virginia peanuts are a popular choice due to their large size and ease of growth in containers. Spanish and Runner peanuts are also viable options, offering slightly different flavor profiles. Avoid using peanuts that have been treated with fungicides or other chemicals, as these can inhibit germination.
2. How big of a container do I need for growing peanuts?
A container that is at least 18 inches in diameter and 12 inches deep is recommended for growing peanuts. Peanuts develop underground, so they need ample space for their roots and pods to grow. The larger the container, the more peanuts you can potentially harvest. Ensure the container has drainage holes to prevent waterlogging, which can lead to root rot. Fabric pots are an excellent choice as they provide good drainage and aeration.
3. What type of soil is best for growing peanuts in containers?
Peanuts thrive in well-draining, sandy loam soil. A mixture of potting soil, sand, and compost is ideal. Avoid heavy clay soils, as they can become compacted and hinder peanut development. The soil should be slightly acidic to neutral, with a pH between 6.0 and 7.0. Adding perlite or vermiculite to the soil mix can improve drainage and aeration.
4. How much sunlight do peanut plants need?
Peanut plants require at least 6-8 hours of direct sunlight per day to thrive. Choose a location that receives ample sunlight throughout the day. If you live in a region with limited sunlight, consider using grow lights to supplement natural light. Rotate the container regularly to ensure all sides of the plant receive adequate sunlight.
5. How often should I water my peanut plants?
Water peanut plants regularly, keeping the soil consistently moist but not waterlogged. Water deeply when the top inch of soil feels dry to the touch. Avoid overhead watering, as this can promote fungal diseases. During hot, dry weather, you may need to water more frequently. Reduce watering as the peanuts mature and the leaves begin to yellow.
6. How long does it take for peanuts to grow in containers?
It typically takes 120-150 days for peanuts to mature from planting to harvest. The exact time frame can vary depending on the peanut variety, climate, and growing conditions. Be patient and monitor your plants closely for signs of maturity, such as yellowing leaves and hardened peanut shells.
7. How do I know when my peanuts are ready to harvest?
The best way to determine if your peanuts are ready to harvest is to check the maturity of the pods. Dig up a few plants and examine the peanut shells. The shells should be fully formed, with a distinct veining pattern. The inside of the shell should be dark in color. The leaves of the plant will also start to yellow and dry out.
8. How do I harvest peanuts from a container?
To harvest peanuts, gently pull the entire plant out of the container. Shake off any excess soil and carefully remove the peanuts from the roots. You can also use a garden fork to loosen the soil and make it easier to pull the plants.
9. How do I cure and store my homegrown peanuts?
After harvesting, cure the peanuts by drying them in a well-ventilated area for 1-2 weeks. Spread the peanuts out in a single layer on a screen or tray. Turn them regularly to ensure even drying. Once the peanuts are dry, store them in an airtight container in a cool, dry place. You can also freeze peanuts for longer storage.
10. Are there any common pests or diseases that affect peanut plants in containers?
Common pests that can affect peanut plants include aphids, spider mites, and leafhoppers. These pests can be controlled with insecticidal soap or neem oil. Fungal diseases, such as leaf spot and root rot, can also affect peanut plants. Prevent these diseases by providing good drainage, avoiding overhead watering, and ensuring adequate air circulation.
11. Can I grow peanuts indoors?
Yes, you can grow peanuts indoors, but it requires careful attention to temperature, humidity, and lighting. You’ll need to provide at least 12-14 hours of artificial light per day using grow lights. Maintain a consistent temperature between 70-80掳F and a humidity level of around 50-60%. Ensure the container has good drainage and use a well-draining soil mix. Indoor peanut plants may not produce as many peanuts as outdoor plants, but it’s still a rewarding experience.
12. Can I reuse the soil from my peanut container for other plants?
Yes, you can reuse the soil from your peanut container for other plants, but it’s important to amend it first. Peanuts are nitrogen-fixing plants, so they can deplete the soil of other nutrients. Add compost, aged manure, or other organic matter to replenish the soil. You may also want to test the soil pH and adjust it as needed.
Leave a Comment