

Growing Mint Indoors can seem like a daunting task, conjuring images of brown, wilted leaves and a sad, neglected herb struggling for survival. But fear not, fellow plant enthusiasts! I’m here to tell you that cultivating a thriving mint patch within the cozy confines of your home is not only achievable but surprisingly simple with a few clever DIY tricks and hacks. Forget expensive store-bought mint that wilts within days; imagine the satisfaction of snipping fresh, fragrant leaves for your tea, cocktails, or culinary creations, all grown with your own two hands.
Mint, with its invigorating aroma and refreshing flavor, has a rich history steeped in tradition. Ancient civilizations, from the Egyptians to the Romans, revered mint for its medicinal properties and culinary uses. It was even believed to symbolize hospitality and was often strewn on floors to welcome guests. Today, the allure of fresh mint remains strong, but access to it can be limited, especially during colder months or for those without outdoor garden space. That’s where the magic of DIY comes in!
Why should you embrace these growing mint indoors DIY tricks? Because it empowers you to take control of your herb supply, ensuring a constant source of fresh, organic mint, free from harmful pesticides. Plus, it’s a fantastic way to add a touch of greenery and vibrancy to your living space, boosting your mood and creating a more inviting atmosphere. So, let’s dive into the wonderful world of indoor mint cultivation and unlock the secrets to a flourishing, fragrant herb garden right in your home!
Minze erfolgreich in Innenräumen anbauen: Dein DIY-Leitfaden
Hallo liebe Pflanzenfreunde! Habt ihr auch genug von teurer Minze aus dem Supermarkt, die nach ein paar Tagen schon schlapp macht? Dann seid ihr hier genau richtig! Ich zeige euch, wie ihr ganz einfach eure eigene Minze in Innenräumen anbauen könnt – frisch, aromatisch und immer griffbereit für Tee, Cocktails oder leckere Gerichte. Keine grünen Daumen nötig, versprochen!
Was du brauchst: Deine Einkaufsliste
Bevor wir loslegen, hier eine Liste mit allem, was du für dein Minz-Indoor-Projekt benötigst:
* Minzsamen oder Minzstecklinge: Samen sind eine günstige Option, aber Stecklinge bringen schneller Ergebnisse. Du kannst Stecklinge von einer gekauften Minzpflanze nehmen oder von einem Freund bekommen.
* Anzuchterde oder Blumenerde: Spezielle Anzuchterde ist ideal für Samen, da sie nährstoffarm und locker ist. Blumenerde funktioniert aber auch gut, besonders für Stecklinge.
* Töpfe mit Drainagelöchern: Die Größe hängt davon ab, wie viel Minze du anbauen möchtest. Kleine Töpfe (ca. 10-15 cm Durchmesser) reichen für den Anfang.
* Unterteller: Um überschüssiges Wasser aufzufangen.
* Sprühflasche: Für die Bewässerung der Samen und jungen Pflanzen.
* Gießkanne: Für die spätere Bewässerung.
* Helle Fensterbank oder Pflanzenlampe: Minze braucht viel Licht!
* Optional: Flüssigdünger für Kräuter.
Minze aus Samen ziehen: Geduld zahlt sich aus
Das Ziehen von Minze aus Samen erfordert etwas mehr Geduld, aber es ist eine tolle Möglichkeit, verschiedene Minzsorten auszuprobieren.
Schritt-für-Schritt-Anleitung:
1. Vorbereitung der Töpfe: Fülle die Töpfe mit Anzuchterde, lass dabei ca. 2 cm Platz bis zum Rand. Drücke die Erde leicht an.
2. Aussaat der Samen: Verteile die Minzsamen gleichmäßig auf der Erde. Minze ist ein Lichtkeimer, das heißt, die Samen brauchen Licht zum Keimen. Bedecke sie also nur ganz leicht mit Erde oder drücke sie einfach an.
3. Bewässerung: Befeuchte die Erde vorsichtig mit der Sprühflasche. Sie sollte feucht, aber nicht nass sein.
4. Abdeckung: Decke die Töpfe mit Frischhaltefolie oder einer durchsichtigen Plastiktüte ab, um die Luftfeuchtigkeit zu erhöhen. Steche ein paar Löcher in die Folie, damit die Luft zirkulieren kann.
5. Standort: Stelle die Töpfe an einen hellen, warmen Ort, aber nicht in die pralle Sonne. Eine Fensterbank ist ideal.
6. Geduldsprobe: Halte die Erde feucht, aber vermeide Staunässe. Nach ca. 10-14 Tagen sollten die ersten Keimlinge erscheinen.
7. Entfernung der Abdeckung: Sobald die Keimlinge da sind, entferne die Folie oder Tüte.
8. Pikieren: Wenn die Pflänzchen groß genug sind (ca. 5 cm hoch), kannst du sie pikieren, d.h. in größere Töpfe umpflanzen. Achte darauf, die Wurzeln nicht zu beschädigen.
Minze aus Stecklingen vermehren: Schnell und einfach
Das Vermehren von Minze aus Stecklingen ist eine schnellere und einfachere Methode, um an eine neue Minzpflanze zu kommen.
So geht’s:
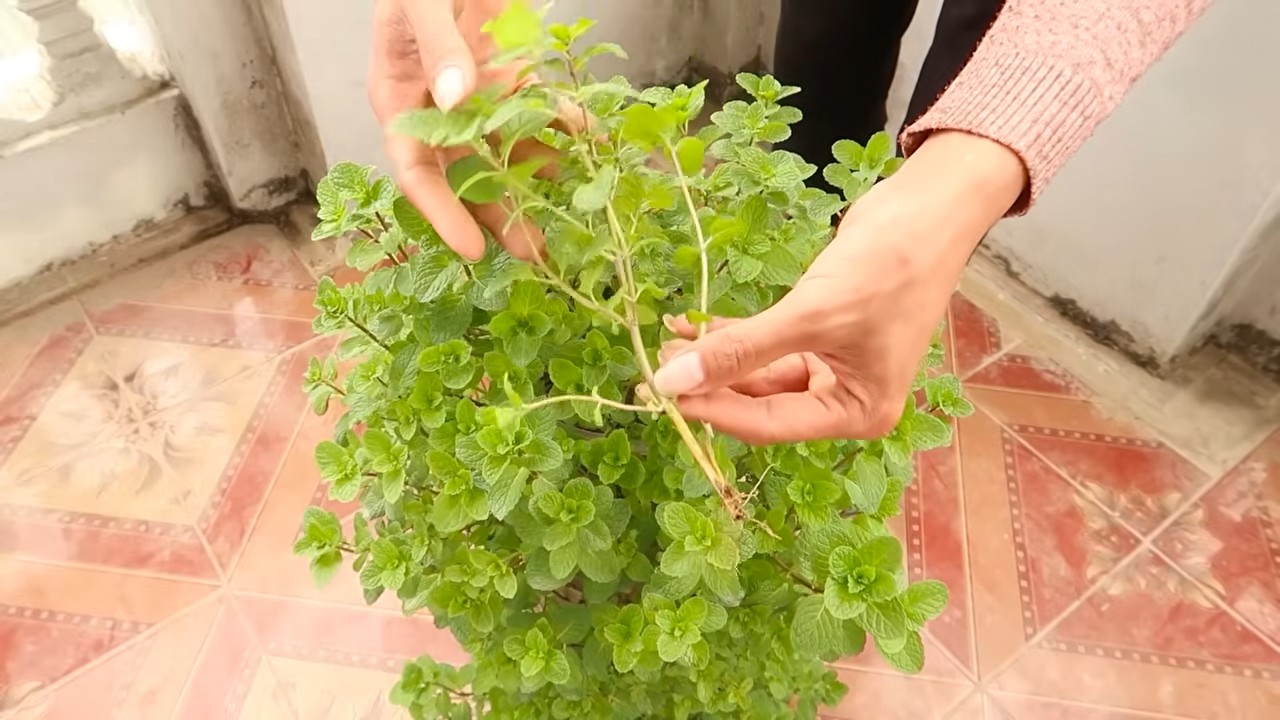
1. Auswahl der Stecklinge: Suche dir gesunde, kräftige Triebe an einer bestehenden Minzpflanze aus. Die Triebe sollten ca. 10-15 cm lang sein.
2. Schneiden der Stecklinge: Schneide die Triebe direkt unterhalb eines Blattknotens ab. Entferne die unteren Blätter, damit sie nicht im Wasser faulen.
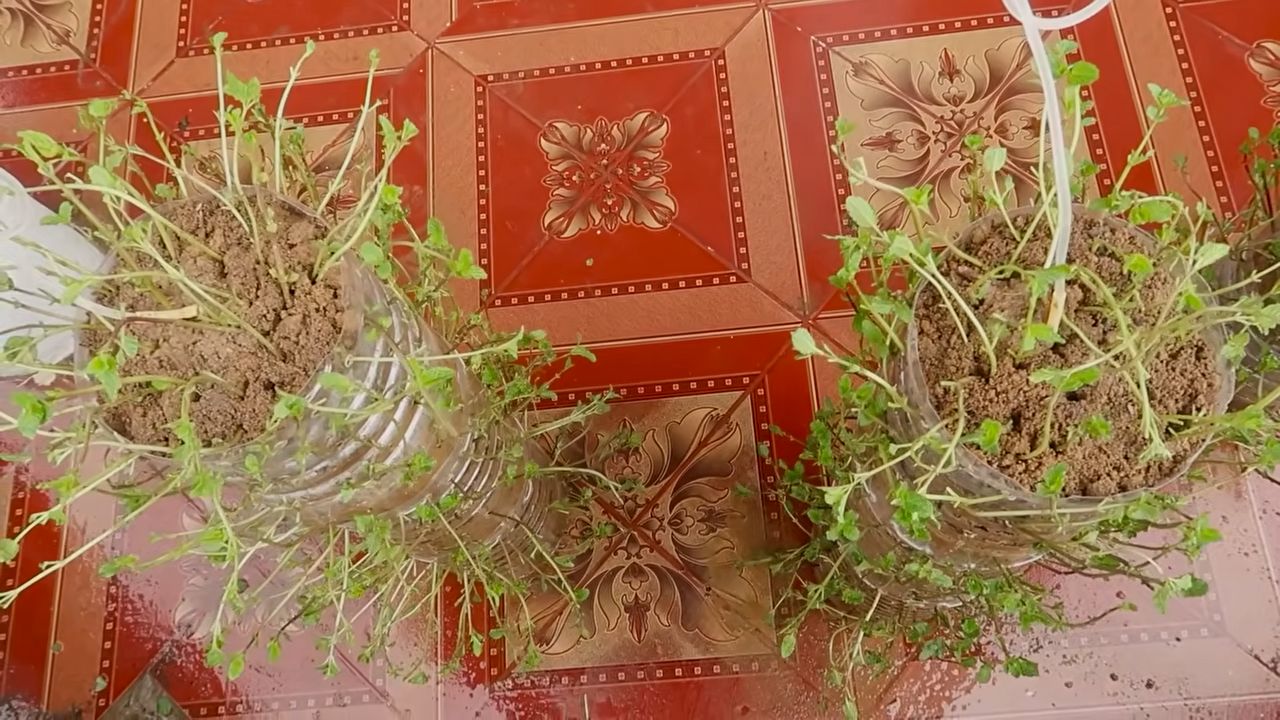
3. Bewurzelung im Wasser: Stelle die Stecklinge in ein Glas mit Wasser. Achte darauf, dass die unteren Blattknoten im Wasser sind.
4. Standort: Stelle das Glas an einen hellen Ort, aber nicht in die pralle Sonne.
5. Geduld: Wechsle das Wasser alle paar Tage. Nach ca. 1-2 Wochen sollten sich Wurzeln bilden.
6. Einpflanzen: Sobald die Wurzeln ca. 2-3 cm lang sind, kannst du die Stecklinge in Töpfe mit Blumenerde pflanzen.
Die richtige Pflege: Damit deine Minze prächtig gedeiht
Minze ist relativ pflegeleicht, aber ein paar Dinge solltest du beachten, damit sie sich bei dir wohlfühlt.
Licht:
Minze braucht viel Licht, mindestens 6 Stunden pro Tag. Eine helle Fensterbank ist ideal. Wenn du nicht genügend natürliches Licht hast, kannst du eine Pflanzenlampe verwenden.
Bewässerung:
Halte die Erde feucht, aber vermeide Staunässe. Gieße regelmäßig, besonders im Sommer. Die Erde sollte sich leicht feucht anfühlen, wenn du sie berührst.
Düngen:
Minze ist nicht sehr anspruchsvoll, aber eine gelegentliche Düngung mit Flüssigdünger für Kräuter kann das Wachstum fördern. Dünge ca. alle 2-4 Wochen während der Wachstumsperiode (Frühling und Sommer).
Schneiden:
Regelmäßiges Schneiden fördert das Wachstum und verhindert, dass die Minze blüht. Blühende Minze verliert an Aroma. Schneide die Triebe einfach mit einer Schere ab. Du kannst die abgeschnittenen Blätter sofort verwenden oder trocknen.
Umpflanzen:
Minze wächst schnell und kann schnell den Topf durchwurzeln. Umpflanzen in einen größeren Topf ist daher regelmäßig notwendig, etwa alle 6-12 Monate.
Häufige Probleme und Lösungen:
* Gelbe Blätter: Können ein Zeichen für Überwässerung, Nährstoffmangel oder zu wenig Licht sein. Überprüfe deine Bewässerungsgewohnheiten, dünge die Pflanze und stelle sie an einen helleren Ort.
* Braune Blätter: Können durch zu trockene Luft oder zu wenig Wasser verursacht werden. Besprühe die Blätter regelmäßig mit Wasser und gieße die Pflanze ausreichend.
* Schädlinge: Minze kann von Blattläusen oder Spinnmilben befallen werden. Sprühe die Pflanze mit einer Lösung aus Wasser und etwas Spülmittel ab oder verwende ein biologisches Schädlingsbekämpfungsmittel.
Minzsorten: Vielfalt für deinen Garten
Es gibt unzählige Minzsorten mit unterschiedlichen Aromen. Hier ein paar beliebte Sorten:
* Pfefferminze: Der Klassiker mit einem intensiven, erfrischenden Geschmack.
* Grüne Minze (Spearmint): Mild und süßlich, ideal für Mojitos und Tees.
* Schokoladenminze: Mit einem Hauch von Schokolade, perfekt für Desserts.
* Erdbeerminze: Mit einem fruchtigen Erdbeeraroma, lecker in Salaten und Getränken.
* Marokkanische Minze: Beliebt für traditionellen marokkanischen Minztee.
Minze ernten und verwenden: Frische für deine Küche
Du kannst die Minze ernten, sobald die Pflanze groß genug ist. Schneide einfach die Triebe mit einer Schere ab. Die Blätter sind am aromatischsten, wenn du sie kurz vor der Blüte erntest.
Minze ist vielseitig einsetzbar:
* Tee: Frische oder getrocknete Minze für einen erfrischenden Tee.
* Cocktails: Mojitos, Minz-Juleps und andere Cocktails.
* Salate: Frische Minze in Salaten für einen besonderen Geschmack.
* Desserts: Minze in Schokoladenmousse, Eis oder anderen Desserts.
* Soßen: Minzsoße zu Lamm oder anderen Gerichten.
Minze trocknen: Für den Wintervorrat
Wenn du mehr Minze hast, als du verbrauchen kannst, kannst du sie trocknen, um sie für den Winter zu konservieren.
1. Ernten: Ernte die Minze am besten am Morgen, nachdem der
Conclusion
So, there you have it! Growing mint indoors isn’t just a whimsical idea for plant enthusiasts; it’s a practical, aromatic, and incredibly rewarding endeavor that anyone can undertake. We’ve walked through the simple steps, from selecting the right container and soil to providing the ideal light and watering conditions. But why is this DIY trick a must-try?
Firstly, having fresh mint readily available at your fingertips elevates your culinary creations to a whole new level. Imagine the burst of flavor in your homemade mojitos, the refreshing touch it adds to your salads, or the soothing warmth it brings to your herbal teas. No more last-minute trips to the grocery store or settling for dried, lackluster mint. You’ll have vibrant, fragrant leaves whenever inspiration strikes.
Secondly, growing mint indoors is a fantastic way to bring a touch of nature into your home, especially during the colder months when outdoor gardening is limited. The vibrant green foliage adds a splash of color and life to any room, creating a more inviting and calming atmosphere. Plus, the delightful aroma of mint can naturally freshen your home, acting as a subtle and pleasant air freshener.
But the benefits don’t stop there. This DIY project is incredibly cost-effective. Instead of constantly buying bunches of mint that often go to waste, you can cultivate your own supply for a fraction of the price. It’s also a sustainable choice, reducing your reliance on commercially grown herbs that may have traveled long distances.
Now, let’s talk about variations. Feel free to experiment with different varieties of mint, such as peppermint, spearmint, chocolate mint, or even apple mint. Each variety offers a unique flavor profile that can enhance your culinary adventures. You can also get creative with your containers, using repurposed jars, decorative pots, or even hanging baskets to add a touch of personal style to your indoor garden. Consider companion planting your mint with other herbs like basil or rosemary, but be mindful of their individual needs and growth habits. Remember that mint is an aggressive grower, so keeping it contained is crucial to prevent it from taking over your entire garden.
Don’t be afraid to experiment with different lighting conditions to find what works best for your mint plant. If you don’t have a sunny windowsill, consider using a grow light to supplement the natural light. And remember to regularly prune your mint plant to encourage bushier growth and prevent it from becoming leggy.
Ultimately, growing mint indoors is a simple yet transformative DIY project that offers a multitude of benefits. It’s a way to enhance your culinary creations, bring nature into your home, save money, and reduce your environmental impact. So, what are you waiting for? Grab a pot, some soil, and a mint plant, and embark on this rewarding journey today!
We’re confident that you’ll love the experience of growing your own fresh mint indoors. And we’d love to hear about your successes (and any challenges you encounter along the way!). Share your experiences, tips, and photos with us in the comments below. Let’s create a community of indoor mint growers and inspire others to embrace this delightful DIY trick! Let us know what you think about this guide to growing mint indoors.
Frequently Asked Questions (FAQ)
1. What kind of pot and soil should I use for growing mint indoors?
The best pot for growing mint indoors is one that is at least 6 inches in diameter and has drainage holes. This allows excess water to escape, preventing root rot. As for the material, terracotta pots are a good choice because they allow the soil to breathe, but plastic pots are also fine as long as they have drainage.
For soil, use a well-draining potting mix. A mix of peat moss, perlite, and vermiculite is ideal. Avoid using garden soil, as it can be too heavy and compact, hindering root growth. You can also add some compost to the potting mix to provide extra nutrients.
2. How much sunlight does indoor mint need?
Mint thrives in bright, indirect sunlight. Ideally, your mint plant should receive at least 4-6 hours of sunlight per day. A south-facing or east-facing window is usually a good location. If you don’t have access to a sunny window, you can use a grow light to supplement the natural light. Place the grow light a few inches above the plant and keep it on for 12-14 hours per day.
If your mint plant is not getting enough light, it may become leggy (tall and spindly) and the leaves may be pale. If this happens, try moving the plant to a sunnier location or using a grow light.
3. How often should I water my indoor mint plant?
Water your mint plant when the top inch of soil feels dry to the touch. Water thoroughly until water drains out of the drainage holes. Avoid overwatering, as this can lead to root rot. Mint prefers consistently moist soil, but not soggy.
During the warmer months, you may need to water your mint plant more frequently than during the cooler months. Check the soil moisture regularly and adjust your watering schedule accordingly.
4. How do I prune my indoor mint plant?
Pruning is essential for keeping your mint plant healthy and productive. Regularly pinch off the top leaves to encourage bushier growth. You can also trim back the stems to maintain the desired shape and size.
When pruning, use clean, sharp scissors or pruning shears. Cut the stems just above a leaf node (the point where a leaf grows out of the stem). This will encourage new growth from that point.
You can use the pruned leaves for cooking, tea, or other purposes.
5. How do I propagate mint from cuttings?
Propagating mint from cuttings is a simple and effective way to create new plants. To propagate mint, take a 4-6 inch cutting from a healthy stem. Remove the lower leaves, leaving only a few leaves at the top.
Place the cutting in a glass of water, making sure that the lower nodes are submerged. Place the glass in a bright, indirect location. Change the water every few days.
After a few weeks, roots will begin to grow. Once the roots are about an inch long, you can plant the cutting in a pot with well-draining potting mix. Water thoroughly and keep the soil moist until the plant is established.
6. What are some common problems with growing mint indoors and how can I fix them?
Some common problems with growing mint indoors include:
* **Pests:** Mint can be susceptible to pests such as aphids, spider mites, and whiteflies. Inspect your plant regularly for signs of infestation. If you find pests, you can try washing them off with a strong stream of water or using an insecticidal soap.
* **Diseases:** Mint can also be affected by diseases such as powdery mildew and rust. These diseases can cause white or orange spots on the leaves. To prevent diseases, make sure your plant has good air circulation and avoid overwatering. If your plant is affected by a disease, you can try using a fungicide.
* **Yellowing leaves:** Yellowing leaves can be a sign of overwatering, underwatering, or nutrient deficiency. Check the soil moisture and adjust your watering schedule accordingly. You can also fertilize your plant with a balanced fertilizer.
* **Leggy growth:** Leggy growth is a sign that your plant is not getting enough light. Move the plant to a sunnier location or use a grow light.
7. Can I grow different varieties of mint together in the same pot?
While it’s tempting to grow different varieties of mint together, it’s generally not recommended. Mint is an aggressive grower and different varieties can cross-pollinate, resulting in unpredictable flavors and growth habits. It’s best to keep each variety in its own separate pot to maintain its unique characteristics.
8. How often should I fertilize my indoor mint plant?
Fertilize your indoor mint plant every 2-4 weeks during the growing season (spring and summer). Use a balanced liquid fertilizer diluted to half strength. Avoid over-fertilizing, as this can burn the roots. During the dormant season (fall and winter), you can reduce the frequency of fertilization to once a month or stop fertilizing altogether.
9. Is mint safe for pets?
While mint is generally considered safe for pets in small quantities, it’s best to keep your mint plant out of reach of your furry friends. Some varieties of mint, such as pennyroyal, can be toxic to pets if ingested in large amounts. If you suspect that your pet has ingested a large amount of mint, contact your veterinarian immediately.
10. How do I harvest mint leaves?
Harvest mint leaves by pinching or cutting them off the stem. You can harvest leaves at any time, but the flavor is usually strongest in the morning. To encourage continued growth, avoid harvesting more than one-third of the plant at a time. You can use the fresh mint leaves immediately or dry them for later use. To dry mint leaves, hang them upside down in a cool, dry place or use a dehydrator.

Leave a Comment