

Growing Kale in Soil Bags: Unlock the secrets to a bountiful harvest, even without a traditional garden! Have you ever dreamt of fresh, vibrant kale gracing your dinner plate, but felt limited by space or soil conditions? I know I have! For centuries, kale has been a nutritional powerhouse, a staple in diets across cultures, from the hearty stews of Scotland to the vibrant salads of the Mediterranean. But what if I told you that you could cultivate this leafy green goodness practically anywhere, using a simple, cost-effective method?
This DIY guide is your passport to growing kale in soil bags, a technique that’s not only incredibly easy but also remarkably rewarding. Forget back-breaking tilling and weeding; this method is perfect for beginners, apartment dwellers, or anyone looking for a low-maintenance gardening solution. We’ll walk you through each step, from selecting the right soil to harvesting your delicious, homegrown kale.
In today’s fast-paced world, knowing where your food comes from and having control over its quality is more important than ever. Plus, there’s nothing quite like the satisfaction of nurturing a plant from seed to table. So, grab your gardening gloves, and let’s embark on this exciting journey of growing kale in soil bags, bringing a touch of green and a whole lot of flavor to your life!
Kohl Anbauen in Pflanzsäcken: Eine einfache DIY-Anleitung
Ich liebe es, frischen Grünkohl direkt aus meinem Garten zu ernten. Aber nicht jeder hat den Platz für ein traditionelles Gemüsebeet. Deshalb zeige ich euch heute, wie ihr Grünkohl ganz einfach in Pflanzsäcken anbauen könnt! Es ist eine super platzsparende und kostengünstige Methode, die auch für Anfänger geeignet ist.
Warum Pflanzsäcke?
Pflanzsäcke bieten einige Vorteile gegenüber dem Anbau im Gartenbeet:
* Platzsparend: Ideal für Balkone, Terrassen oder kleine Gärten.
* Bessere Kontrolle: Du kannst die Bodenqualität und den Feuchtigkeitsgehalt besser steuern.
* Weniger Unkraut: Pflanzsäcke reduzieren das Unkrautwachstum.
* Mobil: Du kannst die Säcke leicht umstellen, um die Sonneneinstrahlung zu optimieren.
* Weniger Bodenerosion: Der Boden bleibt besser an Ort und Stelle.
Was du brauchst
Bevor wir loslegen, hier eine Liste der Materialien und Werkzeuge, die du benötigst:
* Pflanzsäcke: Am besten eignen sich robuste Pflanzsäcke aus atmungsaktivem Material (z.B. Filz oder Jute). Die Größe sollte mindestens 30 Liter betragen, damit der Grünkohl genügend Platz zum Wachsen hat.
* Hochwertige Pflanzerde: Verwende eine spezielle Gemüseerde oder mische Blumenerde mit Kompost.
* Grünkohl-Samen oder Jungpflanzen: Du kannst entweder Samen aussäen oder vorgezogene Jungpflanzen kaufen.
* Kompost oder organischer Dünger: Für eine gute Nährstoffversorgung.
* Gießkanne oder Gartenschlauch: Zum Bewässern.
* Gartenschere oder Messer: Zum Ernten.
* Optional: Mulch (z.B. Stroh oder Holzhackschnitzel) zur Feuchtigkeitsspeicherung und Unkrautunterdrückung.
* Optional: Pflanzstäbe oder Rankgitter, falls du hochwachsende Grünkohlsorten anbaust.
Schritt-für-Schritt-Anleitung
Hier ist eine detaillierte Anleitung, wie du deinen Grünkohl in Pflanzsäcken anbaust:
1. Vorbereitung der Pflanzsäcke
1. Wähle den Standort: Suche einen sonnigen Standort für deine Pflanzsäcke. Grünkohl benötigt mindestens 6 Stunden Sonnenlicht pro Tag.
2. Platziere die Pflanzsäcke: Stelle die leeren Pflanzsäcke an den gewählten Standort. Denke daran, dass sie nach dem Befüllen schwerer sind und nicht mehr so leicht bewegt werden können.
3. Entwässerung sicherstellen: Wenn deine Pflanzsäcke keine Löcher am Boden haben, solltest du ein paar kleine Löcher hineinschneiden, damit überschüssiges Wasser ablaufen kann. Das verhindert Staunässe, die zu Wurzelfäule führen kann.
4. Befülle die Pflanzsäcke: Fülle die Pflanzsäcke mit Pflanzerde. Lasse etwa 5-10 cm Platz bis zum oberen Rand.
5. Erde auflockern: Lockere die Erde leicht auf, damit sie nicht zu fest ist.
2. Aussaat oder Einpflanzen
Hier hast du zwei Möglichkeiten: Entweder du säst die Samen direkt in die Pflanzsäcke oder du pflanzt vorgezogene Jungpflanzen ein.
Aussaat von Samen:
1. Samen aussäen: Drücke mit dem Finger kleine Mulden (ca. 1 cm tief) in die Erde. Der Abstand zwischen den Mulden sollte etwa 5-10 cm betragen.
2. Samen einlegen: Lege in jede Mulde 2-3 Samen.
3. Mit Erde bedecken: Bedecke die Samen mit einer dünnen Schicht Erde.
4. Angießen: Gieße die Erde vorsichtig an, damit die Samen nicht weggespült werden.
5. Feucht halten: Halte die Erde feucht, aber nicht nass, bis die Samen keimen. Das dauert in der Regel 5-10 Tage.
6. Vereinzeln: Sobald die Keimlinge ein paar Blätter haben, solltest du sie vereinzeln. Entferne die schwächeren Pflanzen, so dass nur die stärkste Pflanze pro Stelle übrig bleibt.
Einpflanzen von Jungpflanzen:
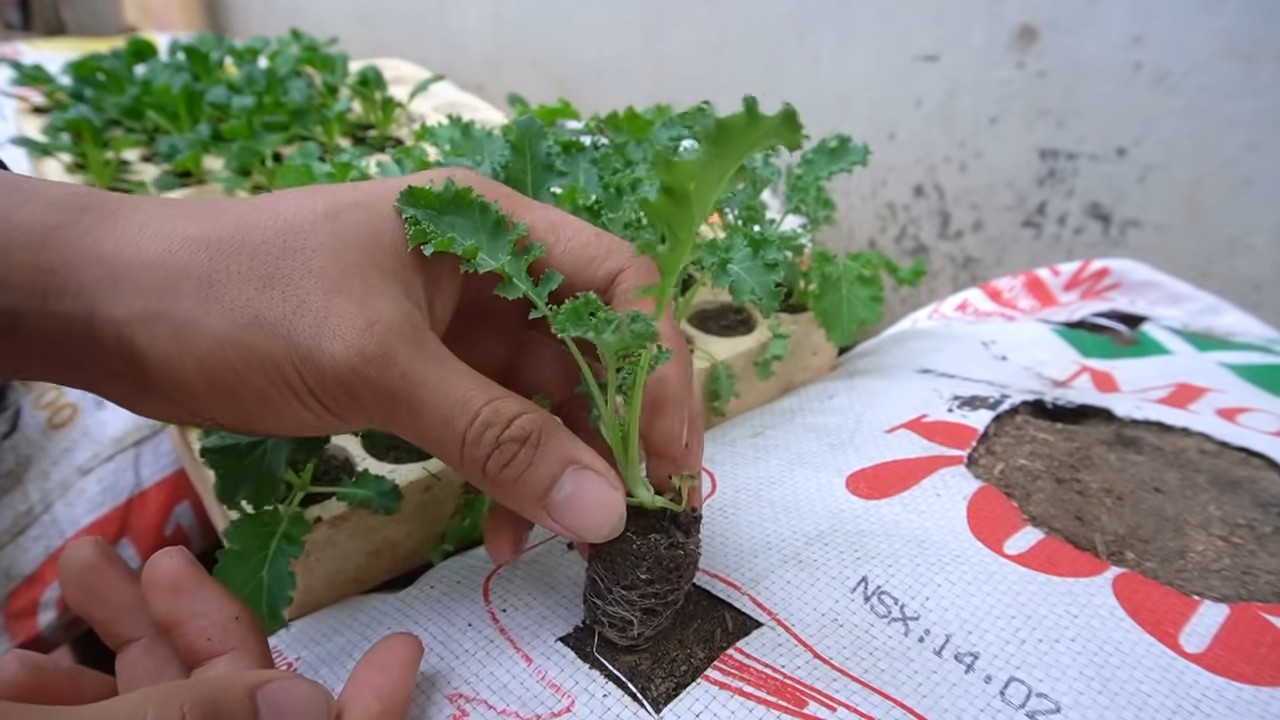
1. Pflanzlöcher vorbereiten: Grabe mit den Fingern oder einem kleinen Spaten Pflanzlöcher in die Erde. Die Löcher sollten so groß sein, dass die Wurzelballen der Jungpflanzen hineinpassen. Der Abstand zwischen den Löchern sollte etwa 30-40 cm betragen.
2. Jungpflanzen einsetzen: Nimm die Jungpflanzen vorsichtig aus ihren Töpfen und setze sie in die Pflanzlöcher. Achte darauf, dass der Wurzelballen nicht beschädigt wird.
3. Mit Erde auffüllen: Fülle die Pflanzlöcher mit Erde auf und drücke sie leicht an.
4. Angießen: Gieße die Jungpflanzen gründlich an.
3. Pflege des Grünkohls
Die richtige Pflege ist entscheidend für eine reiche Ernte.
1. Bewässerung: Grünkohl benötigt regelmäßige Bewässerung, besonders während trockener Perioden. Die Erde sollte immer leicht feucht sein, aber nicht nass. Vermeide Staunässe. Am besten gießt du morgens oder abends, um Verdunstung zu vermeiden.
2. Düngung: Grünkohl ist ein Starkzehrer und benötigt ausreichend Nährstoffe. Dünge die Pflanzen alle 2-3 Wochen mit Kompost, organischem Dünger oder einem speziellen Gemüsedünger. Befolge dabei die Anweisungen auf der Verpackung.
3. Unkraut entfernen: Entferne regelmäßig Unkraut, das in den Pflanzsäcken wächst. Unkraut konkurriert mit dem Grünkohl um Nährstoffe und Wasser.
4. Schutz vor Schädlingen: Grünkohl kann von verschiedenen Schädlingen befallen werden, wie z.B. Kohlweißlingen, Blattläusen oder Schnecken. Kontrolliere die Pflanzen regelmäßig auf Schädlinge und bekämpfe sie bei Bedarf mit geeigneten Mitteln (z.B. biologische Schädlingsbekämpfung).
5. Mulchen: Eine Mulchschicht aus Stroh oder Holzhackschnitzeln hilft, die Feuchtigkeit im Boden zu halten, Unkraut zu unterdrücken und den Boden vor Temperaturschwankungen zu schützen.
6. Stützen: Wenn du hochwachsende Grünkohlsorten anbaust, kann es sinnvoll sein, die Pflanzen mit Pflanzstäben oder Rankgittern zu stützen, damit sie nicht umknicken.
4. Ernte
Die Ernte des Grünkohls kann beginnen, sobald die Blätter eine ausreichende Größe erreicht haben (ca. 15-20 cm).
1. Äußere Blätter ernten: Ernte immer die äußeren Blätter zuerst. Die inneren Blätter können weiterwachsen.
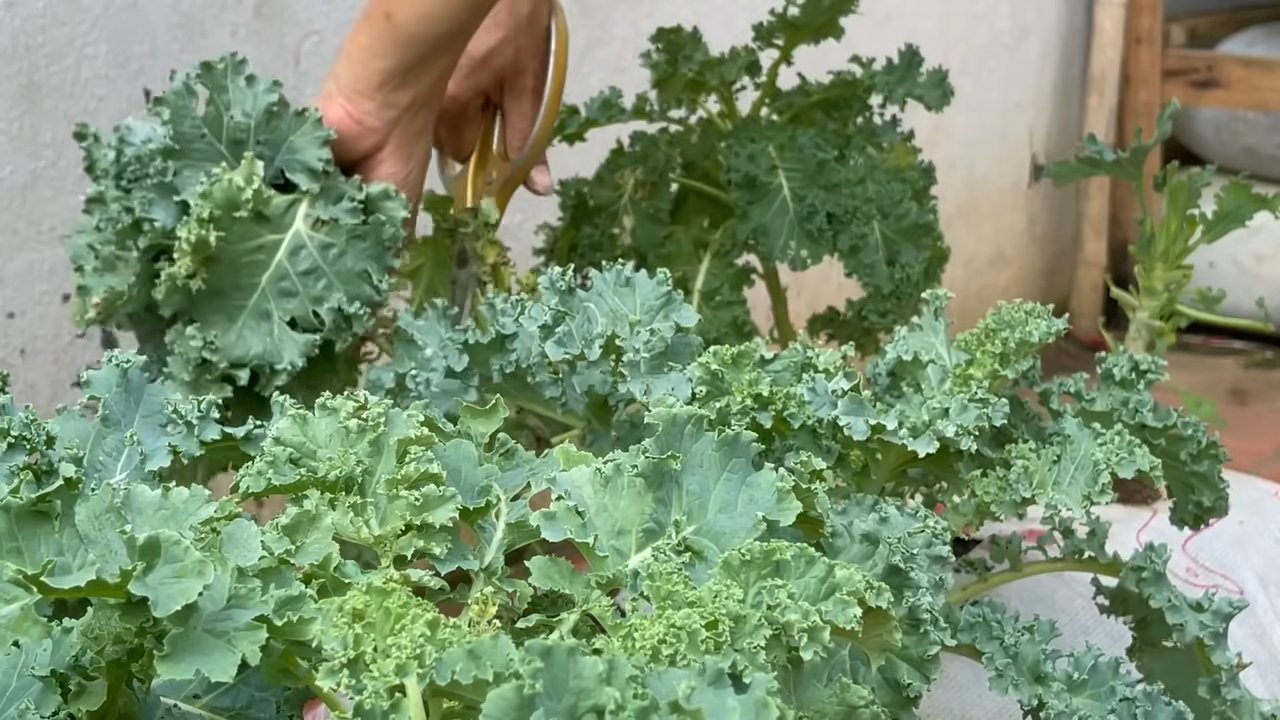
2. Blätter abschneiden: Schneide die Blätter mit einer Gartenschere oder einem Messer ab. Achte darauf, dass du die Knospen in der Mitte der Pflanze nicht beschädigst.
3. Regelmäßig ernten: Je öfter du erntest, desto mehr neue Blätter wachsen nach.
4. Erntezeitpunkt: Grünkohl kann den ganzen Winter über geerntet werden. Nach dem ersten Frost schmecken die Blätter oft noch besser, da der Frost die Bitterstoffe reduziert.
Zusätzliche Tipps
* Sortenwahl: Es gibt viele verschiedene Grünkohlsorten. Wähle eine Sorte, die dir schmeckt und die für den Anbau in Pflanzsäcken geeignet ist. Beliebte Sorten sind z.B. “Nero di Toscana” (Palmkohl), “Halbhoher Grüner Krauser” oder “Red Russian”.
* Fruchtfolge: Baue Grünkohl nicht jedes Jahr am selben Standort an. Wechsle die Anbaufläche, um Krankheiten und Schädlingen vorzubeugen.
* Überwinterung: Grünkohl ist winterhart und kann auch bei Frost im Freien bleiben
Conclusion
So, there you have it! Growing kale in soil bags is not just a gardening trend; it’s a game-changer for anyone looking to enjoy fresh, nutritious greens with minimal effort and maximum yield. We’ve explored the simplicity, cost-effectiveness, and space-saving benefits of this method, and hopefully, you’re now convinced that it’s a must-try for your own garden, balcony, or even patio.
The beauty of growing kale in soil bags lies in its adaptability. Feel free to experiment with different kale varieties. From the curly leaves of Scotch kale to the smooth texture of Lacinato (dinosaur) kale, each offers a unique flavor profile to elevate your culinary creations. Consider adding companion plants like marigolds or nasturtiums around the base of your soil bag to deter pests naturally and add a splash of color to your garden. You can also try interplanting with herbs like rosemary or thyme, which can help repel certain insects and enhance the overall health of your kale plants.
Don’t be afraid to get creative with your soil bag setup. If you’re short on space, consider stacking the bags vertically to create a living wall of kale. Or, if you have a sunny windowsill, you can even grow smaller kale varieties indoors in smaller soil bags. The possibilities are endless!
The key takeaway here is that **growing kale in soil bags** empowers you to take control of your food source, providing you with a sustainable and healthy supply of this superfood right at your fingertips. It’s a rewarding experience that connects you with nature and allows you to enjoy the fruits (or rather, the leaves) of your labor.
We’re confident that once you try this method, you’ll be amazed by the results. The vibrant green leaves, the fresh, earthy aroma, and the satisfaction of harvesting your own kale will undoubtedly make you a convert.
So, grab a soil bag, some kale seeds or seedlings, and get ready to embark on a gardening adventure. We encourage you to share your experiences with us! Post photos of your kale-filled soil bags on social media using #KaleInSoilBags and let us know what varieties you’re growing and any tips or tricks you’ve discovered along the way. We’re eager to learn from your successes and help you troubleshoot any challenges you may encounter. Happy gardening!
Frequently Asked Questions (FAQ)
What type of soil is best for growing kale in soil bags?
The ideal soil for growing kale in soil bags is a well-draining, nutrient-rich potting mix. Avoid using garden soil, as it can be too heavy and compact, hindering root growth and drainage. Look for a potting mix that contains a blend of peat moss, perlite, and vermiculite. You can also amend your potting mix with compost or aged manure to provide additional nutrients. A slightly acidic to neutral pH (around 6.0 to 7.0) is optimal for kale growth.
How often should I water my kale plants in soil bags?
Watering frequency depends on several factors, including the weather, the size of your soil bag, and the stage of growth of your kale plants. Generally, you should water your kale plants when the top inch of soil feels dry to the touch. During hot, dry weather, you may need to water daily, while during cooler, wetter periods, you may only need to water every few days. Be sure to water thoroughly, allowing the water to drain out of the bottom of the bag. Avoid overwatering, as this can lead to root rot. A good rule of thumb is to check the soil moisture regularly and adjust your watering schedule accordingly.
How much sunlight does kale need when grown in soil bags?
Kale thrives in full sun, which means it needs at least 6 hours of direct sunlight per day. However, it can also tolerate partial shade, especially in hotter climates. If you live in an area with intense summer heat, providing some afternoon shade can help prevent the leaves from scorching. When growing kale in soil bags, position the bags in a location that receives ample sunlight throughout the day. If you’re growing kale indoors, you may need to supplement with grow lights to ensure adequate light exposure.
What are some common pests and diseases that affect kale, and how can I prevent them?
Kale is susceptible to several pests and diseases, including aphids, cabbage worms, flea beetles, and downy mildew. To prevent pest infestations, inspect your kale plants regularly for signs of damage. You can handpick pests off the leaves or use insecticidal soap or neem oil to control them. Companion planting with herbs like rosemary, thyme, or sage can also help repel pests. To prevent diseases, ensure good air circulation around your kale plants and avoid overwatering. If you notice signs of disease, remove the affected leaves immediately and treat the plants with a fungicide if necessary. Crop rotation can also help prevent soilborne diseases.
How do I harvest kale from soil bags?
You can begin harvesting kale leaves when they are about 6-8 inches long. Start by harvesting the outer, older leaves, leaving the inner, younger leaves to continue growing. This cut-and-come-again method allows you to harvest kale continuously throughout the growing season. To harvest, simply cut the leaves off at the base of the stem using a sharp knife or scissors. Avoid tearing the leaves, as this can damage the plant. Wash the harvested leaves thoroughly before using them in your favorite recipes.
Can I grow kale in soil bags during the winter?
Yes, kale is a cold-hardy vegetable that can be grown in soil bags during the winter in many regions. In areas with mild winters, you can simply leave your kale plants outdoors and continue harvesting them throughout the season. In colder climates, you may need to provide some protection from frost and snow. You can cover the soil bags with a layer of mulch or move them to a sheltered location, such as a greenhouse or cold frame. You can also use row covers to protect the plants from freezing temperatures. Even if the leaves freeze, they will often thaw out and continue growing when the weather warms up.
How long will kale plants last when grown in soil bags?
Kale is a biennial plant, which means it typically lives for two years. However, when grown in soil bags, kale plants may not last as long due to the limited space and nutrients. With proper care, you can expect your kale plants to produce for several months, or even a year or more. To extend the life of your kale plants, be sure to provide them with adequate water, sunlight, and nutrients. You can also prune the plants regularly to remove any dead or damaged leaves. After the first year, kale plants may bolt (produce flowers and seeds), which can make the leaves taste bitter. If this happens, you can either harvest the seeds or replace the plants with new seedlings.
Can I reuse the soil from my soil bags after harvesting kale?
Yes, you can reuse the soil from your soil bags after harvesting kale, but it’s important to amend it with fresh compost or other organic matter to replenish the nutrients that have been depleted. You can also add some slow-release fertilizer to provide a boost of nutrients for the next crop. Before reusing the soil, remove any plant debris, such as roots and stems. You may also want to sterilize the soil to kill any pathogens or pests that may be present. You can do this by baking the soil in the oven or steaming it in a pot. Alternatively, you can simply replace the soil with fresh potting mix.

Leave a Comment