

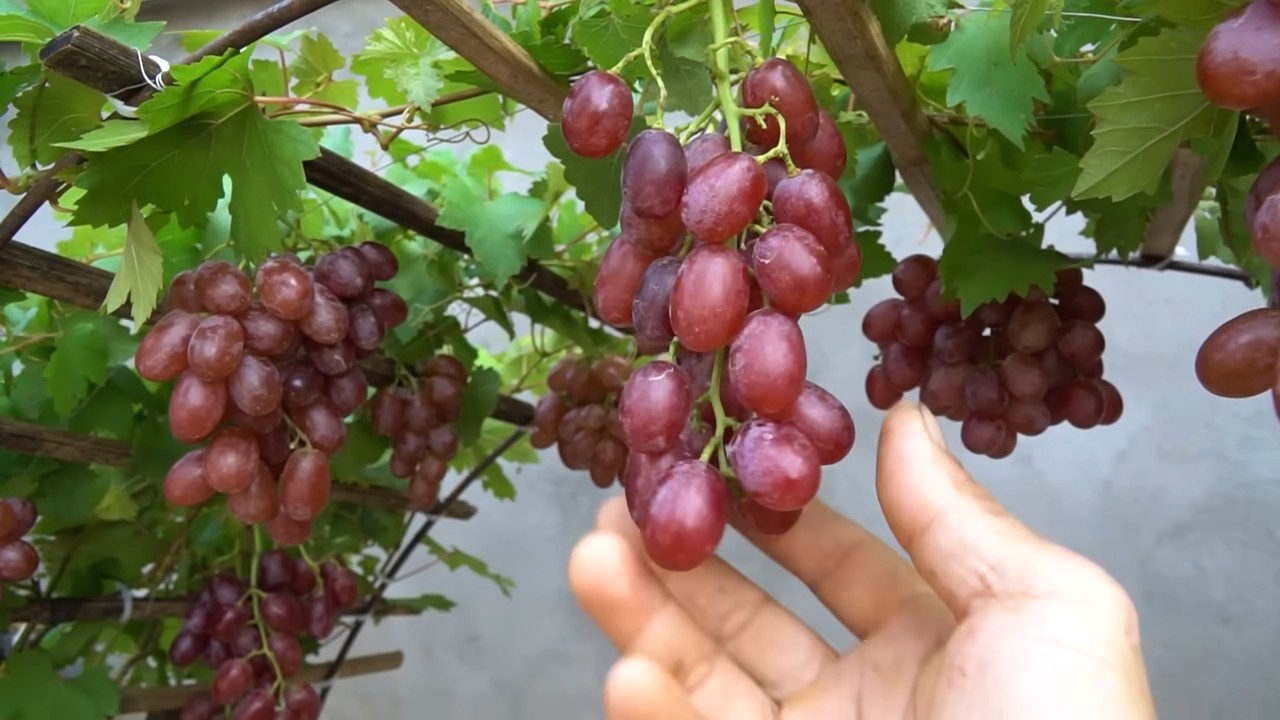
Growing Grapes Year Round might seem like a far-fetched dream reserved for sprawling vineyards in sun-drenched regions, but I’m here to tell you it’s more achievable than you think, even in your own backyard! Forget waiting for that fleeting autumn harvest; imagine plucking juicy, ripe grapes throughout the year. Sounds amazing, right?
For centuries, grapes have held a special place in human history, symbolizing abundance, celebration, and even divine connection. From ancient Roman feasts to modern-day wine production, the grape’s allure is undeniable. But traditionally, enjoying fresh, homegrown grapes was limited by seasonal constraints. That’s where these DIY tricks and hacks come in!
Let’s face it, who wouldn’t want a continuous supply of delicious, homegrown grapes? Whether you’re a seasoned gardener or just starting out, these simple yet effective techniques will empower you to extend your grape-growing season and enjoy the fruits of your labor all year long. We’ll explore everything from selecting the right grape varieties to implementing clever protective measures, ensuring your vines thrive regardless of the weather. So, get ready to unlock the secrets to growing grapes year round and transform your garden into a personal vineyard!
Ganzjährig Trauben anbauen: Ein DIY-Leitfaden für den ambitionierten Gärtner
Hey Leute! Habt ihr euch jemals gewünscht, das ganze Jahr über frische, saftige Trauben direkt aus eurem eigenen Garten zu ernten? Klingt fast zu schön, um wahr zu sein, oder? Aber mit ein bisschen Planung, den richtigen Techniken und einer Prise DIY-Geist ist es tatsächlich möglich! Ich zeige euch, wie ihr das schaffen könnt. Es ist zwar etwas aufwendiger als der normale Anbau, aber der Geschmack von selbstgezogenen Trauben im Winter ist einfach unbezahlbar!
Die Grundlagen: Was ihr braucht, um loszulegen
Bevor wir uns in die Details stürzen, lasst uns sicherstellen, dass wir alles Nötige zusammen haben. Hier ist eine Liste der wichtigsten Dinge, die ihr für dieses Projekt benötigt:
* Geeignete Traubensorte: Nicht alle Traubensorten sind gleich. Wählt eine Sorte, die sich gut für den Anbau im Topf eignet und eine relativ kurze Reifezeit hat. Ich empfehle Sorten wie ‘Vanessa’, ‘Himrod’ oder ‘Lakemont’. Sie sind robust und fruchten auch in kühleren Umgebungen gut.
* Großer Pflanztopf: Trauben brauchen Platz, um ihre Wurzeln auszubreiten. Ein Topf mit einem Durchmesser von mindestens 60 cm und einer Tiefe von 50 cm ist ideal. Achtet darauf, dass der Topf Drainagelöcher hat, damit überschüssiges Wasser ablaufen kann.
* Hochwertige Blumenerde: Verwendet eine gut durchlässige Blumenerde, die reich an Nährstoffen ist. Ihr könnt auch etwas Kompost oder organischen Dünger untermischen, um die Bodenqualität zu verbessern.
* Rankhilfe: Trauben sind Kletterpflanzen und brauchen eine Rankhilfe, um sich daran festzuhalten. Ihr könnt einen Obelisken, ein Spalier oder ein anderes stabiles Gerüst verwenden.
* Pflanzenschutzmittel: Haltet Pflanzenschutzmittel bereit, um eure Trauben vor Schädlingen und Krankheiten zu schützen. Achtet darauf, biologische Produkte zu verwenden, um die Umwelt zu schonen.
* Beheizbares Gewächshaus oder Wintergarten: Das ist der Schlüssel zum ganzjährigen Anbau. Ihr braucht einen Ort, an dem ihr die Temperatur kontrollieren und die Trauben vor Frost schützen könnt.
* Wachstumslampen (optional): In den dunkleren Wintermonaten können Wachstumslampen helfen, das Wachstum der Trauben zu fördern.
* Geduld und Sorgfalt: Der ganzjährige Anbau von Trauben erfordert Zeit und Mühe. Seid geduldig und gebt euren Trauben die Pflege, die sie brauchen.
Schritt-für-Schritt-Anleitung: So pflanzt und pflegt ihr eure Trauben
Okay, jetzt geht’s ans Eingemachte! Hier ist eine detaillierte Anleitung, wie ihr eure Trauben pflanzt und pflegt, um das ganze Jahr über ernten zu können:
1. Die Pflanzung
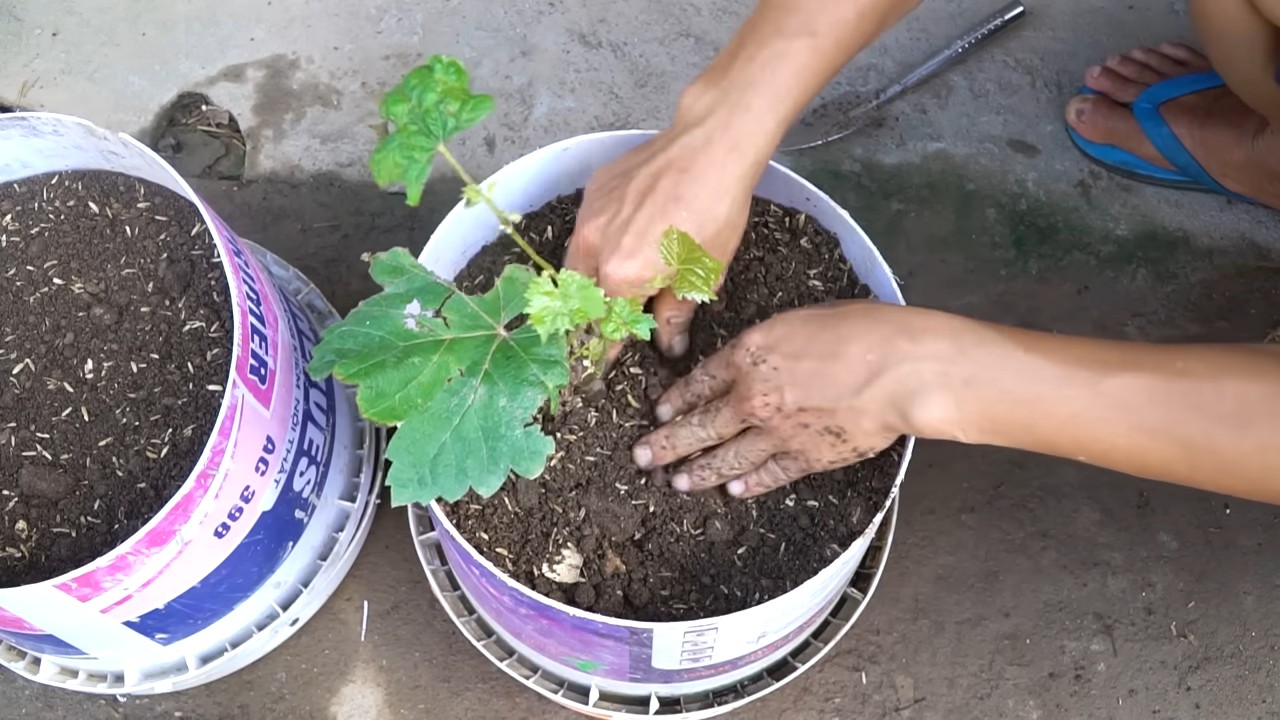
1. Topf vorbereiten: Füllt den Topf mit einer Schicht Kies oder Blähton, um die Drainage zu verbessern. Gebt dann die Blumenerde hinzu, bis der Topf etwa zu zwei Dritteln gefüllt ist.
2. Traube einsetzen: Nehmt die Traubenpflanze vorsichtig aus dem Anzuchttopf und lockert die Wurzeln etwas auf. Setzt die Pflanze in den Topf und füllt den restlichen Raum mit Erde auf. Achtet darauf, dass die Veredelungsstelle (die Stelle, an der die Edelsorte auf die Unterlage gepfropft wurde) etwa 5 cm über der Erde liegt.
3. Angießen: Gießt die Traubenpflanze gründlich an, bis das Wasser aus den Drainagelöchern abläuft.
4. Rankhilfe installieren: Befestigt die Rankhilfe im Topf und leitet die ersten Triebe der Traube daran entlang.
2. Die Pflege im Frühling und Sommer
1. Gießen: Gießt die Trauben regelmäßig, besonders während der Wachstums- und Reifezeit. Achtet darauf, dass die Erde immer leicht feucht ist, aber nicht zu nass. Vermeidet Staunässe, da dies zu Wurzelfäule führen kann.
2. Düngen: Düngt die Trauben alle zwei Wochen mit einem speziellen Traubendünger oder einem organischen Dünger. Befolgt die Anweisungen auf der Verpackung.
3. Schneiden: Der Schnitt ist entscheidend für eine gute Ernte. Im Frühjahr, bevor die Trauben austreiben, solltet ihr einen kräftigen Rückschnitt vornehmen. Entfernt alle toten, kranken oder beschädigten Triebe. Kürzt die verbleibenden Triebe auf etwa 2-3 Augen (Knospen) zurück. Im Sommer könnt ihr die Seitentriebe einkürzen, um die Belüftung der Trauben zu verbessern und die Sonnenexposition zu erhöhen.
4. Schutz vor Schädlingen und Krankheiten: Kontrolliert die Trauben regelmäßig auf Schädlinge und Krankheiten. Bei Bedarf könnt ihr biologische Pflanzenschutzmittel einsetzen. Achtet besonders auf Mehltau, Traubenwickler und Blattläuse.
5. Ausgeizen: Entfernt regelmäßig die Geiztriebe (kleine Triebe, die aus den Blattachseln wachsen), um die Energie der Pflanze auf die Fruchtbildung zu konzentrieren.
3. Die Überwinterung im Gewächshaus/Wintergarten
1. Vorbereitung: Bevor der erste Frost kommt, solltet ihr die Trauben ins Gewächshaus oder den Wintergarten bringen. Reinigt das Gewächshaus gründlich, um Schädlinge und Krankheiten zu vermeiden.
2. Temperaturkontrolle: Die ideale Temperatur für die Überwinterung von Trauben liegt zwischen 5 und 10 Grad Celsius. Achtet darauf, dass die Temperatur nicht unter den Gefrierpunkt fällt. Bei Bedarf könnt ihr eine Heizung verwenden.
3. Bewässerung: Gießt die Trauben während der Überwinterung nur sparsam. Die Erde sollte nicht austrocknen, aber auch nicht zu nass sein.
4. Belüftung: Lüftet das Gewächshaus regelmäßig, um Schimmelbildung zu vermeiden.
5. Ruhephase: Die Trauben brauchen eine Ruhephase, um im nächsten Jahr wieder gut zu fruchten. Reduziert die Bewässerung und Düngung während dieser Zeit.
4. Der ganzjährige Anbau: Tricks für die Winterernte
Hier kommt der Clou! Um das ganze Jahr über Trauben zu ernten, müsst ihr die natürlichen Wachstumszyklen der Trauben manipulieren. Das geht so:
1. Frühzeitiger Austrieb: Im Spätwinter (Januar/Februar) könnt ihr die Temperatur im Gewächshaus langsam erhöhen, um den Austrieb der Trauben zu fördern. Beginnt mit etwa 15 Grad Celsius und erhöht die Temperatur allmählich auf 20-25 Grad Celsius.
2. Zusätzliche Beleuchtung: In den dunkleren Wintermonaten benötigen die Trauben zusätzliche Beleuchtung, um ausreichend Photosynthese betreiben zu können. Verwendet Wachstumslampen, um die Trauben mindestens 12 Stunden am Tag zu beleuchten.
3. Bestäubung: Da im Winter keine Insekten zur Bestäubung vorhanden sind, müsst ihr die Trauben von Hand bestäuben. Verwendet einen kleinen Pinsel, um den Pollen von den Staubgefäßen auf die Narben zu übertragen.
4. Kontinuierliche Pflege: Setzt die Pflege wie im Frühling und Sommer fort. Gießt, düngt und schneidet die Trauben regelmäßig.
5. Ernte: Nach etwa 3-4 Monaten könnt ihr die ersten Trauben ernten. Genießt den Geschmack von selbstgezogenen Trauben im Winter!
Häufige Probleme und Lösungen
Auch beim ganzjährigen Traubenanbau können Probleme auftreten. Hier sind einige der häufigsten Probleme und wie ihr sie lösen könnt:
* Schimmelbildung: Schimmelbildung kann durch zu hohe Luftfeuchtigkeit und mangelnde Belüftung entstehen. Lüftet das Gewächshaus regelmäßig und sorgt für eine gute Luftzirkulation. Bei Bedarf könnt ihr ein Fungizid verwenden.
* Schädlinge: Schädlinge wie Blattläuse, Spinnmilben und Traubenwickler können die Trauben befallen. Kontrolliert die Trauben regelmäßig und setzt bei Bedarf biologische Pflanzenschutzmittel ein.
* Fruchtfall: Fruchtfall kann durch unzureichende Bestäubung
Conclusion
So, there you have it! The secret to enjoying the sweet, juicy taste of homegrown grapes all year round is no longer a distant dream. This DIY method for growing grapes year round, while requiring a bit of initial effort and attention, unlocks a world of possibilities for the home gardener and culinary enthusiast alike. Imagine plucking fresh, sun-ripened grapes from your own vine in the dead of winter, adding a touch of summer sweetness to your holiday meals or simply enjoying a healthy snack whenever the craving strikes.
This isn’t just about having grapes; it’s about reclaiming control over your food source, reducing your reliance on commercially grown produce, and experiencing the profound satisfaction of nurturing life from seed (or cutting) to fruit. The taste difference alone is worth the effort. Commercially grown grapes are often picked before they are fully ripe to withstand transportation and storage, sacrificing flavor in the process. With your own indoor vineyard, you can let your grapes ripen to their peak sweetness, resulting in a flavor explosion that store-bought grapes simply can’t match.
But the benefits extend beyond taste. Growing your own grapes is a sustainable practice that reduces your carbon footprint. You’ll be avoiding the environmental costs associated with shipping grapes from distant locations, and you’ll be contributing to a healthier planet. Plus, tending to your grapevines can be a therapeutic and rewarding experience, providing a connection to nature and a sense of accomplishment.
Don’t be afraid to experiment with different grape varieties to find the ones that thrive best in your indoor environment and suit your personal taste preferences. Consider trying seedless varieties for easy snacking, or explore different colors and flavors to add variety to your harvest. You can also experiment with different training methods to create a visually stunning and productive indoor vineyard. Think about training your vines along a trellis, over an archway, or even as a living curtain.
And remember, this method isn’t just limited to grapes. You can adapt the principles of controlled environment growing to cultivate other fruits and vegetables indoors, extending your growing season and enjoying fresh produce year-round.
We encourage you to take the plunge and try this DIY trick for growing grapes year round. It’s an investment in your health, your happiness, and your connection to nature. Once you’ve experienced the joy of harvesting your own grapes in the middle of winter, you’ll never look at a bunch of store-bought grapes the same way again.
We’re eager to hear about your experiences! Share your successes, your challenges, and your tips in the comments below. Let’s build a community of indoor grape growers and learn from each other. Together, we can unlock the potential of year-round grape cultivation and enjoy the sweet rewards of our labor. So, grab your pots, your soil, and your grape cuttings, and let’s get growing!
Frequently Asked Questions (FAQ)
What grape varieties are best suited for indoor growing?
Choosing the right grape variety is crucial for success when growing grapes indoors. Look for varieties that are naturally compact and well-suited to container growing. Some excellent choices include:
* ‘Himrod’ Seedless: A popular white seedless grape known for its sweet flavor and early ripening. It’s relatively disease-resistant and adapts well to container growing.
* ‘Reliance’ Seedless: A hardy red seedless grape that is cold-hardy and produces flavorful, juicy grapes. It’s a good choice for beginners.
* ‘Vanessa’ Seedless: Another excellent red seedless variety with a crisp texture and sweet-tart flavor. It’s known for its good disease resistance.
* ‘Thompson Seedless’: While typically grown outdoors, ‘Thompson Seedless’ can be successfully grown indoors with proper care and attention to pruning.
* Dwarf Grape Varieties: Some nurseries offer dwarf grape varieties specifically bred for container growing. These are an excellent option for smaller spaces.
When selecting a variety, consider your local climate and the amount of sunlight available in your indoor growing space. Also, research the specific needs of each variety to ensure you can provide the optimal growing conditions.
How much light do indoor grapevines need?
Light is essential for grapevines to thrive and produce fruit. Indoor grapevines require at least 6-8 hours of direct sunlight per day. If you don’t have enough natural light, you’ll need to supplement with grow lights.
Full-spectrum LED grow lights are an excellent choice for indoor grape growing. They provide the necessary wavelengths of light for photosynthesis and can be adjusted to meet the specific needs of your plants. Position the grow lights close enough to the vines to provide adequate light intensity, but not so close that they burn the leaves.
Monitor your grapevines closely for signs of insufficient light, such as leggy growth, pale leaves, and poor fruit production. Adjust the position of your grow lights or increase the duration of light exposure as needed.
What type of soil is best for growing grapes in containers?
Grapevines need well-draining soil that is rich in organic matter. A good potting mix for container-grown grapes should consist of:
* Potting Soil: Provides a base for the mix and helps retain moisture.
* Compost: Adds organic matter, improves drainage, and provides essential nutrients.
* Perlite or Vermiculite: Improves drainage and aeration.
Avoid using garden soil in containers, as it can become compacted and poorly drained. A well-draining potting mix will prevent root rot and ensure that your grapevines have access to the oxygen and nutrients they need to thrive.
How often should I water my indoor grapevines?
Watering frequency will depend on several factors, including the size of the container, the type of soil, the temperature, and the humidity. As a general rule, water your grapevines when the top inch of soil feels dry to the touch.
Water thoroughly, until water drains out of the bottom of the container. Avoid overwatering, as this can lead to root rot. During the growing season, you may need to water your grapevines more frequently. In the winter, when the vines are dormant, you can reduce watering.
How do I prune my indoor grapevines?
Pruning is essential for maintaining the shape and productivity of your indoor grapevines. Prune your vines during the dormant season, typically in late winter or early spring.
Remove any dead, damaged, or diseased wood. Also, prune back the previous year’s growth to encourage new growth and fruit production. The specific pruning method will depend on the variety of grape and the training system you are using. Research the best pruning techniques for your chosen variety.
How do I pollinate my indoor grapevines?
While some grape varieties are self-pollinating, others may require hand-pollination to ensure fruit set. To hand-pollinate your grapevines, use a small paintbrush to transfer pollen from the male flowers to the female flowers.
Gently brush the pollen onto the stigma of the female flowers. Repeat this process every few days during the flowering period. You can also use a small fan to circulate air around the vines, which can help with pollination.
How do I deal with pests and diseases on my indoor
So, there you have it! The secret to enjoying the sweet, juicy taste of homegrown grapes all year round is no longer a distant dream. This DIY method for growing grapes year round, while requiring a bit of initial effort and attention, unlocks a world of possibilities for the home gardener and culinary enthusiast alike. Imagine plucking fresh, sun-ripened grapes from your own vine in the dead of winter, adding a touch of summer sweetness to your holiday meals or simply enjoying a healthy snack whenever the craving strikes.
This isn’t just about having grapes; it’s about reclaiming control over your food source, reducing your reliance on commercially grown produce, and experiencing the profound satisfaction of nurturing life from seed (or cutting) to fruit. The taste difference alone is worth the effort. Commercially grown grapes are often picked before they are fully ripe to withstand transportation and storage, sacrificing flavor in the process. With your own indoor vineyard, you can let your grapes ripen to their peak sweetness, resulting in a flavor explosion that store-bought grapes simply can’t match.
But the benefits extend beyond taste. Growing your own grapes is a sustainable practice that reduces your carbon footprint. You’ll be avoiding the environmental costs associated with shipping grapes from distant locations, and you’ll be contributing to a healthier planet. Plus, tending to your grapevines can be a therapeutic and rewarding experience, providing a connection to nature and a sense of accomplishment.
Don’t be afraid to experiment with different grape varieties to find the ones that thrive best in your indoor environment and suit your personal taste preferences. Consider trying seedless varieties for easy snacking, or explore different colors and flavors to add variety to your harvest. You can also experiment with different training methods to create a visually stunning and productive indoor vineyard. Think about training your vines along a trellis, over an archway, or even as a living curtain.
And remember, this method isn’t just limited to grapes. You can adapt the principles of controlled environment growing to cultivate other fruits and vegetables indoors, extending your growing season and enjoying fresh produce year-round.
We encourage you to take the plunge and try this DIY trick for growing grapes year round. It’s an investment in your health, your happiness, and your connection to nature. Once you’ve experienced the joy of harvesting your own grapes in the middle of winter, you’ll never look at a bunch of store-bought grapes the same way again.
We’re eager to hear about your experiences! Share your successes, your challenges, and your tips in the comments below. Let’s build a community of indoor grape growers and learn from each other. Together, we can unlock the potential of year-round grape cultivation and enjoy the sweet rewards of our labor. So, grab your pots, your soil, and your grape cuttings, and let’s get growing!
Frequently Asked Questions (FAQ)
What grape varieties are best suited for indoor growing?
Choosing the right grape variety is crucial for success when growing grapes indoors. Look for varieties that are naturally compact and well-suited to container growing. Some excellent choices include:
* ‘Himrod’ Seedless: A popular white seedless grape known for its sweet flavor and early ripening. It’s relatively disease-resistant and adapts well to container growing.
* ‘Reliance’ Seedless: A hardy red seedless grape that is cold-hardy and produces flavorful, juicy grapes. It’s a good choice for beginners.
* ‘Vanessa’ Seedless: Another excellent red seedless variety with a crisp texture and sweet-tart flavor. It’s known for its good disease resistance.
* ‘Thompson Seedless’: While typically grown outdoors, ‘Thompson Seedless’ can be successfully grown indoors with proper care and attention to pruning.
* Dwarf Grape Varieties: Some nurseries offer dwarf grape varieties specifically bred for container growing. These are an excellent option for smaller spaces.
When selecting a variety, consider your local climate and the amount of sunlight available in your indoor growing space. Also, research the specific needs of each variety to ensure you can provide the optimal growing conditions.
How much light do indoor grapevines need?
Light is essential for grapevines to thrive and produce fruit. Indoor grapevines require at least 6-8 hours of direct sunlight per day. If you don’t have enough natural light, you’ll need to supplement with grow lights.
Full-spectrum LED grow lights are an excellent choice for indoor grape growing. They provide the necessary wavelengths of light for photosynthesis and can be adjusted to meet the specific needs of your plants. Position the grow lights close enough to the vines to provide adequate light intensity, but not so close that they burn the leaves.
Monitor your grapevines closely for signs of insufficient light, such as leggy growth, pale leaves, and poor fruit production. Adjust the position of your grow lights or increase the duration of light exposure as needed.
What type of soil is best for growing grapes in containers?
Grapevines need well-draining soil that is rich in organic matter. A good potting mix for container-grown grapes should consist of:
* Potting Soil: Provides a base for the mix and helps retain moisture.
* Compost: Adds organic matter, improves drainage, and provides essential nutrients.
* Perlite or Vermiculite: Improves drainage and aeration.
Avoid using garden soil in containers, as it can become compacted and poorly drained. A well-draining potting mix will prevent root rot and ensure that your grapevines have access to the oxygen and nutrients they need to thrive.
How often should I water my indoor grapevines?
Watering frequency will depend on several factors, including the size of the container, the type of soil, the temperature, and the humidity. As a general rule, water your grapevines when the top inch of soil feels dry to the touch.
Water thoroughly, until water drains out of the bottom of the container. Avoid overwatering, as this can lead to root rot. During the growing season, you may need to water your grapevines more frequently. In the winter, when the vines are dormant, you can reduce watering.
How do I prune my indoor grapevines?
Pruning is essential for maintaining the shape and productivity of your indoor grapevines. Prune your vines during the dormant season, typically in late winter or early spring.
Remove any dead, damaged, or diseased wood. Also, prune back the previous year’s growth to encourage new growth and fruit production. The specific pruning method will depend on the variety of grape and the training system you are using. Research the best pruning techniques for your chosen variety.
How do I pollinate my indoor grapevines?
While some grape varieties are self-pollinating, others may require hand-pollination to ensure fruit set. To hand-pollinate your grapevines, use a small paintbrush to transfer pollen from the male flowers to the female flowers.
Gently brush the pollen onto the stigma of the female flowers. Repeat this process every few days during the flowering period. You can also use a small fan to circulate air around the vines, which can help with pollination.
How do I deal with pests and diseases on my indoor grapevines?
Indoor grapevines are generally less susceptible to pests and diseases than outdoor vines. However, it’s still important to monitor your plants regularly for any signs of problems.
Common pests that may affect indoor grapevines include spider mites, aphids, and mealybugs. These pests can be controlled with insecticidal soap or neem oil. Diseases that may affect indoor grapevines include powdery mildew and downy mildew. These diseases can be prevented by providing good air circulation and avoiding overwatering. If you notice any signs of pests or diseases, treat your plants promptly to prevent the problem from spreading.
Can I grow grapes from seed indoors?
While it is possible to grow grapes from seed, it is a very slow and challenging process. Grape seeds require a period of stratification (cold treatment) before they will germinate. Also, grapevines grown from seed may not produce fruit that is true to the parent plant.
For these reasons, it is generally recommended to propagate grapevines from cuttings. Cuttings are easier to root and will produce plants that are identical to the parent plant.

Leave a Comment