

Growing grape tree from seed might seem like a daunting task reserved for seasoned horticulturalists, but I’m here to tell you it’s absolutely achievable for the everyday home gardener! Forget those expensive nursery saplings; imagine the satisfaction of nurturing a thriving grapevine from the tiniest seed, a testament to your patience and green thumb.
Grapevines have a rich history, deeply intertwined with human civilization. From ancient Egypt, where depictions of grape cultivation adorn tomb walls, to the Roman Empire, where wine production flourished, grapes have been a symbol of abundance, celebration, and cultural significance. Today, the tradition continues, and what better way to connect with that history than by embarking on your own grape-growing journey?
Why should you consider growing grape tree from seed? Well, for starters, it’s incredibly rewarding! Plus, it allows you to select specific varieties that might not be readily available in your local garden center. More importantly, it’s a fantastic way to save money and control the entire growing process, ensuring your vine is healthy and robust from the very beginning. In this article, I’ll share my tried-and-true DIY tricks and hacks to help you successfully cultivate your own grape tree from seed, transforming your backyard into a miniature vineyard. Let’s get started!
DIY: Einen Weinstock aus Samen ziehen – So geht’s!
Hallo liebe Gartenfreunde! Habt ihr euch jemals gefragt, ob man einen Weinstock wirklich aus einem einfachen Traubenkern ziehen kann? Die Antwort ist: Ja, das geht! Es ist zwar ein bisschen Geduld gefragt, denn es dauert einige Jahre, bis ihr eure ersten eigenen Trauben ernten könnt, aber der Prozess ist unglaublich lohnend. Ich zeige euch, wie ihr es Schritt für Schritt selbst machen könnt.
Was du brauchst:
* Traubenkerne (am besten von Bio-Trauben, da diese oft nicht behandelt sind)
* Kleine Töpfe oder Anzuchtschalen
* Anzuchterde oder eine Mischung aus Blumenerde und Sand
* Ein scharfes Messer oder eine Rasierklinge
* Feuchtes Küchenpapier
* Plastiktüten oder Frischhaltefolie
* Ein kühler Ort (Kühlschrank oder kühler Keller)
* Ein sonniger Standort für die Keimlinge
* Geduld!
Die Vorbereitung der Traubenkerne: Stratifizierung
Die Stratifizierung ist ein wichtiger Schritt, um die Keimruhe der Traubenkerne zu brechen. Das bedeutet, wir simulieren den Winter, damit die Kerne wissen, dass es Zeit ist, auszutreiben.
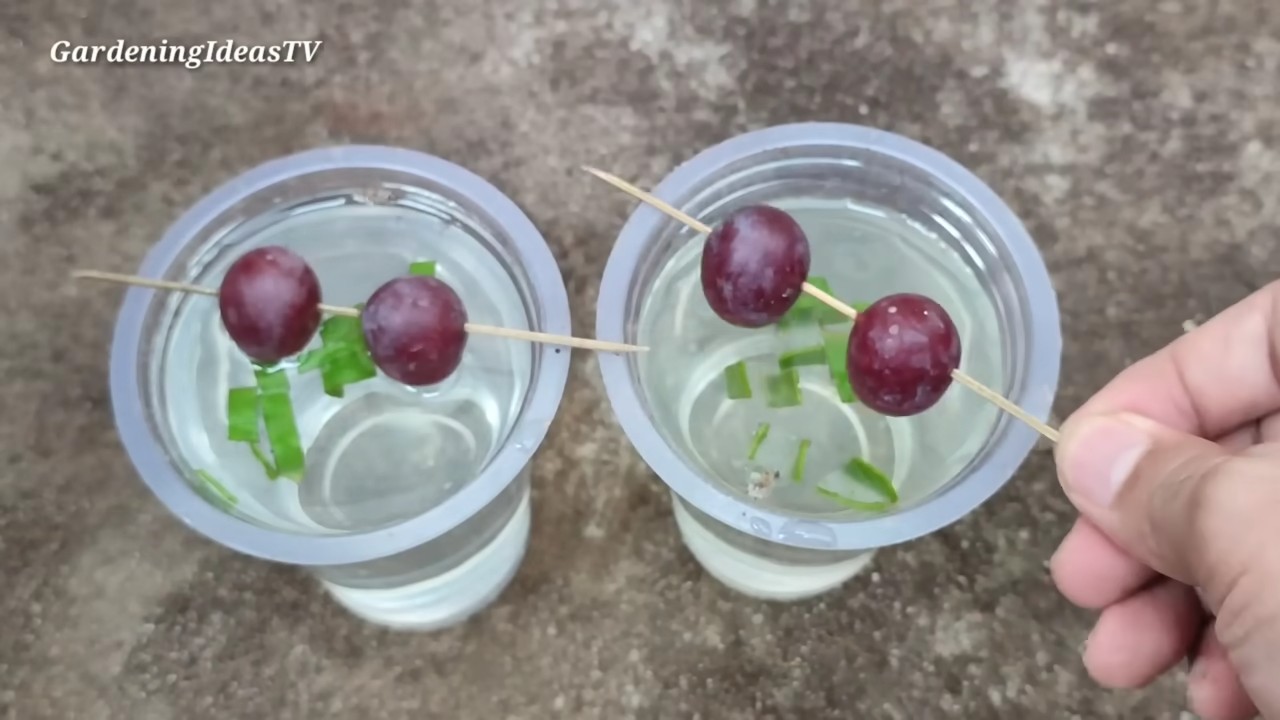
1. Kerne extrahieren: Zuerst müsst ihr die Kerne aus den Trauben holen. Wählt dafür reife, gesunde Trauben aus. Entfernt das Fruchtfleisch gründlich von den Kernen. Am besten spült ihr sie unter fließendem Wasser ab.
2. Kerne vorbereiten (optional): Dieser Schritt ist optional, kann aber die Keimrate erhöhen. Mit einem scharfen Messer oder einer Rasierklinge könnt ihr vorsichtig die harte Schale der Kerne anritzen. Seid dabei extrem vorsichtig, um den Kern nicht zu beschädigen! Das Anritzen erleichtert das Eindringen von Wasser und beschleunigt die Keimung.
3. Einweichen: Legt die Kerne für 24 Stunden in ein Glas mit Wasser. Das hilft, die äußere Schicht aufzuweichen.
4. Stratifizierung: Wickelt die eingeweichten Kerne in feuchtes Küchenpapier. Achtet darauf, dass das Papier nicht zu nass ist, sondern nur feucht. Legt das Päckchen in eine Plastiktüte oder Frischhaltefolie und verschließt es gut.
5. Kühlphase: Legt die Tüte mit den Kernen für 6-8 Wochen in den Kühlschrank (nicht ins Gefrierfach!). Die ideale Temperatur liegt bei 1-5 Grad Celsius. Kontrolliert das Küchenpapier regelmäßig und befeuchtet es gegebenenfalls nach. Achtet darauf, dass sich kein Schimmel bildet.
Aussaat der Traubenkerne
Nach der Stratifizierung können wir die Kerne aussäen.
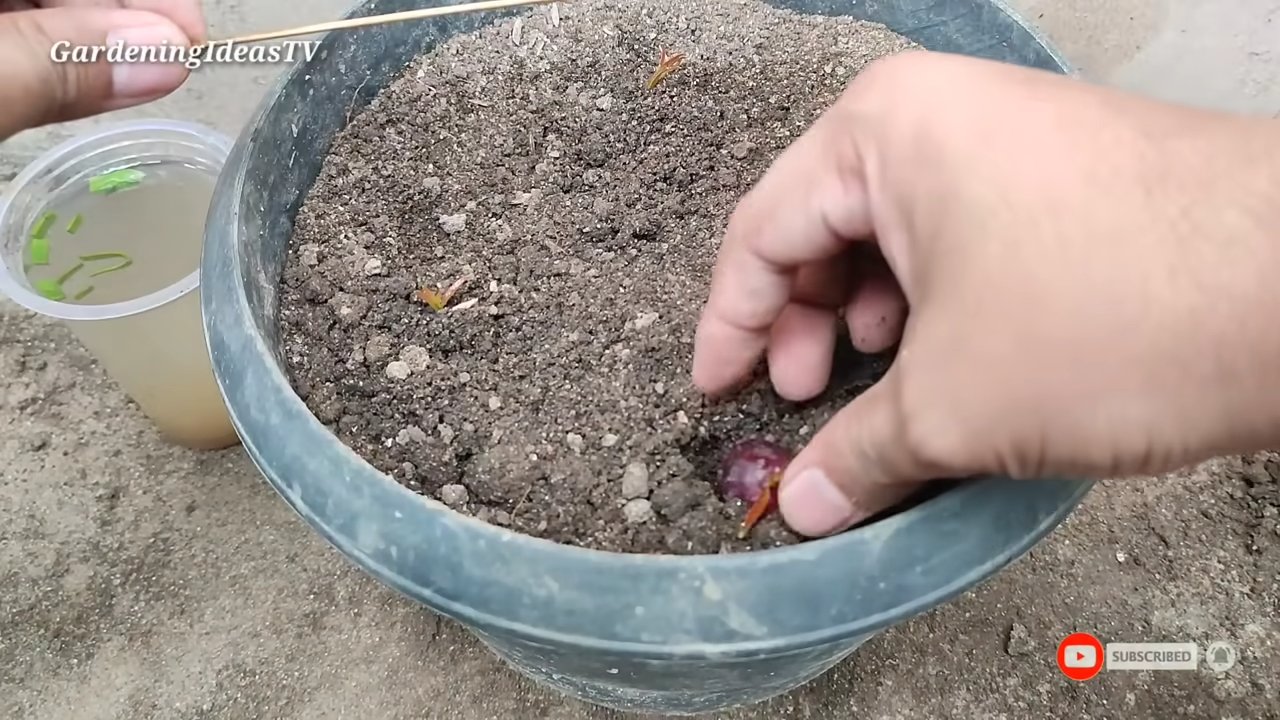
1. Töpfe vorbereiten: Füllt eure Töpfe oder Anzuchtschalen mit Anzuchterde oder einer Mischung aus Blumenerde und Sand. Die Erde sollte locker und gut durchlässig sein.
2. Kerne aussäen: Macht kleine Löcher in die Erde (ca. 1 cm tief) und legt jeweils einen Kern hinein. Bedeckt die Kerne mit Erde und drückt sie leicht an.
3. Gießen: Gießt die Erde vorsichtig an, sodass sie gut durchfeuchtet ist. Vermeidet Staunässe!
4. Standort: Stellt die Töpfe an einen warmen und hellen Ort. Direkte Sonneneinstrahlung sollte vermieden werden, da die jungen Keimlinge empfindlich sind.
5. Feuchtigkeit: Haltet die Erde gleichmäßig feucht, aber nicht nass. Ihr könnt die Töpfe mit Frischhaltefolie abdecken, um die Luftfeuchtigkeit zu erhöhen. Lüftet die Folie aber regelmäßig, um Schimmelbildung zu vermeiden.
Pflege der Keimlinge
Sobald die ersten Keimlinge aus der Erde sprießen, beginnt die eigentliche Pflege.
1. Licht: Die Keimlinge brauchen viel Licht, um kräftig zu wachsen. Stellt sie an einen möglichst hellen Standort, aber vermeidet weiterhin direkte Mittagssonne. Wenn nötig, könnt ihr eine Pflanzenlampe verwenden.
2. Gießen: Gießt die Keimlinge regelmäßig, aber nicht zu viel. Die Erde sollte immer leicht feucht sein.
3. Düngen: Sobald die Keimlinge einige Blätter entwickelt haben, könnt ihr sie mit einem milden Flüssigdünger düngen. Achtet darauf, die Dosierungsempfehlungen auf der Packung zu beachten.
4. Pikieren: Wenn die Keimlinge groß genug sind (ca. 5-10 cm hoch), könnt ihr sie in größere Töpfe pikieren. Wählt dafür Töpfe mit einem Durchmesser von mindestens 10 cm.
5. Umpflanzen: Nach dem letzten Frost (in der Regel Mitte Mai) könnt ihr die jungen Weinstöcke ins Freie pflanzen. Wählt dafür einen sonnigen und windgeschützten Standort. Der Boden sollte gut durchlässig und nährstoffreich sein.
Wichtige Tipps und Tricks
* Geduld: Es kann einige Wochen oder sogar Monate dauern, bis die Kerne keimen. Gebt nicht auf!
* Auswahl der Traubensorte: Informiert euch über die verschiedenen Traubensorten und wählt eine Sorte, die für euer Klima geeignet ist.
* Veredelung: Weinstöcke, die aus Samen gezogen werden, sind oft nicht sortenecht. Das bedeutet, dass die Trauben nicht unbedingt die gleichen Eigenschaften wie die Mutterpflanze haben. Um sicherzustellen, dass ihr die gewünschte Traubensorte erhaltet, könnt ihr den jungen Weinstock veredeln. Die Veredelung ist ein komplexerer Prozess, den ich hier nicht im Detail beschreiben kann, aber es gibt viele Anleitungen im Internet.
* Schutz vor Schädlingen und Krankheiten: Weinstöcke sind anfällig für verschiedene Schädlinge und Krankheiten. Achtet auf Anzeichen von Befall und behandelt die Pflanzen gegebenenfalls mit geeigneten Mitteln.
* Schnitt: Der regelmäßige Schnitt ist wichtig, um den Weinstock in Form zu halten und die Ernte zu fördern. Informiert euch über die verschiedenen Schnitttechniken.
* Unterstützung: Weinstöcke brauchen eine Rankhilfe, an der sie sich festhalten können. Ihr könnt ein Spalier, einen Zaun oder eine andere geeignete Konstruktion verwenden.
* Boden: Der Boden sollte gut durchlässig sein und einen pH-Wert zwischen 6 und 7 haben.
* Wasser: Weinstöcke brauchen regelmäßig Wasser, besonders in trockenen Perioden. Achtet aber darauf, Staunässe zu vermeiden.
* Dünger: Düngt die Weinstöcke regelmäßig mit einem speziellen Weindünger.
* Überwinterung: In kalten Regionen müssen die jungen Weinstöcke im Winter vor Frost geschützt werden. Ihr könnt sie mit Reisig oder Vlies abdecken.
Häufige Probleme und Lösungen
* Kerne keimen nicht: Möglicherweise war die Stratifizierung nicht ausreichend oder die Kerne waren nicht keimfähig. Versucht es mit einer anderen Charge von Kernen und verlängert die Stratifizierungszeit.
* Keimlinge sterben ab: Möglicherweise ist die Erde zu nass oder die Keimlinge bekommen nicht genug Licht. Achtet auf eine gute Drainage und stellt die Keimlinge an einen helleren Standort.
* Schimmelbildung: Schimmelbildung deutet auf zu hohe Luftfeuchtigkeit hin. Lüftet die Töpfe regelmäßig und reduziert die Bewässerung.
Zusätzliche Tipps für eine erfolgreiche Anzucht
* Verwende Regenwasser: Regenwasser ist weicher als Leitungswasser und enthält keine schädlichen Chemikalien.
* Beobachte deine Pflanzen genau: Je genauer du deine Pflanzen beobachtest, desto schneller erkennst du Probleme und kannst entsprechend reagieren.
* Sei kreativ: Es gibt viele verschiedene Möglichkeiten, Weinstöcke anzuziehen. Probiere verschiedene Methoden aus und finde heraus, was für dich am besten funktioniert.
* Dokumentiere deine Fortschritte: Mache Fotos von deinen Pflanzen und notiere dir wichtige Beobachtungen. So kannst du deine Erfahrungen für zukünftige Anzuchten nutzen.
Ich hoffe, diese Anleitung hilft euch dabei, euren eigenen Weinstock aus Samen zu ziehen. Es ist ein spannendes Projekt, das viel Geduld erfordert, aber am Ende mit einer reichen Ernte belohnt wird. Viel Erfolg!
Conclusion
So, there you have it! Growing a grape tree from seed might seem like a daunting task, but with patience, the right techniques, and a little bit of love, you can cultivate your very own grapevine from the very beginning. This DIY approach offers a unique connection to your food, allowing you to witness the entire life cycle of your grape tree, from a tiny seed to a fruit-bearing vine.
Why is this a must-try? Because it’s more than just growing grapes; it’s about the journey. It’s about understanding the intricacies of nature, the satisfaction of nurturing life, and the reward of harvesting grapes that you grew from scratch. Plus, starting from seed allows you to select specific varieties that might not be readily available as established plants in your local nurseries. You have complete control over the rootstock and the eventual fruit characteristics.
Consider these variations to personalize your grape-growing experience:
* Experiment with different grape varieties: From the sweet Concord to the tart Riesling, the world of grapes is vast and diverse. Research different varieties that thrive in your climate and have the flavor profile you desire.
* Grafting for enhanced results: Once your seedling has matured, you can explore grafting techniques to combine the desirable traits of two different grape varieties. This allows you to create a vine with superior disease resistance or enhanced fruit quality.
* Vertical gardening: If you have limited space, train your grape vine to grow vertically along a trellis or fence. This not only saves space but also adds a beautiful architectural element to your garden.
* Organic practices: Embrace organic gardening methods to ensure your grapes are free from harmful chemicals. Use natural fertilizers, pest control solutions, and soil amendments to create a healthy and sustainable growing environment.
Don’t be discouraged if your first attempt isn’t perfect. Growing a grape tree from seed is a learning process, and every challenge is an opportunity to gain valuable experience. The key is to be patient, observant, and persistent.
We wholeheartedly encourage you to embark on this rewarding DIY adventure. Imagine the pride you’ll feel when you harvest your first bunch of grapes from a vine you nurtured from a tiny seed! Share your experiences with us in the comments below. We’d love to hear about your successes, challenges, and any tips you’ve discovered along the way. Let’s create a community of grape-growing enthusiasts and learn from each other’s journeys. So, grab those grape seeds and get ready to experience the joy of growing your own grape tree!
Frequently Asked Questions (FAQ)
How long does it take to grow a grape tree from seed?
Growing a grape tree from seed is a long-term project, requiring patience and commitment. Generally, it takes anywhere from 3 to 5 years for a grape vine grown from seed to produce its first significant harvest. The first year is primarily focused on germination and initial seedling growth. The subsequent years involve developing a strong root system and vine structure. Grafting can sometimes accelerate the fruiting process. Keep in mind that the exact timeframe can vary depending on the grape variety, climate, and growing conditions.
What type of grape seeds should I use?
The best type of grape seeds to use are those from grape varieties that are known to thrive in your local climate. Research which grape varieties are commonly grown in your region and are resistant to local diseases. You can obtain seeds from commercially available grapes, but keep in mind that the resulting plant may not be identical to the parent plant due to genetic variation. For more predictable results, consider purchasing seeds from reputable seed suppliers that specialize in grape varieties.
How do I prepare grape seeds for planting?
Grape seeds require stratification, a period of cold, moist storage, to break dormancy and promote germination. To stratify grape seeds, first, clean them thoroughly to remove any pulp or residue. Then, place the seeds in a moist medium, such as damp paper towels or vermiculite, inside a sealed plastic bag or container. Store the bag in the refrigerator (around 35-40°F or 2-4°C) for 60-90 days. Check the moisture level periodically and add water if needed to keep the medium damp but not soggy. After stratification, the seeds are ready to be planted.
What is the best soil for growing grape trees from seed?
Grape vines thrive in well-draining soil that is rich in organic matter. A loamy soil with a slightly acidic to neutral pH (around 6.0-7.0) is ideal. Before planting, amend the soil with compost, well-rotted manure, or other organic materials to improve drainage, fertility, and water retention. Avoid heavy clay soils, as they can become waterlogged and inhibit root growth. If you have clay soil, consider amending it with sand and organic matter to improve drainage.
How much sunlight do grape trees need?
Grape vines require at least 6-8 hours of direct sunlight per day to thrive and produce abundant fruit. Choose a planting location that receives full sun exposure throughout the growing season. Insufficient sunlight can lead to weak growth, reduced fruit production, and increased susceptibility to diseases.
How often should I water my grape tree seedling?
Water your grape tree seedling regularly, especially during the first few months after planting. Keep the soil consistently moist but not waterlogged. Water deeply whenever the top inch of soil feels dry to the touch. As the vine matures, you can gradually reduce the frequency of watering, allowing the soil to dry out slightly between waterings. Avoid overwatering, as it can lead to root rot.
Do I need to fertilize my grape tree seedling?
Yes, fertilizing your grape tree seedling can help promote healthy growth and development. Use a balanced fertilizer specifically formulated for grape vines, following the instructions on the product label. Apply fertilizer in the spring, just before the growing season begins. Avoid over-fertilizing, as it can lead to excessive vegetative growth at the expense of fruit production. Organic fertilizers, such as compost tea or fish emulsion, are also excellent options.
How do I prune my grape tree?
Pruning is essential for maintaining the shape, health, and productivity of your grape vine. The best time to prune grape vines is during the dormant season, typically in late winter or early spring, before new growth begins. Remove any dead, damaged, or diseased wood. Also, prune back excessive growth to encourage air circulation and sunlight penetration. The specific pruning techniques will depend on the training system you choose for your vine.
How do I protect my grape tree from pests and diseases?
Grape vines can be susceptible to various pests and diseases, such as aphids, spider mites, Japanese beetles, powdery mildew, and black rot. Regularly inspect your vine for signs of infestation or disease. Use organic pest control methods, such as insecticidal soap or neem oil, to control pests. To prevent diseases, ensure good air circulation around the vine, avoid overhead watering, and apply fungicides as needed. Choose grape varieties that are resistant to common diseases in your area.
Can I grow a grape tree in a container?
Yes, you can grow a grape tree in a container, but it requires careful planning and management. Choose a large container (at least 20 gallons) with good drainage. Use a well-draining potting mix and select a grape variety that is suitable for container growing. Provide adequate support for the vine to climb, such as a trellis or stake. Water and fertilize regularly, and protect the container from extreme temperatures. Container-grown grape vines may require more frequent pruning and repotting than those grown in the ground.


Leave a Comment