

Growing Garlic Indoors might seem like a challenge reserved for seasoned gardeners with sprawling outdoor plots, but I’m here to tell you it’s totally achievable, even if your “garden” is just a sunny windowsill! Forget trekking to the grocery store every time you need a clove; imagine the satisfaction of snipping fresh, pungent garlic greens right in your own home.
Garlic, with its rich history dating back thousands of years, has been cultivated for both culinary and medicinal purposes across numerous cultures. From ancient Egypt, where it fueled the pyramid builders, to traditional Chinese medicine, garlic has always been revered. Now, you can bring that ancient power into your modern home!
But why bother growing garlic indoors? Well, for starters, it’s incredibly convenient. Think about it: no more last-minute dashes to the store when your recipe calls for garlic. Plus, it’s a fantastic way to add a touch of green to your living space, especially during those long winter months when outdoor gardening is a distant memory. More importantly, this DIY project is incredibly rewarding. There’s something truly special about nurturing a plant from a single clove to a thriving source of flavor. I’m excited to share these simple tricks and hacks that will have you harvesting your own indoor garlic in no time!
Knoblauch im Topf: So ziehst du dein eigenes Knoblauchgrün in der Wohnung
Hey Leute! Habt ihr auch manchmal Lust auf frischen Knoblauch, aber keinen Garten? Kein Problem! Ich zeige euch, wie ihr ganz einfach Knoblauch in Töpfen in eurer Wohnung ziehen könnt. Das ist super easy und ihr habt immer frisches Knoblauchgrün zur Hand, um eure Gerichte aufzupeppen. Und das Beste: Es ist viel einfacher als man denkt!
Was du brauchst:
* Knoblauchzehen: Am besten Bio-Knoblauch, da dieser oft weniger behandelt ist. Du kannst aber auch Knoblauch aus dem Supermarkt nehmen.
* Töpfe: Wähle Töpfe mit ausreichend Drainagelöchern. Die Größe hängt davon ab, wie viele Knoblauchzehen du pflanzen möchtest. Ein Topf mit einem Durchmesser von 15-20 cm ist für 3-4 Zehen ideal.
* Blumenerde: Verwende hochwertige Blumenerde. Sie sollte locker und gut durchlässig sein.
* Wasser: Zum Gießen, natürlich!
* Optional: Tongranulat oder Blähton zur besseren Drainage.
* Optional: Flüssigdünger für Kräuter oder Gemüse.
Die Vorbereitung: Der Schlüssel zum Erfolg
Bevor wir loslegen, ist es wichtig, die Knoblauchzehen richtig vorzubereiten. Das erhöht die Erfolgschancen ungemein!
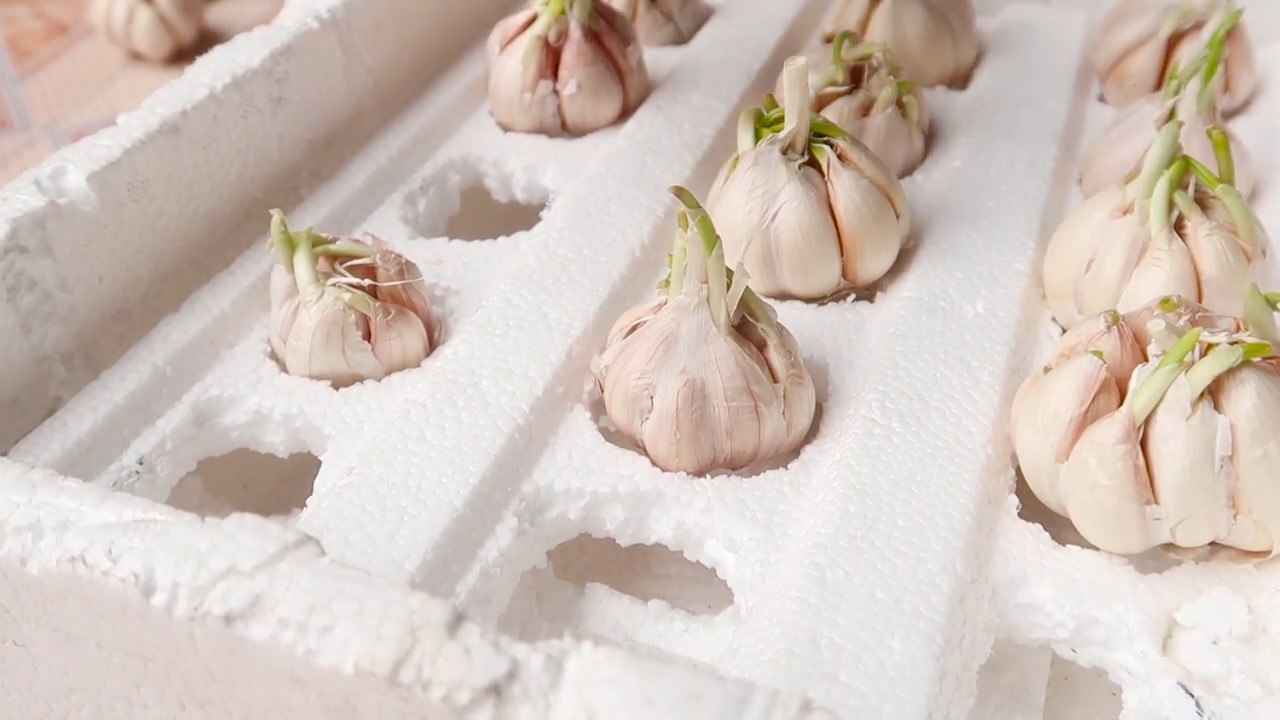
1. Knoblauchzehen auswählen: Suche dir die größten und gesündesten Knoblauchzehen aus. Sie sollten fest und prall sein und keine Anzeichen von Schimmel oder Beschädigungen aufweisen. Je größer die Zehe, desto kräftiger wird die Pflanze.
2. Einweichen (optional): Du kannst die Knoblauchzehen vor dem Pflanzen für ein paar Stunden in Wasser einweichen. Das soll die Keimung beschleunigen. Ich mache das meistens, aber es geht auch ohne.
3. Topf vorbereiten: Wenn dein Topf keine Drainagelöcher hat, solltest du welche bohren. Ansonsten kann sich Staunässe bilden, und das mag der Knoblauch gar nicht. Lege dann eine Schicht Tongranulat oder Blähton auf den Boden des Topfes. Das sorgt für eine gute Drainage und verhindert, dass die Erde die Löcher verstopft.
4. Erde einfüllen: Fülle den Topf mit Blumenerde. Lass dabei etwa 2-3 cm Platz bis zum Rand.
Das Pflanzen: Ab in die Erde damit!
Jetzt kommt der spaßige Teil: Das Pflanzen der Knoblauchzehen!
1. Löcher machen: Drücke mit dem Finger oder einem kleinen Löffel Löcher in die Erde. Die Löcher sollten etwa 5-7 cm tief sein. Achte darauf, dass zwischen den Löchern genügend Abstand ist (ca. 5-7 cm), damit die Pflanzen genügend Platz zum Wachsen haben.
2. Knoblauchzehen einsetzen: Setze die Knoblauchzehen mit der Spitze nach oben in die Löcher. Die Spitze ist der Teil, aus dem das Grün sprießen wird.
3. Mit Erde bedecken: Bedecke die Knoblauchzehen vorsichtig mit Erde. Drücke die Erde leicht an.
4. Gießen: Gieße die Erde gründlich an, bis sie gut durchfeuchtet ist. Achte darauf, dass das Wasser aus den Drainagelöchern abläuft.
Die Pflege: Geduld ist eine Tugend
Nach dem Pflanzen ist die richtige Pflege entscheidend. Hier sind ein paar Tipps, damit dein Knoblauch prächtig gedeiht:
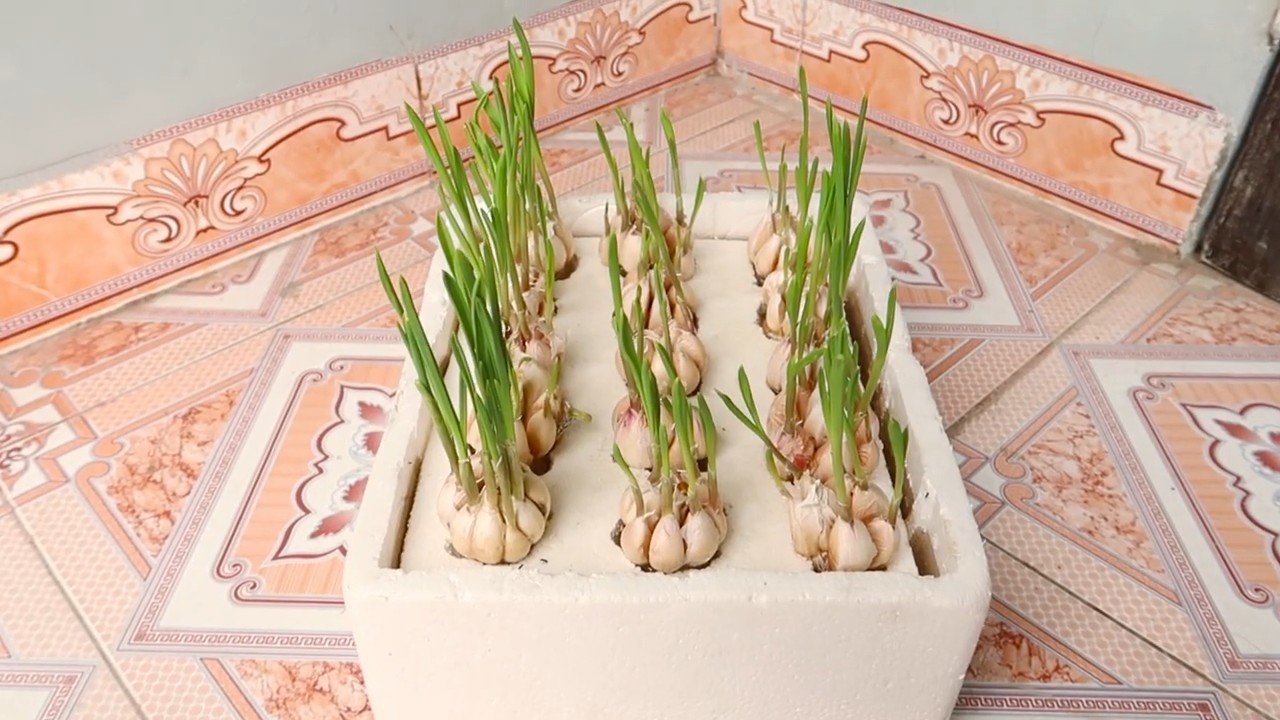
1. Standort: Stelle den Topf an einen hellen und sonnigen Standort. Knoblauch braucht viel Licht, um gut zu wachsen. Ein Fensterbrett nach Süden oder Westen ist ideal.
2. Gießen: Gieße regelmäßig, aber nicht zu viel. Die Erde sollte immer leicht feucht sein, aber nicht nass. Vermeide Staunässe, da dies zu Fäulnis führen kann. Überprüfe die Feuchtigkeit der Erde, indem du mit dem Finger in die Erde stichst. Wenn sie sich trocken anfühlt, ist es Zeit zum Gießen.
3. Düngen (optional): Wenn du möchtest, kannst du den Knoblauch alle paar Wochen mit einem Flüssigdünger für Kräuter oder Gemüse düngen. Das fördert das Wachstum und sorgt für kräftige Pflanzen. Achte darauf, die Dosierungsanleitung auf der Verpackung zu beachten.
4. Schneiden: Wenn das Knoblauchgrün etwa 15-20 cm hoch ist, kannst du es ernten. Schneide einfach die gewünschte Menge mit einer Schere ab. Die Pflanze wird weiterwachsen und neues Grün produzieren. Schneide aber nie alles auf einmal ab, da die Pflanze sonst geschwächt wird.
5. Drehen: Drehe den Topf regelmäßig, damit alle Seiten der Pflanze gleichmäßig Licht bekommen. Das verhindert, dass die Pflanze sich zum Licht neigt und schief wächst.
6. Schädlinge: Achte auf Schädlinge wie Blattläuse oder Spinnmilben. Wenn du welche entdeckst, kannst du sie mit einem natürlichen Schädlingsbekämpfungsmittel bekämpfen. Eine Mischung aus Wasser und etwas Spülmittel kann oft schon helfen.
Die Ernte: Endlich frischer Knoblauch!
Du kannst das Knoblauchgrün schon nach wenigen Wochen ernten. Es schmeckt milder als die Knoblauchzehe selbst und eignet sich hervorragend zum Würzen von Salaten, Suppen, Saucen und vielem mehr.
* Knoblauchgrün: Wie bereits erwähnt, kannst du das Knoblauchgrün regelmäßig ernten, sobald es eine ausreichende Größe erreicht hat.
* Knoblauchzehen (optional): Wenn du möchtest, kannst du auch die Knoblauchzehen ernten. Das dauert allerdings etwas länger. Du erkennst, dass die Zehen reif sind, wenn das Grün anfängt, gelb zu werden und zu welken. Grabe die Zehen vorsichtig aus und lasse sie an einem trockenen und luftigen Ort trocknen.
Häufige Probleme und Lösungen:
* Gelbe Blätter: Gelbe Blätter können verschiedene Ursachen haben. Entweder bekommt die Pflanze zu wenig Licht, zu viel Wasser oder es fehlt ihr an Nährstoffen. Überprüfe die Standortbedingungen, die Bewässerung und dünge gegebenenfalls.
* Schimmel: Schimmelbildung deutet auf Staunässe hin. Reduziere die Bewässerung und sorge für eine bessere Drainage. Du kannst auch die oberste Erdschicht austauschen.
* Schädlinge: Wie bereits erwähnt, können Schädlinge wie Blattläuse oder Spinnmilben auftreten. Bekämpfe sie mit einem natürlichen Schädlingsbekämpfungsmittel.
Zusätzliche Tipps und Tricks:
* Verschiedene Sorten: Probiere verschiedene Knoblauchsorten aus, um herauszufinden, welche dir am besten schmeckt. Es gibt viele verschiedene Sorten mit unterschiedlichen Aromen.
* Nachhaltigkeit: Verwende am besten Bio-Knoblauch und torffreie Blumenerde, um die Umwelt zu schonen.
* Kreativität: Experimentiere mit verschiedenen Anbaumethoden. Du kannst den Knoblauch zum Beispiel auch in einem Hydrokultursystem anbauen.
* Dokumentation: Notiere dir, wann du den Knoblauch gepflanzt hast und wie du ihn gepflegt hast. So kannst du im nächsten Jahr noch besser planen.
Fazit:
Knoblauch im Topf zu ziehen ist wirklich kinderleicht und macht Spaß! Mit ein wenig Geduld und Pflege hast du bald dein eigenes frisches Knoblauchgrün zur Hand. Probiert es aus, ich bin sicher, ihr werdet begeistert sein! Und wer weiß, vielleicht entdeckt ihr ja sogar eure grüne Ader! Viel Erfolg beim Gärtnern!
Conclusion
So, there you have it! Growing garlic indoors is not only possible, but it’s also a surprisingly rewarding experience. Forget those last-minute grocery store runs when you’re missing that crucial clove; with a little patience and this simple DIY trick, you can have fresh, flavorful garlic greens and even bulbs right at your fingertips.
Why is this a must-try? Because it offers a sustainable, cost-effective, and incredibly convenient way to enjoy the pungent goodness of garlic. Imagine the satisfaction of snipping fresh garlic greens to add a burst of flavor to your morning omelet or using your homegrown bulbs in a delicious pasta sauce. Beyond the culinary benefits, growing garlic indoors brings a touch of nature into your home, providing a calming and visually appealing element to your living space. It’s a fantastic project for gardeners of all levels, from seasoned pros to complete beginners.
But don’t stop there! Experiment with different varieties of garlic to discover your favorite flavor profiles. Try growing garlic in different types of containers, from repurposed jars to decorative pots, to find what works best for your space and aesthetic. You can even explore different growing mediums, such as hydroponics, for a more advanced approach. Consider companion planting your indoor garlic with herbs like parsley or chives to create a miniature indoor garden.
The possibilities are endless!
We’ve armed you with the knowledge and the inspiration; now it’s time to put your green thumb to the test. We wholeheartedly encourage you to try this DIY trick for growing garlic indoors. It’s a simple, satisfying, and ultimately delicious way to enhance your culinary creations and connect with nature.
Once you’ve embarked on your indoor garlic growing adventure, we’d love to hear about your experience! Share your tips, tricks, and triumphs in the comments below. Let us know what varieties you’re growing, what challenges you’ve faced, and what delicious dishes you’ve created with your homegrown garlic. Your insights will not only inspire other readers but also help us all learn and grow together as a community of indoor gardeners. So, get planting, get creative, and get ready to enjoy the incredible flavor of fresh, homegrown garlic!
Frequently Asked Questions (FAQ)
1. What kind of garlic should I use for growing indoors?
You can use any type of garlic for growing indoors, but softneck varieties like Artichoke and Silverskin are generally recommended because they tend to be more adaptable to indoor conditions. Hardneck varieties, while flavorful, require a period of cold stratification, which can be more challenging to replicate indoors. Elephant garlic, while technically a type of leek, can also be grown indoors and produces large, mild-flavored cloves. Experiment with different varieties to see what thrives best in your environment and suits your taste preferences. Remember to source your garlic from a reputable supplier to ensure it’s disease-free.
2. How much sunlight does indoor garlic need?
Garlic needs at least 6-8 hours of direct sunlight per day to thrive. If you don’t have a sunny windowsill, you can supplement with grow lights. Position the grow lights about 6-12 inches above the plants and keep them on for 12-14 hours per day. Rotate your garlic plants regularly to ensure even light exposure on all sides. Insufficient sunlight can result in weak, leggy growth and smaller bulbs.
3. What kind of soil is best for growing garlic indoors?
Use a well-draining potting mix that is rich in organic matter. A mix of equal parts potting soil, compost, and perlite or vermiculite is ideal. Avoid using garden soil, as it can be too heavy and may contain pests or diseases. Good drainage is crucial to prevent root rot, which is a common problem with indoor plants.
4. How often should I water my indoor garlic?
Water your garlic plants when the top inch of soil feels dry to the touch. Avoid overwatering, as this can lead to root rot. Ensure that the pot has drainage holes to allow excess water to escape. During the active growing season (spring and summer), you may need to water more frequently than during the dormant season (fall and winter).
5. When and how should I harvest my indoor garlic?
You can harvest garlic greens (the leaves) at any time once they are a few inches tall. Simply snip off the leaves as needed, leaving at least a few inches of growth to allow the plant to continue growing. To harvest the bulbs, wait until the leaves start to turn yellow and brown, usually about 8-9 months after planting. Gently dig up the bulbs and allow them to cure in a dry, well-ventilated place for a few weeks before storing.
6. Can I grow garlic indoors year-round?
Yes, you can grow garlic indoors year-round, but you may need to provide supplemental lighting and adjust your watering schedule depending on the season. Garlic typically requires a period of cold dormancy to produce large bulbs. To mimic this indoors, you can place the potted garlic in a cool (around 40-50°F), dark place for a few weeks before planting or after harvesting the greens.
7. What are some common problems when growing garlic indoors and how can I fix them?
Some common problems include yellowing leaves, stunted growth, and pest infestations. Yellowing leaves can be caused by overwatering, underwatering, or nutrient deficiencies. Adjust your watering schedule and fertilize with a balanced liquid fertilizer. Stunted growth can be due to insufficient sunlight or poor soil. Provide more light and repot into a better-quality potting mix. Pests like aphids and spider mites can be controlled with insecticidal soap or neem oil. Regularly inspect your plants for signs of pests and diseases.
8. Can I use the same garlic clove to grow multiple times?
No, each garlic clove will only produce one plant. Once you harvest the bulb, you’ll need to plant new cloves to start the process again. However, you can save some of the cloves from your harvested bulbs to plant for the next growing season.
9. How do I fertilize my indoor garlic plants?
Fertilize your garlic plants every 2-3 weeks with a balanced liquid fertilizer diluted to half strength. Look for a fertilizer with an NPK ratio (nitrogen, phosphorus, potassium) of around 10-10-10. Avoid over-fertilizing, as this can burn the roots. You can also amend the soil with compost or worm castings to provide a slow-release source of nutrients.
10. Is growing garlic indoors worth it?
Absolutely! While it may require a bit of effort, growing garlic indoors offers numerous benefits, including fresh, flavorful garlic greens and bulbs, a sustainable and cost-effective way to enjoy garlic, and a rewarding gardening experience. Plus, it’s a great way to add a touch of greenery to your home. Give it a try and see for yourself!

Leave a Comment