

Growing garlic in water might sound like something out of a science fiction movie, but trust me, it’s a real and surprisingly simple way to enjoy fresh garlic greens right from your kitchen! Forget those days of running to the store for a few sprigs of chives or garlic scapes; with this easy DIY trick, you can have a constant supply at your fingertips.
Humans have cultivated garlic for thousands of years, with evidence suggesting its use dates back to ancient Egypt and beyond. Historically, it wasn’t just a culinary staple but also valued for its medicinal properties. Now, we’re taking this ancient ingredient and giving it a modern, space-saving twist!
Why should you try growing garlic in water? Well, for starters, it’s incredibly convenient. Whether you live in an apartment with limited outdoor space or simply want a fun and educational project for the kids, this method is perfect. Plus, it’s a fantastic way to reduce food waste by using those garlic cloves that might be starting to sprout in your pantry. I’m excited to share this simple hack that will bring a touch of green and a burst of flavor to your home!
Growing Garlic in Water: A DIY Guide for Fresh Garlic Shoots
Hello dear garden friends! Have you ever wondered how you can enjoy fresh garlic even without a garden? Today I’ll show you how you can easily grow garlic in water to harvest delicious and healthy garlic shoots. These shoots are not only super easy to grow but also a great addition to salads, soups, or simply on bread. Let’s get started!
What you need:
- A head of garlic (preferably organic quality, as these are less treated)
- A small glass or dish
- Water (tap water is sufficient)
- Optional: Toothpicks
Step-by-Step Guide:
1. Prepare the garlic cloves:
- First, carefully separate the individual cloves from the garlic head. Be careful not to damage them.
- Do not remove the outer, dry skin of the cloves. It protects the clove and helps prevent rot.
2. The right positioning:
- Now for the trick: You can either place the garlic cloves directly in the water or secure them with toothpicks.
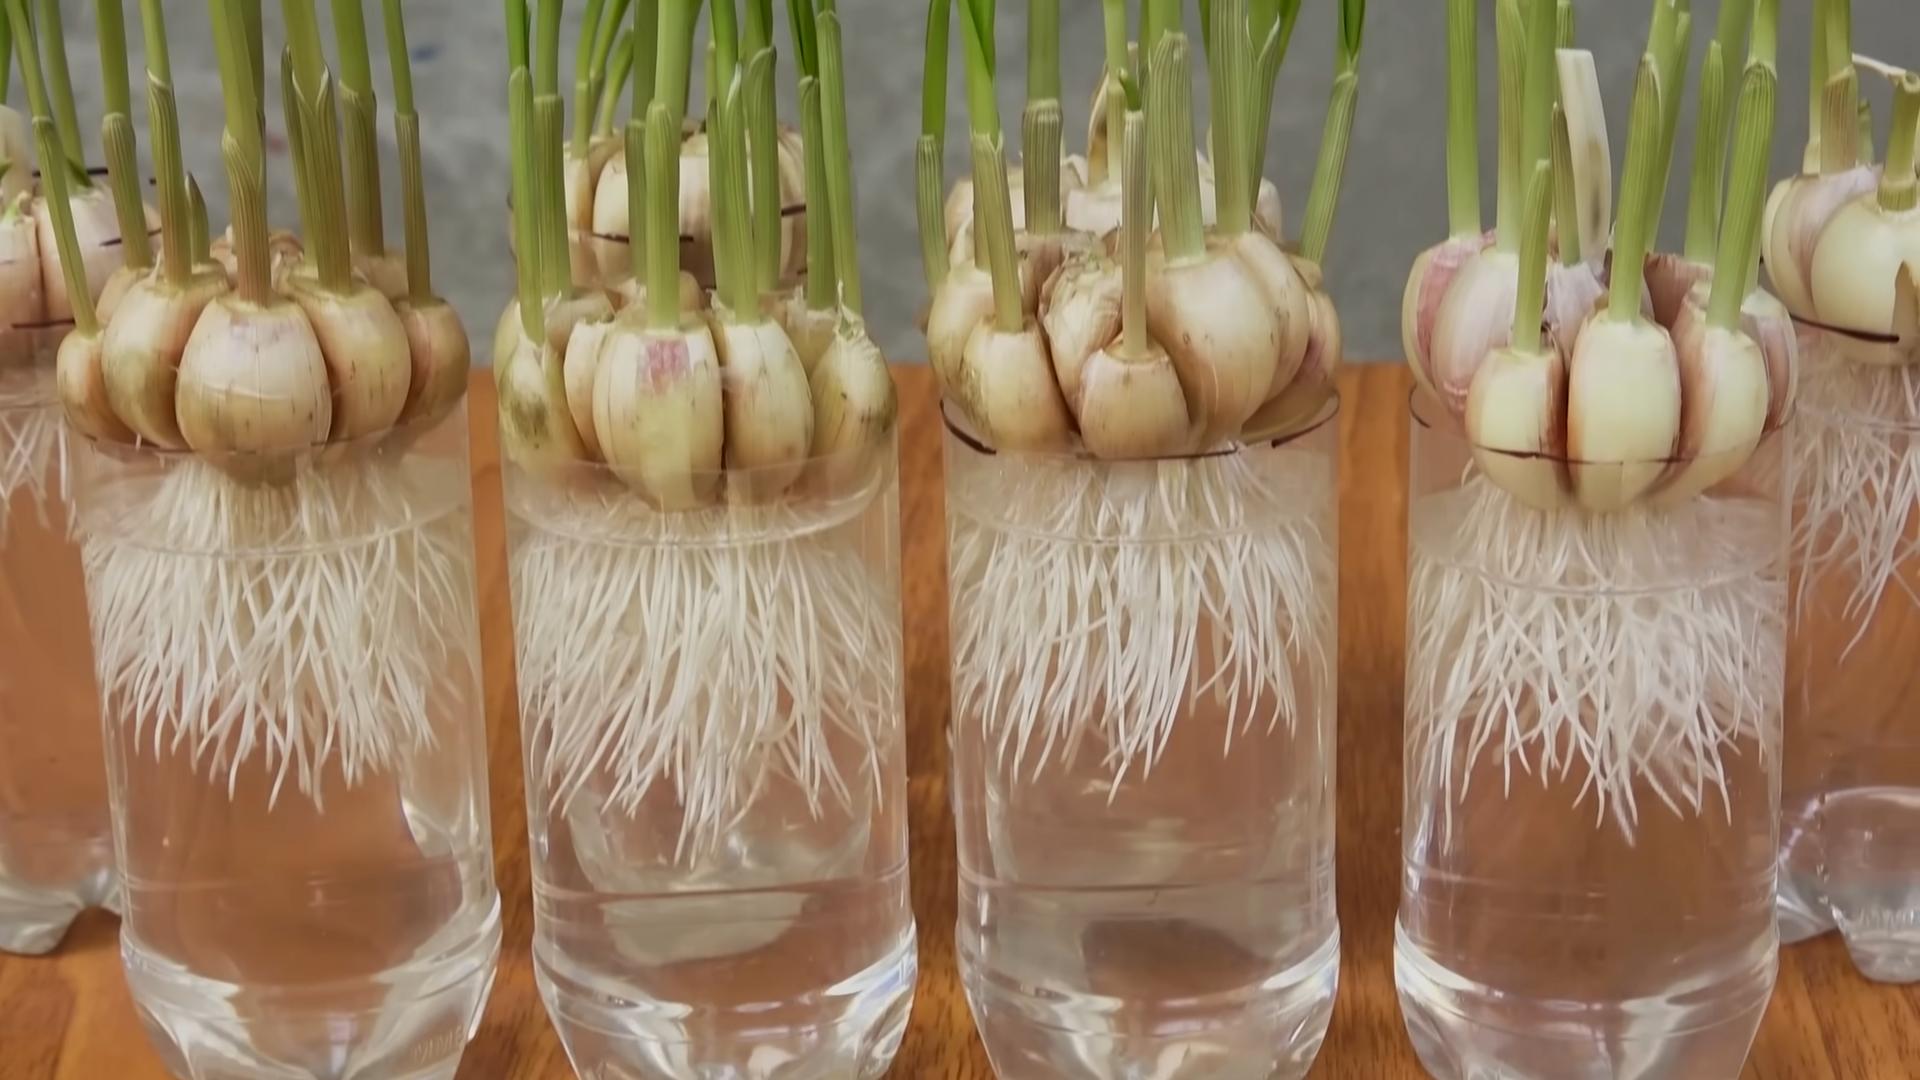
- Placing directly in water: Fill the glass or dish with water so that the bottom part of the garlic clove (the root base) is in the water. The tip of the clove should stick out of the water.
- Securing with toothpicks: Insert three to four toothpicks evenly into the middle of the garlic clove. Be careful not to pierce the clove too deeply. The toothpicks act as little “legs” that hold the clove above the water, so only the root base touches the water.
3. The right location:
- Place the glass or dish in a bright spot, but avoid direct sunlight. A windowsill is ideal.
4. Water change and care:
- Change the water every one to two days to prevent rot and promote the growth of the shoots.
- Make sure the water level always remains the same, so the root base of the garlic clove stays in the water.
5. Patience is required:
- After a few days (usually 3-7 days), you should see the first green shoots.
- The shoots grow relatively quickly. Depending on the location and light conditions, they can grow several centimeters long within one to two weeks.
6. Harvest time:
- Once the shoots have reached a length of about 10-15 cm, you can harvest them.
- Simply cut the shoots with scissors or a knife. Leave about 2-3 cm of the shoots so they can continue to grow.
7. Enjoy and repeat:
- You can use the harvested garlic shoots immediately. They have a mild garlic flavor, but are milder and fresher.
- You can repeat the process with the same garlic cloves until they no longer produce shoots.
Common Problems and Solutions:
- Rot: If the garlic clove rots, it’s usually due to too much moisture or poor hygiene. Change the water more frequently and make sure only the root base is in the water. Remove rotten cloves immediately to prevent spreading.
- Mold: Mold can also occur. Again, regular water changes and good ventilation will help.
- Slow growth: If the shoots grow slowly, it could be due to too little light. Move the glass to a brighter location.
Tips and Tricks for Even More Success
- Try different varieties: Not every garlic variety sprouts equally well. Try different varieties to find out which one works best for you.
- Prefer organic garlic: Organic garlic is often more robust and less treated, which can have a positive effect on growth.
- Regular fertilizing: You can add a drop of liquid fertilizer to the water from time to time to promote the growth of the shoots. But be careful not to use too much fertilizer, as this can damage the shoots.
- Creative containers: Instead of a simple glass, you can also use other containers, such as old jam jars or small planters. This not only looks nicer but can also promote the growth of the shoots.
- Garlic water as fertilizer: The water in which the garlic cloves have been standing contains valuable nutrients. You can use it diluted as a fertilizer for your other plants.
- Reusing the garlic clove: Even if the garlic clove no longer produces shoots, you can still use it. For example, you can chop it up and use it for cooking.
- Observation is important: Observe your garlic cloves regularly to identify and fix problems early.
The Health Benefits of Garlic Shoots
Garlic shoots are not only delicious but also very healthy. They contain many vitamins and minerals, such as Vitamin C, Vitamin B6, manganese, and selenium. They also have antibacterial and anti-inflammatory effects.
- Strengthening the immune system: The contained vitamins and minerals strengthen the immune system and help to ward off colds and other infections.
- Lowering blood pressure: Garlic shoots can help to lower blood pressure and reduce the risk of cardiovascular diseases.
- Anti-inflammatory effect: The ingredients have an anti-inflammatory effect and can help with various inflammations in the body.
- Antioxidant effect: Garlic shoots contain antioxidants that protect the cells from damage by free radicals.
Recipe Ideas with Garlic Shoots
Garlic shoots are versatile and add a special touch to many dishes. Here are a few recipe ideas:
- Salad: Chop the garlic shoots and add them to your salad. They go well with leafy greens, tomatoes, cucumbers, and peppers.
- Soup: Add the garlic shoots to your soup just before serving. They pair well with vegetable, potato, or tomato soups.
- Bread: Sprinkle your bread with finely chopped garlic shoots. They go well with butter, cream cheese, or avocado.
- Omelet: Add the garlic shoots to your omelet. They pair well with cheese, ham, or vegetables.
- Pesto: Use the garlic shoots instead of basil for a delicious garlic shoot pesto.
- Dips: Mix the garlic shoots into your dip. They go well with quark, yogurt, or hummus.
- Stir-fry dishes: Add the garlic shoots to your stir-fry just before serving. They pair well with vegetables, meat, or tofu.
I hope this guide helps you to grow and enjoy your own garlic shoots. Have fun trying it out
Conclusion
So, there you have it! Growing garlic in water isn’t just a quirky experiment; it’s a genuinely rewarding way to enjoy fresh garlic greens right from your kitchen. It’s a sustainable, space-saving, and surprisingly simple method that brings a touch of green to your home, even if you don’t have a garden. Forget those sad, sprouting garlic cloves languishing in your pantry – give them a new lease on life and transform them into a continuous supply of flavorful greens.
This DIY trick is a must-try for several compelling reasons. First, it’s incredibly easy and requires minimal effort. You don’t need any special equipment or a green thumb to succeed. Second, it’s a fantastic way to reduce food waste. Instead of tossing out sprouting garlic, you’re repurposing it and getting a delicious harvest in return. Third, the garlic greens you harvest are packed with flavor and can be used in a variety of dishes, adding a fresh, garlicky punch to everything from salads and soups to stir-fries and omelets.
Looking to experiment further? Consider these variations:
* Different Containers: While a glass jar or cup works perfectly, you can also use repurposed plastic containers, ceramic pots, or even a dedicated hydroponic setup for a more sophisticated approach.
* Nutrient Solutions: For enhanced growth, you can add a diluted liquid fertilizer or hydroponic nutrient solution to the water every few weeks. Be sure to follow the instructions on the fertilizer packaging carefully to avoid over-fertilizing.
* Growing Different Varieties: While most garlic varieties will sprout in water, some may perform better than others. Experiment with different types of garlic to see which ones thrive in your environment. Softneck varieties, which are often found in grocery stores, tend to be more reliable.
* Creative Displays: Get creative with how you display your water-grown garlic. Use decorative jars, arrange multiple cloves in a single container, or even create a vertical garden using repurposed materials.
Beyond the basic method, you can also explore different ways to use your harvested garlic greens. Chop them finely and sprinkle them over pasta dishes, use them as a garnish for soups and stews, or blend them into pesto for a unique and flavorful twist. You can even add them to homemade bread or biscuits for a garlicky kick.
The possibilities are endless!
We wholeheartedly encourage you to try this simple yet satisfying DIY trick. It’s a fun and educational project for both adults and children, and it’s a great way to connect with nature, even in a small way. Plus, you’ll have a constant supply of fresh, flavorful garlic greens at your fingertips.
Don’t just take our word for it – give it a try and see for yourself! We’re confident that you’ll be amazed at how easy and rewarding it is to grow garlic in water.
Once you’ve tried it, we’d love to hear about your experience. Share your tips, tricks, and photos in the comments below. Let’s create a community of garlic-growing enthusiasts and inspire others to embrace this simple and sustainable practice. Happy growing!
Frequently Asked Questions (FAQ)
How long does it take for garlic to sprout in water?
Generally, you should start seeing sprouts within a few days to a week. The exact timeframe depends on factors like the garlic variety, the temperature of your environment, and the quality of the water. Warmer temperatures tend to encourage faster sprouting. If you don’t see any activity after a week, try changing the water and ensuring the garlic is in a well-lit location.
What part of the garlic clove should be submerged in water?
Only the root end (the flat, wider end) of the garlic clove should be submerged in water. The pointed end, from which the green shoots will emerge, should remain above the water line. Submerging the entire clove can lead to rot and prevent sprouting.
What kind of water should I use?
Tap water is generally fine, but it’s best to let it sit for a few hours to allow any chlorine to dissipate. Filtered water or rainwater can also be used. Avoid using distilled water, as it lacks the minerals that plants need to thrive. Change the water every few days to prevent bacterial growth and keep the garlic healthy.
How much light does the garlic need?
Garlic greens need bright, indirect light to grow properly. Place your garlic in a location that receives several hours of sunlight each day, but avoid direct sunlight, which can scorch the leaves. A windowsill facing east or west is often ideal. If you don’t have access to enough natural light, you can supplement with a grow light.
How often should I change the water?
Change the water every 2-3 days to prevent the growth of bacteria and mold. This will also help to keep the garlic cloves fresh and healthy. When changing the water, gently rinse the cloves to remove any debris.
Can I eat the garlic bulb after harvesting the greens?
While the garlic bulb itself will likely be smaller and less potent than a freshly planted bulb, it is still edible. However, its primary purpose in this method is to provide nutrients for the growth of the greens. The bulb may become soft or mushy over time, so it’s best to harvest the greens regularly and discard the bulb when it’s no longer viable.
How do I harvest the garlic greens?
Once the greens have grown to a few inches in length, you can start harvesting them. Use scissors or a sharp knife to cut the greens near the base, leaving about an inch or two of growth. This will encourage the plant to continue producing new greens. Harvest regularly to maintain a continuous supply.
Can I replant the garlic clove in soil after growing it in water?
Yes, you can replant the garlic clove in soil after growing it in water. However, keep in mind that the bulb may be weakened from being grown in water, so it may not produce as large or healthy of a bulb as a clove that was planted directly in soil. To replant, choose a sunny location with well-draining soil. Plant the clove with the root end down and the pointed end just below the surface of the soil. Water regularly and fertilize as needed.
Are there any pests or diseases that affect garlic grown in water?
Garlic grown in water is generally less susceptible to pests and diseases than garlic grown in soil. However, it’s still important to monitor your plants for any signs of problems. Common issues include mold or mildew growth, which can be prevented by changing the water regularly and ensuring good air circulation. If you notice any pests, such as aphids or spider mites, you can try washing them off with a strong stream of water or using an organic insecticidal soap.
Can I grow garlic in water year-round?
Yes, you can grow garlic in water year-round, as long as you provide the right conditions. The most important factors are light, water, and temperature. Ensure that your garlic receives enough bright, indirect light, change the water regularly, and keep the temperature relatively stable. You may need to adjust your care routine depending on the season.
Leave a Comment