

Growing Celery at Home might seem like a challenge reserved for seasoned gardeners, but I’m here to tell you it’s totally achievable, even if you’re a beginner! Forget those limp, expensive stalks from the grocery store. Imagine crisp, flavorful celery, fresh from your own backyard or even a sunny windowsill. This isn’t just about saving money; it’s about connecting with your food and experiencing the satisfaction of nurturing something from seed to table.
Celery has a surprisingly rich history, dating back to ancient Greece and Rome, where it was valued more for its medicinal properties than its culinary uses. Over time, cultivation techniques improved, transforming the bitter wild plant into the crunchy vegetable we know and love today. But why bother growing it yourself? Well, commercially grown celery is often heavily treated with pesticides. By growing celery at home, you have complete control over what goes into your food, ensuring a healthier and more sustainable harvest for you and your family.
This DIY guide is packed with simple tricks and hacks that will demystify the process. I’ll walk you through everything from choosing the right variety and preparing your soil to troubleshooting common problems and harvesting your bounty. So, grab your gardening gloves, and let’s get started on this exciting journey of growing your own delicious, homegrown celery!
Growing Celery at Home: A Comprehensive DIY Guide
Hey everyone! Have you ever wondered how to grow that crisp, refreshing celery we love so much, right at home? I’ve tried it, and it’s easier than you think! In this article, I’ll show you step-by-step how to grow your own celery, whether you have a large garden or just a small balcony. Let’s get started!
What you need: The Right Equipment
Before we start, we’ll need a few things. Don’t worry, you probably have most of them at home already!
- Celery seeds or a celery base: You can either start with seeds or use a celery base from the supermarket. I personally find the base method easier for beginners.
- Seed trays or small pots: For starting the seeds or the base.
- Seed-starting mix: This soil is lighter and more nutrient-rich than regular garden soil and is ideal for young plants.
- Garden soil or compost: For later transplanting into larger pots or a garden bed.
- A planter or a spot in the garden: Depending on where you want to grow your celery.
- Watering can or spray bottle: For watering.
- A knife: For cutting the celery base.
- Optional: Liquid fertilizer: To support the celery during its growth.
Growing Celery from Seed: The Slightly Longer Way
If you want to start with seeds, you’ll need a little patience, but it’s worth it!
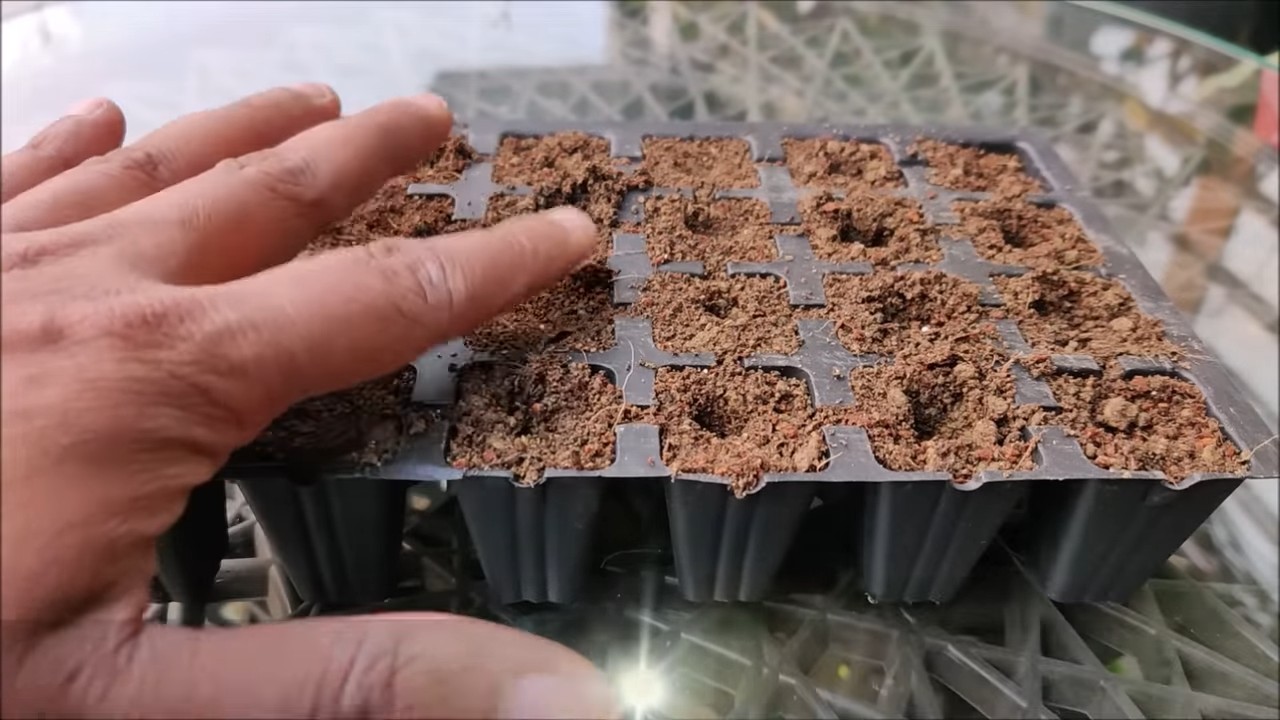
- Prepare for sowing: Fill your seed trays or small pots with seed-starting mix. Lightly moisten the soil.
- Sow the seeds: Celery seeds are very small. Sprinkle them carefully on the surface of the soil. Do not press them in, as they need light to germinate.
- Moisten and cover: Spray the seeds with a spray bottle to keep them moist. Cover the seed trays with a transparent film or a lid to increase humidity.
- Place in a warm and bright spot: Put the seed trays in a warm and bright place, but not in direct sun. A temperature of 20-25°C (68-77°F) is ideal.
- Keep it moist: Check the soil regularly and spray it if necessary to keep it moist.
- Wait for germination: Germination can take 2-3 weeks. Be patient!
- Thinning out: Once the seedlings are large enough to handle (about 5-7 cm / 2-3 inches high), you can transplant them into separate pots.
Growing Celery from a Base: The Quick Start
This is my preferred method because it’s so easy!
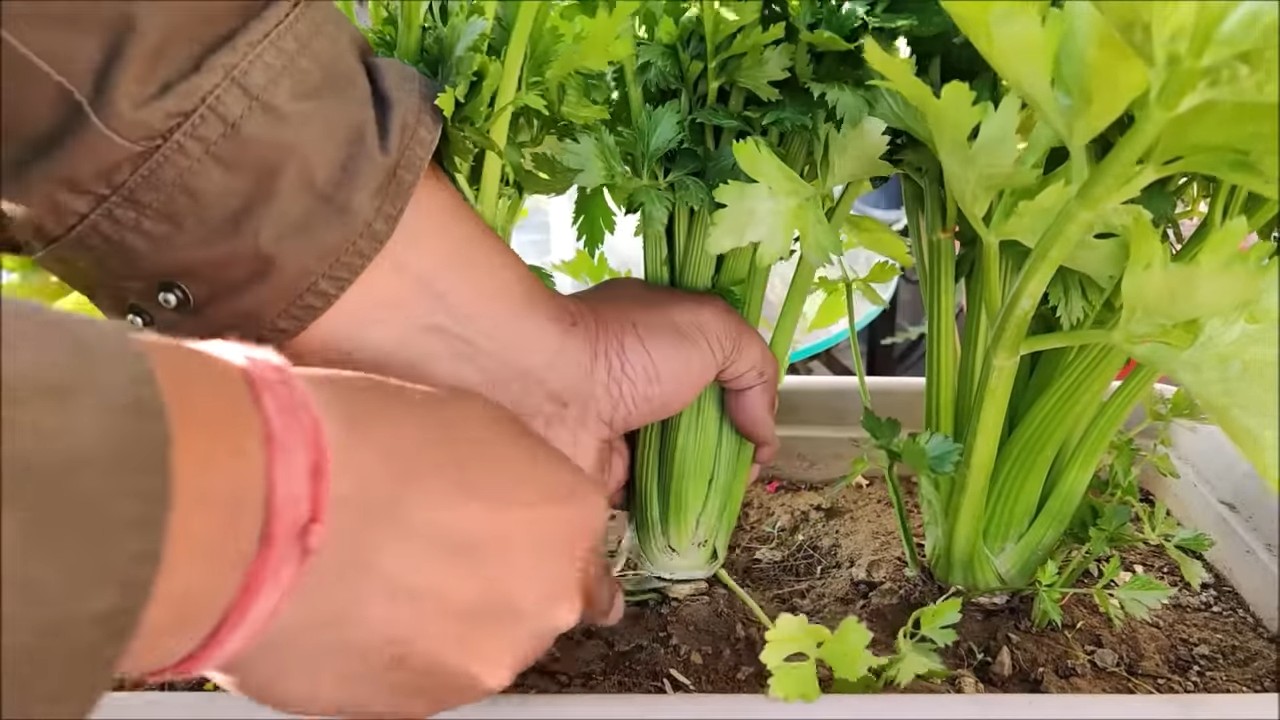
- Prepare the celery base: Cut off the bottom part of the celery stalk, about 5-7 cm (2-3 inches) from the bottom. Make sure the base is intact.
- Place in water: Put the base in a glass or bowl of water. The water should be about 2-3 cm (1 inch) deep and cover the base of the stalk.
- Place in a bright spot: Put the glass with the stalk in a bright place, but not in direct sun.
- Change the water: Change the water every 1-2 days to keep it clean.
- Let roots form: After about a week, you should see small roots growing from the base of the stalk.
- Transplanting: Once the roots are about 5 cm (2 inches) long, it’s time to plant the stalk in soil.
Transplanting and Care: The Path to Success
Whether you started with seeds or a base, now comes the important part: transplanting and proper care.
- Prepare the planter or bed: Fill your planter or bed with a mixture of garden soil and compost. Celery likes nutrient-rich soil.
- Transplanting: Make a hole in the soil large enough for the celery’s roots. Carefully place the celery in the hole and cover the roots with soil. Press the soil down lightly.
- Watering: Water the celery thoroughly until the soil is moist.
- Location: Celery needs a sunny spot with at least 6 hours of sun per day.
- Watering schedule: Celery needs a lot of water. Water it regularly, especially in dry weather. The soil should always be moist, but not wet.
- Fertilizing: Fertilize the celery every 2-3 weeks with a liquid fertilizer. Be sure to follow the instructions on the package.
- Pest protection: Celery can be infested by slugs and other pests. Check your plants regularly and remove pests if necessary.
- Blanching (optional): If you prefer lighter-colored celery, you can blanch the stalks about 2 weeks before harvesting. To do this, wrap the stalks with paper or cardboard, leaving only the leaves exposed.
Harvest Time: The Reward for Your Work
After about 3-4 months, your celery is ready for harvest.
- Harvest time: The celery is ready when the stalks are thick and crisp.
- Harvesting: Cut the stalks at the base with a knife. You can either harvest the whole celery at once or just individual stalks as needed.
- Storage: Celery keeps in the refrigerator for about 1-2 weeks. Wrap it in a damp cloth or store it in a container with water.
Additional Tips and Tricks: For the Perfect Celery
- Soil quality: Celery loves nutrient-rich, well-draining soil. Improve your soil with compost or other organic matter.
- Regular watering: Celery needs a lot of water, especially during hot periods. Make sure the soil is always moist.
- Keep an eye on pests: Slugs and other pests can infest celery. Check your plants regularly and remove pests if necessary.
- Blanching for lighter stalks: If you prefer lighter celery, you can blanch the stalks about 2 weeks before harvesting.
- Growing celery in pots: Celery can also be grown in pots. Choose a pot with enough space for the roots.
- Celery as a companion plant: Celery is a good companion plant for cabbage, tomatoes, and onions.
Common Problems and Solutions: What to Do When Something Goes Wrong
Fungal diseases: Fungal diseases can affect celery, especially in damp weather. Ensure good ventilation and remove affected leaves.
Yellow leaves: Yellow leaves can be a sign of a lack of water or nutrients. Water the celery regularly and fertilize it if necessary.
Slug infestation: Slugs can eat celery leaves. Pick off the slugs or use slug bait.
Conclusion
So, there you have it! Growing celery at home isn’t just a quirky gardening experiment; it’s a genuinely rewarding experience that puts fresh, crisp, and flavorful celery right at your fingertips. Forget those limp, pre-packaged stalks from the grocery store – imagine the vibrant crunch and intense celery flavor you can achieve with your own homegrown crop.
This DIY trick, starting from a celery base, is a game-changer for several reasons. First, it’s incredibly sustainable. You’re essentially recycling food waste and turning it into something productive and delicious. Second, it’s cost-effective. Think of all the money you’ll save on buying celery regularly, especially if you’re a frequent consumer of this versatile vegetable. Third, it’s incredibly satisfying. There’s a unique joy in nurturing a plant from its humble beginnings to a thriving, edible state.
But the benefits don’t stop there. Homegrown celery is often more nutritious than store-bought varieties. You have complete control over the growing environment, ensuring that your celery is free from harmful pesticides and chemicals. Plus, the flavor is simply unmatched. The freshness and intensity of homegrown celery will elevate your salads, soups, stews, and snacks to a whole new level.
Looking for variations? Absolutely! Experiment with different celery varieties. There are several types available, each with its own unique flavor profile and texture. Try growing ‘Utah Tall’ for its classic celery taste, or ‘Golden Self-Blanching’ for a sweeter, milder flavor. You can also try growing celery in containers if you have limited garden space. Just make sure to choose a pot that’s large enough to accommodate the plant’s root system.
Consider companion planting to further enhance your celery’s growth and flavor. Celery thrives alongside plants like onions, garlic, and tomatoes. These companion plants can help deter pests and improve the overall health of your celery crop.
Don’t be afraid to experiment with different growing techniques. Some gardeners prefer to start their celery indoors from seed, while others opt for the quicker method of regrowing from a celery base. Find what works best for you and your growing conditions.
We wholeheartedly encourage you to give this DIY celery growing trick a try. It’s a simple, sustainable, and rewarding way to enjoy fresh, flavorful celery right from your own home. Once you taste the difference between homegrown and store-bought celery, you’ll never go back.
So, grab a celery base, follow our simple instructions, and get ready to experience the joy of growing your own celery. And most importantly, don’t forget to share your experiences with us! We’d love to hear about your successes, challenges, and any tips or tricks you discover along the way. Share your photos and stories on social media using #HomegrownCelery and let’s inspire others to embrace the joys of gardening. Happy growing!
Frequently Asked Questions (FAQ)
How long does it take to regrow celery from a base?
The time it takes to regrow celery from a base can vary depending on several factors, including the variety of celery, the growing conditions, and the amount of sunlight it receives. Generally, you can expect to see new growth within a week or two of placing the celery base in water. After about 2-3 weeks, you should have a small plant that’s ready to be transplanted into soil. From there, it can take another 2-3 months for the celery to mature and be ready for harvest. Be patient and consistent with watering and fertilizing, and you’ll be rewarded with a bountiful harvest of fresh, homegrown celery.
What kind of soil is best for growing celery?
Celery thrives in rich, well-draining soil that’s high in organic matter. The ideal soil pH for celery is between 6.0 and 6.8. Before planting, amend your soil with compost, aged manure, or other organic materials to improve its fertility and drainage. If your soil is heavy clay, consider adding sand or perlite to improve drainage. Celery also benefits from regular fertilization, so be sure to feed your plants with a balanced fertilizer every few weeks during the growing season.
How much sunlight does celery need?
Celery needs at least 6 hours of sunlight per day to thrive. Choose a sunny location in your garden that receives plenty of direct sunlight. If you’re growing celery indoors, place it near a sunny window or use grow lights to supplement the natural light. Insufficient sunlight can result in leggy, weak plants with poor flavor.
How often should I water celery?
Celery needs consistent moisture to grow properly. Water your celery plants deeply and regularly, especially during hot, dry weather. Aim to keep the soil consistently moist but not waterlogged. Check the soil moisture regularly and water when the top inch of soil feels dry to the touch. Mulching around your celery plants can help retain moisture and suppress weeds.
What are some common pests and diseases that affect celery?
Celery can be susceptible to several pests and diseases, including aphids, celery leaf tiers, and fungal diseases like early blight and late blight. Regularly inspect your plants for signs of pests or diseases and take action promptly to prevent them from spreading. Use organic pest control methods like insecticidal soap or neem oil to control aphids and other pests. To prevent fungal diseases, ensure good air circulation around your plants and avoid overhead watering. If you notice signs of disease, remove the affected leaves and treat the plants with a fungicide.
Can I grow celery in containers?
Yes, you can definitely grow celery in containers, especially if you have limited garden space. Choose a large container that’s at least 12 inches deep and wide to accommodate the plant’s root system. Use a well-draining potting mix and water regularly. Place the container in a sunny location that receives at least 6 hours of sunlight per day. Container-grown celery may require more frequent watering and fertilization than celery grown in the ground.
How do I harvest celery?
You can harvest celery when the stalks are at least 6-8 inches long and have reached the desired thickness. To harvest, simply cut the stalks at the base of the plant with a sharp knife. You can harvest individual stalks as needed, or you can harvest the entire plant at once. After harvesting, store your celery in the refrigerator to keep it fresh and crisp.
Can I eat the celery leaves?
Yes, celery leaves are perfectly edible and can be used in a variety of culinary applications. Celery leaves have a stronger flavor than the stalks and can be used to add flavor to soups, stews, salads, and other dishes. You can also dry the leaves and use them as a seasoning. Don’t throw away those nutritious and flavorful celery leaves – put them to good use in your kitchen!
My celery is bitter. What could be the reason?
Bitter celery can be caused by several factors, including insufficient watering, nutrient deficiencies, and exposure to high temperatures. Celery needs consistent moisture and nutrients to develop its characteristic sweet flavor. Make sure to water your celery plants regularly and fertilize them with a balanced fertilizer. Also, try to protect your celery from extreme heat by providing shade during the hottest part of the day.
Is growing celery at home worth the effort?
Absolutely! While growing celery at home requires some effort and attention, the rewards are well worth it. Homegrown celery is fresher, more flavorful, and often more nutritious than store-bought celery. Plus, it’s a sustainable and cost-effective way to enjoy this versatile vegetable. Once you taste the difference between homegrown and store-bought celery, you’ll be hooked!


Leave a Comment