

Growing carrots in soil bags might sound unconventional, but trust me, it’s a game-changer for any home gardener, especially if you’re short on space or dealing with challenging soil conditions! For centuries, humans have cultivated carrots, tracing back to ancient Afghanistan, where they were initially purple and white. Over time, selective breeding gifted us the vibrant orange variety we know and love today. But regardless of color, the challenge of achieving long, straight, and sweet carrots has always been there.
Let’s face it, traditional in-ground carrot growing can be tricky. Rocky soil leads to forked roots, poor drainage results in rot, and pests can decimate your entire crop. That’s where this DIY trick comes in! Growing carrots in soil bags offers a controlled environment, allowing you to customize the soil composition, ensure proper drainage, and even move your carrots to a sunnier spot as needed. I’m going to show you how to bypass all the common pitfalls and enjoy a bountiful harvest of delicious, homegrown carrots, no matter your gardening experience. Get ready to ditch the garden bed blues and embrace the ease and efficiency of soil bag gardening!
Growing Carrots in Bags: A Beginner’s Guide
Hey there, fellow gardening enthusiasts! Are you dreaming of pulling fresh, crunchy carrots straight from your garden, but space is a bit of a constraint? Well, I’ve got fantastic news! You can absolutely grow carrots in bags, and I’m here to walk you through the entire process. It’s easier than you think, and the results are incredibly rewarding. Let’s get our hands dirty!
Why Grow Carrots in Bags?
Before we dive into the how-to, let’s quickly touch on why bag gardening is a brilliant idea for carrots:
* Space-Saving: Perfect for balconies, patios, or small gardens. You don’t need a huge plot of land to enjoy homegrown carrots.
* Control Over Soil: You get to choose the perfect soil mix, ensuring optimal drainage and nutrient content for your carrots.
* Mobility: Bags are easy to move around, allowing you to chase the sun or protect your carrots from harsh weather.
* Less Weeding: Bags tend to have fewer weeds compared to traditional garden beds.
* Fun and Accessible: It’s a great project for beginners and kids, making gardening accessible to everyone.
What You’ll Need
Alright, let’s gather our supplies. Here’s what you’ll need to get started:
* Grow Bags: Choose fabric grow bags (at least 12 inches deep, preferably 18-24 inches for longer carrot varieties) or sturdy plastic bags with drainage holes. I personally prefer fabric bags because they allow for better aeration and drainage.
* Carrot Seeds: Select a carrot variety that suits your taste and growing conditions. Shorter, rounder varieties like ‘Parisian’ or ‘Thumbelina’ are ideal for bag gardening, but you can also grow longer varieties if you have deep enough bags.
* Potting Mix: This is crucial! Use a well-draining potting mix specifically formulated for vegetables. Avoid using garden soil, as it can be too heavy and compact. I like to mix equal parts of compost, peat moss (or coco coir), and perlite.
* Slow-Release Fertilizer: A balanced slow-release fertilizer will provide your carrots with the nutrients they need throughout the growing season. Look for one with a higher phosphorus content to encourage root development.
* Watering Can or Hose: For regular watering.
* Trowel or Small Shovel: For filling the bags with soil and planting seeds.
* Optional: Horticultural sand to mix into the soil for even better drainage, and mulch to help retain moisture.
Step-by-Step Guide to Growing Carrots in Bags
Okay, let’s get down to the nitty-gritty. Here’s a detailed step-by-step guide to growing carrots in bags:
1. Prepare Your Grow Bags
* Choose Your Location: Select a sunny spot that receives at least 6-8 hours of direct sunlight per day. Carrots thrive in full sun.
* Set Up the Bags: Place your grow bags in the chosen location before filling them with soil. Once they’re full, they’ll be heavy and difficult to move.
* Ensure Drainage: If you’re using plastic bags, make sure to create plenty of drainage holes in the bottom. Fabric bags naturally provide good drainage.
2. Prepare the Soil Mix
* Mix the Ingredients: In a large container or wheelbarrow, thoroughly mix your potting mix, compost, peat moss (or coco coir), perlite, and slow-release fertilizer. I usually use a ratio of 1:1:1 for potting mix, compost, and peat moss/coco coir, and then add perlite until the mixture feels light and airy.
* Moisten the Soil: Lightly moisten the soil mix with water. It should be damp but not soggy.
3. Fill the Grow Bags
* Fill ‘Er Up: Carefully fill the grow bags with the prepared soil mix, leaving about 2-3 inches of space at the top.
* Settle the Soil: Gently pat down the soil to remove any air pockets.
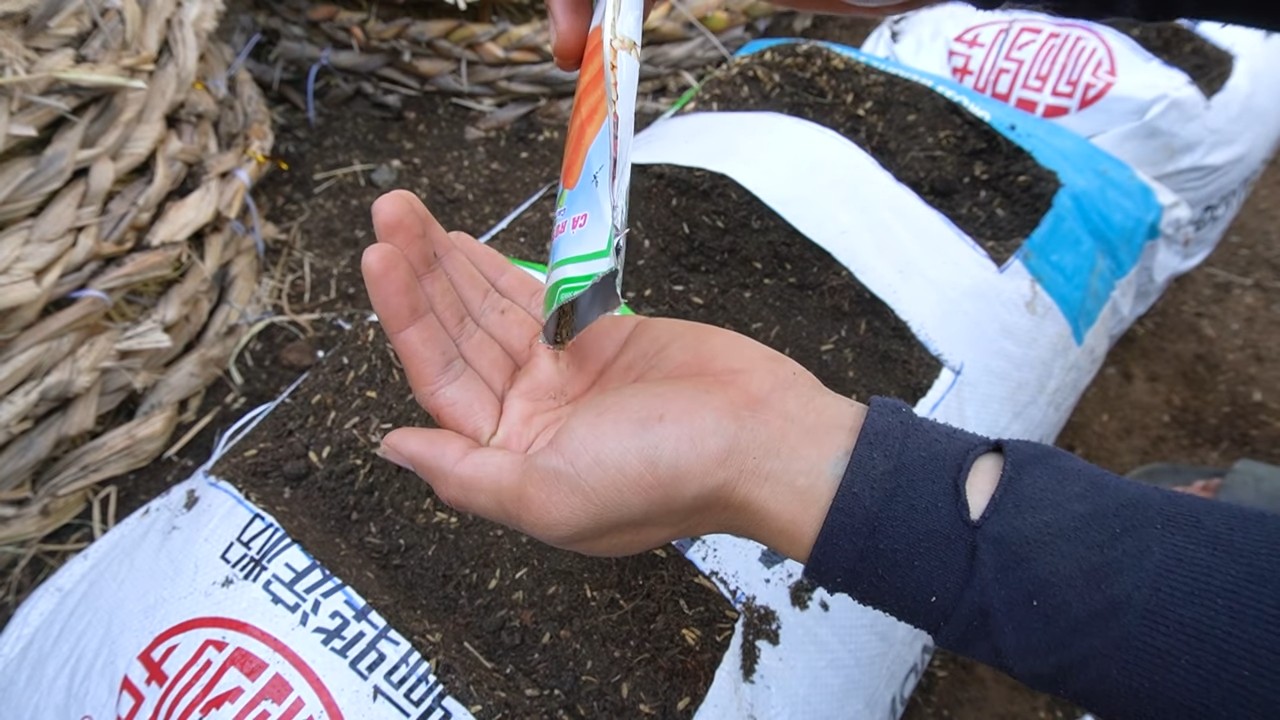
4. Sow the Carrot Seeds
* Sow Sparsely: Carrot seeds are tiny, so it’s easy to sow them too thickly. Sprinkle the seeds thinly over the surface of the soil. Aim for about 1/2 inch spacing between seeds.
* Cover Lightly: Cover the seeds with a very thin layer of soil (about 1/4 inch). You can also use a fine layer of vermiculite.
* Water Gently: Gently water the soil using a watering can with a rose attachment or a hose with a gentle spray nozzle. Be careful not to dislodge the seeds.
5. Germination and Early Care
* Keep the Soil Moist: Keep the soil consistently moist but not waterlogged. Water regularly, especially during dry spells.
* Germination Time: Carrot seeds can take anywhere from 7 to 21 days to germinate, depending on the temperature and moisture levels. Be patient!
* Thinning: Once the seedlings emerge and have a few true leaves, it’s time to thin them. This is crucial for allowing the carrots to develop properly. Thin the seedlings to about 1-2 inches apart. You can use small scissors to snip off the unwanted seedlings at the soil level. Don’t try to pull them out, as this can disturb the roots of the remaining seedlings.
6. Ongoing Care
* Watering: Water regularly, especially during hot, dry weather. Carrots need consistent moisture to develop properly. Check the soil moisture regularly by sticking your finger into the soil. If the top inch feels dry, it’s time to water.
* Fertilizing: Carrots are heavy feeders, so they benefit from regular fertilization. You can use a liquid fertilizer diluted to half strength every 2-3 weeks. Look for a fertilizer that is high in potassium, which promotes root growth.
* Weeding: Keep the grow bags free of weeds. Weeds compete with carrots for nutrients and water.
* Sunlight: Ensure your carrots continue to receive at least 6-8 hours of direct sunlight per day.
* Mulching (Optional): Add a layer of mulch around the base of the plants to help retain moisture, suppress weeds, and regulate soil temperature. Straw, shredded leaves, or wood chips work well.
7. Pest and Disease Control
* Carrot Rust Flies: These pests can be a problem for carrots. Cover your grow bags with insect netting to prevent them from laying their eggs.
* Nematodes: These microscopic worms can damage carrot roots. Use a soil amendment containing beneficial nematodes to help control them.
* Leaf Spot Diseases: These diseases can cause spots on the leaves. Ensure good air circulation around the plants and avoid overhead watering. If you notice any signs of disease, remove the affected leaves.
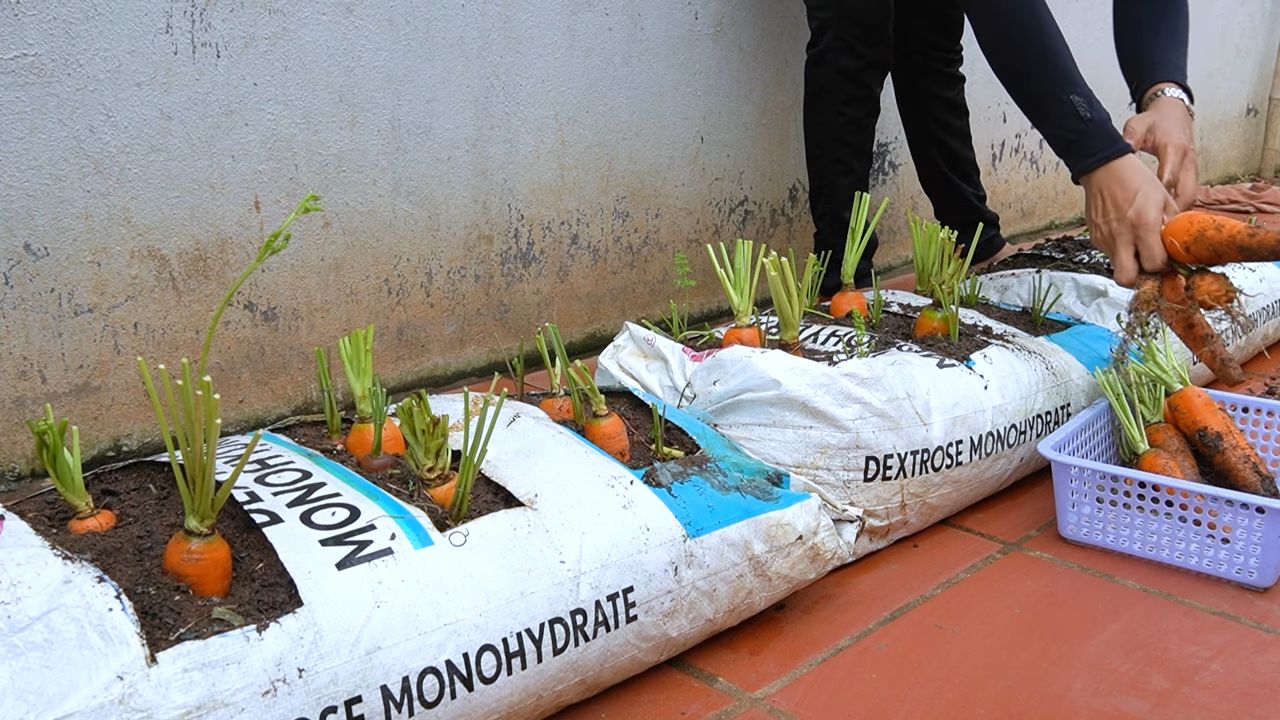
8. Harvesting
* Harvest Time: Carrots are typically ready to harvest 60-80 days after planting, depending on the variety.
* Check for Size: Gently brush away the soil around the top of the carrots to check their size.
* Harvest Carefully: To harvest, gently loosen the soil around the carrots with a trowel or fork. Then, grasp the tops of the carrots firmly and pull them straight up.
* Enjoy Your Harvest: Wash the carrots thoroughly and enjoy them fresh from the garden!
Troubleshooting Tips
* Carrots are small and stunted: This could be due to poor soil, lack of nutrients, or overcrowding. Make sure you’re using a well-draining potting mix, fertilizing regularly, and thinning the seedlings properly.
* Carrots are forked or misshapen: This is often caused by rocks or other obstacles in the soil. Remove any rocks or debris from the soil before planting.
* Carrots are bitter: This can be caused by inconsistent watering or hot weather. Water regularly and provide shade during the hottest part of the day.
* Carrot tops are wilting: This could be due to lack of water or pests. Check the soil moisture and look for signs of pests.
Choosing the Right Carrot Variety for Bag Gardening
As I mentioned earlier, some carrot varieties are better suited for bag gardening than others. Here are a few of my favorites:
* ‘Parisian’: These are small, round carrots that are perfect for shallow containers.
* ‘Thumbelina’: Another round variety that’s ideal for bag gardening.
* ‘Little Finger’: These are short, slender carrots that mature quickly.
* ‘Nantes’: A classic carrot variety that grows well in bags if you have enough depth.
* ‘Danvers’: Another popular variety that can be grown in bags, but requires a deeper bag.
Final Thoughts
Growing carrots in bags is
Conclusion
So, there you have it! Growing carrots in soil bags isn’t just a gardening trend; it’s a game-changer for anyone who dreams of harvesting sweet, crisp carrots regardless of their space constraints or soil quality. We’ve explored the simplicity, the efficiency, and the sheer joy of this method, and hopefully, we’ve convinced you that it’s a must-try for your next gardening adventure.
Why is this DIY trick a must-try? Because it democratizes carrot cultivation! No longer are you limited by rocky, clay-heavy soil or the lack of a sprawling garden plot. Soil bags provide a controlled environment, allowing you to tailor the growing medium to the exact needs of your carrot varieties. This translates to healthier roots, fewer misshapen carrots, and a significantly higher yield compared to traditional in-ground planting in less-than-ideal conditions. Plus, the portability of soil bags means you can chase the sun, protect your precious carrots from unexpected frosts, and even move them indoors if necessary.
But the beauty of this method lies not only in its practicality but also in its adaptability. Feel free to experiment with different carrot varieties. Short, round varieties like ‘Thumbelina’ or ‘Parisian’ are particularly well-suited for soil bags, but don’t let that stop you from trying longer, more slender types. Just ensure your bags are deep enough to accommodate their growth.
Consider adding companion plants to your soil bags. Marigolds can help deter nematodes, while basil can repel aphids. These natural pest control methods will keep your carrots healthy and thriving without the need for harsh chemicals. You can also try interplanting with radishes, which mature quickly and help break up the soil, making it easier for carrot roots to penetrate.
And don’t forget about the soil! While we recommend a well-draining mix of compost, peat moss, and perlite, feel free to adjust the proportions to suit your local climate and the specific needs of your chosen carrot variety. Adding a slow-release fertilizer at planting time will provide your carrots with a steady supply of nutrients throughout the growing season.
We’ve also found that using different colored soil bags can have an impact on soil temperature. Darker bags absorb more heat, which can be beneficial in cooler climates, while lighter bags reflect heat, which can be advantageous in warmer regions. Experiment to see what works best for your specific environment.
Ultimately, the best way to discover the magic of growing carrots in soil bags is to try it yourself. So, grab some soil bags, your favorite carrot seeds, and get ready to experience the satisfaction of harvesting your own homegrown carrots. We are confident that you will be amazed by the results.
We wholeheartedly encourage you to embark on this gardening journey. Once you’ve experienced the joy of pulling perfectly formed, vibrant carrots from your soil bags, we want to hear all about it! Share your experiences, your tips, and your photos with us. Let’s create a community of soil bag carrot enthusiasts and learn from each other’s successes and challenges. Tag us on social media and use the hashtag #SoilBagCarrots so we can see your amazing creations. Happy gardening!
FAQ
What kind of soil should I use for growing carrots in soil bags?
The ideal soil mix for growing carrots in soil bags is a well-draining blend that is loose and free of rocks and clumps. Carrots need to be able to easily push through the soil to develop properly. A good starting point is a mix of equal parts compost, peat moss (or coco coir as a sustainable alternative), and perlite. The compost provides nutrients, the peat moss/coco coir retains moisture, and the perlite ensures good drainage. You can also add a slow-release fertilizer to the mix to provide a steady supply of nutrients throughout the growing season. Avoid using heavy clay soil, as it can hinder root development and lead to misshapen carrots.
How deep should my soil bags be for growing carrots?
The depth of your soil bags will depend on the variety of carrots you plan to grow. For shorter, round varieties like ‘Thumbelina’ or ‘Parisian,’ a bag that is at least 12 inches deep should suffice. However, for longer, more slender varieties like ‘Nantes’ or ‘Imperator,’ you’ll need a bag that is at least 18-24 inches deep to allow the roots to develop fully. Insufficient depth can result in stunted or misshapen carrots.
How often should I water my carrots grown in soil bags?
Watering frequency will depend on the climate, the type of soil mix you’re using, and the size of your soil bags. Generally, you should aim to keep the soil consistently moist but not waterlogged. Check the soil moisture level regularly by sticking your finger about an inch into the soil. If it feels dry, it’s time to water. Water deeply and thoroughly, ensuring that the entire soil bag is moistened. Avoid frequent, shallow watering, as this can encourage shallow root growth. During hot, dry weather, you may need to water daily, while during cooler, wetter periods, you may only need to water every few days.
What are some common pests and diseases that affect carrots grown in soil bags, and how can I prevent them?
Common pests that can affect carrots include carrot rust flies, aphids, and nematodes. Diseases include leaf blight and root rot. To prevent these problems, start with healthy, disease-free seeds. Practice crop rotation to avoid building up pests and diseases in the soil. Companion planting with marigolds can help deter nematodes, while basil can repel aphids. Use row covers to protect your carrots from carrot rust flies. Ensure good drainage to prevent root rot. If you notice any signs of pests or diseases, take action promptly by using organic pest control methods or removing affected plants.
Can I reuse soil bags for growing carrots?
Yes, you can reuse soil bags for growing carrots, but it’s important to take some precautions. Before reusing a soil bag, remove any remaining plant debris and amend the soil with fresh compost and fertilizer to replenish nutrients. If you suspect that the soil may be contaminated with pests or diseases, sterilize it by baking it in the oven at 180掳F (82掳C) for 30 minutes or solarizing it by covering it with clear plastic in the sun for several weeks. Alternatively, you can simply replace the soil with fresh potting mix.
How many carrot seeds should I plant in each soil bag?
The number of carrot seeds you plant in each soil bag will depend on the size of the bag and the desired spacing between plants. A good rule of thumb is to sow seeds about 1/2 inch apart and then thin them to 2-3 inches apart once the seedlings emerge. Overcrowding can lead to stunted growth and smaller carrots. If you’re using a large soil bag, you can plant multiple rows of carrots, leaving about 6-8 inches between rows.
When is the best time to harvest carrots grown in soil bags?
The best time to harvest carrots will depend on the variety and your personal preference. Generally, carrots are ready to harvest when they reach the size specified on the seed packet. You can also gently brush away some of the soil around the base of the plant to check the size of the root. Carrots tend to get sweeter after a light frost, so if you live in a region with cold winters, you can leave them in the ground a little longer. To harvest, simply grasp the base of the carrot and gently pull it out of the soil. If the soil is dry, you may need to water it beforehand to make it easier to pull the carrots.
Leave a Comment