

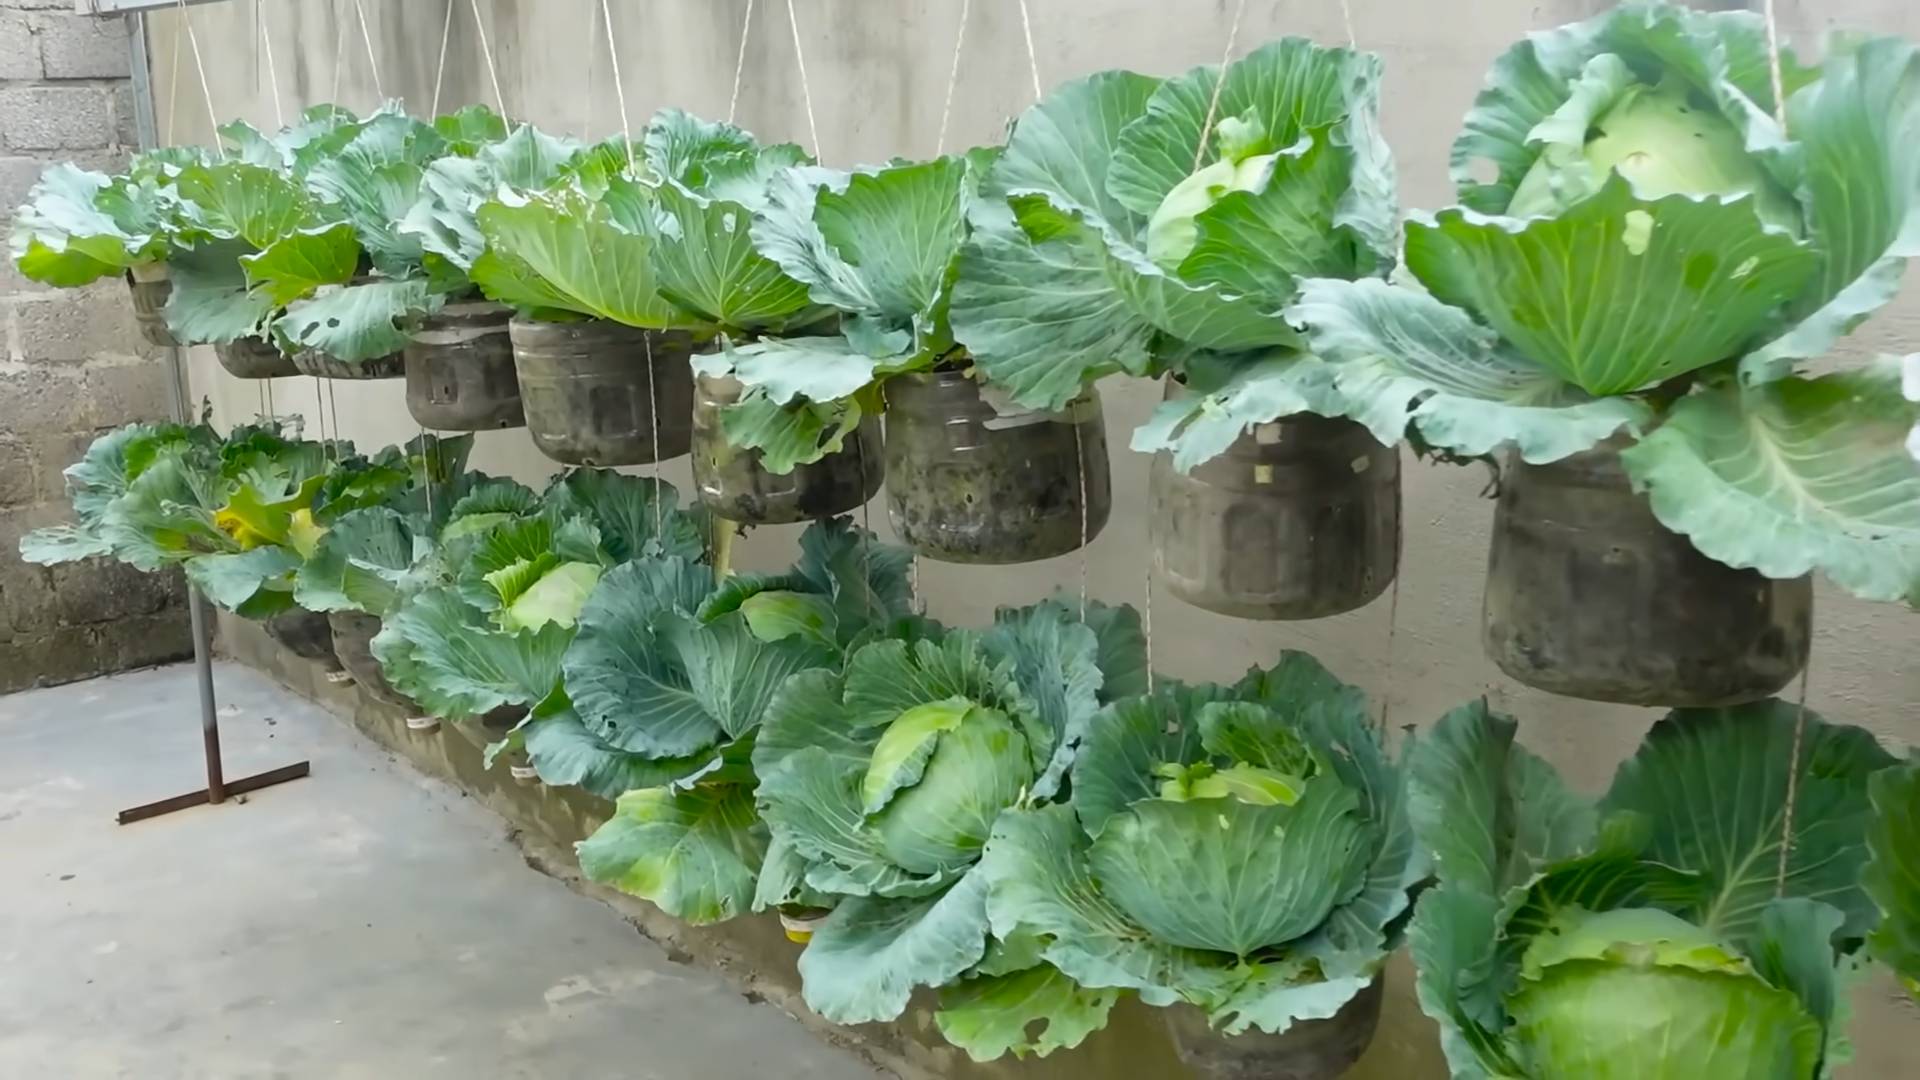
Growing Cabbage in Bottles might sound like something out of a science fiction novel, but trust me, it’s a surprisingly effective and space-saving gardening trick that I’m excited to share with you! Are you dreaming of fresh, homegrown cabbage but limited by a tiny balcony, a postage-stamp-sized yard, or even just a lack of traditional garden space? Well, get ready to ditch the limitations and embrace a revolutionary approach to cultivating this leafy green.
The concept of container gardening, of which this bottle method is a unique twist, has roots stretching back centuries. From the hanging gardens of Babylon to the humble window boxes of Victorian England, people have always found creative ways to bring nature into their lives, regardless of their spatial constraints. But this particular method takes resourcefulness to a whole new level, repurposing everyday plastic bottles into mini-cabbage patches.
Why should you try growing cabbage in bottles? Because it’s a game-changer for urban gardeners, apartment dwellers, and anyone looking to maximize their yield in a small area. It’s also a fantastic way to recycle and reduce plastic waste. Plus, let’s be honest, there’s something incredibly satisfying about nurturing a thriving cabbage plant from a discarded bottle. I’m going to walk you through the entire process, step-by-step, so you can enjoy fresh, delicious cabbage, no matter where you live!
Growing Cabbage in Bottles: A Fun and Space-Saving DIY Project
Hey there, fellow gardening enthusiasts! Are you short on space but still dreaming of fresh, homegrown cabbage? Well, I’ve got a fantastic solution for you: growing cabbage in bottles! It’s a surprisingly effective and visually appealing way to cultivate these leafy greens, even if you only have a balcony or a small patio. I’ve tried this myself, and I’m excited to share my experience and guide you through the process.
Why Grow Cabbage in Bottles?
Before we dive in, let’s talk about why this method is so cool:
* Space-Saving: Bottles take up minimal space compared to traditional garden beds. Perfect for urban gardeners!
* Upcycling: You’re giving plastic bottles a new life, reducing waste and being eco-friendly.
* Easy to Manage: Watering and fertilizing are a breeze.
* Pest Control: Elevated bottles can help deter some ground-dwelling pests.
* Unique Aesthetic: A wall of cabbage-filled bottles is a conversation starter and adds a touch of green to any space.
What You’ll Need
Here’s a list of everything you’ll need to get started:
* Plastic Bottles: Choose sturdy plastic bottles, ideally 2-liter or larger. Clear or slightly opaque bottles work best. I prefer using bottles that have a relatively smooth surface for easier cleaning and handling.
* Cabbage Seeds or Seedlings: Select your favorite cabbage variety. I’ve had success with early varieties like ‘Golden Acre’ and ‘Early Jersey Wakefield’ as they mature relatively quickly.
* Potting Mix: Use a high-quality potting mix that drains well. Avoid garden soil, as it can become compacted in containers. I like to add some compost to my potting mix for extra nutrients.
* Drill or Utility Knife: For creating drainage holes and mounting points. Be careful when using sharp tools!
* Hanging System: This could be rope, wire, chain, or even sturdy zip ties. The choice depends on how you want to hang your bottles. I’ve used everything from repurposed clothesline to decorative macrame hangers.
* Watering Can or Hose: For watering your cabbage plants.
* Fertilizer: A balanced liquid fertilizer or slow-release fertilizer.
* Gloves: To protect your hands.
* Measuring Tape or Ruler: To ensure consistent spacing.
* Optional: Landscape fabric or burlap to line the bottles (helps retain moisture).
Step-by-Step Guide: Planting Your Cabbage in Bottles
Okay, let’s get our hands dirty! Here’s how to transform those plastic bottles into mini cabbage gardens:
1. Prepare the Bottles:
* Thoroughly clean the plastic bottles with soap and water. Remove any labels or residue.
* Drill or cut drainage holes in the bottom of each bottle. I usually make about 4-5 holes, each about ¼ inch in diameter. This is crucial to prevent waterlogging, which can lead to root rot.
* If you’re using landscape fabric or burlap, cut pieces to fit inside the bottles and line them. This will help retain moisture and prevent soil from washing out.
2. Create Mounting Points:
* Decide how you want to hang your bottles. There are several options:
* Horizontal Hanging: Drill two holes on opposite sides of the bottle, near the top. This allows you to thread rope or wire through the holes and hang the bottle horizontally.
* Vertical Hanging: Drill holes near the top of the bottle to attach a hanging system. You can use a single hole for a simple hanging loop or multiple holes for a more secure attachment.
* Make sure the holes are large enough to accommodate your chosen hanging material.
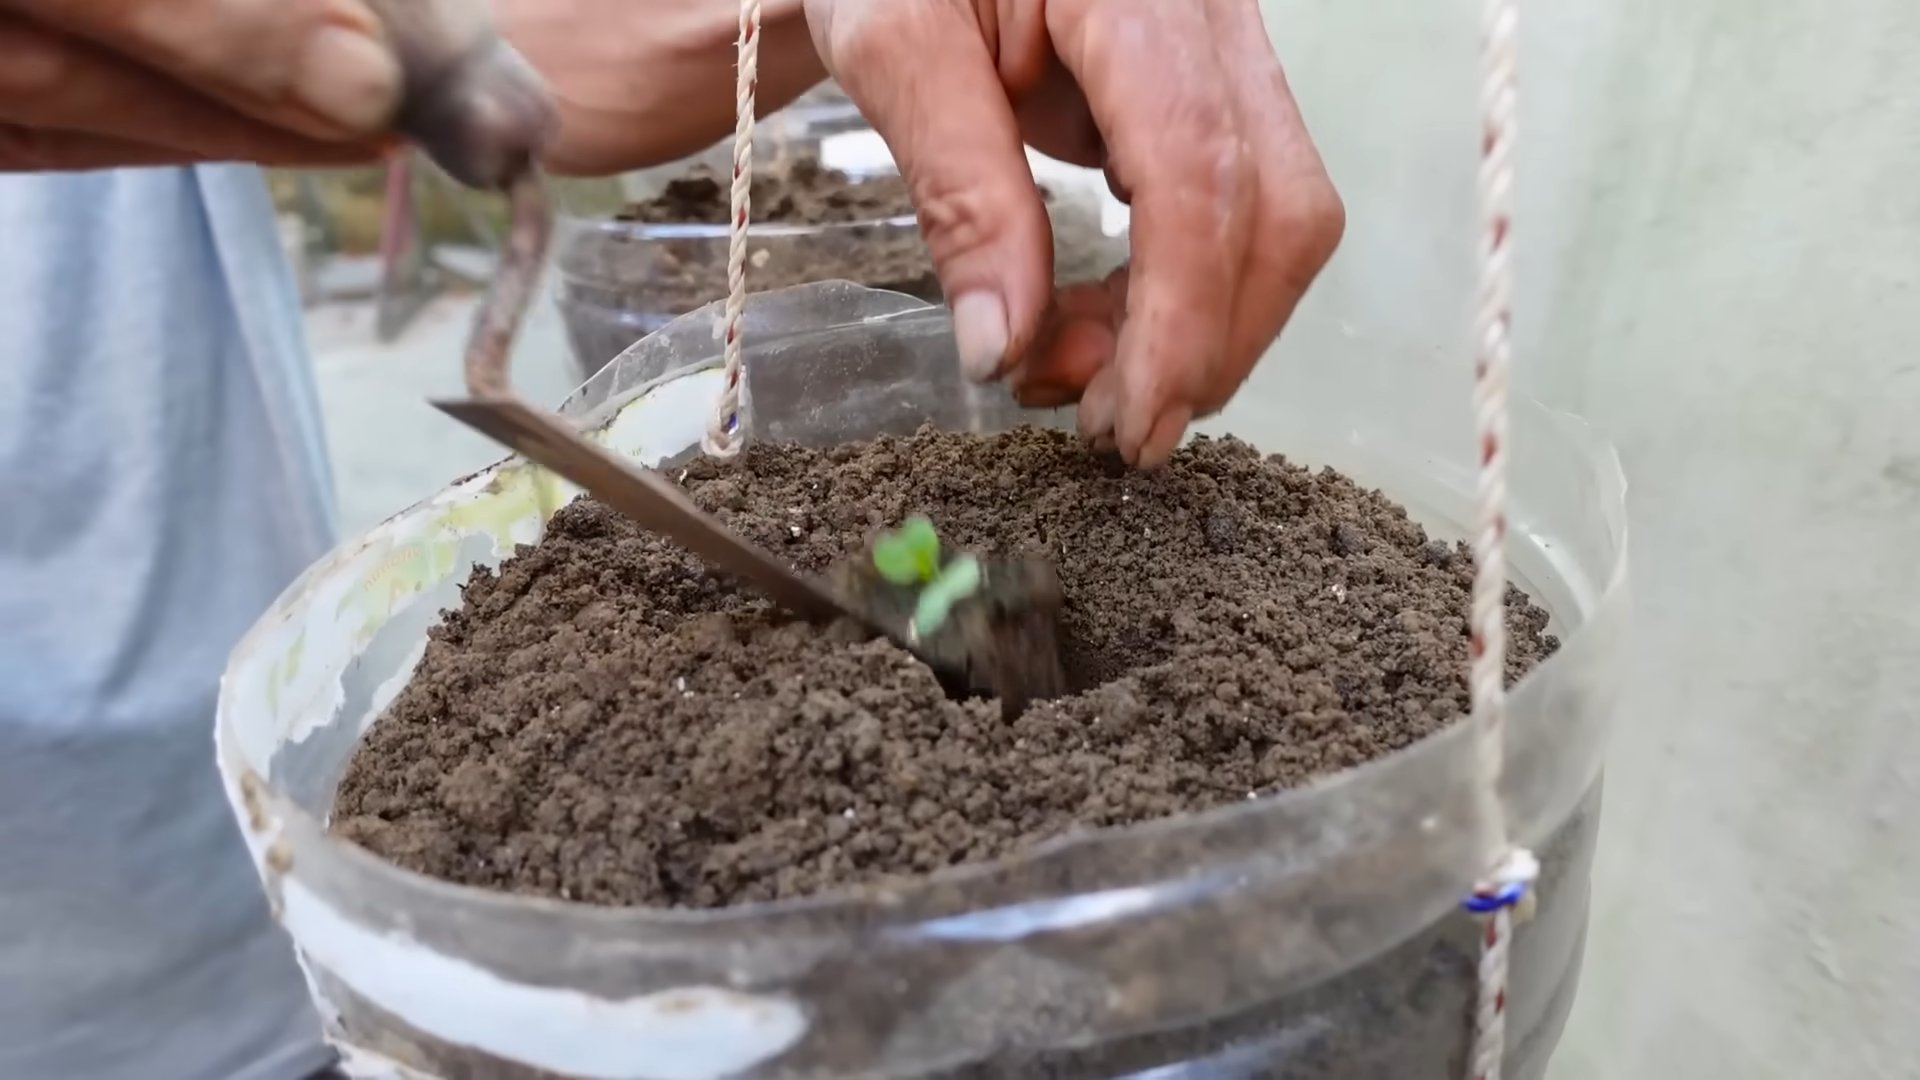
3. Fill the Bottles with Potting Mix:
* Slowly fill each bottle with potting mix, leaving about an inch or two of space at the top.
* Gently tap the bottle to settle the soil and remove any air pockets.
* Water the potting mix thoroughly until water drains out of the drainage holes. This will help compact the soil and prepare it for planting.
4. Plant Your Cabbage Seeds or Seedlings:
* From Seeds: Sow 2-3 cabbage seeds in the center of each bottle, about ½ inch deep. Cover the seeds with potting mix and gently water. Keep the soil consistently moist until the seeds germinate. Once the seedlings emerge, thin them to one strong plant per bottle.
* From Seedlings: Carefully remove the cabbage seedlings from their containers. Gently loosen the roots and plant one seedling in the center of each bottle. Make sure the top of the root ball is level with the surrounding soil. Water thoroughly after planting.
5. Hang Your Cabbage Bottles:
* Attach your chosen hanging system (rope, wire, chain, etc.) to the mounting points on the bottles.
* Hang the bottles in a location that receives at least 6 hours of sunlight per day. Cabbage needs plenty of sunlight to thrive.
* Ensure the hanging system is strong enough to support the weight of the bottles, especially when they are filled with soil and water.
Caring for Your Bottle-Grown Cabbage
Now that your cabbage is planted, here’s how to keep it happy and healthy:
1. Watering:
* Water your cabbage plants regularly, especially during hot and dry weather. Check the soil moisture by sticking your finger into the soil. If the top inch feels dry, it’s time to water.
* Water deeply, allowing the water to drain out of the drainage holes.
* Avoid overwatering, as this can lead to root rot.
2. Fertilizing:
* Feed your cabbage plants with a balanced liquid fertilizer every 2-3 weeks. Follow the instructions on the fertilizer label.
* Alternatively, you can use a slow-release fertilizer at planting time.
* Cabbage is a heavy feeder, so regular fertilization is essential for healthy growth.
3. Pest Control:
* Monitor your cabbage plants regularly for pests such as cabbage worms, aphids, and slugs.
* Handpick any pests you find.
* Use organic pest control methods such as insecticidal soap or neem oil if necessary.
* Consider using row covers to protect your plants from pests.
4. Sunlight:
* Ensure your cabbage plants receive at least 6 hours of sunlight per day.
* If you live in a hot climate, provide some afternoon shade to prevent the plants from overheating.
5. Rotation:
* Rotate the bottles periodically to ensure even sunlight exposure. This will help the cabbage heads develop evenly.
Harvesting Your Cabbage
The moment you’ve been waiting for! Here’s how to harvest your homegrown cabbage:
1. Timing:
* Cabbage is typically ready to harvest when the heads are firm and compact.
* The exact time to harvest will depend on the variety of cabbage you’re growing and the growing conditions.
* Check the seed packet or plant tag for information on the expected maturity date.
2. Harvesting:
* Use a sharp knife to cut the cabbage head from the stem.
* Leave a few outer leaves on the stem, as these can sometimes produce smaller side shoots.
3. Storage:
* Store harvested cabbage in the refrigerator for up to 2 weeks.
* Wrap the cabbage head in plastic wrap or place it in a plastic bag to prevent it from drying out.
Troubleshooting
Even with the best care, you might encounter some challenges. Here are a few common problems and how to address them:
* Yellowing Leaves: This could be a sign of overwatering, underwatering, or nutrient deficiency. Check the soil moisture and adjust your watering schedule accordingly. Fertilize your plants with a balanced fertilizer.
* Stunted Growth: This could be due to insufficient sunlight, poor soil, or pest infestation. Ensure your plants are getting enough sunlight and fertilize them regularly. Check for pests and take appropriate action.
* Root Rot: This is caused by overwatering and poor drainage. Ensure your bottles have adequate drainage holes and avoid overwatering.
* Pest Infestation: Monitor your plants regularly for pests and take action as soon as you notice any problems.
Tips and Tricks for Success
Here are a few extra tips to help you succeed with growing cabbage in bottles:
* Choose the Right Variety: Select cabbage varieties that are well-suited to container gardening and your local climate.
* Use High-Quality Potting Mix: Avoid using garden soil, as it can become compacted in containers.
* Provide Adequate Drainage: Ensure your bottles have plenty of drainage holes to prevent water
Conclusion
So, there you have it! Growing cabbage in bottles might sound unconventional, but it’s a game-changer for urban gardeners, those with limited space, or anyone looking for a fun and rewarding gardening project. This method offers a surprising number of benefits, from protecting your young cabbage plants from pests and diseases to maximizing your yield in a small area. It’s a fantastic way to enjoy fresh, homegrown cabbage even if you don’t have a sprawling garden.
This DIY trick isn’t just about saving space; it’s about creating a controlled environment for your cabbage. The bottle acts as a mini-greenhouse, warming the soil and protecting the delicate seedlings from harsh weather conditions. Plus, it makes watering and fertilizing a breeze, ensuring your cabbage receives the precise amount of nutrients it needs to thrive.
But don’t just take our word for it! We encourage you to give this method a try. Experiment with different bottle sizes and types of cabbage. You could even try growing other leafy greens like lettuce or spinach in bottles using the same technique. Consider using clear plastic bottles for maximum sunlight exposure, or try painting the bottles white to reflect excess heat in hotter climates. For added drainage, you can add a layer of gravel at the bottom of the bottle before adding your soil.
Remember to monitor your cabbage plants regularly for any signs of pests or diseases. While the bottle offers some protection, it’s still important to be vigilant. If you notice any problems, address them promptly to prevent them from spreading.
The beauty of this DIY project is its adaptability. You can tailor it to your specific needs and preferences. Whether you’re a seasoned gardener or a complete beginner, growing cabbage in bottles is a fun and accessible way to get your hands dirty and enjoy the fruits (or vegetables!) of your labor.
We’re confident that you’ll be amazed by the results. Imagine harvesting fresh, crisp cabbage from your own bottle garden! It’s a truly rewarding experience.
So, grab some bottles, some soil, and some cabbage seeds, and get ready to embark on a unique gardening adventure. Don’t forget to document your progress and share your experiences with us! We’d love to see your bottle gardens and hear about your successes (and challenges). Share your photos and tips in the comments below, or tag us on social media. Let’s inspire others to embrace this innovative and sustainable way of growing cabbage. Let’s all become experts in growing cabbage in bottles!
FAQ
What kind of bottles are best for growing cabbage?
The best bottles for growing cabbage are clear plastic bottles, such as those used for water or soda. Clear bottles allow maximum sunlight to reach the plant, which is essential for photosynthesis. However, in hotter climates, you might consider using white or opaque bottles to reflect some of the heat and prevent the soil from overheating. The size of the bottle will depend on the variety of cabbage you’re growing. Smaller varieties can thrive in smaller bottles, while larger varieties will need more space. A good starting point is a 2-liter bottle, but larger bottles are preferable for larger cabbage types. Ensure the bottles are clean and free of any residue before planting.
How do I prepare the bottles for planting?
Preparing the bottles is a crucial step for successful cabbage growing. First, thoroughly clean the bottles with soap and water to remove any dirt or residue. Rinse them well to ensure no soap remains. Next, cut off the top of the bottle, leaving enough of the bottle intact to provide support for the plant. You can cut the bottle at the shoulder or slightly lower, depending on your preference. Be careful when cutting the plastic, as it can be sharp. After cutting, drill or poke several drainage holes in the bottom of the bottle to allow excess water to escape. This is essential to prevent root rot. Finally, consider adding a layer of gravel or small stones to the bottom of the bottle to further improve drainage.
What type of soil should I use?
The ideal soil for growing cabbage in bottles is a well-draining, nutrient-rich potting mix. Avoid using garden soil, as it can be too heavy and compact, hindering root growth. A good potting mix will provide the necessary nutrients and aeration for healthy cabbage plants. You can also amend the potting mix with compost or other organic matter to further improve its fertility. A slightly acidic to neutral pH is best for cabbage. You can test the pH of your soil using a soil testing kit and adjust it accordingly if needed.
How often should I water the cabbage plants in bottles?
Watering frequency will depend on the climate, the type of soil, and the size of the bottle. Generally, you should water the cabbage plants when the top inch of soil feels dry to the touch. Avoid overwatering, as this can lead to root rot. Water deeply, ensuring that the water reaches the roots. Check the drainage holes to make sure excess water is draining properly. In hotter weather, you may need to water more frequently. In cooler weather, you can water less often. Monitor the plants closely and adjust your watering schedule accordingly.
How do I fertilize the cabbage plants?
Cabbage plants are heavy feeders and require regular fertilization to thrive. You can use a balanced liquid fertilizer or a slow-release granular fertilizer. Follow the instructions on the fertilizer package for application rates. Fertilize the plants every 2-3 weeks during the growing season. You can also supplement with compost tea or other organic fertilizers. Avoid over-fertilizing, as this can burn the roots. Monitor the plants for signs of nutrient deficiencies, such as yellowing leaves, and adjust your fertilization schedule accordingly.
How do I protect the cabbage plants from pests and diseases?
While growing cabbage in bottles offers some protection from pests and diseases, it’s still important to be vigilant. Common cabbage pests include cabbage worms, aphids, and flea beetles. You can control these pests with organic insecticides, such as neem oil or insecticidal soap. Regularly inspect the plants for signs of infestation and treat them promptly. Diseases such as black rot and clubroot can also affect cabbage plants. To prevent these diseases, use disease-resistant varieties, practice crop rotation, and avoid overwatering. Ensure good air circulation around the plants to reduce humidity.
When is the best time to harvest the cabbage?
The best time to harvest cabbage is when the head is firm and compact. The size of the head will vary depending on the variety of cabbage you’re growing. Check the seed packet or plant tag for information on the expected size and maturity time. To harvest, cut the cabbage head from the stem with a sharp knife. Leave a few outer leaves on the stem to protect the remaining plant. You can store harvested cabbage in the refrigerator for several weeks.
Can I reuse the bottles for growing other plants?
Yes, you can definitely reuse the bottles for growing other plants. After harvesting the cabbage, clean the bottles thoroughly with soap and water. You can then use them to grow other vegetables, herbs, or flowers. The bottles are particularly well-suited for growing leafy greens, such as lettuce and spinach, as well as herbs like basil and parsley. Just make sure to choose plants that are appropriate for the size of the bottle and provide them with the necessary nutrients and care. Reusing the bottles is a great way to reduce waste and promote sustainable gardening practices.

Leave a Comment