

Growing Bitter Gourd might seem intimidating, but trust me, with a few clever tricks and a little DIY spirit, you can harvest your own bounty of this nutritious and unique vegetable right in your backyard! Forget those bland, store-bought gourds – imagine the satisfaction of serving up a dish made with something you nurtured from seed to table.
Bitter gourd, also known as bitter melon or karela, has a rich history, deeply rooted in Asian and African cultures. For centuries, it’s been prized not only for its distinctive flavor but also for its impressive health benefits. From traditional medicine to culinary delights, this vegetable has earned its place as a staple ingredient.
But why should *you* bother with the effort of growing your own? Well, for starters, homegrown produce simply tastes better! Plus, you have complete control over what goes into your garden, ensuring you’re enjoying fresh, organic goodness. And let’s be honest, who doesn’t love a good DIY project? This article is packed with easy-to-follow tips and tricks that will empower you to successfully growing bitter gourd, even if you’re a complete beginner. We’ll cover everything from seed starting to pest control, so you can enjoy a thriving and productive bitter gourd patch. Get ready to roll up your sleeves and discover the joy of homegrown goodness!
Growing Bitter Gourd: A DIY Guide for a Bountiful Harvest
Hey there, fellow gardening enthusiasts! Are you ready to tackle a slightly challenging, but incredibly rewarding, vegetable? I’m talking about bitter gourd, also known as bitter melon or karela. Don’t let the name scare you; with a little patience and this guide, you’ll be harvesting your own bitter gourds in no time. I’ve grown these successfully for years, and I’m excited to share my secrets with you.
Choosing Your Variety and Starting Seeds
Before we get our hands dirty, let’s talk about choosing the right bitter gourd variety and getting those seeds started.
* Variety Selection: There are several varieties of bitter gourd, each with slightly different shapes, sizes, and levels of bitterness. Some popular choices include:
* Long Green: A common variety with long, slender, light green fruits.
* Short White: A smaller variety with white or pale green fruits.
* Chinese Bitter Melon: Often less bitter than other varieties.
* Indian Bitter Gourd: Known for its intense bitterness and spiky appearance.
I personally prefer the Long Green variety because it’s readily available and produces a good yield. But feel free to experiment and find what works best for your taste!
* Seed Starting vs. Direct Sowing: Bitter gourd thrives in warm weather, so starting seeds indoors is generally recommended, especially if you have a shorter growing season. Direct sowing is possible in warmer climates, but you’ll need to wait until the soil is consistently warm.
* Seed Preparation: To improve germination rates, I like to scarify the seeds slightly. This involves gently nicking the seed coat with a knife or sandpaper. Be careful not to damage the inner seed! Soaking the seeds in warm water for 24 hours before planting also helps.
Now, let’s get to the step-by-step instructions:
1. Prepare Your Seed Starting Trays or Pots: Fill your trays or pots with a well-draining seed starting mix. I usually use a mix of peat moss, vermiculite, and perlite.
2. Sow the Seeds: Plant the scarified and soaked seeds about 1/2 inch deep in the soil.
3. Water Gently: Water the soil gently to avoid disturbing the seeds.
4. Provide Warmth: Bitter gourd seeds need warmth to germinate. Aim for a soil temperature of around 75-85°F (24-29°C). You can use a heat mat to help maintain the temperature.
5. Maintain Moisture: Keep the soil consistently moist, but not waterlogged.
6. Provide Light: Once the seedlings emerge (usually within 7-14 days), provide them with plenty of light. A sunny windowsill or grow lights will work well.
7. Harden Off Seedlings: Before transplanting your seedlings outdoors, you’ll need to harden them off. This involves gradually exposing them to outdoor conditions over a period of 7-10 days. Start by placing them in a sheltered spot for a few hours each day, gradually increasing the amount of time they spend outdoors.
Preparing the Garden Bed and Transplanting
Now that your seedlings are thriving, it’s time to prepare the garden bed and get them ready for their permanent home.
* Choosing the Right Location: Bitter gourd needs plenty of sunlight (at least 6-8 hours per day) and well-draining soil. Choose a location that meets these requirements.
* Soil Preparation: Amend the soil with plenty of organic matter, such as compost or well-rotted manure. This will improve drainage, fertility, and water retention. Bitter gourd prefers a slightly acidic to neutral soil pH (6.0-7.0).
* Building a Trellis: Bitter gourd is a climbing vine, so it needs a trellis or other support structure to grow on. You can use a sturdy trellis, fence, or even a pergola. I’ve found that a trellis made of sturdy wire mesh works best. Make sure the trellis is tall enough to accommodate the mature vines, which can grow up to 10-15 feet long.
Let’s move on to the transplanting process:
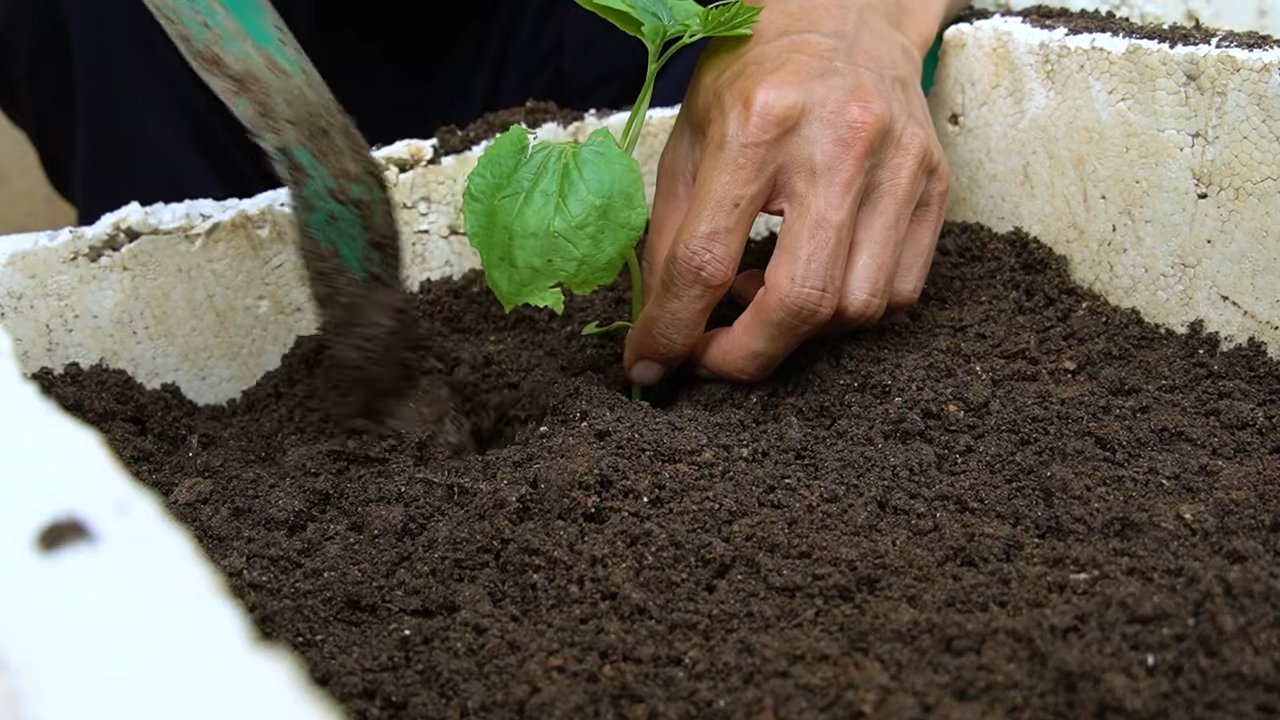
1. Dig Holes: Dig holes that are slightly larger than the root balls of your seedlings. Space the holes about 2-3 feet apart.
2. Gently Remove Seedlings: Carefully remove the seedlings from their trays or pots, being careful not to damage the roots.
3. Transplant Seedlings: Place the seedlings in the holes and gently backfill with soil.
4. Water Thoroughly: Water the seedlings thoroughly after transplanting.
5. Mulch: Apply a layer of mulch around the base of the plants to help retain moisture, suppress weeds, and regulate soil temperature. I like to use straw or wood chips.
6. Train the Vines: As the vines grow, gently train them to climb the trellis. You can use plant ties or twine to secure them to the support structure.
Caring for Your Bitter Gourd Plants
Once your bitter gourd plants are established, it’s important to provide them with the care they need to thrive.
* Watering: Bitter gourd needs consistent moisture, especially during hot, dry weather. Water deeply and regularly, but avoid overwatering, which can lead to root rot. I usually water my plants every 2-3 days, depending on the weather.
* Fertilizing: Feed your bitter gourd plants with a balanced fertilizer every 2-3 weeks. Look for a fertilizer that is high in phosphorus and potassium, which are essential for fruit production. You can also use organic fertilizers, such as compost tea or fish emulsion.
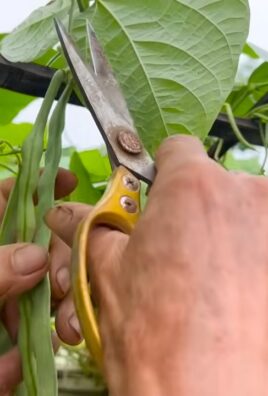
* Pruning: Pruning can help improve air circulation and encourage fruit production. Remove any dead or yellowing leaves, as well as any suckers (shoots that grow from the base of the plant). You can also pinch back the tips of the vines to encourage branching.
* Pest and Disease Control: Bitter gourd can be susceptible to certain pests and diseases, such as aphids, spider mites, and powdery mildew. Inspect your plants regularly for signs of infestation or disease. If you spot any problems, take action immediately. You can use insecticidal soap or neem oil to control pests, and fungicides to control diseases. I prefer to use organic methods whenever possible.
Pollination and Harvesting
Bitter gourd plants produce separate male and female flowers. The female flowers have a small fruit behind them, while the male flowers do not. Pollination is essential for fruit development.
* Pollination: Bitter gourd is typically pollinated by insects, such as bees and butterflies. However, if you’re not seeing much insect activity in your garden, you may need to hand-pollinate the flowers. To hand-pollinate, use a small paintbrush to transfer pollen from the male flowers to the female flowers.
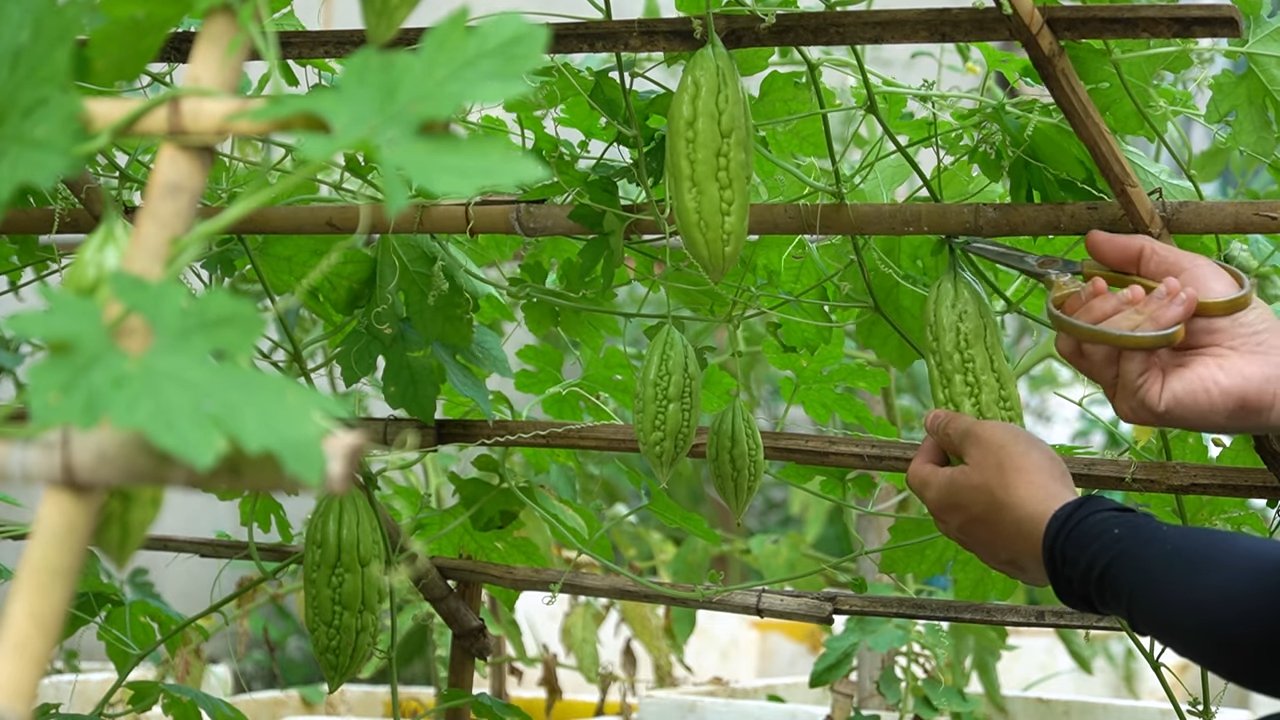
* Harvesting: Bitter gourd fruits are typically harvested when they are still green and slightly immature. The exact timing will depend on the variety and your personal preference. The fruits should be firm and have a slightly glossy appearance. Overripe fruits will turn yellow or orange and become more bitter. Use a sharp knife or pruners to cut the fruits from the vine, leaving a short stem attached.
I usually harvest my bitter gourds when they are about 6-8 inches long. Remember that the smaller the fruit, the less bitter it will be.
Enjoying Your Harvest
Now that you’ve harvested your bitter gourds, it’s time to enjoy the fruits of your labor! Bitter gourd can be used in a variety of dishes, from stir-fries to curries to soups. It’s also a popular ingredient in traditional medicine.
* Reducing Bitterness: If you find the bitterness of bitter gourd too intense, there are a few things you can do to reduce it. Soaking the sliced bitter gourd in salt water for 30 minutes before cooking can help draw out some of the bitterness. You can also blanch the bitter gourd in boiling water for a few minutes.
* Storage: Bitter gourd can be stored in the refrigerator for up to a week. Wrap the fruits in a paper towel and place them in a plastic bag.
Growing bitter gourd can be a challenging but rewarding experience. With a little patience and the right techniques, you can enjoy a bountiful harvest of this unique and nutritious vegetable. Happy gardening!
Conclusion
So, there you have it! Mastering the art of growing bitter gourd doesn’t have to be a daunting task. By implementing these simple yet effective DIY tricks, you can transform your garden into a thriving haven for this nutritious and somewhat misunderstood vegetable. We’ve covered everything from optimizing soil conditions and crafting the perfect support system to battling common pests and diseases with natural solutions. Remember, the key to success lies in consistent care, keen observation, and a willingness to experiment.
Why is this DIY approach a must-try? Because it empowers you to take control of your food source, ensuring that you’re consuming fresh, healthy, and organically grown bitter gourd. Store-bought varieties often lack the vibrant flavor and nutritional value of homegrown produce, and you can never be entirely sure about the pesticides and chemicals used in their cultivation. With our DIY methods, you can rest assured that your bitter gourd is free from harmful substances and bursting with goodness. Plus, there’s an undeniable satisfaction that comes from nurturing a plant from seed to harvest.
But the benefits extend beyond just health and taste. Growing your own bitter gourd is also an incredibly rewarding and educational experience. You’ll learn about plant biology, soil science, and the intricate relationships within your garden ecosystem. It’s a fantastic way to connect with nature, reduce your carbon footprint, and even save money on your grocery bill.
Looking for variations? Consider experimenting with different varieties of bitter gourd. Some are smaller and more compact, making them ideal for container gardening, while others are larger and more prolific. You can also try intercropping bitter gourd with other vegetables, such as beans or corn, to maximize space and create a more diverse and resilient garden. Another exciting variation is to explore different trellising methods. Instead of a traditional trellis, you could use an archway or even a repurposed ladder to create a unique and visually appealing support system for your growing bitter gourd.
Don’t be afraid to get creative and adapt these DIY tricks to suit your specific needs and preferences. The most important thing is to have fun and enjoy the process. We encourage you to embrace the challenge, get your hands dirty, and witness the magic of growing your own food.
Now, it’s your turn! We’re confident that with these tips and a little bit of dedication, you’ll be harvesting a bountiful crop of bitter gourd in no time. We’d love to hear about your experiences. Share your photos, tips, and challenges in the comments section below. Let’s create a community of passionate gardeners who are dedicated to growing their own healthy and delicious food. So go ahead, give these DIY tricks a try, and discover the joy of growing bitter gourd! Let us know how your **growing bitter gourd** journey goes!
Frequently Asked Questions (FAQ)
1. What is the best time of year to plant bitter gourd?
The ideal time to plant bitter gourd is during the late spring or early summer, after the last frost has passed. Bitter gourd thrives in warm weather and requires a long growing season of at least 90-120 days. Soil temperature should be consistently above 65°F (18°C) for optimal germination and growth. If you live in a region with a shorter growing season, you can start seeds indoors 4-6 weeks before the last expected frost and transplant them outdoors once the weather warms up.
2. What kind of soil is best for growing bitter gourd?
Bitter gourd prefers well-drained, fertile soil that is rich in organic matter. A slightly acidic to neutral pH of 6.0 to 7.0 is ideal. Before planting, amend your soil with compost, aged manure, or other organic materials to improve drainage, fertility, and water retention. Avoid heavy clay soils, as they can become waterlogged and inhibit root growth. If you have clay soil, consider growing bitter gourd in raised beds or containers with a well-draining potting mix.
3. How much sunlight does bitter gourd need?
Bitter gourd requires at least 6-8 hours of direct sunlight per day to thrive. Choose a planting location that receives full sun throughout the day. Insufficient sunlight can lead to stunted growth, reduced fruit production, and increased susceptibility to pests and diseases. If you live in a particularly hot climate, providing some afternoon shade can help prevent sunscald on the fruits.
4. How often should I water bitter gourd?
Bitter gourd needs consistent moisture, especially during hot and dry weather. Water deeply and regularly, aiming to keep the soil consistently moist but not waterlogged. Avoid overhead watering, as this can promote fungal diseases. Instead, water at the base of the plant or use a drip irrigation system. Mulching around the plants can help retain moisture and suppress weeds. Check the soil moisture regularly and adjust your watering schedule accordingly.
5. What kind of support system does bitter gourd need?
Bitter gourd is a climbing vine and requires a strong support system to grow properly. A trellis, fence, or arbor are all suitable options. The support system should be at least 6-8 feet tall to accommodate the vigorous growth of the vine. Ensure that the support system is sturdy enough to withstand the weight of the mature vines and fruits. Train the vines to climb the support system by gently guiding them and tying them with soft twine or plant ties.
6. How do I deal with pests and diseases on my bitter gourd plants?
Bitter gourd can be susceptible to various pests and diseases, including aphids, squash bugs, cucumber beetles, powdery mildew, and downy mildew. Regularly inspect your plants for signs of infestation or disease. Use organic pest control methods, such as insecticidal soap, neem oil, or diatomaceous earth, to control pests. For fungal diseases, improve air circulation, avoid overhead watering, and apply a fungicide if necessary. Crop rotation and good sanitation practices can also help prevent pest and disease problems.
7. When is bitter gourd ready to harvest?
Bitter gourd is typically ready to harvest 8-12 weeks after planting. The fruits should be firm, green, and have a slightly waxy coating. The size of the fruit will vary depending on the variety. Harvest the fruits before they turn orange or yellow, as they will become more bitter and less palatable. Use a sharp knife or pruning shears to cut the fruits from the vine, leaving a short stem attached.
8. How do I reduce the bitterness of bitter gourd?
Bitter gourd is known for its distinctive bitter taste, but there are several ways to reduce the bitterness. Soaking the sliced or chopped bitter gourd in salted water for 30 minutes to an hour can help draw out some of the bitterness. You can also blanch the bitter gourd in boiling water for a few minutes before cooking. Another method is to remove the seeds and pith from the center of the fruit, as these are the most bitter parts. Cooking bitter gourd with acidic ingredients, such as vinegar or lemon juice, can also help to balance the bitterness.
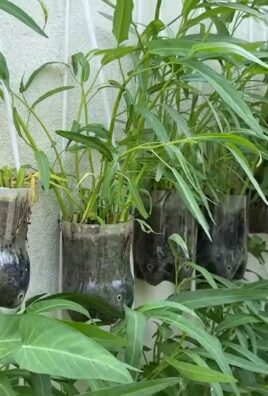
9. Can I grow bitter gourd in containers?
Yes, bitter gourd can be successfully grown in containers, provided that you choose a large enough container (at least 10-15 gallons) and use a well-draining potting mix. Ensure that the container has drainage holes to prevent waterlogging. Provide a sturdy trellis or other support system for the vines to climb. Water and fertilize regularly, as container-grown plants tend to dry out and deplete nutrients more quickly than those grown in the ground. Choose a sunny location for your container-grown bitter gourd.
10. How do I save seeds from my bitter gourd plants?
To save seeds from your bitter gourd plants, allow a few fruits to mature fully on the vine until they turn orange or yellow. Once the fruits are ripe, harvest them and extract the seeds. Wash the seeds thoroughly and spread them out on a paper towel to dry completely. Store the dried seeds in an airtight container in a cool, dark, and dry place. Properly stored bitter gourd seeds can remain viable for several years.
Leave a Comment