

Grow water spinach at home? Absolutely! Imagine stepping into your backyard and harvesting fresh, vibrant water spinach, ready to be stir-fried into a delicious and healthy meal. No more trips to the Asian market or wondering about the freshness of your greens. This DIY guide will unlock the secrets to cultivating this nutritious vegetable right in your own backyard, even if you have limited space or gardening experience.
Water spinach, also known as Ong Choy or Kangkong, has a rich history, deeply rooted in Asian cuisine and culture. For centuries, it has been a staple in dishes across Southeast Asia, prized for its mild flavor, crisp texture, and impressive nutritional benefits. It’s packed with vitamins, minerals, and antioxidants, making it a fantastic addition to any diet.
But why should you bother growing it yourself? Well, for starters, you’ll have access to the freshest, most flavorful water spinach imaginable. Store-bought varieties often lack the vibrancy and crispness of homegrown. Plus, you’ll know exactly what’s going into your food – no harmful pesticides or chemicals. And let’s be honest, there’s something incredibly satisfying about nurturing a plant from seed to table. I’m excited to share these simple yet effective tricks and hacks that will empower you to grow water spinach at home successfully, regardless of your gardening skill level. Let’s get started!

Grow Your Own Delicious Water Spinach at Home: A DIY Guide
Hey there, fellow gardening enthusiasts! Ever wanted to grow your own fresh, crunchy water spinach (also known as kangkong or ong choy)? It’s surprisingly easy, even if you don’t have a huge garden. I’m going to walk you through everything you need to know to cultivate this delicious leafy green right at home. Get ready to impress your friends and family with your homegrown bounty!
What You’ll Need
Before we dive in, let’s gather our supplies. This is what I’ve found works best:
* Water Spinach Seeds: You can find these online or at your local garden center. Make sure they’re from a reputable source for the best germination rates.
* Containers: You have a few options here. I’ve successfully used:
* Large plastic tubs (at least 12 inches deep)
* Buckets (5-gallon size or larger)
* Even a kiddie pool!
* Potting Mix: A good quality potting mix is essential. You can also amend it with compost for extra nutrients.
* Water: Obviously! Water spinach loves water, so make sure you have a reliable source.
* Sunlight: Water spinach needs at least 6 hours of sunlight per day. Choose a sunny spot for your containers.
* Optional:
* Slow-release fertilizer: This can give your plants a boost.
* Liquid fertilizer: For regular feeding.
* Aerate pump: If you are growing in a container with no drainage holes.
Choosing Your Growing Method
There are two main ways to grow water spinach: in soil or hydroponically (in water). I’ll cover both methods, so you can choose the one that best suits your space and preferences.
* Soil Method: This is the more traditional approach. You’ll plant the seeds in potting mix and water regularly.
* Hydroponic Method: This involves growing the plants directly in water, with nutrients added. It can be a bit more involved, but it’s also very rewarding.
Growing Water Spinach in Soil: Step-by-Step
This is the method I started with, and it’s super beginner-friendly.
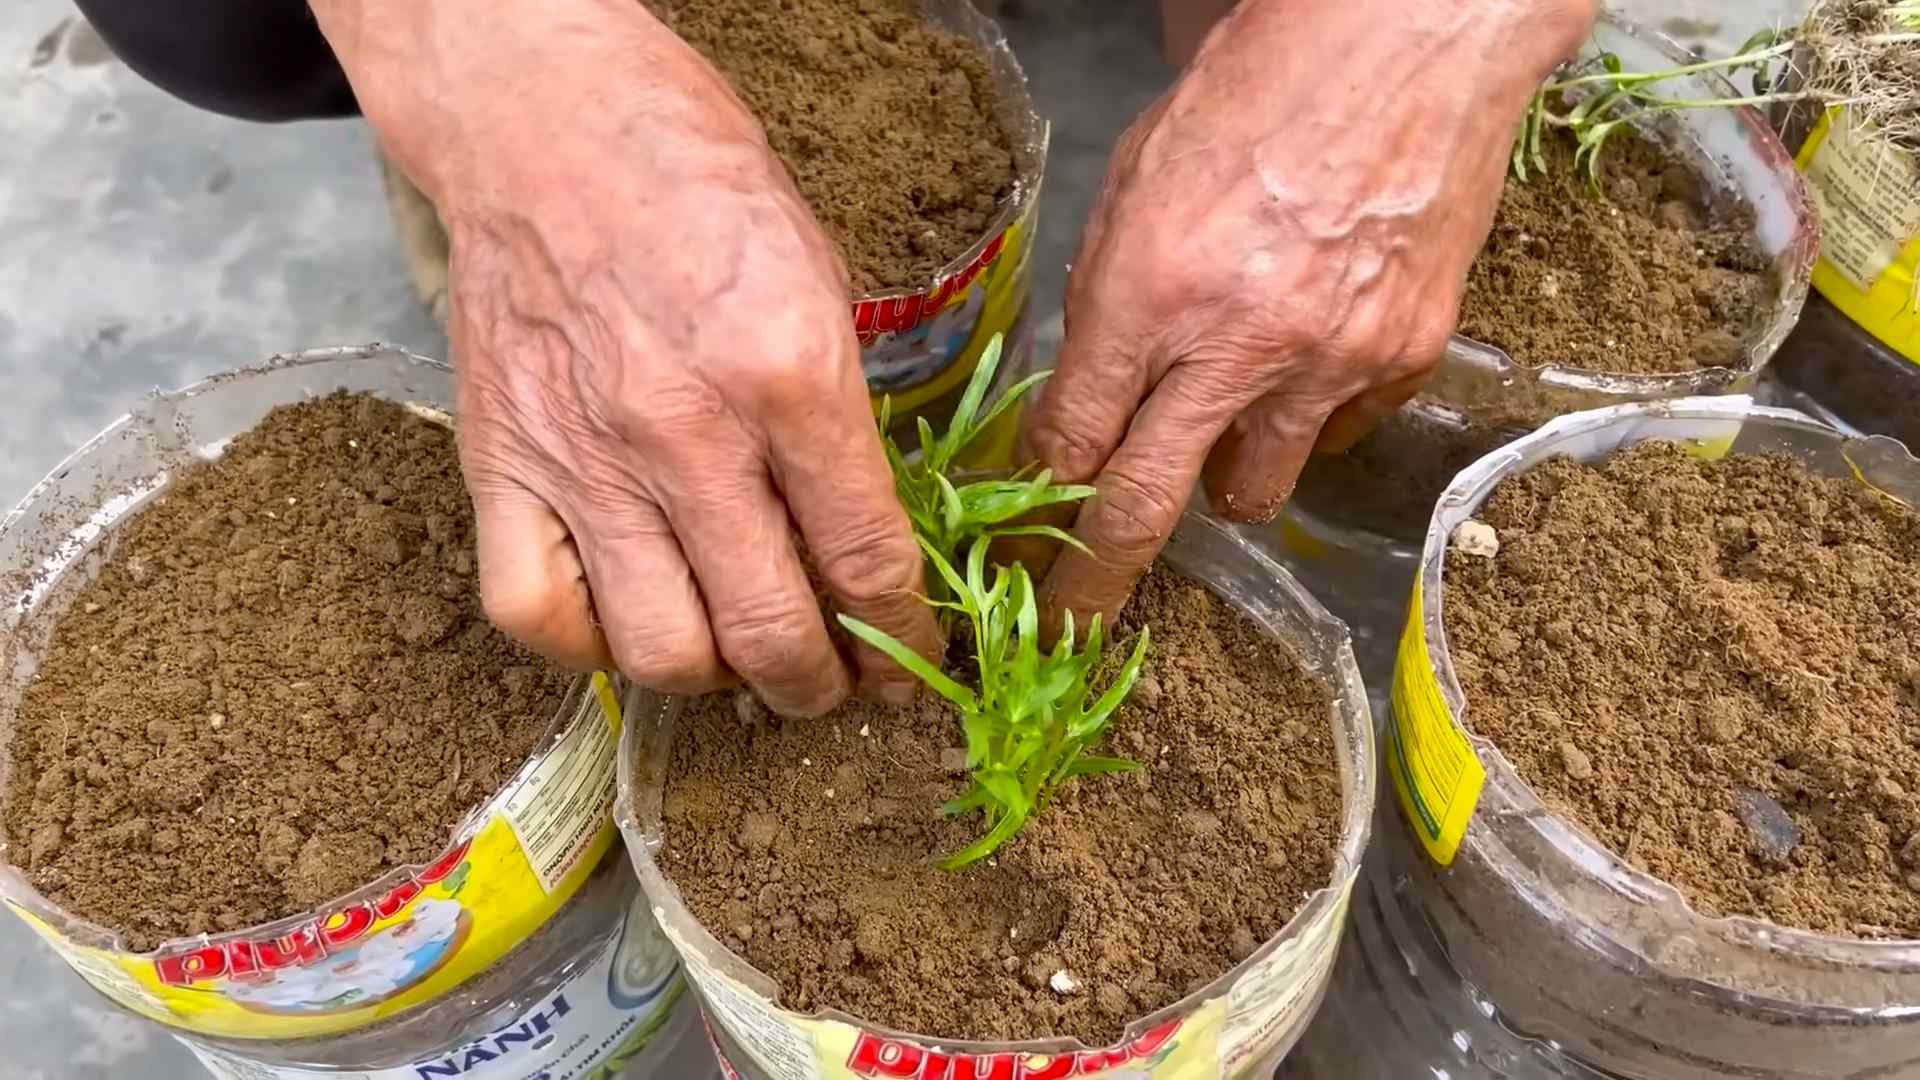
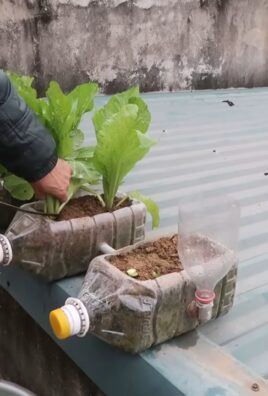
1. Prepare Your Container: Fill your chosen container with potting mix, leaving a couple of inches of space at the top. Moisten the soil thoroughly.
2. Sow the Seeds: Sprinkle the water spinach seeds evenly over the surface of the soil. Then, cover them with a thin layer (about ¼ inch) of soil.
3. Water Gently: Use a watering can with a gentle rose attachment to water the seeds. You want to keep the soil moist but not waterlogged.
4. Provide Sunlight: Place the container in a sunny location that receives at least 6 hours of direct sunlight per day.
5. Maintain Moisture: Water regularly to keep the soil consistently moist. Water spinach loves water, so don’t let the soil dry out. I usually check the soil moisture every day and water when the top inch feels dry.
6. Fertilize (Optional): If you want to give your plants a boost, you can add a slow-release fertilizer to the soil when you plant the seeds. Alternatively, you can use a liquid fertilizer every few weeks. Follow the instructions on the fertilizer packaging.
7. Thin Seedlings (If Necessary): Once the seedlings emerge (usually within a week or two), you may need to thin them out if they’re too crowded. Aim for a spacing of about 4-6 inches between plants.
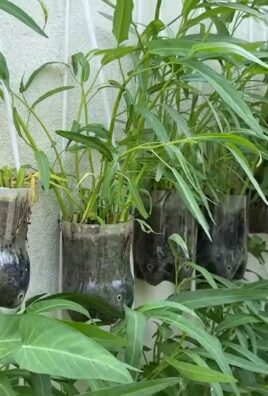
8. Harvest: You can start harvesting your water spinach about 4-6 weeks after planting. Simply cut the stems a few inches above the soil line. The plants will regrow, allowing you to harvest multiple times.
Growing Water Spinach Hydroponically: Step-by-Step
This method is a bit more advanced, but it’s also a lot of fun and can result in faster growth.
1. Prepare Your Container: Choose a container that can hold water. A large plastic tub or a kiddie pool works well.
2. Create a Raft (Optional): You can use a floating raft to support the plants. This can be made from Styrofoam or other buoyant material. Cut holes in the raft to hold the plants. If you don’t want to use a raft, you can simply suspend the plants in the water using net pots or other supports.
3. Germinate the Seeds: You can germinate the seeds in a separate container filled with moist paper towels. Place the seeds on the paper towels, cover them with another layer of paper towels, and keep them moist. Once the seeds have sprouted, you can transfer them to your hydroponic system.
4. Add Water and Nutrients: Fill the container with water and add hydroponic nutrients according to the instructions on the nutrient packaging. Water spinach needs a balanced nutrient solution to thrive.
5. Place the Seedlings: Carefully place the seedlings in the holes in the raft or in the net pots. Make sure the roots are submerged in the water.
6. Provide Sunlight: Place the container in a sunny location that receives at least 6 hours of direct sunlight per day.
7. Maintain Water Quality: Regularly check the water quality and adjust the nutrient levels as needed. You may also need to change the water periodically to prevent algae growth.
8. Aerate the Water (Optional): If you’re using a deep container, you may want to aerate the water using an air pump and air stone. This will help to oxygenate the roots and prevent them from rotting.
9. Harvest: You can start harvesting your water spinach about 3-5 weeks after planting. Simply cut the stems a few inches above the water line. The plants will regrow, allowing you to harvest multiple times.
Troubleshooting Common Problems
Even with the best care, you might encounter a few challenges. Here’s how I deal with them:
* Yellowing Leaves: This could be a sign of nutrient deficiency. Try adding more fertilizer or adjusting the pH of the water.
* Slow Growth: Make sure your plants are getting enough sunlight and water. Also, check the nutrient levels in the soil or water.
* Pests: Water spinach is generally pest-resistant, but you might occasionally encounter aphids or other pests. You can try spraying the plants with insecticidal soap or neem oil.
* Algae Growth (Hydroponics): Algae can be a problem in hydroponic systems. To prevent algae growth, keep the water clean and change it regularly. You can also add a small amount of hydrogen peroxide to the water.
Tips for a Bountiful Harvest
Here are a few extra tips I’ve learned along the way:
* Succession Planting: Plant new seeds every few weeks to ensure a continuous harvest.
* Regular Harvesting: Harvesting regularly encourages the plants to produce more leaves.
* Provide Support: As the plants grow taller, they may need some support. You can use stakes or trellises to keep them upright.
* Monitor Water Quality: Especially with hydroponics, keep a close eye on the pH and nutrient levels.
* Enjoy Your Harvest! Water spinach is delicious stir-fried, steamed, or added to soups.
Harvesting Your Water Spinach
This is the best part! Knowing when and how to harvest is key to enjoying a continuous supply of fresh greens.
* When to Harvest: You can start harvesting when the stems are about 6-8 inches long.
* How to Harvest: Use sharp scissors or a knife to cut the stems a few inches above the soil or water line.
* Encouraging Regrowth: Leaving a few inches of stem allows the plant to regrow quickly, giving you multiple harvests.
* Storage: Freshly harvested water spinach is best used immediately. However, you can store it in the refrigerator for a few days. Wrap it in a damp paper towel and place it in a plastic bag.
Enjoying Your Homegrown Water Spinach
Now that you’ve successfully grown your own water spinach, it’s time to enjoy the fruits (or rather, leaves) of your labor! Water spinach is a versatile ingredient that can be used in a variety of dishes.
* Stir-fries: This is one of the most popular ways to prepare water spinach. Simply stir-fry it with garlic, ginger, and your favorite sauce.
* Soups: Add water spinach to soups for a boost of nutrients and flavor.
* Salads: Young, tender water spinach leaves can be added to salads.
* Steamed: Steamed water spinach is a simple and healthy side dish.
I hope this guide has inspired you to grow your own water spinach at home. It’s a rewarding experience that will provide you with fresh, delicious greens all season long. Happy gardening!
Conclusion
So, there you have it! Growing your own water spinach at home is not just a fun project; it’s a gateway to fresher, more flavorful meals and a more sustainable lifestyle. We’ve walked you through the simple steps, from choosing the right container to harvesting your leafy greens. But why is this DIY trick a must-try?
Firstly, the taste difference is undeniable. Store-bought water spinach often lacks the vibrant freshness of homegrown varieties. When you harvest your own, you’re getting peak flavor and nutrients, untainted by long transportation times or chemical preservatives. Imagine stir-fries bursting with a more intense, slightly nutty flavor, or salads with a crisp, refreshing bite.
Secondly, it’s incredibly rewarding. There’s a unique satisfaction in nurturing a plant from seed (or cutting) to harvest. Watching your water spinach thrive, knowing you’ve provided the right conditions, is a small but significant victory. It connects you to the food you eat in a way that simply buying it from the store never can.
Thirdly, it’s cost-effective. While there’s an initial investment in seeds or cuttings and a suitable container, you’ll quickly recoup that cost with the amount of water spinach you can harvest. Plus, you’ll be reducing your reliance on grocery stores and potentially saving money on organic produce.
Fourthly, it’s environmentally friendly. Growing your own food reduces your carbon footprint by eliminating transportation emissions and minimizing packaging waste. You’ll also have more control over the growing process, allowing you to avoid harmful pesticides and herbicides.
But the benefits don’t stop there. Growing water spinach at home can also be a therapeutic activity. Tending to your plants can be a calming and meditative experience, providing a welcome break from the stresses of daily life. It’s a chance to connect with nature, even in a small way, and to appreciate the simple beauty of the natural world.
Ready to take your water spinach cultivation to the next level? Consider these variations:
* Vertical Gardening: If you’re short on space, try growing your water spinach in a vertical garden. This is a great way to maximize your yield in a small area.
* Hydroponics: For a more advanced approach, explore hydroponic water spinach cultivation. This method involves growing plants without soil, using nutrient-rich water solutions.
* Different Varieties: Experiment with different varieties of water spinach to discover your favorite flavor and texture. Some varieties are more heat-tolerant, while others are more disease-resistant.
* Companion Planting: Plant your water spinach alongside other beneficial plants, such as basil or mint, to deter pests and improve growth.
We encourage you to give this DIY trick a try. It’s easier than you might think, and the rewards are well worth the effort. Don’t be afraid to experiment and adapt the techniques to suit your own environment and preferences.
Most importantly, we want to hear about your experience! Share your photos, tips, and challenges in the comments below. Let’s create a community of water spinach enthusiasts and learn from each other. Happy growing! Let us know if you have any questions about how to grow water spinach at home.
Frequently Asked Questions (FAQ)
What is the best time of year to grow water spinach?
Water spinach thrives in warm weather, so the best time to grow it is during the late spring and summer months. Aim for temperatures consistently above 70°F (21°C). In warmer climates, you can potentially grow it year-round. If you live in an area with colder winters, you can start your seeds indoors a few weeks before the last frost and then transplant them outdoors once the weather warms up. Alternatively, you can grow water spinach indoors under grow lights.
How much sunlight does water spinach need?
Water spinach needs at least 6 hours of direct sunlight per day to thrive. If you’re growing it indoors, supplement with grow lights to ensure it gets enough light. Insufficient sunlight can lead to leggy growth and reduced yields. If you notice your plants are stretching towards the light, it’s a sign that they need more illumination.
What kind of soil is best for water spinach?
Water spinach prefers moist, fertile soil that is rich in organic matter. A well-draining potting mix amended with compost or aged manure is ideal. The soil pH should be slightly acidic to neutral, around 6.0 to 7.0. Avoid heavy clay soils, as they can become waterlogged and inhibit growth. If you’re growing water spinach in a container, make sure it has drainage holes to prevent water from accumulating.
How often should I water water spinach?
Water spinach needs consistently moist soil, so water it regularly, especially during hot weather. Check the soil moisture daily and water when the top inch feels dry to the touch. Avoid letting the soil dry out completely, as this can stress the plants and reduce their growth. However, also avoid overwatering, as this can lead to root rot. A good rule of thumb is to water deeply and less frequently, rather than shallowly and more often.
How often should I fertilize water spinach?
Water spinach is a heavy feeder, so it benefits from regular fertilization. Use a balanced liquid fertilizer diluted to half strength every 2-3 weeks. You can also amend the soil with compost or aged manure at planting time to provide a slow-release source of nutrients. Avoid over-fertilizing, as this can lead to excessive foliage growth at the expense of flavor.
How do I harvest water spinach?
You can start harvesting water spinach about 4-6 weeks after planting. To harvest, simply cut the stems about 4-6 inches from the top. The plant will continue to produce new shoots from the cut stems, providing you with a continuous harvest. Harvest regularly to encourage new growth and prevent the plants from becoming too leggy.
What are some common pests and diseases that affect water spinach?
Water spinach is generally resistant to pests and diseases, but it can be susceptible to aphids, spider mites, and fungal diseases like powdery mildew. To prevent pest infestations, inspect your plants regularly and remove any pests you find. You can also use insecticidal soap or neem oil to control pests. To prevent fungal diseases, ensure good air circulation around your plants and avoid overwatering.
Can I grow water spinach in water only?
Yes, water spinach can be grown hydroponically in water only. This method involves suspending the roots of the plants in a nutrient-rich water solution. You can use a hydroponic system or simply place the cuttings in a jar of water with added nutrients. Change the water regularly to prevent algae growth and ensure the plants receive adequate nutrients.
How do I propagate water spinach?
Water spinach is easily propagated from stem cuttings. Simply cut a 4-6 inch stem from a mature plant and remove the lower leaves. Place the cutting in a glass of water and wait for roots to develop. Once the roots are about an inch long, you can transplant the cutting into soil or a hydroponic system.
Is water spinach safe to eat?
Yes, water spinach is safe to eat when grown properly. However, it’s important to wash it thoroughly before eating to remove any dirt or debris. Avoid eating water spinach that has been grown in contaminated water, as it can accumulate heavy metals and other toxins. Also, if you are prone to kidney stones, consume water spinach in moderation due to its oxalate content.

Leave a Comment