

Grow Sweet Potatoes at Home – imagine harvesting a bounty of these vibrant, nutritious tubers right from your own backyard! For centuries, sweet potatoes have been a staple in diets around the world, from their origins in Central and South America to becoming a beloved ingredient in Southern cuisine and beyond. Their rich history is intertwined with cultures celebrating their sweetness and versatility.
But you don’t need a sprawling farm to enjoy the taste of freshly grown sweet potatoes. I’m here to tell you that you can absolutely grow sweet potatoes at home, even if you have limited space! This DIY guide is packed with simple, effective tricks and hacks that will transform your gardening game. Forget expensive store-bought produce – with a little know-how, you can cultivate your own supply of these delicious and healthy root vegetables.
Why should you bother with this DIY project? Well, for starters, you’ll have complete control over the growing process, ensuring your sweet potatoes are free from harmful pesticides and chemicals. Plus, there’s nothing quite like the satisfaction of nurturing a plant from start to finish and then enjoying the fruits (or, in this case, the tubers!) of your labor. So, let’s dive in and discover the secrets to successfully growing sweet potatoes at home!
Grow Your Own Sweet Potatoes: A Beginner’s Guide
Hey there, fellow gardening enthusiasts! Ever thought about growing your own sweet potatoes? It’s surprisingly easy and incredibly rewarding. Imagine digging up your own homegrown sweet potatoes – the taste is just unbeatable! I’m going to walk you through the whole process, from sprouting slips to harvesting your delicious bounty. Let’s get started!
What You’ll Need
Before we dive in, let’s gather our supplies. Here’s a list of everything you’ll need to successfully grow sweet potatoes:
* Sweet Potatoes: Choose organic sweet potatoes if possible, as they are less likely to be treated with sprout inhibitors. You’ll need at least one, but I recommend starting with a few to increase your chances of success.
* Glass Jars or Containers: Wide-mouthed jars or containers work best for suspending the sweet potatoes in water.
* Toothpicks: These will help suspend the sweet potato in the water.
* Potting Mix: A well-draining potting mix is essential for starting your slips.
* Garden Soil: Sweet potatoes thrive in loose, well-drained soil. Amend your garden soil with compost or other organic matter if needed.
* Gardening Gloves: Protect your hands!
* Watering Can or Hose: For watering your slips and plants.
* Shovel or Garden Fork: For preparing your garden bed and harvesting.
* Optional: Rooting Hormone: This can help speed up the rooting process, but it’s not essential.
* Optional: Black Plastic Mulch: This helps warm the soil and suppress weeds.
Sprouting Sweet Potato Slips: The First Step
The first step in growing sweet potatoes is sprouting slips. Slips are the leafy shoots that grow from the sweet potato, and these are what you’ll plant in your garden.
1. Prepare the Sweet Potatoes: Wash your sweet potatoes thoroughly to remove any dirt or debris.
2. Insert Toothpicks: Insert toothpicks around the middle of each sweet potato, spacing them evenly. These toothpicks will act as supports to suspend the sweet potato in the water.
3. Suspend in Water: Fill your glass jars or containers with water. Suspend the sweet potatoes in the jars, pointy end down, so that the bottom half of the sweet potato is submerged in water. Make sure the water level stays consistent.
4. Find a Sunny Spot: Place the jars in a warm, sunny location. A windowsill that receives plenty of sunlight is ideal.
5. Change the Water Regularly: Change the water every few days to prevent mold and bacteria growth. This will also help keep the water fresh and oxygenated, which is important for root development.
6. Wait for Slips to Grow: Be patient! It can take several weeks for slips to start growing. You should see small roots emerging from the bottom of the sweet potato and leafy shoots sprouting from the top.
7. Harvesting the Slips: Once the slips are 6-8 inches long, they’re ready to be harvested. Gently twist or cut the slips off the sweet potato, being careful not to damage the roots.
Rooting the Slips: Giving Them a Head Start
Now that you have your slips, it’s time to root them. This will give them a stronger start before you transplant them into your garden.
1. Prepare a Container: Fill a container with well-draining potting mix.
2. Plant the Slips: Make small holes in the potting mix and gently insert the bottom ends of the slips into the holes. Space the slips about 2 inches apart.
3. Water Thoroughly: Water the slips thoroughly after planting.
4. Optional: Use Rooting Hormone: Dip the cut ends of the slips in rooting hormone before planting to encourage faster root development.
5. Keep Moist and Warm: Keep the potting mix moist but not soggy. Place the container in a warm, sunny location.
6. Wait for Roots to Develop: It will take about a week or two for the slips to develop roots. You’ll know they’re ready to transplant when you see new growth.
Preparing Your Garden Bed: The Foundation for Success
Sweet potatoes need loose, well-drained soil to thrive. Preparing your garden bed properly is crucial for a successful harvest.
1. Choose a Sunny Location: Sweet potatoes need at least 6-8 hours of sunlight per day. Choose a location in your garden that receives plenty of sunlight.
2. Prepare the Soil: Loosen the soil to a depth of at least 12 inches using a shovel or garden fork.
3. Amend the Soil: Sweet potatoes prefer slightly acidic soil with a pH of 5.5 to 6.5. Amend the soil with compost or other organic matter to improve drainage and fertility. You can also add a soil acidifier if your soil is too alkaline.
4. Create Ridges: Sweet potatoes grow best in ridges or mounds. Create ridges that are about 8-10 inches high and 12 inches wide. Space the ridges about 3-4 feet apart. This will help with drainage and allow the sweet potatoes to develop properly.
5. Optional: Use Black Plastic Mulch: Cover the ridges with black plastic mulch to warm the soil and suppress weeds. This is especially helpful in cooler climates.
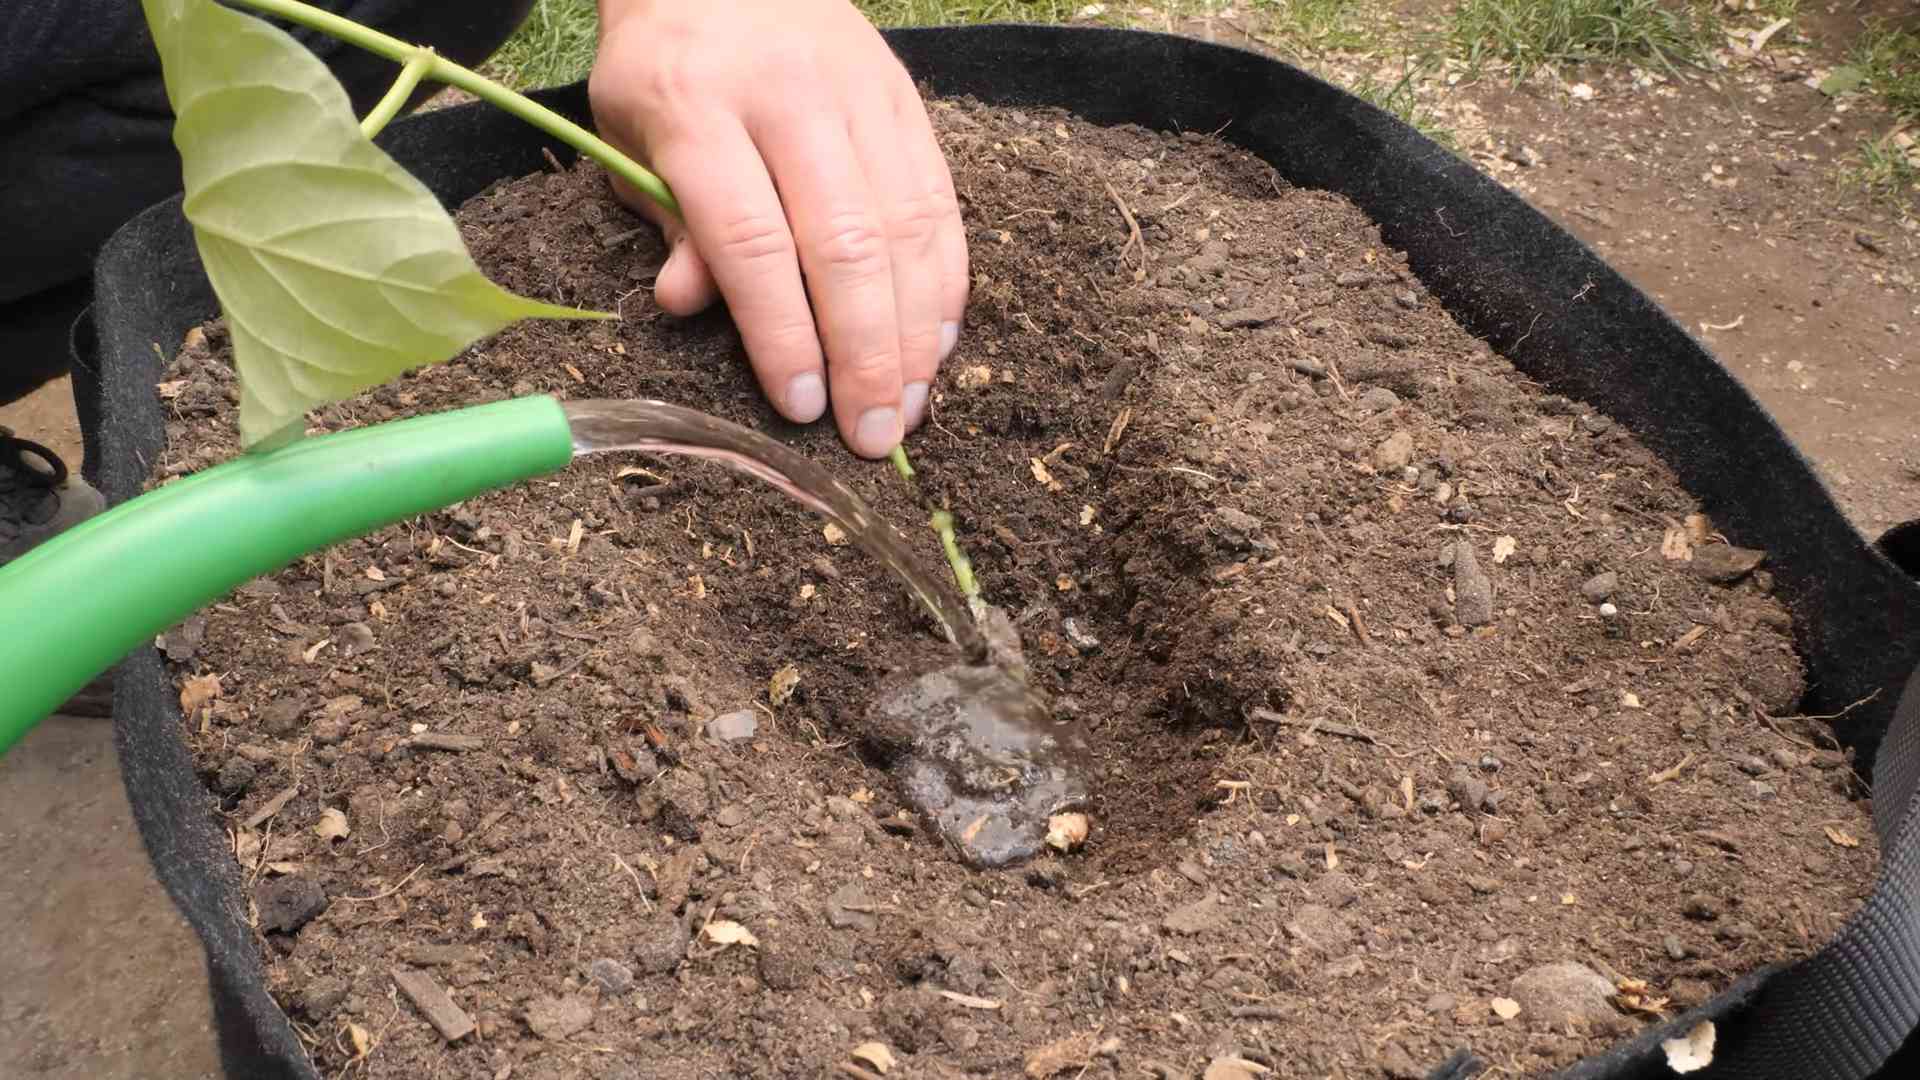
Transplanting the Slips: Getting Them in the Ground
Now that your garden bed is prepared and your slips have developed roots, it’s time to transplant them into the ground.
1. Choose the Right Time: Transplant the slips after the last frost, when the soil has warmed up to at least 60°F (15°C).
2. Water the Slips: Water the slips thoroughly before transplanting.
3. Plant the Slips: Make small holes in the ridges, spacing the slips about 12 inches apart. Gently remove the slips from the container and plant them in the holes, burying the roots and the bottom part of the stem.
4. Water Again: Water the newly transplanted slips thoroughly.
5. Protect from Pests: Protect the young plants from pests such as flea beetles and sweet potato weevils. You can use row covers or insecticidal soap if necessary.
Caring for Your Sweet Potato Plants: Nurturing Your Crop
Once your sweet potato plants are in the ground, it’s important to provide them with the care they need to thrive.
1. Water Regularly: Water the plants regularly, especially during dry periods. Sweet potatoes need about 1 inch of water per week.
2. Weed Regularly: Keep the garden bed free of weeds. Weeds can compete with the sweet potato plants for nutrients and water.
3. Fertilize Sparingly: Sweet potatoes don’t need a lot of fertilizer. Avoid using high-nitrogen fertilizers, as they can promote leafy growth at the expense of tuber development. A balanced fertilizer or a fertilizer specifically formulated for root crops is best.
4. Control Pests and Diseases: Monitor your plants for pests and diseases. Common pests include flea beetles, sweet potato weevils, and aphids. Common diseases include stem rot and fungal leaf spots. Treat any problems promptly to prevent them from spreading.
5. Avoid Overwatering: While sweet potatoes need regular watering, avoid overwatering. Overwatering can lead to root rot and other problems.
Harvesting Your Sweet Potatoes: The Grand Finale
After about 90-120 days, your sweet potatoes should be ready to harvest.
1. Choose the Right Time: Harvest your sweet potatoes before the first frost. Frost can damage the tubers and make them less palatable.
2. Loosen the Soil: Use a shovel or garden fork to loosen the soil around the plants. Be careful not to damage the tubers.
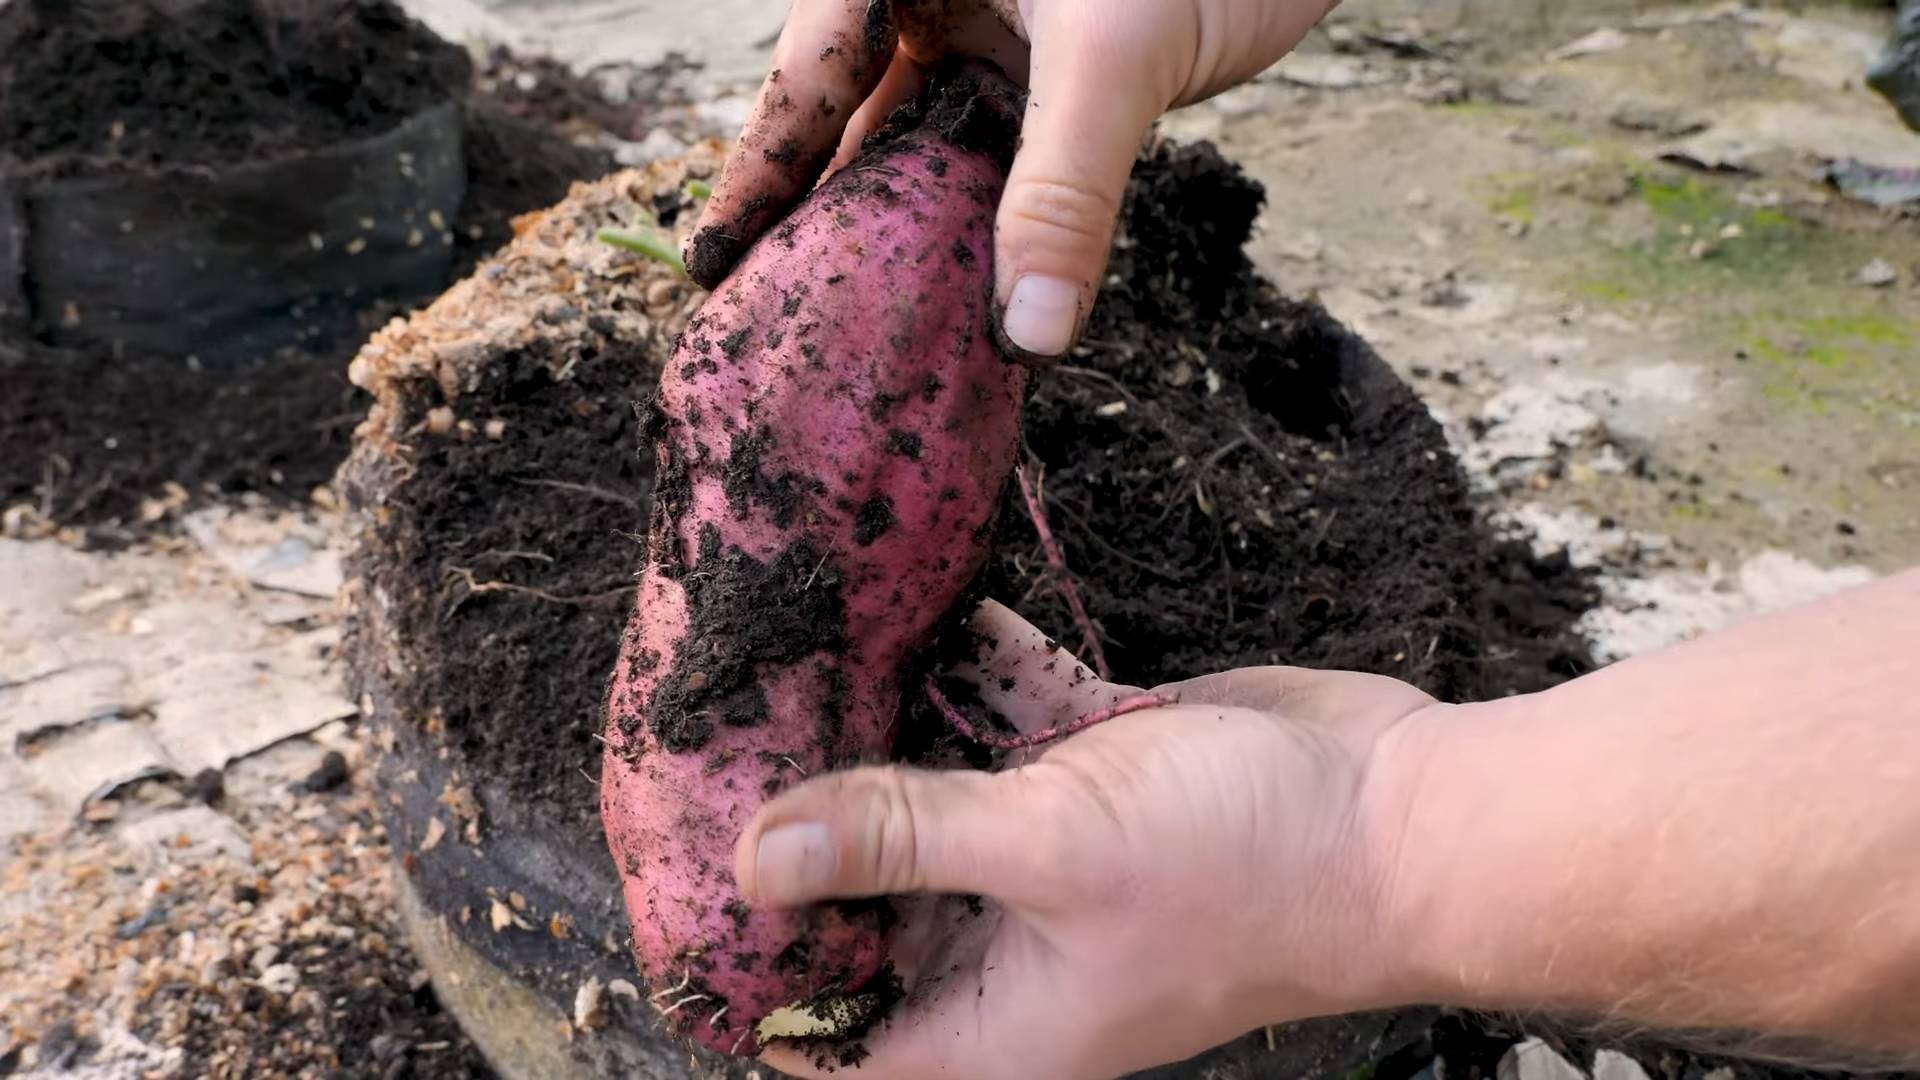
3. Dig Up the Sweet Potatoes: Gently lift the plants from the ground, being careful not to break the tubers.
4. Cure the Sweet Potatoes: Curing is an important step in the harvesting process. It helps to heal any wounds on the tubers and improves their flavor and storage life. To cure your sweet potatoes, place them in a warm, humid location (80-85°F and 85-90% humidity) for about a week.
5. Store the Sweet Potatoes: After curing, store your sweet potatoes in a cool, dry, and dark place. They should keep for several months.
Troubleshooting: Common Problems and Solutions
Even with the best care, you may encounter some problems when growing sweet potatoes. Here are some common issues and how to address them:
* Slips Not Sprouting: Make sure the sweet potatoes are in a warm, sunny location and that the water is changed regularly. If the sweet potatoes are treated with sprout inhibitors, they may not sprout. Try using organic sweet potatoes.
* Yellowing Leaves: Yellowing leaves can be a
Conclusion
So, there you have it! Growing sweet potatoes at home, while it might seem daunting at first, is surprisingly achievable and incredibly rewarding. We’ve walked you through the process, from sprouting slips to harvesting your own delicious, homegrown sweet potatoes. But why should you bother? Why dedicate your time and effort to this particular gardening endeavor?
The answer is multifaceted. First and foremost, the taste. There’s simply no comparison between a store-bought sweet potato and one you’ve nurtured from sprout to tuber. The flavor is richer, sweeter, and more complex, a testament to the care and attention you’ve invested. You know exactly where your food came from and what went into it, avoiding any unwanted pesticides or chemicals. This is especially important for families with young children or anyone concerned about eating clean, healthy food.
Beyond the superior taste, growing your own sweet potatoes is a fantastic way to connect with nature and learn about the growing process. It’s a tangible reminder of the earth’s bounty and the satisfaction of cultivating your own food. It’s also a surprisingly educational experience, teaching you about plant biology, soil science, and the importance of patience.
Furthermore, consider the economic benefits. While the initial investment in supplies might seem like a hurdle, the yield from even a small sweet potato patch can significantly offset the cost of buying them from the grocery store. And let’s not forget the environmental advantages. By growing your own food, you’re reducing your carbon footprint by minimizing transportation and packaging.
But perhaps the most compelling reason to try this DIY trick is the sheer joy of it. There’s something deeply satisfying about digging into the soil and unearthing your own sweet potatoes, a tangible reward for your hard work and dedication. It’s a feeling that’s hard to replicate and one that will undoubtedly leave you feeling proud and accomplished.
Variations and Suggestions:
Don’t be afraid to experiment! Try different varieties of sweet potatoes to find your favorite. Beauregard, Georgia Jet, and Japanese sweet potatoes are all popular choices with distinct flavors and textures. You can also adjust the growing conditions to suit your local climate. If you live in a cooler region, consider starting your slips indoors earlier in the season or using raised beds to warm the soil.
Another fun variation is to grow sweet potatoes in containers. This is a great option for those with limited space or who live in apartments. Just make sure to choose a large container with good drainage and use a high-quality potting mix.
Finally, consider using your sweet potato vines as an ornamental ground cover. They’re beautiful, vigorous growers that can add a touch of tropical flair to your garden. Just be sure to keep them contained to prevent them from spreading too aggressively.
We wholeheartedly encourage you to give this DIY trick a try. Growing sweet potatoes at home is a rewarding and enriching experience that will connect you with nature, improve your diet, and save you money. So, grab a sweet potato, some water, and a few toothpicks, and get started today!
And most importantly, don’t forget to share your experience with us! We’d love to hear about your successes, challenges, and any tips or tricks you’ve discovered along the way. Share your photos and stories on social media using #HomeGrownSweetPotatoes and let’s inspire others to join the sweet potato growing revolution! Let’s all enjoy the benefits of learning how to grow sweet potatoes at home.
Frequently Asked Questions (FAQ)
Q: How long does it take to grow sweet potatoes?
A: The entire process, from sprouting slips to harvesting, typically takes around 4-5 months. Sprouting slips can take anywhere from 4-8 weeks, depending on the temperature and humidity. Once the slips are planted, it takes another 3-4 months for the sweet potatoes to mature.
Q: What kind of soil is best for growing sweet potatoes?
A: Sweet potatoes prefer well-drained, sandy loam soil with a pH between 5.5 and 6.5. Avoid heavy clay soils, as they can restrict root growth and lead to misshapen tubers. If your soil is heavy, amend it with compost, sand, and other organic matter to improve drainage and aeration.
Q: How much sunlight do sweet potatoes need?
A: Sweet potatoes need at least 6-8 hours of direct sunlight per day to thrive. Choose a sunny location in your garden that receives plenty of sunlight throughout the growing season.
Q: How often should I water sweet potatoes?
A: Water sweet potatoes regularly, especially during dry periods. Keep the soil consistently moist, but avoid overwatering, which can lead to root rot. A good rule of thumb is to water deeply once or twice a week, depending on the weather and soil conditions.
Q: Do I need to fertilize sweet potatoes?
A: Sweet potatoes are not heavy feeders, but they do benefit from a balanced fertilizer. Apply a slow-release fertilizer at planting time and side-dress with a nitrogen-rich fertilizer a few weeks later. Avoid over-fertilizing, as this can lead to excessive vine growth and reduced tuber production.
Q: How do I know when my sweet potatoes are ready to harvest?
A: Sweet potatoes are typically ready to harvest in the fall, about 90-120 days after planting. The leaves will start to turn yellow and the vines will begin to die back. To check for maturity, dig up a test potato and see if it’s the desired size and color.
Q: How do I cure sweet potatoes after harvesting?
A: Curing sweet potatoes is essential for improving their flavor and storage life. After harvesting, gently brush off any excess soil and place the sweet potatoes in a warm, humid place (80-85°F and 85-90% humidity) for 7-10 days. This allows the skins to harden and the starches to convert to sugars.
Q: How do I store sweet potatoes?
A: After curing, store sweet potatoes in a cool, dry, and dark place (55-60°F) with good ventilation. Avoid storing them in the refrigerator, as this can cause them to develop a hard core. Properly cured and stored sweet potatoes can last for several months.
Q: Can I grow sweet potatoes in containers?
A: Yes, you can grow sweet potatoes in containers, but you’ll need a large container (at least 20 gallons) with good drainage. Use a high-quality potting mix and provide plenty of sunlight and water. Container-grown sweet potatoes may not produce as large of a yield as those grown in the ground, but they can still provide a delicious harvest.
Q: What are some common pests and diseases that affect sweet potatoes?
A: Some common pests that affect sweet potatoes include sweet potato weevils, flea beetles, and aphids. Common diseases include stem rot, black rot, and scurf. Practice good sanitation, crop rotation, and use resistant varieties to prevent pest and disease problems.
Q: Can I eat the sweet potato leaves?
A: Yes, sweet potato leaves are edible and nutritious. They can be eaten raw in salads or cooked like spinach. Choose young, tender leaves for the best flavor and texture.
Q: My sweet potato slips are growing long and leggy. What should I do?
A: Long and leggy slips are often a sign of insufficient light. Move your slips to a sunnier location or provide supplemental lighting. You can also pinch back the tips of the slips to encourage bushier growth.
Q: Can I regrow sweet potatoes from store-bought sweet potatoes?
A: Yes, you can regrow sweet potatoes from store-bought sweet potatoes, but it’s best to use organic sweet potatoes to avoid any potential chemical treatments that may inhibit sprouting. Follow the same sprouting process as described in the article.
Leave a Comment