

Grow Sweet Potatoes
Have you ever dreamed of harvesting your own sweet, delicious sweet potatoes right from your backyard? I know I have! This article is all about sharing my favorite Grow Sweet Potatoes tricks and DIY solutions to help you achieve that dream. It’s more achievable than you might think, and the satisfaction of pulling a vibrant orange sweet potato from the earth you cultivated yourself is truly unparalleled.
Growing sweet potatoes has a rich history, dating back centuries to the Americas. These nutritious tubers weren’t always readily available in grocery stores; they were, and in many parts of the world still are, a staple crop, deeply woven into the fabric of many cultures. Understanding this history adds a layer of appreciation to the process, transforming it from simply growing a vegetable into connecting with a legacy of agricultural ingenuity.
Why Grow Your Own?
Beyond the delicious reward, there are many reasons to try your hand at growing your own sweet potatoes. Firstly, you’ll have complete control over the quality and freshness of your produce. No more worrying about pesticides or long transportation times – your sweet potatoes will be as close to nature as possible. Secondly, Grow Sweet Potatoes is a surprisingly rewarding project, even for beginner gardeners. It’s a great way to connect with nature, teach children about where food comes from, and enjoy the fruits (or should I say, roots?) of your labor.
In this article, I’ll walk you through everything you need to know, from selecting the right slips to harvesting your bountiful crop. We’ll cover simple DIY techniques to maximize your yield and overcome common challenges. Get ready to embark on this exciting journey of Grow Sweet Potatoes and experience the joy of homegrown goodness!
Growing Sweet Potatoes: A Complete DIY Guide
I’ve always loved the taste of sweet potatoes, and nothing beats the satisfaction of growing your own. This guide will walk you through the entire process, from preparing the slips to harvesting your delicious crop. Let’s get started!
Phase 1: Preparing Sweet Potato Slips
- Selecting Sweet Potatoes: Choose healthy, organically grown sweet potatoes that are firm and free from blemishes. Avoid potatoes that are already sprouting excessively, as these might be too old.
- Preparing the Potatoes: Wash the sweet potatoes thoroughly and gently scrub off any dirt. You’ll need to select a few potatoes – one for every few plants you want to grow. More is always better!
- Starting the Slips: Find a shallow tray or container. Fill it with a well-draining potting mix. I like to use a mix of peat moss, vermiculite, and perlite. Place the sweet potatoes horizontally on top of the mix, about half-buried. Keep the soil moist but not soggy.
- Providing Warmth and Humidity: Place the tray in a warm, sunny location. A temperature between 70-80°F (21-27°C) is ideal. You can cover the tray with plastic wrap to increase humidity, but make sure to vent it daily to prevent mold.
- Waiting for Sprouts: It usually takes 2-4 weeks for sprouts to emerge. Be patient! Once the sprouts are a few inches long and have developed roots, they’re ready to be planted.
Phase 2: Planting Your Sweet Potato Slips
- Choosing a Location: Sweet potatoes need at least 6-8 hours of direct sunlight per day. Select a location in your garden that receives ample sunshine. They also need well-drained soil, so avoid areas prone to waterlogging.
- Soil Preparation: Prepare the soil by loosening it with a garden fork or tiller. Sweet potatoes prefer loose, sandy loam soil. Amend the soil with compost or well-rotted manure to improve drainage and fertility. A soil pH between 5.5 and 6.8 is ideal.
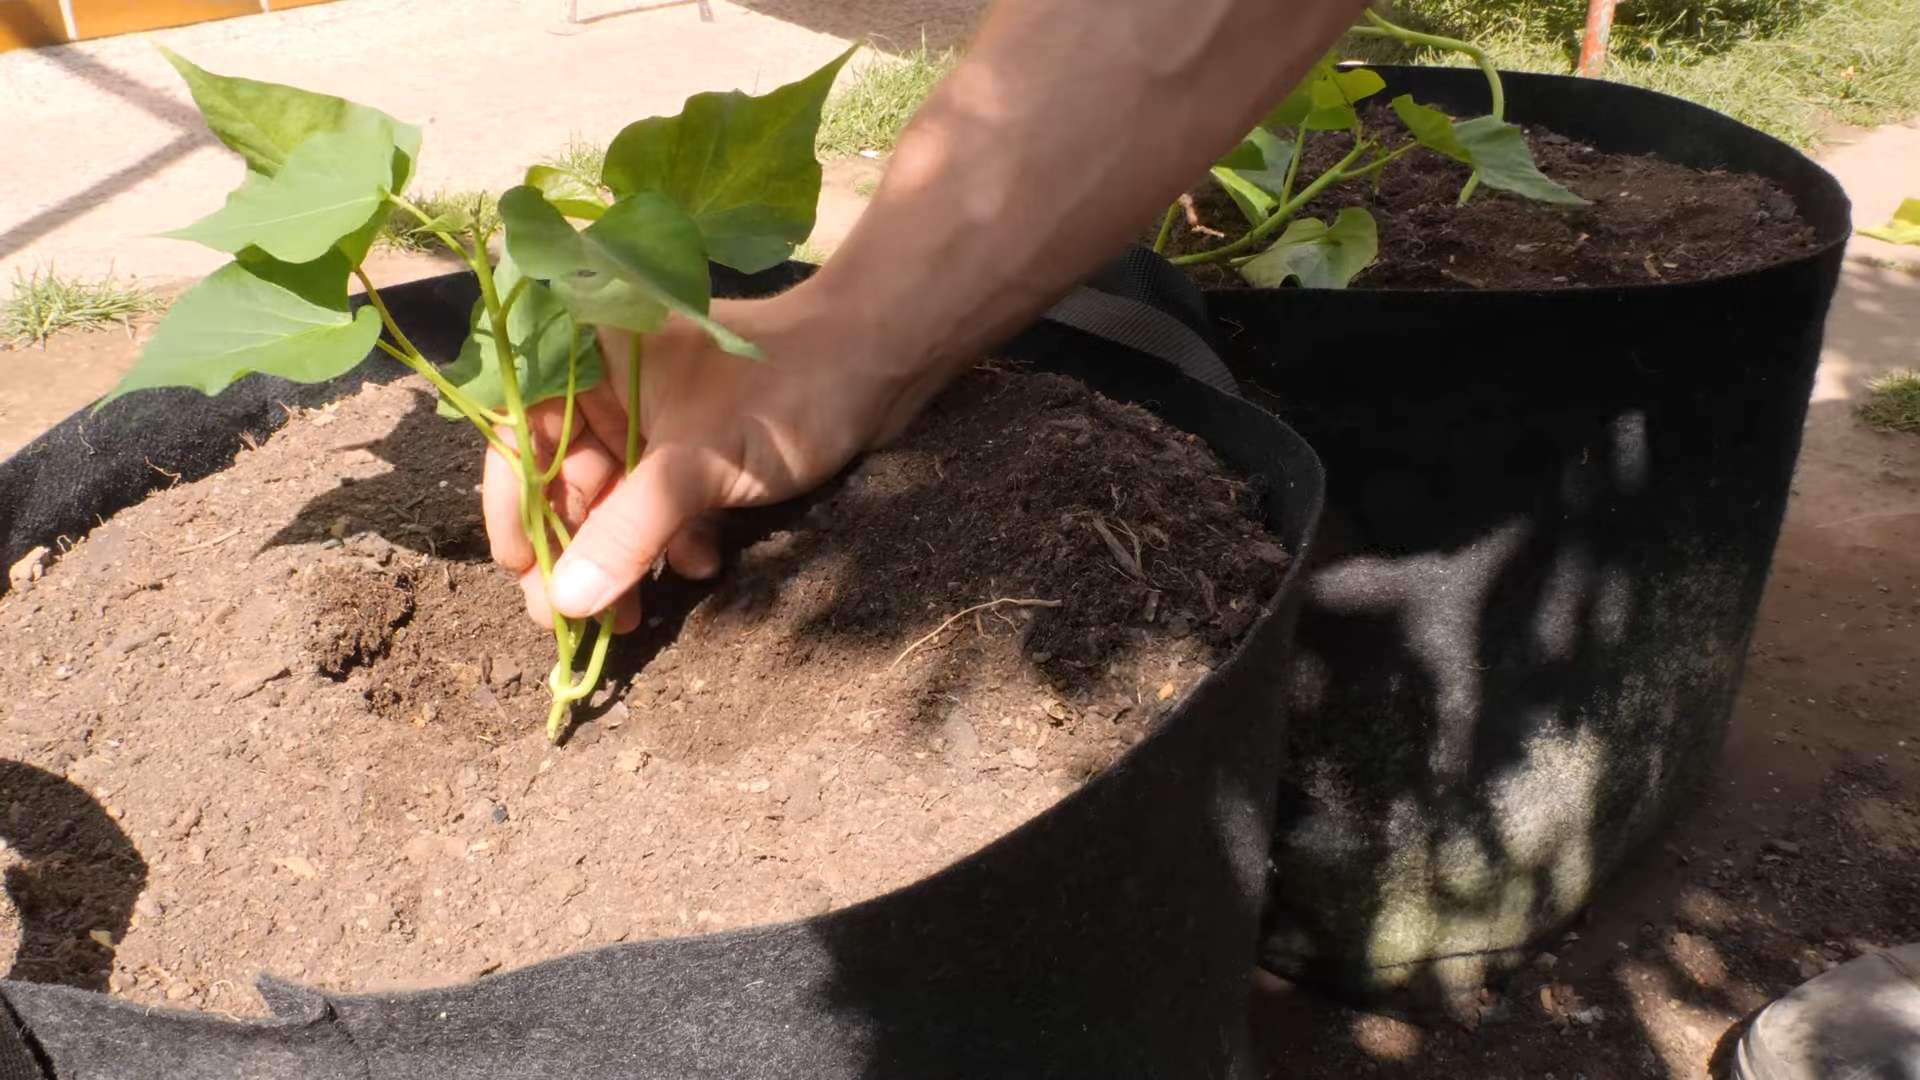
- Planting the Slips: Dig holes about 6 inches deep and 12-18 inches apart. Gently separate the sprouts from the sweet potato, ensuring each slip has a few roots attached. Plant the slips, burying the roots and leaving the top few inches of the sprout exposed.
- Watering: Water the newly planted slips thoroughly. Keep the soil consistently moist but not waterlogged throughout the growing season. Overwatering can lead to root rot.
- Mulching: Apply a layer of mulch around the plants to help retain moisture, suppress weeds, and regulate soil temperature. Straw, hay, or shredded leaves work well.
Phase 3: Sweet Potato Care and Maintenance
- Watering Regularly: Consistent watering is crucial, especially during dry periods. Aim for about 1 inch of water per week, either through rainfall or supplemental irrigation. Check the soil moisture regularly and water deeply when the top inch feels dry.
- Weed Control: Regularly remove weeds around the plants to prevent competition for nutrients and water. Mulching helps significantly in weed suppression.
- Fertilizing: While sweet potatoes are not heavy feeders, a balanced fertilizer can boost their growth and yield. Apply a slow-release fertilizer at planting time or use a liquid fertilizer every few weeks, following the product instructions carefully. Avoid over-fertilizing, as this can lead to excessive vine growth at the expense of tuber development.
- Pest and Disease Management: Monitor your plants regularly for signs of pests or diseases. Common pests include sweet potato weevils and aphids. Common diseases include root rot and fungal leaf spots. Address any issues promptly using appropriate organic pest and disease control methods. Prevention is key – ensure good air circulation and avoid overhead watering.
- Hilling: As the plants grow, gradually hill the soil around the base of the vines. This encourages the development of more sweet potatoes. You can do this every few weeks, adding a few inches of soil around the base of the plants.
Phase 4: Harvesting Your Sweet Potatoes
- Timing: Sweet potatoes are typically ready for harvest 3-4 months after planting, depending on the variety and growing conditions. The vines will start to die back, and the leaves will turn yellow. This is a good indication that the potatoes are mature.
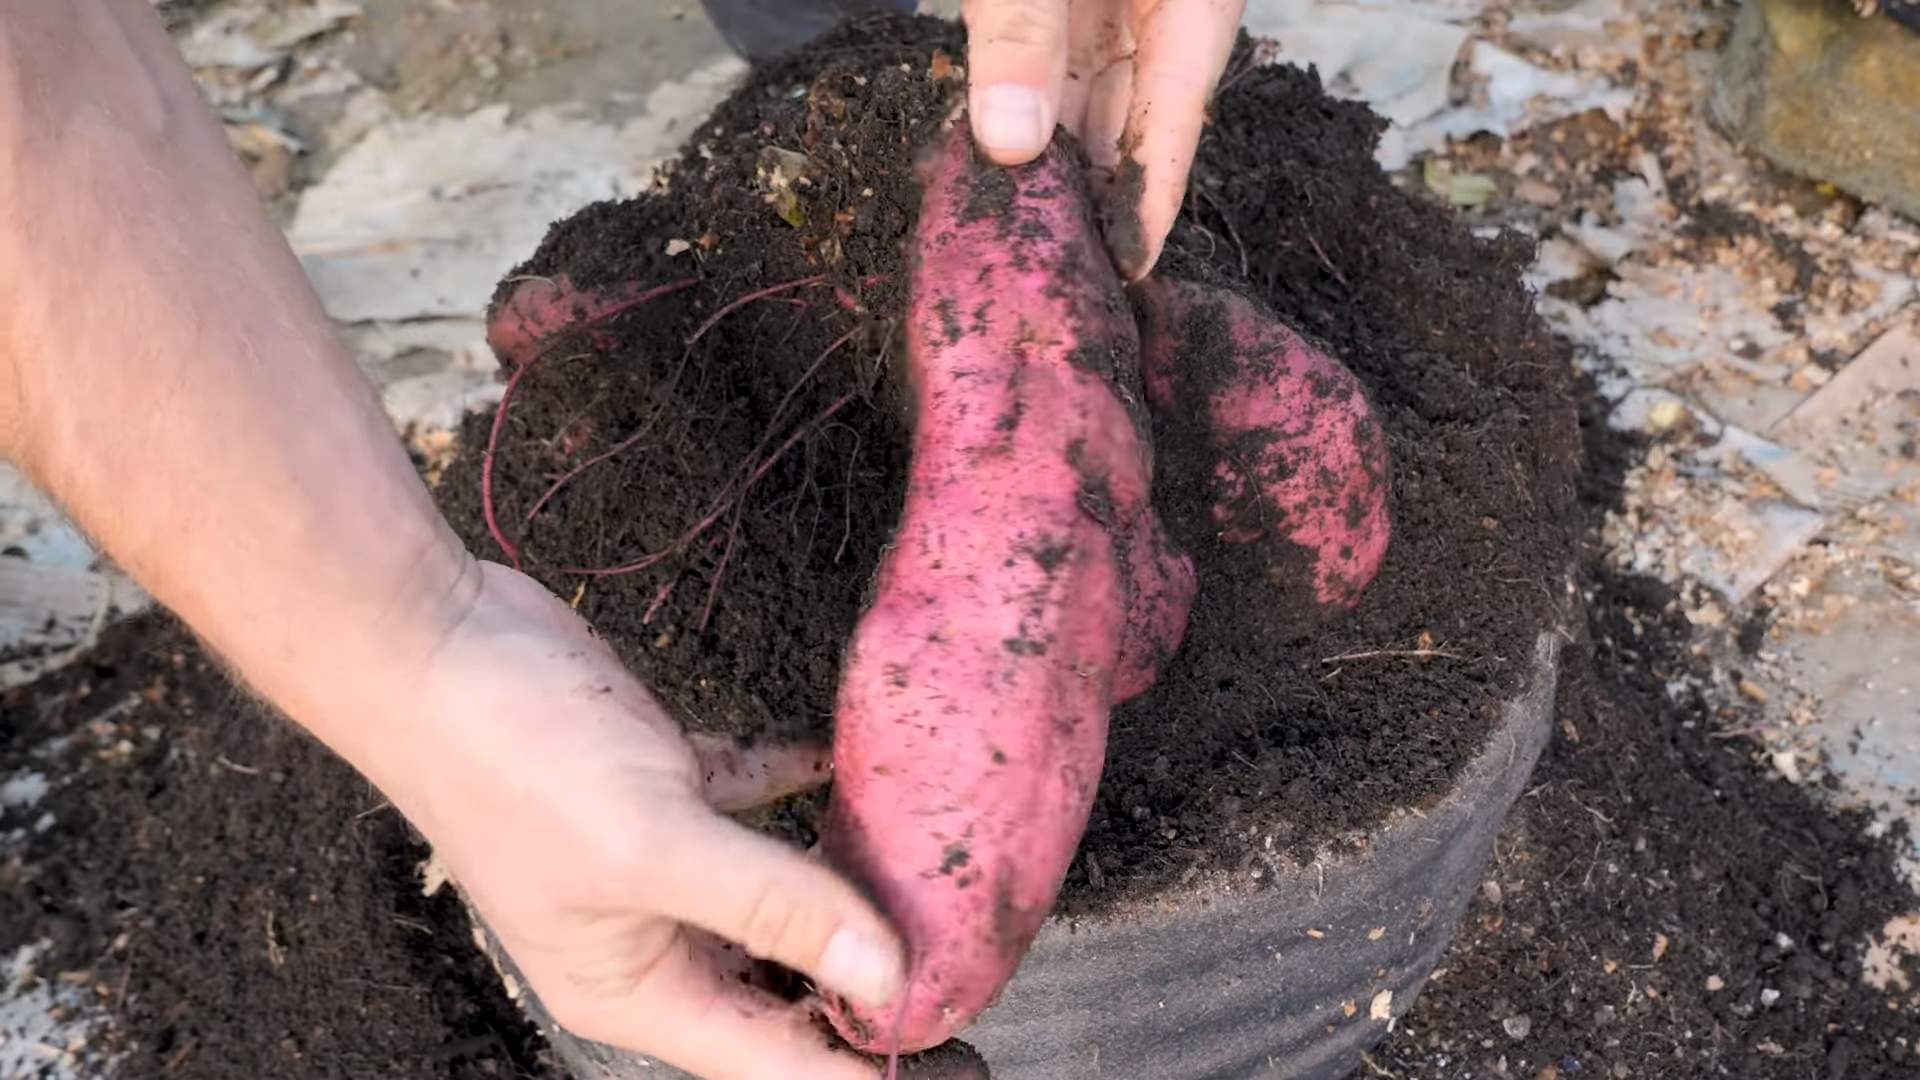
- Harvesting: On a dry day, carefully loosen the soil around the plants with a garden fork. Gently lift the plants and collect the sweet potatoes. Be careful not to damage the tubers. Avoid washing the potatoes immediately after harvesting.
- Curing: After harvesting, allow the sweet potatoes to cure for 7-10 days in a warm, dry, and well-ventilated area. This process helps to heal any minor wounds and improves their storage life. Spread them out in a single layer and avoid stacking them.
- Storing: Once cured, store the sweet potatoes in a cool, dark, and dry place. Temperatures between 55-60°F (13-16°C) are ideal. They can be stored for several months under these conditions.
Phase 5: Troubleshooting Common Issues
Problem: Poor Growth
Possible causes: Insufficient sunlight, poor soil drainage, nutrient deficiencies, or pests/diseases. Solutions: Ensure adequate sunlight, improve soil drainage, fertilize appropriately, and address any pest or disease issues.
Problem: Root Rot
Possible causes: Overwatering, poor drainage, or fungal infection. Solutions: Improve soil drainage, reduce watering frequency, and consider using a fungicide if necessary. Prevention is key – ensure good air circulation and avoid overhead watering.
Problem: Pests (e.g., Sweet Potato Weevils)
Possible causes: Infestation from neighboring plants or soil. Solutions: Use organic pest control methods such as neem oil or insecticidal soap. Monitor regularly and address infestations promptly.
Problem: Small Sweet Potatoes
Possible causes: Poor soil conditions, insufficient nutrients, or overcrowding. Solutions: Improve soil fertility, ensure adequate spacing between plants, and provide sufficient nutrients.
Conclusion
So there you have it – a comprehensive guide to growing your own sweet potatoes! This DIY trick isn’t just about saving money; it’s about experiencing the profound satisfaction of nurturing a plant from a humble slip to a bountiful harvest. Growing your own sweet potatoes allows you to control the entire process, from selecting the perfect variety to ensuring pesticide-free, organically grown tubers. The taste difference between homegrown and store-bought sweet potatoes is remarkable; the sweetness is more intense, the texture smoother, and the overall flavor far superior. This method is surprisingly simple, even for beginner gardeners, requiring minimal space and effort. Whether you have a sprawling backyard or a small balcony, you can successfully cultivate these delicious and nutritious roots. The rewards far outweigh the minimal investment of time and resources. Don’t just take our word for it – experience the joy of harvesting your own sweet potatoes! This simple yet rewarding gardening project is a fantastic way to connect with nature and enjoy the fruits (or rather, roots!) of your labor. We encourage you to try this method and share your experiences with us. Let us know what varieties you choose, any challenges you encounter, and most importantly, how delicious your homegrown sweet potatoes turned out! Share your photos and stories on social media using #GrowSweetPotatoesDIY – we can’t wait to see your success! Beyond the basic method outlined, there are numerous exciting variations you can explore. Experiment with different varieties of sweet potatoes to discover your favorite flavor profiles. Consider using different growing mediums, such as hydroponics or vertical gardening techniques, to maximize space efficiency. You can also explore companion planting, incorporating other plants that benefit sweet potato growth. The possibilities are endless, and the journey of growing your own sweet potatoes is as rewarding as the harvest itself.
Frequently Asked Questions
What type of sweet potato slips should I use?
Using slips from healthy, disease-free sweet potatoes is crucial for a successful harvest. You can purchase certified slips from reputable nurseries or propagate your own from healthy sweet potatoes. Look for slips that are firm, vibrant green, and free from any signs of disease or pests. Avoid slips that are wilted, yellowed, or show any signs of damage.
How much sunlight do sweet potatoes need?
Sweet potatoes are sun-worshippers! They thrive in full sun, meaning at least six to eight hours of direct sunlight per day. Choose a location in your garden or on your balcony that receives ample sunlight throughout the day. Insufficient sunlight can lead to poor growth and reduced yields.
What kind of soil is best for growing sweet potatoes?
Sweet potatoes prefer well-drained, sandy loam soil. Heavy clay soils can retain too much water, leading to root rot. Amend heavy clay soils with organic matter, such as compost or well-rotted manure, to improve drainage and aeration. The soil pH should ideally be slightly acidic, between 6.0 and 6.8.
How often should I water my sweet potatoes?
Consistent watering is essential, especially during the growing season. Water deeply and regularly, ensuring the soil remains moist but not waterlogged. The frequency of watering will depend on your climate and soil conditions. During dry periods, you may need to water more frequently. Always check the soil moisture before watering to avoid overwatering.
When can I harvest my sweet potatoes?
Sweet potatoes are typically ready for harvest about four months after planting, usually in the fall. The leaves will begin to yellow and die back as the tubers mature. Gently dig around the plants to locate the sweet potatoes. Avoid damaging the tubers during harvesting. Cure the harvested sweet potatoes in a warm, dry place for a few weeks to improve their flavor and storage life.
What are some common problems when growing sweet potatoes?
Some common problems include root rot (due to overwatering or poorly drained soil), fungal diseases (like leaf blight), and insect pests (like sweet potato weevils). Proper soil preparation, adequate drainage, and regular monitoring for pests and diseases are crucial for preventing these issues. Consider using organic pest control methods if necessary.
Can I grow sweet potatoes in containers?
Absolutely! Growing sweet potatoes in containers is a great option for those with limited space. Choose large containers with ample drainage holes. Use a well-draining potting mix and ensure the containers receive at least six to eight hours of sunlight per day. Regular watering is essential, as containers dry out more quickly than in-ground plantings.
What are the benefits of growing my own sweet potatoes?
Growing your own sweet potatoes offers numerous benefits. You’ll enjoy incredibly flavorful, fresh sweet potatoes free from pesticides and other chemicals. It’s a rewarding gardening experience, connecting you with nature and providing a sense of accomplishment. Plus, you’ll save money compared to buying sweet potatoes from the store. And finally, you’ll have the satisfaction of knowing exactly where your food comes from and how it was grown.
What if my sweet potato slips don’t grow?
Several factors can affect the growth of sweet potato slips. Ensure your slips are healthy and disease-free. Check that they are receiving adequate sunlight, water, and nutrients. Poor soil drainage can also hinder growth. If you’re still experiencing problems, consider consulting with a local gardening expert for further assistance. Remember, patience is key! Sometimes, slips take a little time to establish themselves before vigorous growth begins.
Can I save seeds from my harvest to grow more sweet potatoes next year?
Sweet potatoes are propagated vegetatively, not from seeds. You cannot save seeds from your harvest to grow more sweet potatoes. Instead, you need to save slips from your healthy plants or purchase new slips from a reputable nursery for the next growing season. This ensures that you are planting healthy, disease-free material for a successful harvest.
Leave a Comment