

Grow Romanesco Cauliflower in Containers? Absolutely! Have you ever gazed upon the fractal beauty of a Romanesco cauliflower and thought, “I wish I could grow that!”? Well, you’re not alone. This vibrant, otherworldly vegetable, with its mesmerizing spiral patterns, has captivated gardeners and food enthusiasts for centuries. Originating in Italy, specifically near Rome (hence the name!), the Romanesco cauliflower is more than just a pretty face; it’s packed with nutrients and boasts a delicious, nutty flavor.
But let’s be honest, the idea of growing such an exotic vegetable can seem daunting, especially if you’re short on space. That’s where the magic of container gardening comes in! Many people think they need acres of land to cultivate their own food, but I’m here to tell you that’s simply not true. With a few simple tricks and a little know-how, you can successfully grow Romanesco cauliflower in containers, even on a small balcony or patio.
This DIY guide is your passport to homegrown Romanesco goodness. We’ll break down the process step-by-step, from choosing the right container and soil to providing the perfect growing conditions. Imagine the satisfaction of harvesting your own stunning Romanesco, knowing you nurtured it from seed to table. Not only will you impress your friends and family, but you’ll also enjoy the health benefits and the sheer joy of connecting with nature, right in your own backyard (or balcony!). So, grab your gardening gloves, and let’s get started!
Grow Your Own Romanesco Cauliflower in Containers: A Step-by-Step Guide
Hey there, fellow gardening enthusiasts! Have you ever seen a Romanesco cauliflower and thought, “Wow, that’s too beautiful to eat!”? Well, I’m here to tell you that you can grow your own stunning Romanesco right in your backyard, even if you only have a patio or balcony. Container gardening makes it totally achievable, and I’m going to walk you through every step. Let’s get started!
Choosing the Right Container and Soil
First things first, we need to talk about the home where your Romanesco will thrive.
* Container Size: Romanesco needs space to grow, so opt for a container that’s at least 18 inches in diameter and 18 inches deep. A 5-gallon bucket works well, but bigger is always better! Think of it like giving your plant a spacious apartment instead of a tiny studio.
* Drainage: Excellent drainage is crucial. Make sure your container has plenty of drainage holes at the bottom. Romanesco hates sitting in soggy soil.
* Soil Mix: Forget using garden soil straight from the ground. It’s often too heavy and doesn’t drain well. Instead, create a well-draining, nutrient-rich potting mix. I like to use a blend of:
* 1 part compost (for nutrients and moisture retention)
* 1 part peat moss or coco coir (for moisture retention and aeration)
* 1 part perlite or vermiculite (for drainage)
Starting Your Romanesco Seeds
You have two options here: starting seeds indoors or buying seedlings from a nursery. I prefer starting from seed because it gives me more control over the process, and it’s usually more cost-effective.
* When to Start: Romanesco needs a long growing season, so start your seeds indoors about 4-6 weeks before the last expected frost in your area. Check your local frost dates to be sure!
* Seed Starting Supplies: You’ll need:
* Seed starting trays or small pots
* Seed starting mix (a finer version of potting mix)
* A spray bottle
* A heat mat (optional, but helpful)
* A grow light (also optional, but highly recommended)
Step-by-Step Seed Starting:
1. Moisten the Seed Starting Mix: Before filling your trays or pots, moisten the seed starting mix with water. It should be damp but not soggy.
2. Fill the Trays/Pots: Fill your seed starting trays or pots with the moistened mix, leaving about half an inch of space at the top.
3. Sow the Seeds: Plant 2-3 seeds per cell or pot, about ¼ inch deep.
4. Cover the Seeds: Gently cover the seeds with more seed starting mix.
5. Water Gently: Use a spray bottle to gently water the surface of the soil. Avoid overwatering, which can cause the seeds to rot.
6. Provide Warmth: Place the trays or pots on a heat mat (if using) and cover them with a humidity dome or plastic wrap to create a greenhouse effect. This will help the seeds germinate.
7. Provide Light: Place the trays or pots under a grow light (if using) or in a bright, sunny window. If using a grow light, keep it a few inches above the seedlings.
8. Monitor and Water: Check the soil moisture daily and water as needed to keep it consistently moist but not soggy.
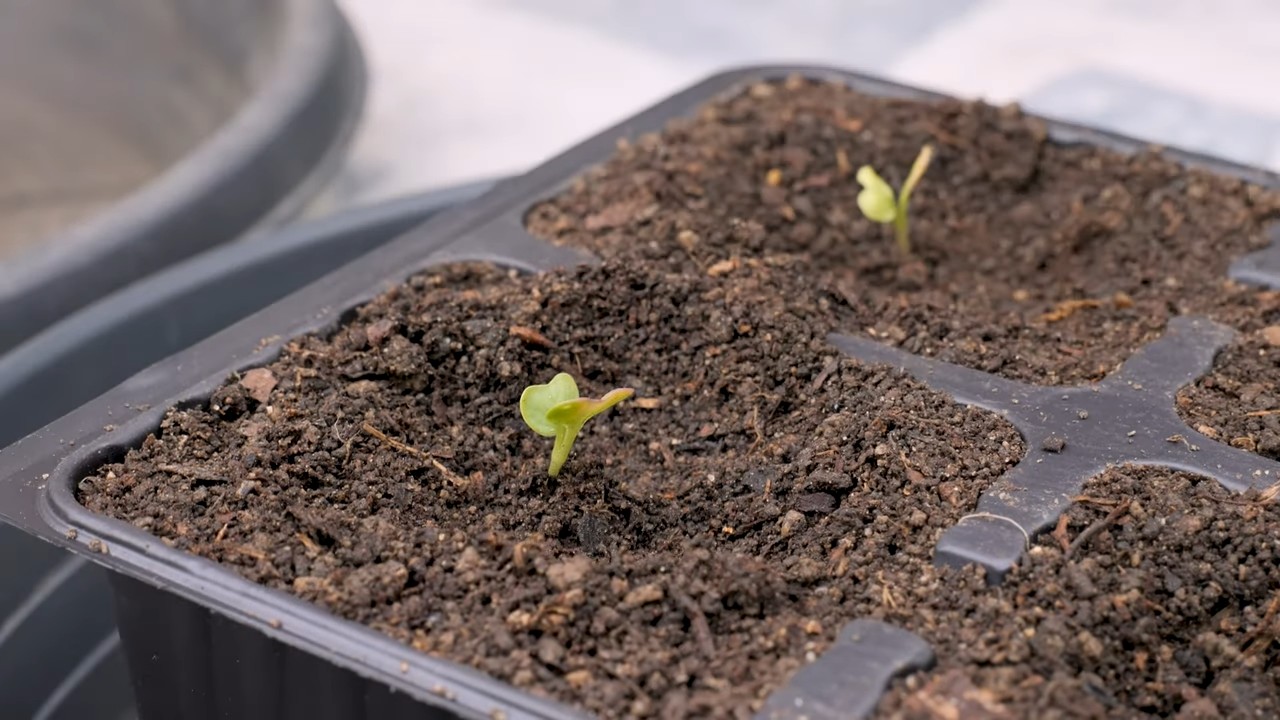
9. Remove Humidity Dome: Once the seeds germinate (usually in 5-10 days), remove the humidity dome or plastic wrap.
10. Thin Seedlings: Once the seedlings have their first true leaves (the second set of leaves), thin them to one seedling per cell or pot. Choose the strongest, healthiest-looking seedling and snip off the others at the soil line. Don’t pull them out, as this can disturb the roots of the remaining seedling.
Transplanting Your Seedlings
Once your seedlings have grown a few inches tall and have a few sets of true leaves, it’s time to transplant them into their final containers.
* Hardening Off: Before transplanting, you need to “harden off” your seedlings. This means gradually exposing them to outdoor conditions to help them adjust to the sun, wind, and temperature changes. Start by placing them outside in a sheltered spot for an hour or two each day, gradually increasing the amount of time they spend outdoors over the course of a week.
* Transplanting Time: Choose a cloudy or overcast day to transplant your seedlings. This will help prevent them from getting stressed by the sun.
Step-by-Step Transplanting:
1. Prepare the Container: Fill your prepared container with the potting mix, leaving a few inches of space at the top.
2. Dig a Hole: Dig a hole in the center of the container that’s large enough to accommodate the root ball of the seedling.
3. Remove the Seedling: Gently remove the seedling from its tray or pot. Be careful not to damage the roots. If the seedling is root-bound (the roots are circling around the bottom of the pot), gently loosen the roots before planting.
4. Plant the Seedling: Place the seedling in the hole and backfill with potting mix. Gently firm the soil around the base of the plant.
5. Water Thoroughly: Water the seedling thoroughly after transplanting.
6. Mulch: Add a layer of mulch around the base of the plant to help retain moisture and suppress weeds. Straw, wood chips, or shredded leaves work well.
Caring for Your Romanesco Plants
Now that your Romanesco is in its final home, it’s time to provide it with the care it needs to thrive.
* Sunlight: Romanesco needs at least 6 hours of sunlight per day. Place your container in a sunny location.
* Watering: Water your Romanesco regularly, especially during hot, dry weather. The soil should be consistently moist but not soggy. Check the soil moisture by sticking your finger into the soil. If the top inch of soil is dry, it’s time to water.
* Fertilizing: Romanesco is a heavy feeder, so it needs regular fertilization. Use a balanced fertilizer (e.g., 10-10-10) every 2-3 weeks. You can also use a liquid fertilizer, such as fish emulsion or seaweed extract, every week.
* Pest Control: Keep an eye out for pests, such as aphids, cabbage worms, and flea beetles. You can control these pests with insecticidal soap, neem oil, or by hand-picking them off the plants.
* Weed Control: Keep the container free of weeds. Weeds compete with the Romanesco for nutrients and water.
* Support: As the Romanesco head grows, it may need support to prevent the plant from falling over. You can use a stake or tomato cage to provide support.
Harvesting Your Romanesco
The moment you’ve been waiting for! Harvesting your beautiful Romanesco.
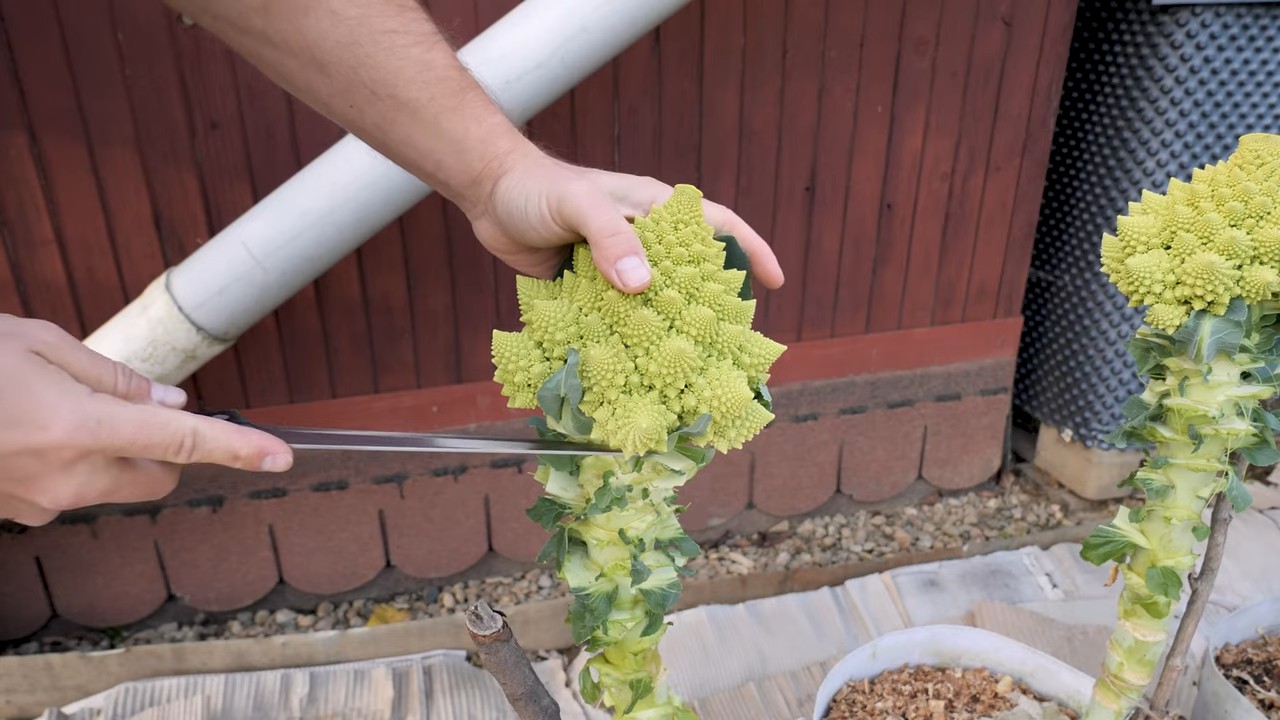
* When to Harvest: Romanesco is ready to harvest when the head is firm and compact, and the florets are tightly closed. The head should be about 6-8 inches in diameter.
* How to Harvest: Use a sharp knife to cut the head from the plant, leaving a few inches of stem attached.
Troubleshooting
Even with the best care, you might encounter some problems along the way. Here are a few common issues and how to address them:
* Yellowing Leaves: This could be a sign of overwatering, underwatering, or nutrient deficiency. Check the soil moisture and adjust your watering accordingly. Fertilize the plant with a balanced fertilizer.
* Stunted Growth: This could be caused by insufficient sunlight, poor soil, or pests. Make sure the plant is getting enough sunlight and fertilize it regularly. Check for pests and treat them as needed.
* Bolting: Bolting is when the plant prematurely flowers. This is usually caused by hot weather or stress. To prevent bolting, try to keep the plant cool and well-watered.
* Clubroot: This is a soilborne disease that causes the roots to swell and become distorted. To prevent clubroot, make sure to use well-draining soil and avoid planting Romanesco in the same spot year after year.
And there you have it! Growing Romanesco cauliflower in containers is a rewarding experience. With a little patience and care, you’ll be enjoying your own homegrown fractal florets in no time. Happy gardening!
Conclusion
So, there you have it! Growing Romanesco cauliflower in containers might seem like a challenge at first, but with the right approach, it’s an incredibly rewarding experience. We’ve walked you through the essential steps, from selecting the perfect container and soil to nurturing your plant through its growth cycle. The unique beauty and delicious flavor of homegrown Romanesco are well worth the effort.
But why is this DIY trick a must-try? Beyond the satisfaction of cultivating your own food, growing Romanesco in containers offers several compelling advantages. First, it provides greater control over the growing environment. You can easily move your container to optimize sunlight exposure, protect it from harsh weather, and shield it from pests. This is especially beneficial for those living in areas with unpredictable climates or limited garden space. Second, container gardening allows you to use a specially formulated soil mix that provides the ideal nutrients and drainage for Romanesco cauliflower, leading to healthier and more productive plants. Finally, it’s simply a fascinating and educational process, connecting you more deeply with the food you eat.
Don’t be afraid to experiment with variations! Consider adding companion plants like marigolds or nasturtiums to your container to deter pests and attract beneficial insects. You could also try different types of organic fertilizers to see which one works best for your Romanesco. For a spicier twist, try growing some hot peppers nearby – the capsaicin can naturally deter some pests. Another variation is to try succession planting, starting new seeds every few weeks to ensure a continuous harvest throughout the growing season. You can also experiment with different container sizes to see what works best for your space and growing conditions. Remember to adjust your watering and fertilizing schedule based on the size of the container and the plant’s growth stage.
We wholeheartedly encourage you to give this DIY trick a try. Growing Romanesco cauliflower in containers is a fantastic way to enjoy fresh, healthy produce, even if you don’t have a traditional garden. It’s a project that’s both educational and rewarding, and the results are truly stunning.
Once you’ve harvested your beautiful Romanesco, be sure to share your experience with us! We’d love to see photos of your plants and hear about any tips or tricks you discovered along the way. Your insights could help other gardeners succeed in growing their own Romanesco cauliflower in containers. Share your stories and photos on social media using relevant gardening hashtags, or leave a comment below. Let’s build a community of Romanesco enthusiasts and inspire others to embrace the joy of homegrown produce! Remember, the key to successful container gardening, especially when attempting to grow Romanesco cauliflower, is patience, observation, and a willingness to learn. Happy gardening!
Frequently Asked Questions (FAQ)
What is the ideal container size for growing Romanesco cauliflower?
A container that is at least 12 inches in diameter and 12 inches deep is generally recommended for growing Romanesco cauliflower. However, a larger container, such as a 5-gallon bucket or a similar-sized pot, is even better. Romanesco needs ample space for its roots to develop properly, and a larger container provides that space. Insufficient space can lead to stunted growth and smaller heads. Make sure the container has adequate drainage holes to prevent waterlogging.
What type of soil is best for growing Romanesco cauliflower in containers?
Romanesco cauliflower thrives in well-draining, nutrient-rich soil. A good potting mix specifically formulated for vegetables is an excellent choice. You can also create your own mix by combining equal parts of compost, peat moss (or coconut coir), and perlite or vermiculite. Compost provides essential nutrients, peat moss (or coconut coir) helps retain moisture, and perlite or vermiculite improves drainage. Avoid using garden soil in containers, as it can become compacted and hinder root growth.
How much sunlight does Romanesco cauliflower need?
Romanesco cauliflower requires at least 6 hours of direct sunlight per day to grow properly. Choose a location for your container that receives ample sunlight throughout the day. If you live in a particularly hot climate, some afternoon shade may be beneficial to prevent the plant from overheating. If you don’t have a sunny spot, you can supplement with grow lights.
How often should I water my Romanesco cauliflower plant?
Water your Romanesco cauliflower plant regularly, keeping the soil consistently moist but not waterlogged. The frequency of watering will depend on the weather conditions, the size of the container, and the type of soil you’re using. Check the soil moisture level daily by sticking your finger about an inch into the soil. If it feels dry, it’s time to water. Water deeply, allowing the water to drain out of the bottom of the container. Avoid overhead watering, as this can increase the risk of fungal diseases.
What kind of fertilizer should I use for Romanesco cauliflower?
Romanesco cauliflower is a heavy feeder and requires regular fertilization to produce large, healthy heads. Use a balanced fertilizer with an NPK ratio of 10-10-10 or 14-14-14. You can also use an organic fertilizer, such as compost tea or fish emulsion. Fertilize your plant every 2-3 weeks, following the instructions on the fertilizer package. Avoid over-fertilizing, as this can burn the roots and damage the plant.
How do I protect my Romanesco cauliflower from pests?
Several pests can attack Romanesco cauliflower, including cabbage worms, aphids, and flea beetles. To protect your plant, you can use row covers to prevent pests from reaching the plant. You can also handpick pests off the plant or use insecticidal soap or neem oil to control infestations. Companion planting with herbs like rosemary and thyme can also help deter pests. Regularly inspect your plant for signs of pests and take action promptly to prevent them from spreading.
How long does it take to grow Romanesco cauliflower?
Romanesco cauliflower typically takes 75-100 days to mature from seed. The exact time will depend on the variety, the growing conditions, and the climate. Start your seeds indoors 6-8 weeks before the last expected frost. Transplant the seedlings into containers when they are 4-6 weeks old. Be patient and provide your plant with the proper care, and you’ll be rewarded with a beautiful and delicious harvest.
How do I know when my Romanesco cauliflower is ready to harvest?
Romanesco cauliflower is ready to harvest when the head is firm, compact, and has reached the desired size. The size will vary depending on the variety, but typically, a head that is 6-8 inches in diameter is ready to harvest. The florets should be tightly packed together and have a vibrant green color. Use a sharp knife to cut the head from the plant, leaving a few leaves attached.
Can I grow Romanesco cauliflower in containers in a small space?
Yes, growing Romanesco cauliflower in containers is an excellent option for small spaces, such as balconies, patios, or small gardens. The container allows you to control the growing environment and provide the plant with the specific conditions it needs to thrive. Choose a compact variety of Romanesco cauliflower and use a container that is appropriately sized for the plant. With proper care and attention, you can successfully grow Romanesco cauliflower in even the smallest of spaces.
What are some common problems when growing Romanesco cauliflower and how can I fix them?
Some common problems include bolting (premature flowering), buttoning (small heads), and pest infestations. Bolting can be caused by stress, such as extreme temperatures or lack of water. Ensure consistent watering and protect from extreme heat. Buttoning is often due to nutrient deficiencies; fertilize regularly. For pests, use row covers, handpick, or apply organic insecticides. Regularly inspect your plants to catch problems early.
Leave a Comment