

Grow Radishes Indoors Kitchen – ever dreamt of snipping fresh, peppery radishes right from your kitchen counter? I know I have! Forget trekking to the garden or relying on supermarket produce; with a few simple tricks, you can cultivate these vibrant root vegetables right in the heart of your home.
Radishes, humble as they may seem, have a surprisingly rich history. Believed to have originated in Asia, they were cultivated in ancient Egypt and Greece, valued for both their edible roots and leaves. From humble peasant fare to a staple in sophisticated salads, radishes have graced tables for centuries. But what if I told you that you could bring this historical veggie right into your modern kitchen?
In today’s fast-paced world, access to fresh, healthy food is more important than ever. Growing your own radishes indoors offers a fantastic solution. It’s a quick, easy, and rewarding project, perfect for beginners and seasoned gardeners alike. Plus, who wouldn’t love the satisfaction of adding a burst of homegrown flavor to their meals? This DIY guide will equip you with all the knowledge you need to successfully grow radishes indoors kitchen, regardless of your space or experience. Let’s get started and bring a little bit of the garden inside!
Grow Your Own Radishes Indoors: A Beginner’s Guide
Hey there, fellow gardening enthusiasts! Ever thought about growing your own radishes right in your kitchen? It’s easier than you might think, and the satisfaction of harvesting your own spicy little roots is totally worth it. Plus, fresh radishes add a delightful crunch and zing to salads, sandwiches, and even just as a snack. So, let’s dive into how you can bring a little bit of the garden indoors and enjoy fresh radishes year-round!
What You’ll Need
Before we get started, let’s gather all the necessary supplies. This will make the whole process smoother and more enjoyable. Trust me, having everything ready beforehand is a game-changer!
* Radish Seeds: Choose a variety that matures quickly. ‘Cherry Belle’ and ‘French Breakfast’ are popular choices for indoor growing. I personally love ‘Cherry Belle’ because they’re ready in about a month!
* Container: You’ll need a container that’s at least 6 inches deep. Radishes need room to grow downwards. A plastic container, a terracotta pot, or even a repurposed container will work just fine. Just make sure it has drainage holes!
* Potting Mix: Use a well-draining potting mix. Avoid using garden soil, as it can be too heavy and compact for container gardening. I prefer a mix of peat moss, perlite, and vermiculite.
* Watering Can or Spray Bottle: You’ll need a gentle way to water your radishes without disturbing the seeds or seedlings.
* Grow Lights (Optional but Recommended): While radishes can grow indoors with enough natural light, grow lights will ensure they get the consistent light they need for optimal growth, especially during the darker months.
* Small Shovel or Trowel: For filling your container with potting mix.
* Plant Labels (Optional): To keep track of what you’re growing, especially if you’re planting multiple varieties.
Preparing Your Container
Okay, now that we have all our supplies, let’s get our container ready for planting!
1. Clean Your Container: If you’re using a previously used container, make sure to clean it thoroughly with soap and water to remove any dirt or debris. This will help prevent diseases and pests.
2. Ensure Drainage: Make sure your container has drainage holes. If it doesn’t, you’ll need to drill some. Radishes don’t like sitting in soggy soil, so good drainage is crucial.
3. Fill with Potting Mix: Fill your container with potting mix, leaving about an inch of space at the top. Gently pat down the soil to remove any air pockets.
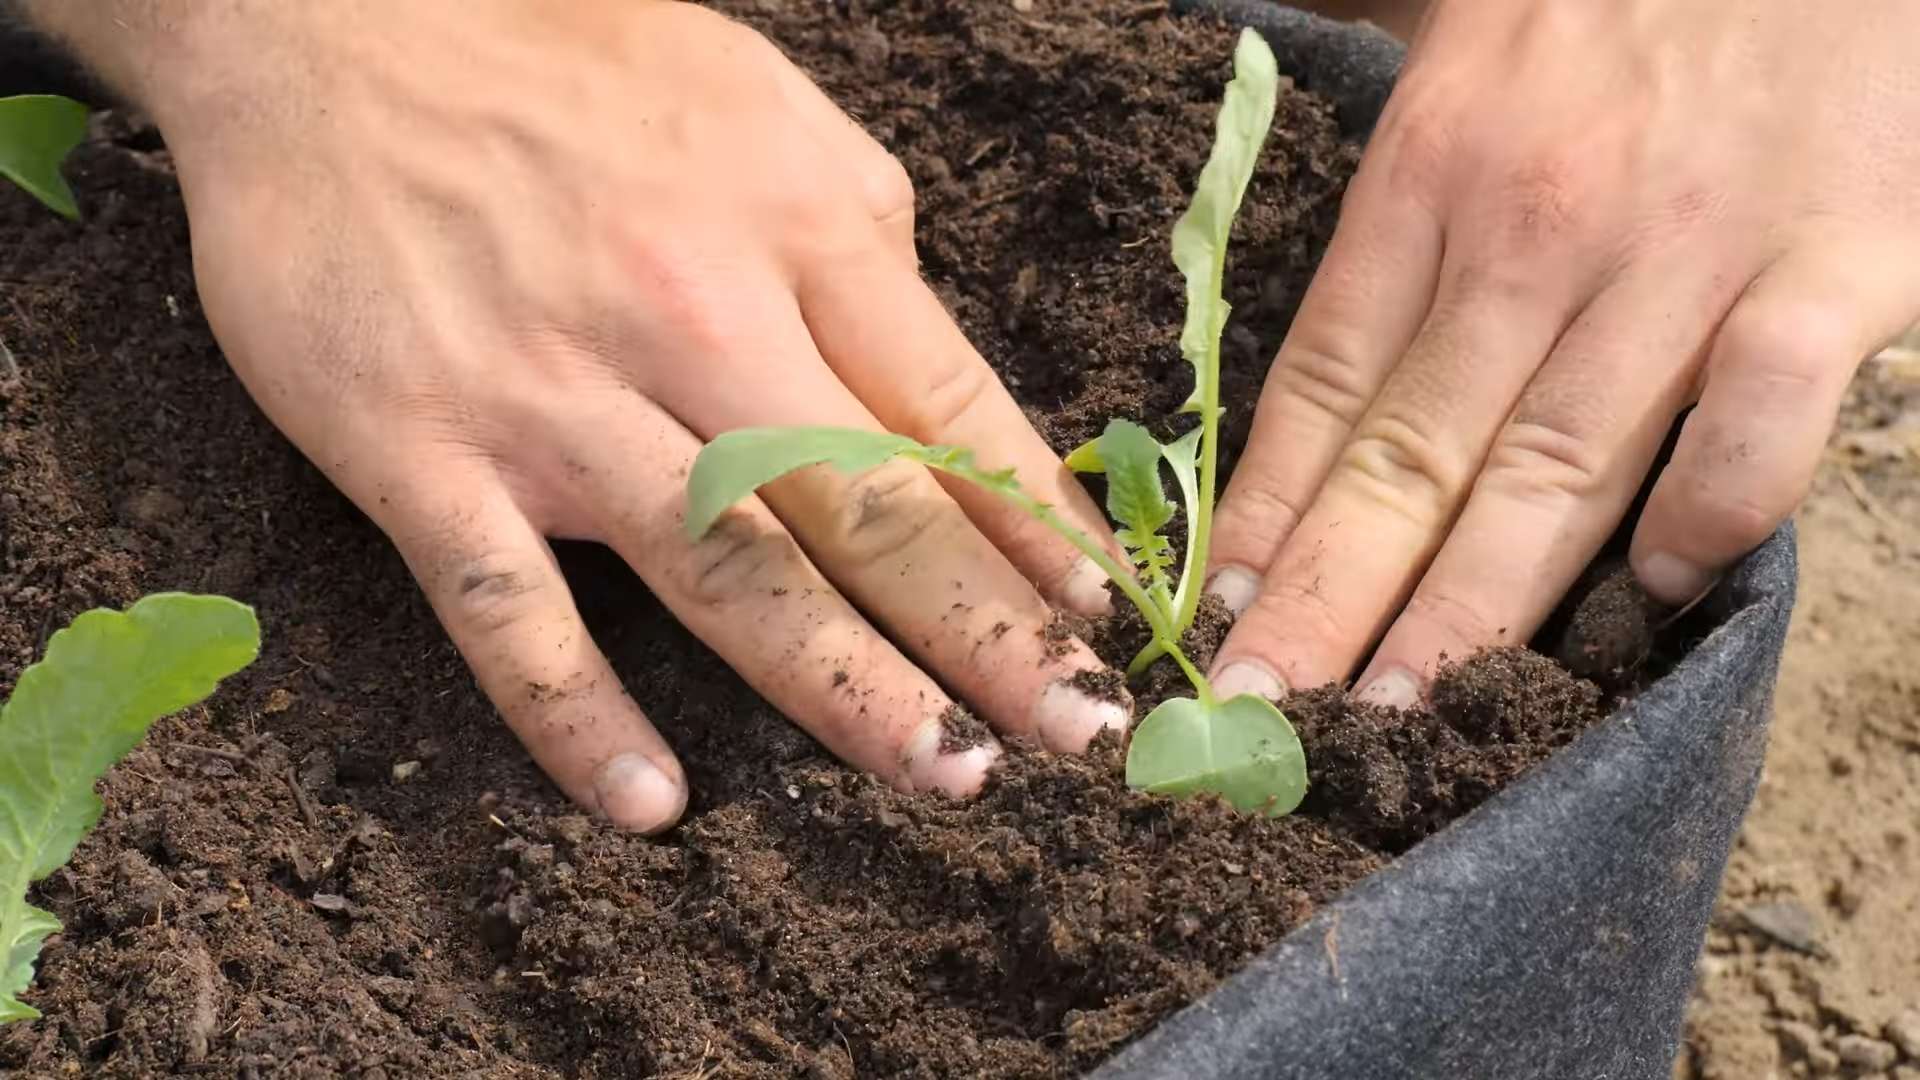
Planting Your Radish Seeds
This is the fun part! Let’s get those seeds in the ground (or rather, in the potting mix!).
1. Sow the Seeds: Sprinkle the radish seeds evenly over the surface of the potting mix. Aim for about 1/2 inch spacing between seeds. You can also create shallow furrows (about 1/4 inch deep) and sow the seeds in the furrows.
2. Cover the Seeds: Lightly cover the seeds with a thin layer of potting mix.
3. Water Gently: Use a watering can or spray bottle to gently water the soil. Be careful not to wash away the seeds. The soil should be moist but not soggy.
Caring for Your Radishes
Now that your radishes are planted, it’s time to provide them with the care they need to thrive.
1. Light: Radishes need at least 6 hours of sunlight per day. If you don’t have enough natural light, use grow lights. Position the grow lights a few inches above the seedlings. I usually keep my grow lights on for about 12-14 hours a day.
2. Watering: Keep the soil consistently moist but not soggy. Water when the top inch of soil feels dry to the touch. Overwatering can lead to root rot, so be careful!
3. Thinning: Once the seedlings emerge (usually within a few days), you’ll need to thin them out. This means removing some of the seedlings so that the remaining ones have enough space to grow. Aim for about 1-2 inches between plants. Don’t be afraid to pull out the weaker-looking seedlings.
4. Temperature: Radishes prefer cool temperatures, ideally between 50°F and 65°F (10°C and 18°C). Avoid placing your container near a heat source, such as a radiator.
5. Fertilizing (Optional): Radishes don’t require a lot of fertilizer. However, if you want to give them a boost, you can use a diluted liquid fertilizer every few weeks. I usually use a balanced fertilizer (10-10-10) diluted to half strength.
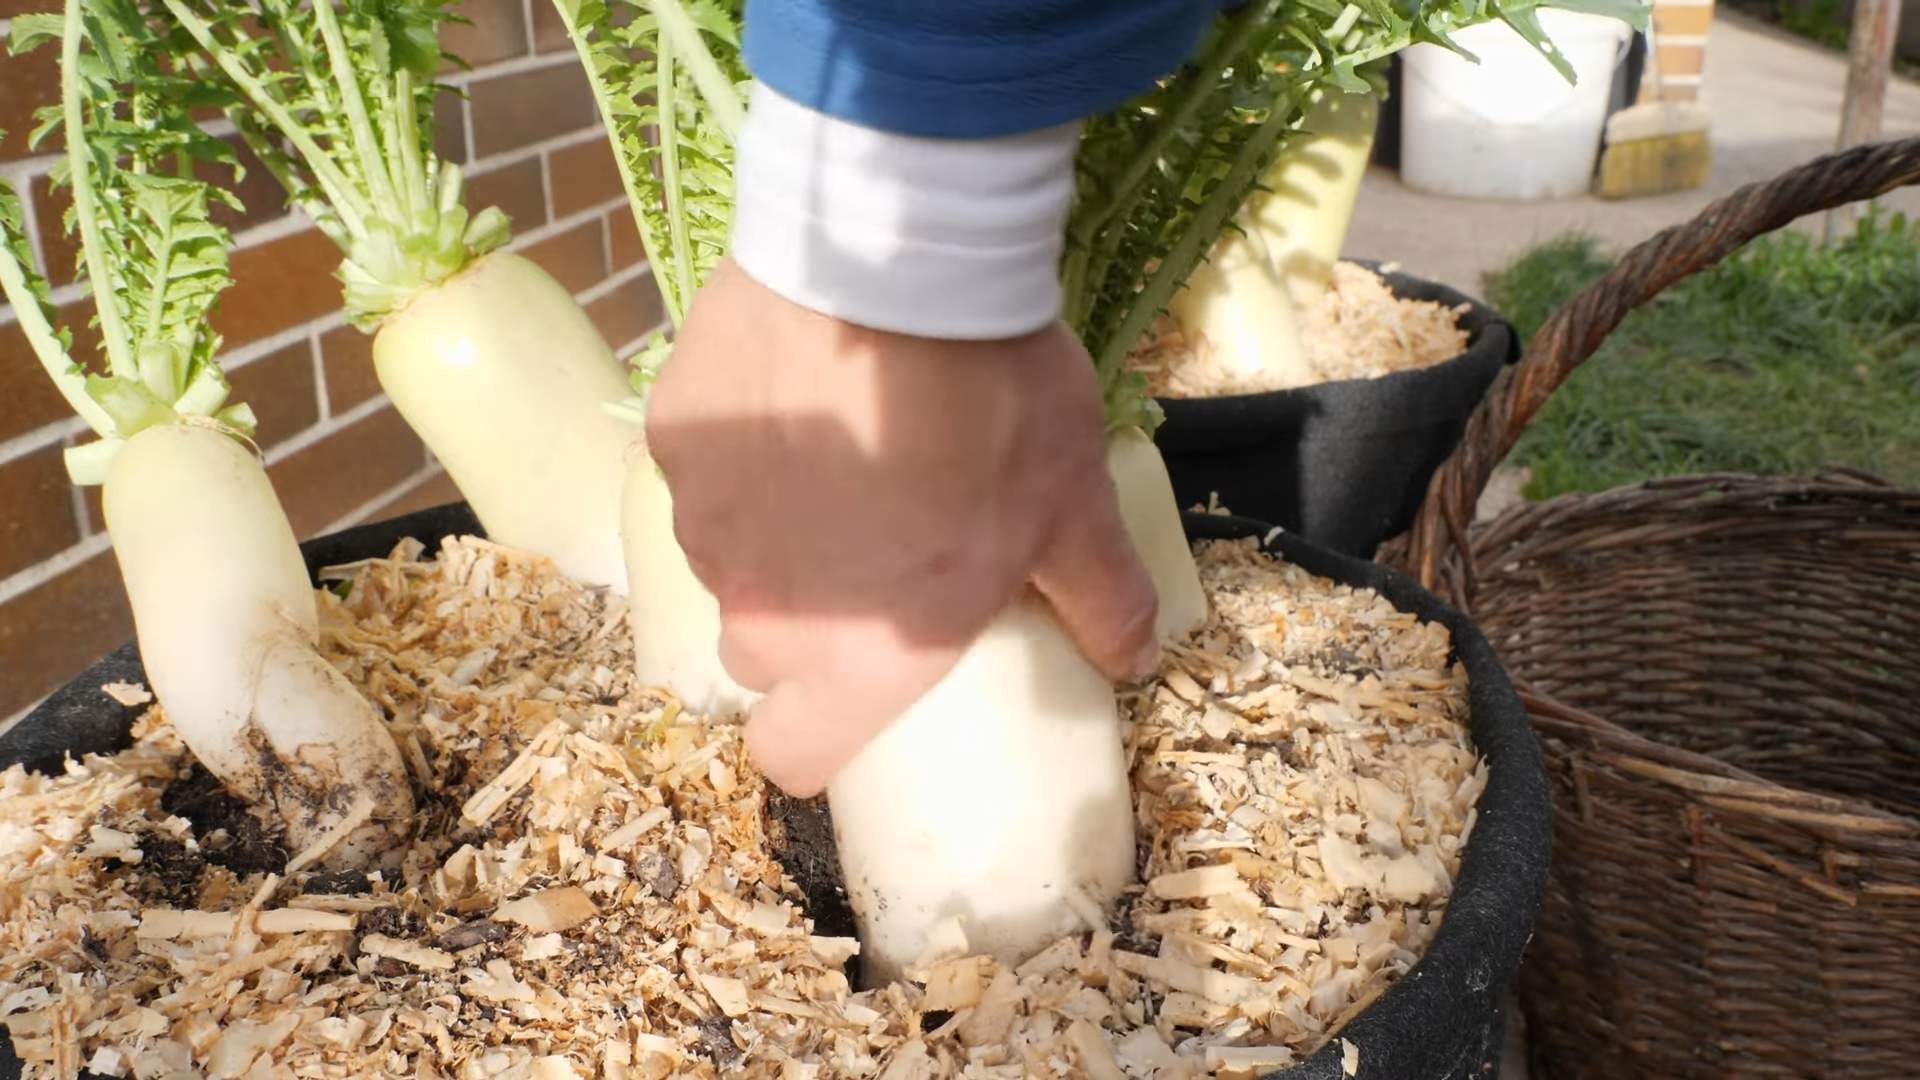
Harvesting Your Radishes
The moment you’ve been waiting for! Harvesting your own homegrown radishes is incredibly rewarding.
1. Check for Maturity: Radishes are typically ready to harvest in about 3-4 weeks, depending on the variety. Check the seed packet for specific maturity times.
2. Harvest When Ready: Gently pull the radishes from the soil. If they’re difficult to pull, you can loosen the soil around them with a small trowel.
3. Enjoy Your Harvest: Wash the radishes thoroughly and enjoy them fresh! They’re delicious in salads, sandwiches, or as a crunchy snack. You can also eat the radish greens! They have a peppery flavor and can be added to salads or stir-fries.
Troubleshooting
Even with the best care, you might encounter some problems while growing radishes indoors. Here are a few common issues and how to address them:
* Leggy Seedlings: If your seedlings are tall and spindly, they’re not getting enough light. Move them closer to a window or use grow lights.
* Root Rot: If the roots are mushy and brown, you’re overwatering. Allow the soil to dry out slightly between waterings.
* Pests: Aphids and flea beetles can sometimes attack radishes. Inspect your plants regularly and treat any infestations with insecticidal soap. I’ve found that a strong blast of water from the hose can also help dislodge aphids.
* Cracked Radishes: This can be caused by inconsistent watering. Make sure to keep the soil consistently moist.
* Radishes Not Bulbing: This can be caused by overcrowding, lack of sunlight, or poor soil. Thin your seedlings, provide adequate light, and use a well-draining potting mix.
Choosing the Right Radish Variety
Not all radish varieties are created equal, especially when it comes to indoor growing. Here are a few of my favorites and why they’re great for containers:
* Cherry Belle: As I mentioned earlier, this is a classic choice. They mature quickly (about 22 days) and produce small, round, bright red radishes with a mild flavor.
* French Breakfast: These radishes are elongated with a red top and white bottom. They have a slightly milder flavor than Cherry Belle and mature in about 25 days.
* Easter Egg: This is a fun mix of radishes that come in a variety of colors, including red, pink, purple, and white. They mature in about 28 days and add a splash of color to your garden and your plate.
* Sparkler White Tip: These radishes are round and red with a white tip. They have a crisp texture and a slightly spicy flavor. They mature in about 25 days.
Tips for Success
Here are a few extra tips to help you grow the best radishes possible indoors:
* Rotate Your Crops: If you’re growing radishes in the same container year after year, it’s a good idea to rotate your crops. This means planting different types of vegetables in the container each year to prevent soil depletion and disease buildup.
* Use a Self-Watering Container: If you tend to forget to water your plants, a self-watering container can be a lifesaver. These containers have a reservoir of water that the plants can draw from as needed.
* Succession Planting: To enjoy a continuous harvest of radishes, sow a new batch of seeds every few weeks. This is called succession planting.
* Don’t Forget the Greens: Radish greens are edible and nutritious! Add them to salads, stir-fries, or soups. They have a peppery flavor that adds a nice kick.
* Have Fun! Gardening should be enjoyable. Don’t get discouraged if you encounter some challenges along the way. Just learn from your mistakes and keep experimenting.
Growing radishes indoors is a fun and rewarding experience. With a little bit of care and attention, you can enjoy fresh, homegrown radishes year-round. So, grab some seeds, get your hands dirty, and start growing!
Conclusion
So, there you have it! Growing radishes indoors in your kitchen is not only possible, but it’s surprisingly simple and incredibly rewarding. Forget those bland, store-bought radishes that lack the peppery punch you crave. With this easy DIY trick, you can cultivate a continuous supply of fresh, crisp, and flavorful radishes right on your windowsill, adding a vibrant touch of green to your kitchen and a zesty kick to your meals.
Why is this a must-try? Because it puts you in control. You control the soil, the light, and the watering, ensuring your radishes are grown exactly how you like them, free from harmful pesticides and herbicides. Plus, it’s a fantastic way to introduce children to the wonders of gardening and the satisfaction of growing their own food. Imagine the excitement of harvesting radishes they nurtured from tiny seeds!
But the benefits don’t stop there. Growing radishes indoors is a fantastic way to combat those winter blues. The sight of vibrant green leaves sprouting in the middle of a cold, gray day is a mood booster in itself. And let’s not forget the convenience! No more last-minute trips to the grocery store when you need a few radishes for your salad or crudité platter. They’re right there, ready to be harvested whenever you need them.
Looking for variations? Experiment with different radish varieties! ‘Cherry Belle’ is a classic choice for its bright red color and mild flavor, but don’t be afraid to try ‘French Breakfast’ for its elongated shape and slightly sweeter taste, or ‘Black Spanish’ for its bold, peppery bite. You can also try succession planting, sowing a new batch of seeds every week or two, to ensure a continuous harvest throughout the growing season. Consider using different types of containers too. While plastic pots work perfectly well, terracotta pots can add a rustic charm to your indoor garden. Just remember that terracotta dries out faster, so you’ll need to water more frequently.
This DIY radish growing method is a game-changer for any home cook or gardening enthusiast. It’s a simple, affordable, and incredibly satisfying way to bring fresh, flavorful produce into your kitchen, regardless of the season or your outdoor space.
We wholeheartedly encourage you to give this DIY trick a try. It’s easier than you think, and the rewards are well worth the effort. Once you’ve harvested your first batch of homegrown radishes, you’ll be hooked!
Don’t forget to share your experience with us! We’d love to see photos of your indoor radish gardens and hear about your favorite ways to enjoy your homegrown harvest. Tag us on social media and let us know what you think. Happy growing!
Frequently Asked Questions (FAQ)
What kind of soil should I use for growing radishes indoors?
The best soil for growing radishes indoors is a well-draining potting mix. Avoid using garden soil, as it can be too heavy and compact, hindering root development. Look for a potting mix that contains ingredients like peat moss, perlite, and vermiculite, which will provide good drainage and aeration. You can also create your own potting mix by combining equal parts of these ingredients. Ensure the pH level of the soil is between 6.0 and 7.0 for optimal radish growth.
How much light do radishes need when grown indoors?
Radishes need at least 6 hours of direct sunlight per day to thrive. If you don’t have a sunny windowsill, you can supplement with artificial light. A fluorescent grow light or an LED grow light will work well. Position the light a few inches above the plants and keep it on for 12-14 hours per day. Rotate the plants regularly to ensure even light exposure on all sides. Insufficient light can result in leggy plants with small, underdeveloped radishes.
How often should I water my indoor radishes?
Water your radishes regularly, keeping the soil consistently moist but not waterlogged. Check the soil moisture by sticking your finger about an inch deep. If the soil feels dry, it’s time to water. Water thoroughly until excess water drains out of the bottom of the pot. Avoid overwatering, as this can lead to root rot. The frequency of watering will depend on factors such as the temperature, humidity, and type of pot you’re using. Terracotta pots, for example, dry out faster than plastic pots.
How long does it take for radishes to grow indoors?
Radishes are one of the fastest-growing vegetables, making them ideal for indoor gardening. Most varieties will be ready to harvest in just 3-4 weeks from planting. The exact time will depend on the variety, growing conditions, and your personal preferences. You can start harvesting when the radish roots are about 1 inch in diameter. Don’t let them grow too large, as they can become woody and bitter.
What are some common problems when growing radishes indoors and how can I fix them?
Some common problems include:
* **Leggy plants:** This is usually caused by insufficient light. Provide more light, either by moving the plants to a sunnier location or using artificial light.
* **Small radishes:** This can be caused by overcrowding, poor soil, or lack of nutrients. Thin out the seedlings to give them more space, use a good-quality potting mix, and fertilize with a balanced liquid fertilizer every few weeks.
* **Root rot:** This is caused by overwatering. Ensure the soil is well-draining and avoid overwatering.
* **Pests:** Aphids and flea beetles can sometimes infest indoor radishes. Inspect your plants regularly and treat any infestations with insecticidal soap or neem oil.
Can I grow radishes indoors year-round?
Yes, you can grow radishes indoors year-round, as long as you provide them with adequate light, water, and nutrients. Indoor growing allows you to control the environment, protecting your plants from extreme temperatures and pests. Succession planting is key to maintaining a continuous harvest.
Do I need to fertilize my indoor radishes?
While radishes don’t require heavy fertilization, a light feeding every few weeks can help them grow faster and produce larger roots. Use a balanced liquid fertilizer diluted to half strength. Avoid over-fertilizing, as this can lead to excessive foliage growth at the expense of root development.
How do I harvest radishes grown indoors?
Harvest radishes when the roots are about 1 inch in diameter. Gently pull the radishes out of the soil, holding them by the base of the leaves. Wash them thoroughly and trim off the leaves and root tips. The leaves are also edible and can be used in salads or stir-fries.
Can I regrow radish tops?
While you can’t regrow a whole radish from the top, you can sprout the tops and use them as microgreens. Place the radish tops in a shallow dish of water, ensuring the cut end is submerged. Place the dish in a sunny location and change the water daily. Within a few days, the tops will start to sprout. You can then use the sprouts in salads, sandwiches, or as a garnish.
What are some creative ways to use my homegrown radishes?
Beyond the classic salad addition, get creative! Slice them thinly and add them to tacos for a crunchy, peppery bite. Roast them with other root vegetables for a sweet and savory side dish. Pickle them for a tangy condiment. Or, simply enjoy them raw with a sprinkle of sea salt and a drizzle of olive oil. Don’t forget the greens! Radish greens can be sautéed, added to soups, or used to make pesto. The possibilities are endless!

Leave a Comment