

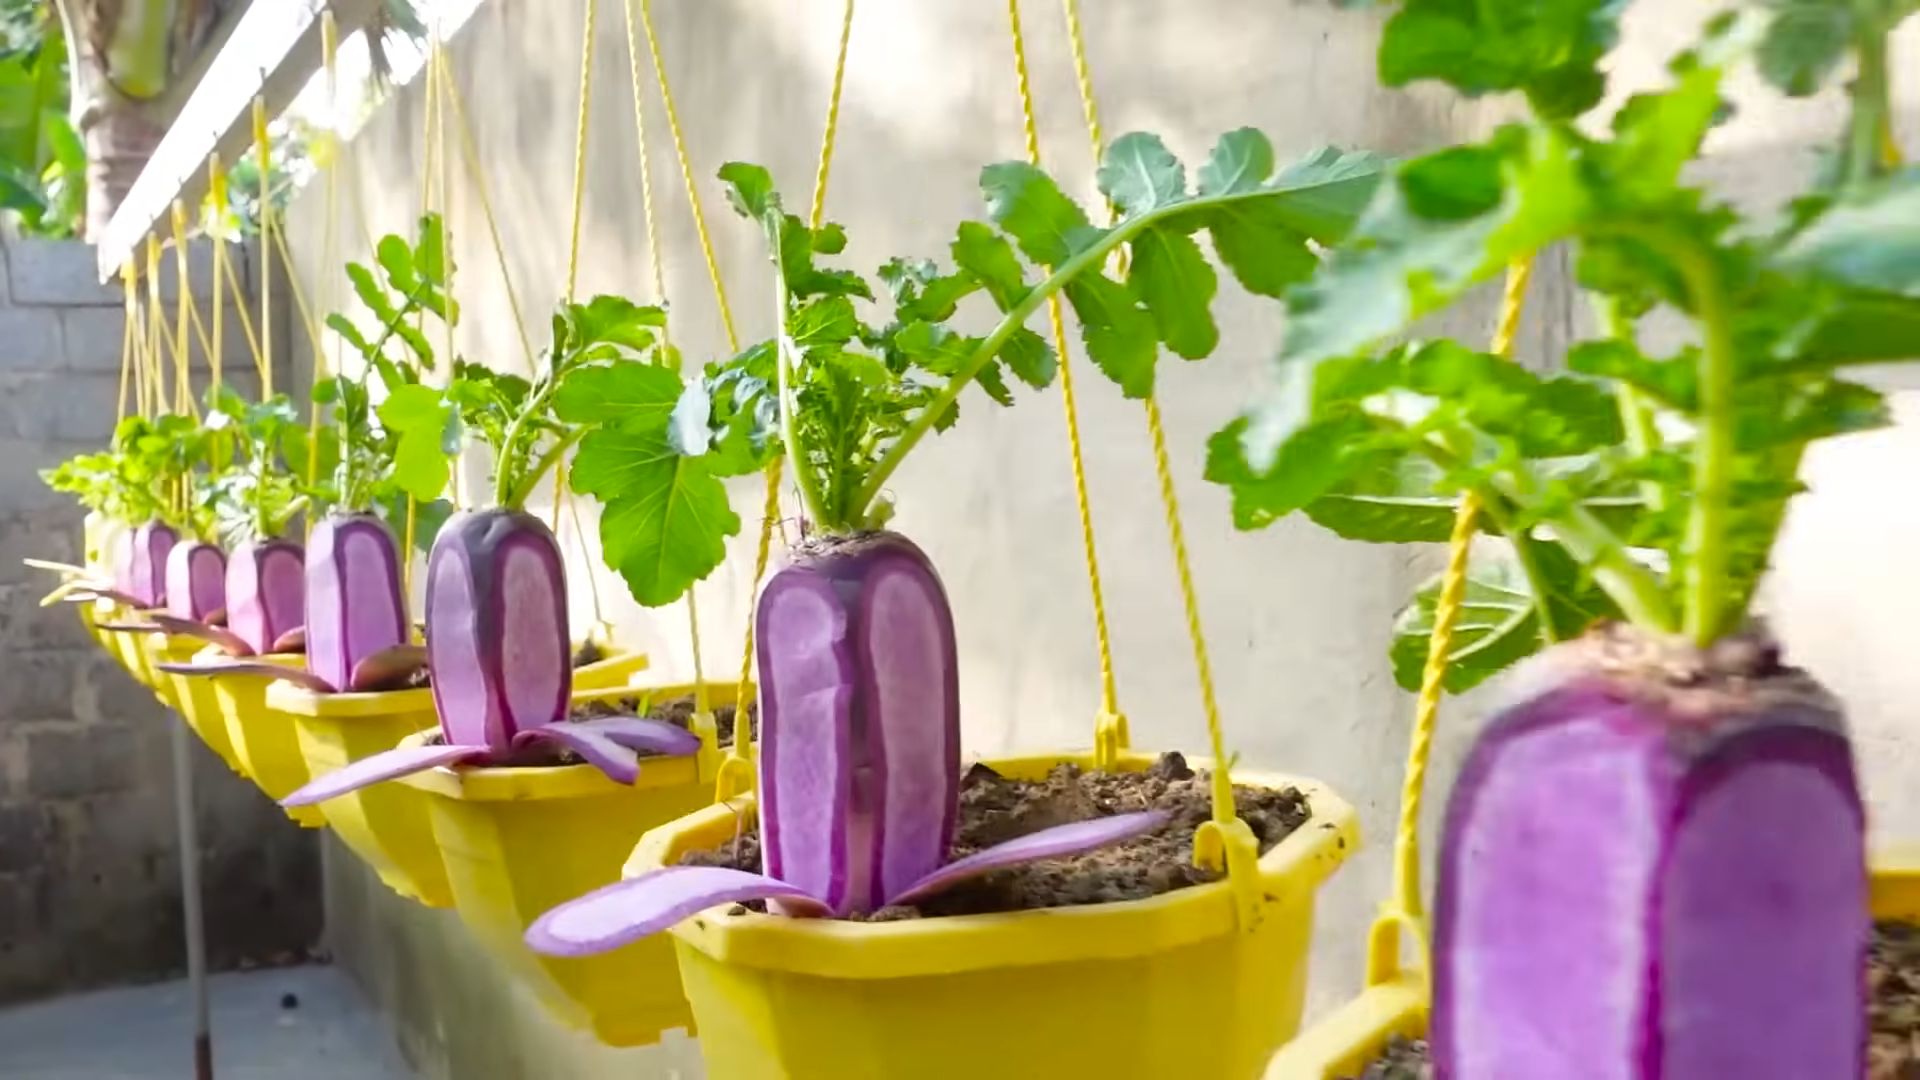
Grow Pink Radishes, and add a vibrant splash of color and a peppery kick to your salads, snacks, and even cooked dishes! Have you ever dreamed of harvesting a rainbow of vegetables right from your own backyard? Well, let’s start with these beauties! For centuries, radishes have been a staple in gardens around the world, dating back to ancient Egypt. Their ease of cultivation and quick growth made them a valuable food source.
But why should you bother with growing your own radishes, especially the pink variety? In today’s world, where convenience often trumps quality, knowing exactly where your food comes from is more important than ever. Plus, store-bought radishes can sometimes lack that fresh, crisp flavor. With these simple DIY tricks, you can grow pink radishes that are bursting with flavor and packed with nutrients, all while saving money and enjoying the satisfaction of nurturing your own food.
I’m going to share some easy-to-follow tips and hacks that will have you harvesting a bumper crop of these delightful pink gems in no time. Whether you’re a seasoned gardener or a complete beginner, these secrets will help you unlock the potential of your garden and enjoy the freshest, most flavorful radishes imaginable. Get ready to get your hands dirty and discover the joy of homegrown goodness!
Grow Your Own Vibrant Pink Radishes: A DIY Guide
Hey there, fellow gardening enthusiasts! I’m so excited to share my tried-and-true method for growing the most beautiful, vibrant pink radishes you’ve ever seen. Forget those bland, boring radishes from the grocery store – we’re talking about eye-catching, peppery delights that will add a pop of color and flavor to your salads, snacks, and everything in between. This guide will walk you through every step, from seed to harvest, ensuring you have a bountiful crop of these rosy gems.
Choosing the Right Radish Variety
First things first, you need to select the right radish variety. While many radishes have a reddish hue, some are specifically bred for that intense pink color we’re after. Here are a few of my personal favorites:
* Pink Beauty: As the name suggests, these radishes are known for their stunning pink skin and mild flavor. They mature quickly, making them perfect for impatient gardeners like myself!
* French Breakfast: These elongated radishes have a beautiful gradient of pink at the top, fading to white at the bottom. They have a slightly spicier flavor than Pink Beauty.
* Easter Egg Blend: While not exclusively pink, this blend includes radishes in a variety of colors, including pink, red, purple, and white. It’s a fun option if you want a colorful mix.
Preparing Your Planting Area
Radishes are relatively easy to grow, but they do appreciate well-prepared soil. Here’s what I do to get my planting area ready:
* Sunlight: Radishes need at least 6 hours of sunlight per day. Choose a spot in your garden that gets plenty of sunshine.
* Soil: Radishes prefer loose, well-drained soil. If your soil is heavy clay, amend it with compost or other organic matter to improve drainage.
* pH: The ideal soil pH for radishes is between 6.0 and 7.0. You can test your soil pH with a simple soil testing kit.
* Clearing: Remove any rocks, weeds, or debris from the planting area.
* Tilling/Digging: Loosen the soil to a depth of at least 6 inches. This will allow the radish roots to grow easily.
* Adding Compost: Incorporate a generous amount of compost into the soil. Compost provides essential nutrients and improves soil structure.
Planting Your Radish Seeds
Now for the fun part – planting those tiny seeds! Radishes are cool-season crops, so the best time to plant them is in early spring or late summer.
* Timing: Plant radish seeds 4-6 weeks before the last expected frost in spring, or 4-6 weeks before the first expected frost in fall.
* Spacing: Sow seeds about ½ inch deep and 1 inch apart in rows that are 6 inches apart.
* Sowing: I like to create shallow furrows in the soil with my finger, sprinkle the seeds in, and then gently cover them with soil.
* Watering: Water the planting area thoroughly after sowing. Keep the soil consistently moist until the seeds germinate.
* Succession Planting: To ensure a continuous harvest, plant a new batch of radish seeds every 1-2 weeks.
Caring for Your Radish Plants
Radishes are relatively low-maintenance, but there are a few things you can do to help them thrive.
* Watering: Water regularly, especially during dry periods. Radishes need consistent moisture to grow quickly and prevent them from becoming woody or bitter.
* Thinning: Once the seedlings emerge, thin them to about 2 inches apart. This will give the radishes enough space to grow.
* Weeding: Keep the planting area free of weeds. Weeds compete with radishes for nutrients and water.
* Fertilizing: Radishes don’t need a lot of fertilizer, but you can give them a light feeding of a balanced fertilizer a few weeks after planting. I prefer using a liquid seaweed fertilizer.
* Pest Control: Radishes are generally pest-resistant, but they can be susceptible to flea beetles. If you notice small holes in the leaves, you can use insecticidal soap to control them.
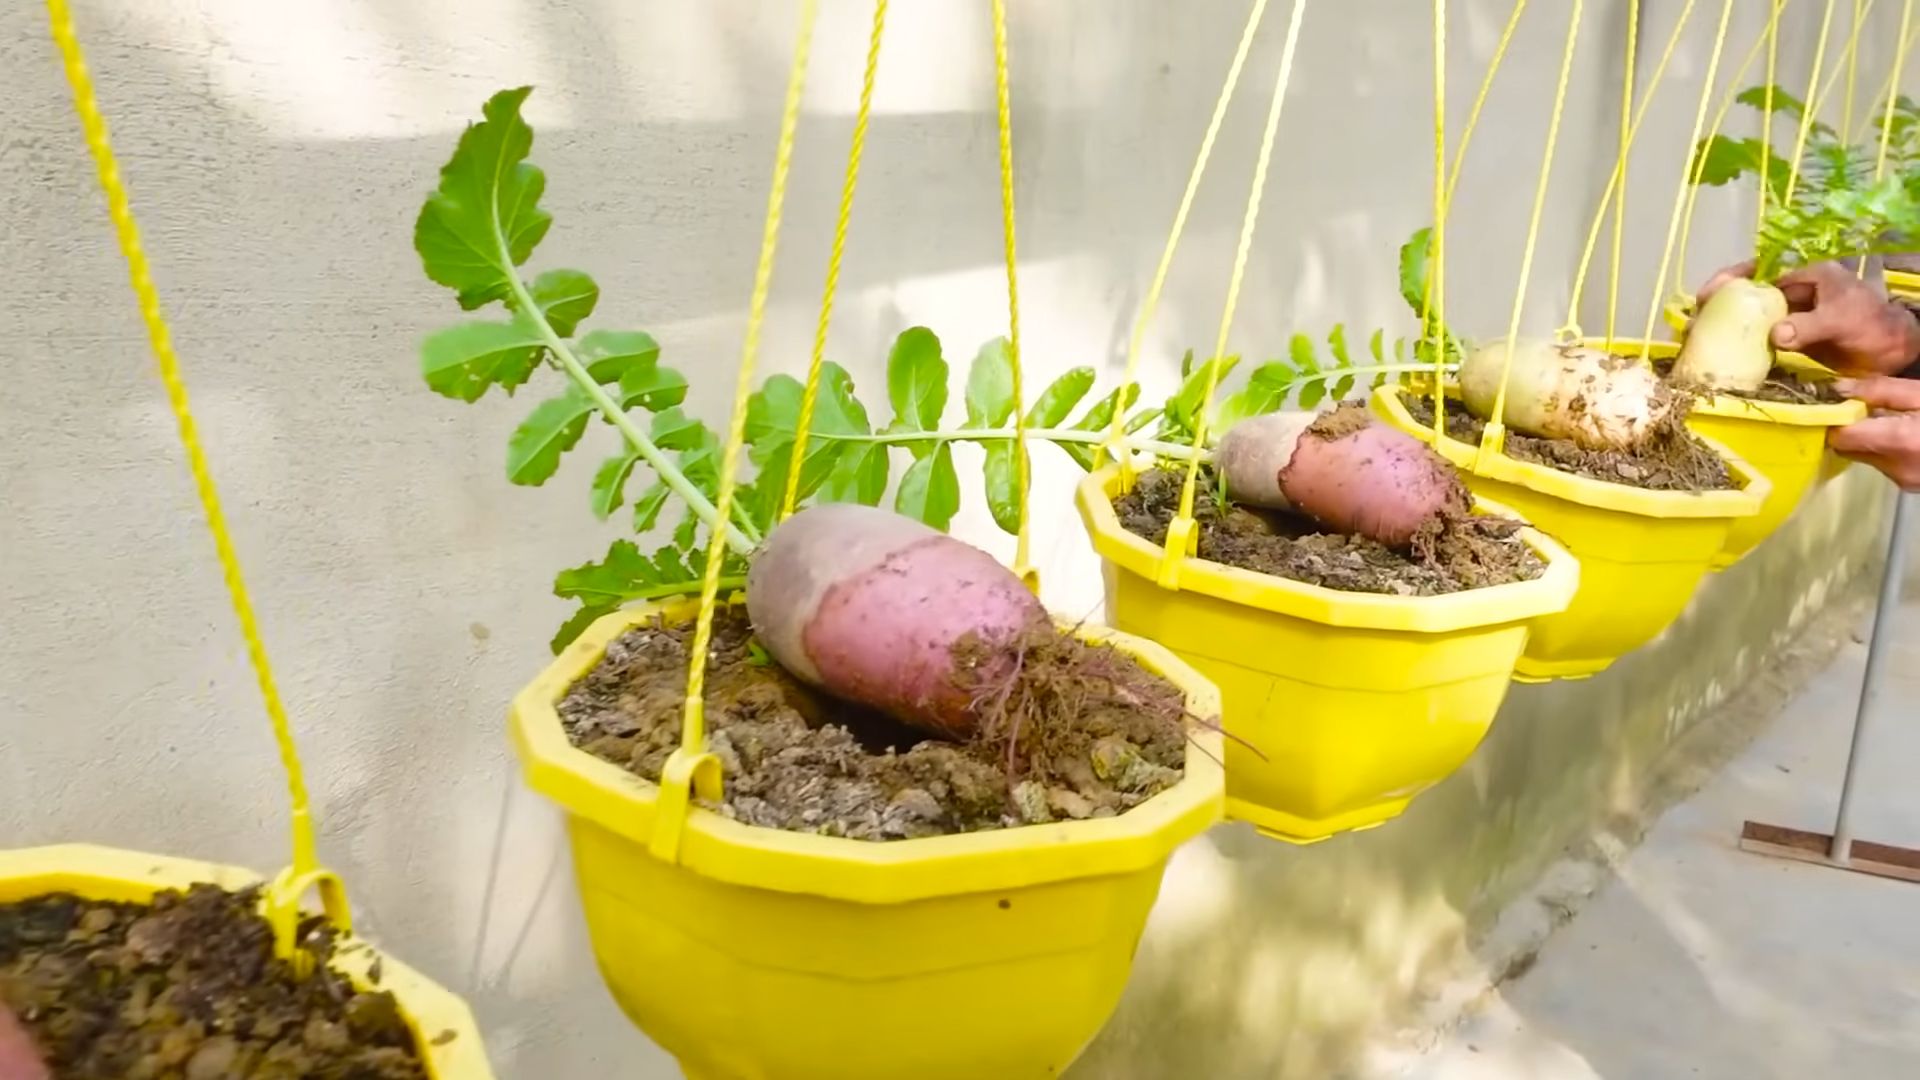
Harvesting Your Pink Radishes
The best part! Radishes are fast growers, so you won’t have to wait long to enjoy your harvest.
* Timing: Radishes are typically ready to harvest in 3-4 weeks.
* Signs of Maturity: The radish roots should be about 1 inch in diameter. You can gently brush away the soil around the base of the plant to check the size.
* Harvesting Technique: Gently pull the radishes from the soil. If the soil is dry, you may need to loosen it with a garden fork first.
* Cleaning: Wash the radishes thoroughly to remove any dirt.
* Storage: Store radishes in the refrigerator in a plastic bag or container. They will keep for about a week.
Troubleshooting Common Radish Problems
Even with the best care, you might encounter a few problems while growing radishes. Here are some common issues and how to address them:
* Radishes are too spicy: This is often caused by hot weather or inconsistent watering. Make sure to water your radishes regularly and harvest them before they get too large.
* Radishes are woody or cracked: This is usually caused by dry soil. Water your radishes deeply and regularly, especially during dry periods.
* Radishes are small: This could be due to overcrowding, poor soil, or lack of sunlight. Thin your seedlings, amend the soil with compost, and make sure your radishes are getting enough sunlight.
* Flea beetles: These tiny pests can create small holes in the leaves of your radish plants. Use insecticidal soap to control them.
* Root maggots: These pests can tunnel into the radish roots, causing them to rot. Rotate your crops and avoid planting radishes in the same spot year after year.
Creative Ways to Use Your Pink Radishes
Now that you have a beautiful harvest of pink radishes, it’s time to get creative in the kitchen! Here are a few of my favorite ways to use them:
* Salads: Thinly sliced radishes add a peppery crunch and a pop of color to any salad.
* Snacks: Serve radishes with butter and sea salt for a simple and satisfying snack.
* Sandwiches: Add sliced radishes to sandwiches for extra flavor and texture.
* Pickled Radishes: Pickled radishes are a delicious and tangy condiment.
* Radish Greens: Don’t throw away the radish greens! They are edible and can be used in salads, soups, or stir-fries. They have a slightly peppery flavor similar to arugula.
* Radish Butter: Finely chop radishes and mix them with softened butter for a flavorful spread.
* Radish Salsa: Dice radishes and mix them with tomatoes, onions, cilantro, and lime juice for a refreshing salsa.
* Roasted Radishes: Roasting radishes mellows their flavor and brings out their sweetness. Toss them with olive oil, salt, and pepper, and roast them in the oven until tender.
Extra Tips for Radish Success
Here are a few extra tips that I’ve learned over the years that can help you grow even better radishes:
* Choose the right variety for your climate: Some radish varieties are better suited for hot weather, while others are better suited for cool weather.
* Plant in well-drained soil: Radishes don’t like to sit in soggy soil. Make sure your soil is well-drained to prevent root rot.
* Water consistently: Radishes need consistent moisture to grow quickly and prevent them from becoming woody or bitter.
* Harvest radishes when they are young and tender: Overripe radishes can be tough and bitter.
* Don’t forget the greens! Radish greens are a delicious and nutritious addition to salads, soups, and stir-fries.
Section: Seed Saving for Future Pink Radishes
If you really love a particular variety of pink radish, you can save the seeds to plant again next year! It’s a rewarding process and ensures you’ll always have your favorite type on hand.
1. Select Your Best Plants: Choose the healthiest, most vibrant pink radishes from your harvest. These are the plants you want to save seeds from.
2. Allow Bolting: Unlike harvesting for eating, you need to let these radishes “bolt,” meaning they’ll send up a flower stalk. This is how they produce seeds.
3. Support the Stalk: As the flower stalk grows, it might need support, especially if it gets tall. Use a stake to prevent it from falling over.
4. Pollination: Radishes
Conclusion
So, there you have it! Growing pink radishes at home is not only achievable but surprisingly simple and rewarding. Forget bland, store-bought radishes that lack that peppery punch and vibrant color. With this DIY trick, you’re unlocking a world of fresh, flavorful, and visually stunning radishes right from your own garden or even a sunny windowsill.
Why is this a must-try? Because it puts you in control. You dictate the growing conditions, ensuring your radishes are free from unwanted chemicals and bursting with natural goodness. Plus, the satisfaction of harvesting something you’ve nurtured from seed to table is unparalleled. Imagine the vibrant salads, the colorful crudités platters, and the delightful garnishes you can create with your homegrown pink radishes.
But the fun doesn’t stop there! Feel free to experiment with different radish varieties. While we’ve focused on achieving that beautiful pink hue, you can explore other colors and shapes. Try mixing different radish seeds in the same container for a rainbow effect. Or, consider adding companion plants like carrots or lettuce to your radish patch to maximize space and deter pests.
Another variation to consider is the growing medium. While soil works perfectly well, you can also experiment with hydroponics or aquaponics for a faster and more efficient growing process. This is especially beneficial if you have limited space or live in an urban environment.
Don’t be afraid to get creative with your radish recipes too! Beyond salads, try pickling your pink radishes for a tangy and crunchy condiment. Roast them with a drizzle of olive oil and herbs for a surprisingly sweet and savory side dish. Or, thinly slice them and add them to tacos or sandwiches for a burst of flavor and color.
The key to success with this DIY trick is consistency. Regular watering, adequate sunlight, and well-drained soil are essential for healthy radish growth. Don’t be discouraged if your first attempt isn’t perfect. Gardening is a learning process, and every mistake is an opportunity to improve.
We are confident that you will enjoy the process of growing pink radishes. It’s a fantastic way to connect with nature, learn about food production, and enjoy the fruits (or rather, roots) of your labor.
So, what are you waiting for? Grab some radish seeds, prepare your growing medium, and embark on this exciting gardening adventure. We encourage you to try this DIY trick and share your experiences with us! Post photos of your homegrown pink radishes on social media using #HomegrownRadishes and tag us so we can see your amazing results. We can’t wait to see what you create! Let’s spread the joy of homegrown goodness together!
Frequently Asked Questions (FAQ)
What kind of radish seeds should I use to get pink radishes?
The best radish seeds for achieving a vibrant pink color are those specifically labeled as “pink” or “rose” radishes. Varieties like ‘Pink Beauty’, ‘French Breakfast’ (which has a pink top), and ‘Easter Egg’ (which often includes pink radishes in the mix) are excellent choices. Be sure to check the seed packet description to confirm the expected color. Keep in mind that even with pink varieties, the intensity of the color can be influenced by growing conditions.
How much sunlight do radishes need?
Radishes thrive in full sun, which means they need at least 6 hours of direct sunlight per day. If you’re growing them indoors, place them near a sunny window or use grow lights to supplement natural light. Insufficient sunlight can result in leggy growth, smaller radishes, and less vibrant color.
What kind of soil is best for growing radishes?
Radishes prefer loose, well-drained soil that is rich in organic matter. Amend heavy clay soil with compost or other organic materials to improve drainage and aeration. A slightly acidic to neutral soil pH (around 6.0 to 7.0) is ideal. Avoid soils that are compacted or waterlogged, as these can lead to root rot and stunted growth.
How often should I water my radishes?
Radishes need consistent moisture to grow quickly and develop crisp, flavorful roots. Water them regularly, especially during dry periods. Aim to keep the soil consistently moist but not waterlogged. Overwatering can lead to root rot, while underwatering can cause the radishes to become tough and bitter. Check the soil moisture regularly and water when the top inch feels dry.
How long does it take for radishes to grow?
One of the great things about radishes is their quick growth rate. Most varieties mature in just 3 to 4 weeks from planting. This makes them a great option for impatient gardeners or those looking for a quick harvest. The exact time to maturity can vary depending on the variety, growing conditions, and weather.
Why are my radishes not turning pink?
Several factors can influence the color of your radishes. Insufficient sunlight, poor soil quality, and improper watering can all affect the development of the pink pigment. Make sure your radishes are getting enough sunlight, are planted in well-drained soil, and are watered regularly. Also, ensure you are using a variety of radish that is known for its pink color. Sometimes, even with the right variety, environmental factors can impact the intensity of the color.
Can I grow radishes in containers?
Yes, radishes are well-suited for container gardening. Choose a container that is at least 6 inches deep to allow the roots to develop properly. Use a well-draining potting mix and ensure the container has drainage holes. Place the container in a sunny location and water regularly. Container-grown radishes may need more frequent watering than those grown in the ground, as the soil in containers tends to dry out faster.
Are radish greens edible?
Yes, radish greens are perfectly edible and nutritious! They have a peppery flavor similar to the radish root itself. You can use them in salads, soups, stir-fries, or as a garnish. Be sure to wash them thoroughly before using them. Harvest the greens when they are young and tender for the best flavor.
How do I prevent pests from attacking my radishes?
Several pests can attack radishes, including flea beetles, root maggots, and aphids. To prevent pest problems, practice good garden hygiene. Remove weeds and debris from around your radish plants to eliminate hiding places for pests. Use row covers to protect your plants from flying insects. Companion planting with herbs like mint or basil can also help deter pests. If you do encounter pests, consider using organic pest control methods such as insecticidal soap or neem oil.
How do I know when my radishes are ready to harvest?
Radishes are ready to harvest when they reach the size specified on the seed packet. Gently loosen the soil around the radish and pull it out of the ground. If the radish is too small, leave it in the ground for a few more days. Overripe radishes can become tough and bitter, so it’s best to harvest them promptly.

Leave a Comment