

Grow Nutritious Gourds Save Money 鈥?that’s the dream, isn’t it? Imagine stepping into your backyard and harvesting vibrant, healthy gourds, all while watching your grocery bill shrink. Forget those pricey organic vegetables at the supermarket; with a few clever tricks and a little elbow grease, you can cultivate your own gourd bounty right at home!
For centuries, gourds have been more than just decorative fall accents. In many cultures, they’ve been a staple food source, providing essential nutrients and playing a vital role in traditional diets. Think of the diverse uses 鈥?from soups and stews to roasted snacks, gourds offer a versatile and delicious way to nourish your body. But let’s be honest, the idea of growing them can seem a little daunting. Where do you even begin?
That’s where this DIY guide comes in! I’m going to share some simple, yet effective, home gardening tricks that will empower you to grow nutritious gourds save money. We’ll cover everything from selecting the right varieties for your climate to maximizing your yield with easy-to-implement hacks. Why spend a fortune on store-bought produce when you can create your own thriving garden and enjoy the satisfaction of harvesting your own delicious, healthy gourds? Let’s get started!
Grow Your Own Nutritious Gourds and Save Money!
Hey there, fellow gardeners! Are you looking for a rewarding and budget-friendly way to add some healthy goodness to your meals? Look no further than growing your own gourds! Forget those expensive supermarket prices 鈥?with a little effort, you can cultivate a bountiful harvest of nutritious gourds right in your backyard. I’m going to walk you through the entire process, from seed to table, so you can enjoy fresh, homegrown gourds all season long.
Choosing Your Gourd Variety
First things first, let’s talk about choosing the right gourd for your needs. Not all gourds are created equal! Some are better suited for eating, while others are primarily ornamental. For this guide, we’ll focus on edible gourds, specifically those that are relatively easy to grow and packed with nutrients. Here are a few of my favorites:
* Butternut Squash: This is a classic for a reason! Butternut squash is sweet, nutty, and incredibly versatile. It’s fantastic roasted, pureed into soup, or used in pies.
* Acorn Squash: Another popular choice, acorn squash has a slightly milder flavor than butternut squash. It’s delicious baked, stuffed, or added to stews.
* Spaghetti Squash: If you’re looking for a low-carb alternative to pasta, spaghetti squash is your answer! When cooked, the flesh separates into strands that resemble spaghetti.
* Pumpkin (Smaller Varieties): While giant pumpkins are fun for carving, smaller varieties like sugar pumpkins are perfect for cooking and baking.
When selecting your seeds or seedlings, make sure to choose varieties that are well-suited to your climate and growing conditions. Check the seed packet or plant label for information on days to maturity, sunlight requirements, and spacing.
Preparing Your Garden Bed
Now that you’ve chosen your gourd variety, it’s time to get your garden bed ready. Gourds are heavy feeders, so they need rich, well-drained soil to thrive. Here’s how I prepare my garden bed for gourds:
* Sunlight: Gourds need at least 6-8 hours of direct sunlight per day. Choose a location in your garden that gets plenty of sun.
* Soil: Gourds prefer well-drained soil that is rich in organic matter. If your soil is heavy clay or sandy, amend it with compost, aged manure, or other organic materials.
* pH: The ideal soil pH for gourds is between 6.0 and 7.0. You can test your soil pH with a soil testing kit and amend it accordingly.
* Spacing: Gourds need plenty of space to spread out. Check the seed packet or plant label for specific spacing recommendations, but generally, you’ll need at least 2-3 feet between plants.
* Support: Some gourd varieties, like spaghetti squash, can benefit from being grown on a trellis. This helps to keep the fruits off the ground and improves air circulation.
Planting Your Gourds
There are two ways to start your gourds: from seed or from seedlings. Starting from seed is more economical, but it requires a bit more patience.
Starting from Seed:
1. Start Seeds Indoors (Optional): To get a head start on the growing season, you can start your gourd seeds indoors 2-3 weeks before the last expected frost. Sow the seeds in peat pots or seed trays filled with seed-starting mix. Keep the soil moist and warm (around 70-75掳F).
2. Direct Sow Seeds: Once the danger of frost has passed and the soil has warmed up, you can direct sow your gourd seeds directly into the garden bed. Plant the seeds about 1 inch deep and space them according to the seed packet instructions.
3. Water Thoroughly: After planting, water the seeds thoroughly to help them germinate. Keep the soil consistently moist until the seedlings emerge.
Planting Seedlings:
1. Harden Off Seedlings: If you started your seeds indoors, you’ll need to harden them off before transplanting them into the garden. This means gradually exposing them to outdoor conditions over a period of 7-10 days. Start by placing the seedlings in a sheltered location for a few hours each day, gradually increasing the amount of time they spend outdoors.
2. Transplant Seedlings: Once the seedlings are hardened off, you can transplant them into the garden bed. Dig a hole that is slightly larger than the root ball of the seedling. Gently remove the seedling from its pot and place it in the hole. Backfill the hole with soil and water thoroughly.
3. Space Properly: Make sure to space your seedlings according to the seed packet or plant label instructions.
Caring for Your Gourds
Once your gourds are planted, it’s important to provide them with the care they need to thrive. Here are some tips for caring for your gourd plants:
* Watering: Gourds need consistent moisture, especially during hot, dry weather. Water deeply and regularly, especially when the fruits are developing. Aim to water at the base of the plant to avoid wetting the foliage, which can lead to fungal diseases.
* Fertilizing: Gourds are heavy feeders, so they benefit from regular fertilization. Use a balanced fertilizer or a fertilizer specifically formulated for vegetables. Follow the instructions on the fertilizer label. I like to side-dress my gourds with compost tea every few weeks to give them an extra boost.
* Weeding: Keep your garden bed free of weeds, which can compete with your gourds for nutrients and water. Hand-pull weeds regularly or use a hoe to cultivate the soil.
* Pest Control: Gourds can be susceptible to a variety of pests, including squash bugs, squash vine borers, and aphids. Inspect your plants regularly for signs of pests and take action to control them. I prefer to use organic pest control methods, such as insecticidal soap or neem oil.
* Pollination: Gourds have separate male and female flowers. The female flowers need to be pollinated in order to produce fruit. If you’re not seeing many fruits developing, you may need to hand-pollinate the flowers. To do this, use a small paintbrush to transfer pollen from the male flowers to the female flowers.
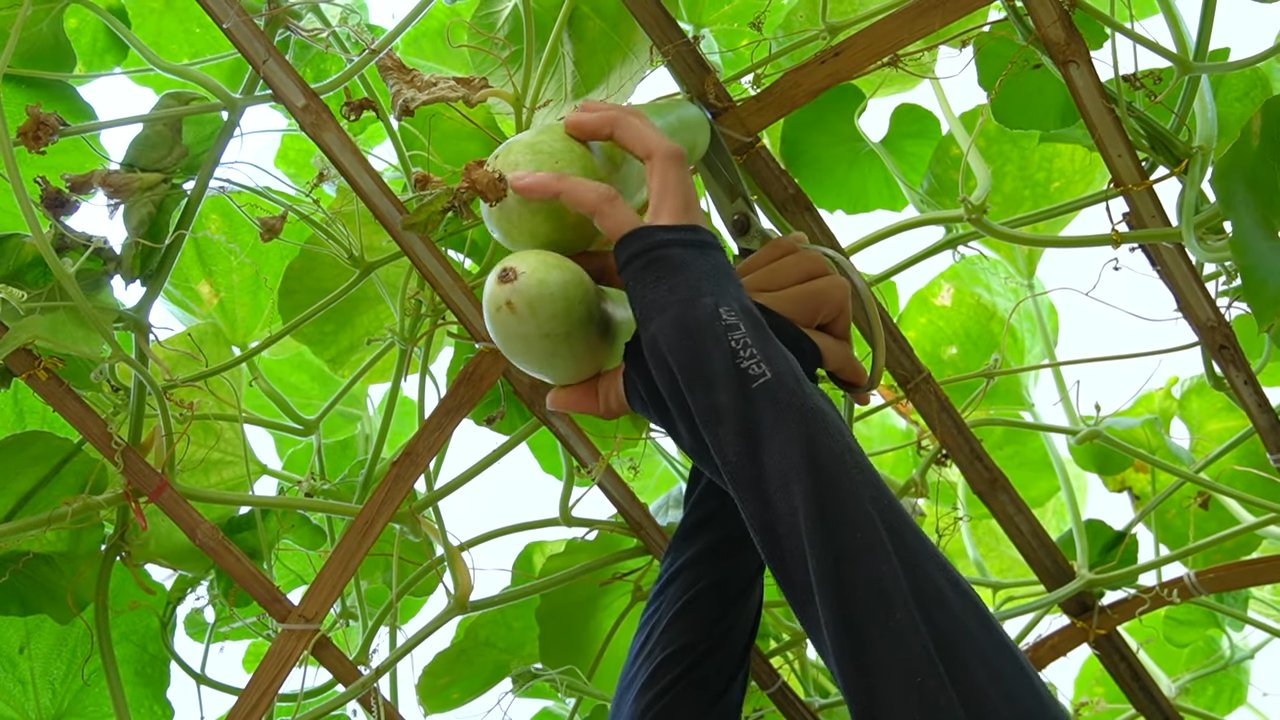
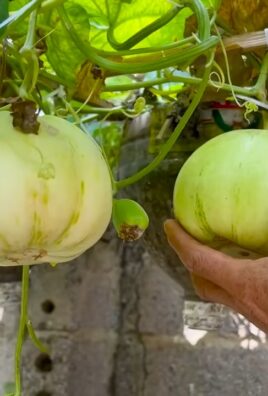
Harvesting Your Gourds
The time it takes for your gourds to mature will depend on the variety you’re growing. Check the seed packet or plant label for information on days to maturity. Here are some general guidelines for harvesting different types of gourds:
* Butternut Squash: Butternut squash is ready to harvest when the skin is hard and the stem is dry and brown. The squash should also have a deep tan color.
* Acorn Squash: Acorn squash is ready to harvest when the skin is hard and the stem is dry and brown. The squash should also have a deep green color with a patch of orange where it rested on the ground.
* Spaghetti Squash: Spaghetti squash is ready to harvest when the skin is hard and the stem is dry and brown. The squash should also have a golden yellow color.
* Pumpkin (Smaller Varieties): Pumpkins are ready to harvest when the skin is hard and the stem is dry and brown. The pumpkin should also have a deep orange color.
To harvest your gourds, use a sharp knife or pruning shears to cut the stem about 2 inches from the fruit. Be careful not to damage the fruit.
Storing Your Gourds
Proper storage is essential for extending the shelf life of your gourds. Here are some tips for storing your harvested gourds:
* Curing: Before storing your gourds, you’ll need to cure them. This helps to harden the skin and prevent rot. To cure your gourds, place them in a warm, dry, well-ventilated area for 1-2 weeks.
* Storage Conditions: Store your cured gourds in a cool, dry, dark place. The ideal storage temperature is between 50-60掳F.
* Avoid Bruising: Handle your gourds carefully to avoid bruising them. Bruised gourds are more likely to rot.
* Check Regularly: Check your stored gourds regularly for signs of rot. If you find any rotten gourds, remove them immediately to prevent the rot from spreading.
Enjoying Your Homegrown Gourds
Now for the best part 鈥?enjoying the fruits (or rather, gourds!) of your labor! There are countless ways to cook and enjoy your homegrown gourds. Here are just a few ideas:
* Roasted: Roasting is a simple and delicious way to prepare most gourds. Simply cut the gourd in half, scoop out the seeds, and roast it in the oven until tender.
* Soup: Pureed gourd soup is a comforting and nutritious meal. Add some spices and herbs to create your own unique flavor.
* Pie: Butternut squash and pumpkin are both popular ingredients in pies. Use your homegrown gourds to make a delicious and festive dessert.
* Stuffed: Acorn squash is

Conclusion
So, there you have it! Growing your own nutritious gourds isn’t just a fun gardening project; it’s a pathway to self-sufficiency, healthier eating, and significant cost savings. We’ve walked through the simple steps, from seed selection to harvesting, and hopefully, dispelled any myths about gourds being difficult to cultivate. The truth is, with a little planning and consistent care, you can transform your backyard into a thriving gourd patch, bursting with fresh, wholesome produce.
Why is this DIY trick a must-try? Because it empowers you to take control of your food source. In a world where grocery bills are constantly rising and concerns about food quality are ever-present, knowing exactly where your food comes from and how it’s grown is invaluable. Plus, the satisfaction of harvesting your own gourds, knowing you nurtured them from tiny seeds to mature fruits, is incredibly rewarding.
But the benefits extend beyond just saving money. Think about the nutritional value! Homegrown gourds are packed with vitamins, minerals, and fiber, offering a delicious and healthy addition to your diet. You can experiment with different varieties, each with its unique flavor profile and texture. From the sweet butternut squash to the versatile spaghetti squash, the possibilities are endless.
And speaking of variations, don’t be afraid to get creative! Try growing your gourds on a trellis to save space and create a beautiful vertical garden. Experiment with companion planting to deter pests and attract beneficial insects. Consider saving seeds from your best gourds to continue the cycle year after year. You can even explore different cooking methods, from roasting and grilling to pureeing and stuffing.
We encourage you to embrace this DIY project and experience the joy of growing your own nutritious gourds. It’s a sustainable, cost-effective, and incredibly fulfilling way to enhance your life. And remember, gardening is a journey, not a destination. There will be challenges along the way, but the rewards are well worth the effort.
So, grab your seeds, prepare your soil, and get ready to embark on this exciting adventure. We’re confident that you’ll be amazed by what you can achieve. And most importantly, don’t forget to share your experiences with us! We’d love to hear about your successes, your challenges, and your favorite ways to enjoy your homegrown gourds. Share your photos, your recipes, and your tips in the comments below. Let’s build a community of gourd-growing enthusiasts and inspire others to discover the magic of DIY gardening. Let’s all learn how to **grow nutritious gourds** together!
Frequently Asked Questions (FAQ)
What types of gourds are easiest for beginners to grow?
For beginners, we recommend starting with zucchini, yellow squash, or spaghetti squash. These varieties are relatively fast-growing, require minimal maintenance, and are generally resistant to common pests and diseases. Butternut squash is also a good option, although it may require a slightly longer growing season. Avoid more challenging varieties like pumpkins or gourds with specific pollination requirements until you gain more experience. Remember to choose varieties that are well-suited to your local climate and growing conditions.
How much space do I need to grow gourds?
The amount of space required depends on the variety of gourd you’re growing. Bush varieties, like zucchini and yellow squash, typically need about 2-3 feet of space per plant. Vining varieties, like spaghetti squash and butternut squash, can spread much further, requiring 6-8 feet of space per plant. If you’re short on space, consider growing vining varieties on a trellis or fence to maximize vertical space. Container gardening is also an option for smaller varieties, but be sure to choose a large container (at least 10 gallons) and provide adequate support for the plant.
What kind of soil is best for growing gourds?
Gourds thrive in well-drained, fertile soil that is rich in organic matter. Before planting, amend your soil with compost, aged manure, or other organic amendments to improve its structure and nutrient content. A soil pH of 6.0 to 7.0 is ideal. If your soil is heavy clay or sandy, consider building raised beds or using containers to improve drainage and soil quality. Regular soil testing can help you determine if your soil is lacking any essential nutrients.
How often should I water my gourd plants?
Gourds need consistent moisture, especially during hot, dry weather. Water deeply and regularly, aiming to keep the soil consistently moist but not waterlogged. Avoid overhead watering, as this can increase the risk of fungal diseases. Instead, water at the base of the plants, using a soaker hose or drip irrigation system if possible. Mulching around the plants can help retain moisture and suppress weeds. Check the soil moisture regularly by sticking your finger into the soil about an inch deep. If the soil feels dry, it’s time to water.
What are some common pests and diseases that affect gourds, and how can I prevent them?
Common pests that affect gourds include squash bugs, squash vine borers, aphids, and cucumber beetles. Common diseases include powdery mildew, downy mildew, and blossom-end rot. To prevent pests and diseases, practice good garden hygiene, such as removing plant debris and weeds regularly. Use row covers to protect young plants from pests. Encourage beneficial insects, such as ladybugs and lacewings, to control aphids and other pests. Choose disease-resistant varieties whenever possible. Ensure proper air circulation around the plants to prevent fungal diseases. If you notice signs of pests or diseases, treat them promptly with appropriate organic or chemical controls.
When is the best time to harvest my gourds?
The best time to harvest your gourds depends on the variety. Summer squash, like zucchini and yellow squash, should be harvested when they are young and tender, typically when they are about 6-8 inches long. Winter squash, like butternut squash and spaghetti squash, should be harvested when they are fully mature, typically in the fall. The skin should be hard and difficult to pierce with your fingernail. The stem should be dry and brown. Leave a few inches of stem attached to the gourd when harvesting to prevent rot.
How do I store my harvested gourds?
Summer squash should be stored in the refrigerator and used within a week. Winter squash can be stored in a cool, dry place for several months. The ideal storage temperature is around 50-60 degrees Fahrenheit. Avoid storing squash near apples or bananas, as these fruits release ethylene gas, which can cause the squash to ripen and spoil more quickly. Check your stored squash regularly for signs of rot or spoilage.
Can I save seeds from my homegrown gourds?
Yes, you can save seeds from your homegrown gourds, but it’s important to understand the basics of seed saving. Open-pollinated varieties will produce seeds that are true to type, meaning that the offspring will be similar to the parent plant. Hybrid varieties, on the other hand, may not produce seeds that are true to type. To save seeds, allow the gourd to fully mature on the vine. Scoop out the seeds and rinse them thoroughly. Spread the seeds out on a paper towel to dry completely. Store the dried seeds in an airtight container in a cool, dry place.
What are some creative ways to use my homegrown gourds in cooking?
The culinary possibilities with homegrown gourds are endless! Zucchini and yellow squash can be grilled, saut茅ed, roasted, or used in soups, stews, and breads. Spaghetti squash can be baked or microwaved and used as a low-carb alternative to pasta. Butternut squash can be roasted, pureed, or used in soups, stews, and pies. Pumpkin can be used in pies, breads, soups, and stews. Don’t be afraid to experiment with different recipes and flavor combinations to discover your favorite ways to enjoy your homegrown gourds.
How can I get my kids involved in growing gourds?
Growing gourds is a great way to get kids involved in gardening and teach them about where their food comes from. Let them help with planting, watering, and harvesting. Choose varieties that are easy to grow and fun to eat. Let them decorate the gourds after harvesting. Consider creating a small garden plot just for them. Make it a fun and educational experience for the whole family.
Leave a Comment