

Grow mushrooms at home? Absolutely! Imagine harvesting fresh, flavorful mushrooms right from your own kitchen, ready to elevate your next culinary masterpiece. Forget those bland, store-bought varieties – with a few simple tricks and a little DIY spirit, you can cultivate a thriving mushroom patch indoors, regardless of your gardening experience.
The art of mushroom cultivation has ancient roots, dating back centuries to cultures in Asia and Europe, where these fungi were prized for their medicinal and culinary properties. Today, the mystique surrounding mushroom growing might seem intimidating, but I’m here to tell you it doesn’t have to be! This guide will demystify the process and empower you to grow mushrooms at home with ease.
Why embark on this fungal adventure? Well, beyond the sheer satisfaction of growing your own food, cultivating mushrooms at home offers numerous benefits. You’ll have access to a sustainable source of fresh, organic produce, free from pesticides and long-distance transportation. Plus, it’s a fantastic way to reduce your carbon footprint and connect with nature, even within the confines of your apartment. So, let’s dive in and unlock the secrets to successful indoor mushroom cultivation!
Mushroom Cultivation for Beginners: Your Own Mushroom Paradise at Home!
Hey mushroom friends! Have you ever wondered what it would be like to grow your own delicious mushrooms at home? I can tell you, it’s easier than you think and incredibly satisfying! In this article, I’ll show you how to grow your own mushrooms with simple tools and a bit of patience. We’ll focus on oyster mushrooms (Pleurotus ostreatus), as they are relatively easy to grow and produce results quickly. Let’s get started!
What you’ll need for your mushroom cultivation:
Here is a list of the things you’ll need for your mushroom-growing adventure. Don’t worry, most of them are easy to find or may even be in your household already:
- Mushroom spawn: This is the “seed” for your mushrooms. You can buy oyster mushroom spawn online or at specialized garden markets. Make sure the spawn is fresh and of good quality.
- Substrate: This is the material on which your mushrooms will grow. Straw is an excellent and inexpensive option. You can also use coffee grounds, sawdust, or even cardboard.
- A container: You’ll need a container in which you can mix your substrate and the mushroom spawn. A bucket, a plastic bag, or a special mushroom growing bag is ideal.
- A spray bottle: To keep the substrate moist.
- Disinfectant: To keep your workspace and tools clean and to prevent contamination.
- Gloves: To keep your hands clean and not contaminate the mushroom spawn.
- Optional: A thermometer to monitor the temperature.
Step-by-Step Guide to Mushroom Cultivation:
Here is a detailed guide that will walk you through the entire process. Don’t worry, it’s not as complicated as it looks!
1. Preparing the Substrate:
The substrate is the foundation for your mushroom cultivation. It must be prepared correctly to provide the mushrooms with the best possible growing conditions.
- Pasteurize the straw: If you are using straw, you must pasteurize it to kill unwanted microorganisms. The easiest way to do this is to pour hot water (approx. 70-80°C / 160-175°F) over the straw in a large pot or bucket and let it soak for about an hour. The water should completely cover the straw.
- Let it cool: After soaking, drain the straw and let it cool until it is warm to the touch. It should be moist, but not dripping wet.
- Prepare alternative substrates: If you are using coffee grounds, make sure they are fresh and show no signs of mold. Sawdust should also be pasteurized to avoid contamination. Cardboard can be torn into small pieces and covered with hot water.
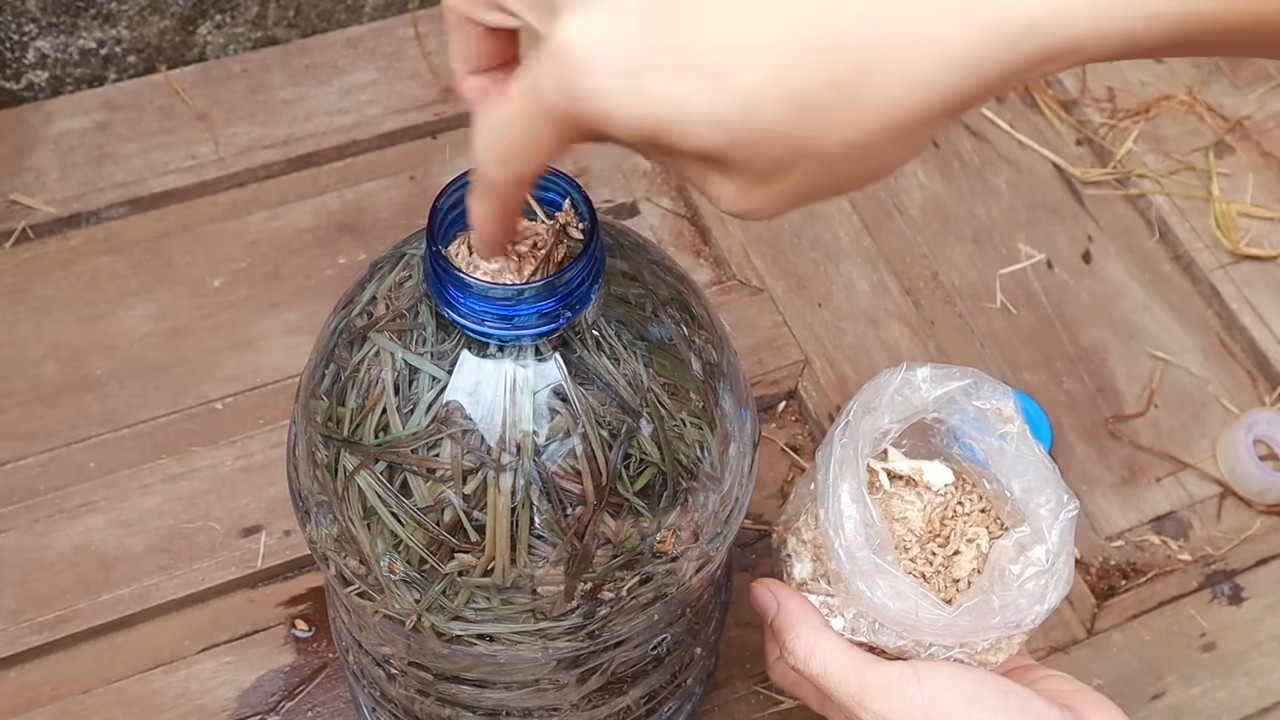
2. Inoculation:
Inoculation is the process of mixing the mushroom spawn with the substrate.
- Disinfect your workspace: Before you begin, thoroughly disinfect your workspace and your hands. Wear gloves to avoid contaminating the mushroom spawn.
- Mix substrate and spawn: Mix the prepared substrate with the mushroom spawn in your container. A good ratio is about 1 part mushroom spawn to 10 parts substrate. Distribute the spawn evenly throughout the substrate.
- Fill the container: Fill the container with the mixture of substrate and spawn. Lightly press the substrate to avoid air pockets.
- Drill holes (optional): If you are using a plastic bag, drill small holes in the bag to ensure ventilation.
3. Incubation:
Incubation is the phase in which the mycelium (the fungal network) grows through the substrate.
- Dark and warm place: Place the container in a dark and warm place (approx. 20-25°C / 68-77°F). A pantry, a basement, or a closet is ideal.
- Control moisture: Make sure the substrate stays moist. Spray it with water if necessary.
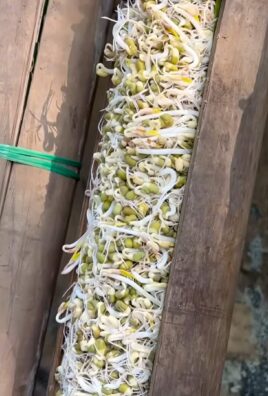
- Be patient: The incubation period usually lasts 2-3 weeks. During this time, the mycelium will grow through the substrate and form a white, fluffy layer.
4. Fruiting:
Fruiting is the phase in which the mushrooms grow.
- Light and moisture: Once the substrate is completely colonized with mycelium, you will need more light and higher humidity to trigger fruiting. Move the container to a brighter place, but avoid direct sunlight.
- Increase humidity: Spray the substrate several times a day with water to increase the humidity. You can also place a plastic bag over the container to retain moisture. However, make sure that the bag is not directly on the substrate and that there is sufficient ventilation.
- Control the temperature: The ideal temperature for fruiting is around 15-20°C (59-68°F).
- Watch the mushrooms: After a few days, small mushroom heads (pins) should form. Watch them closely and spray them regularly with water.
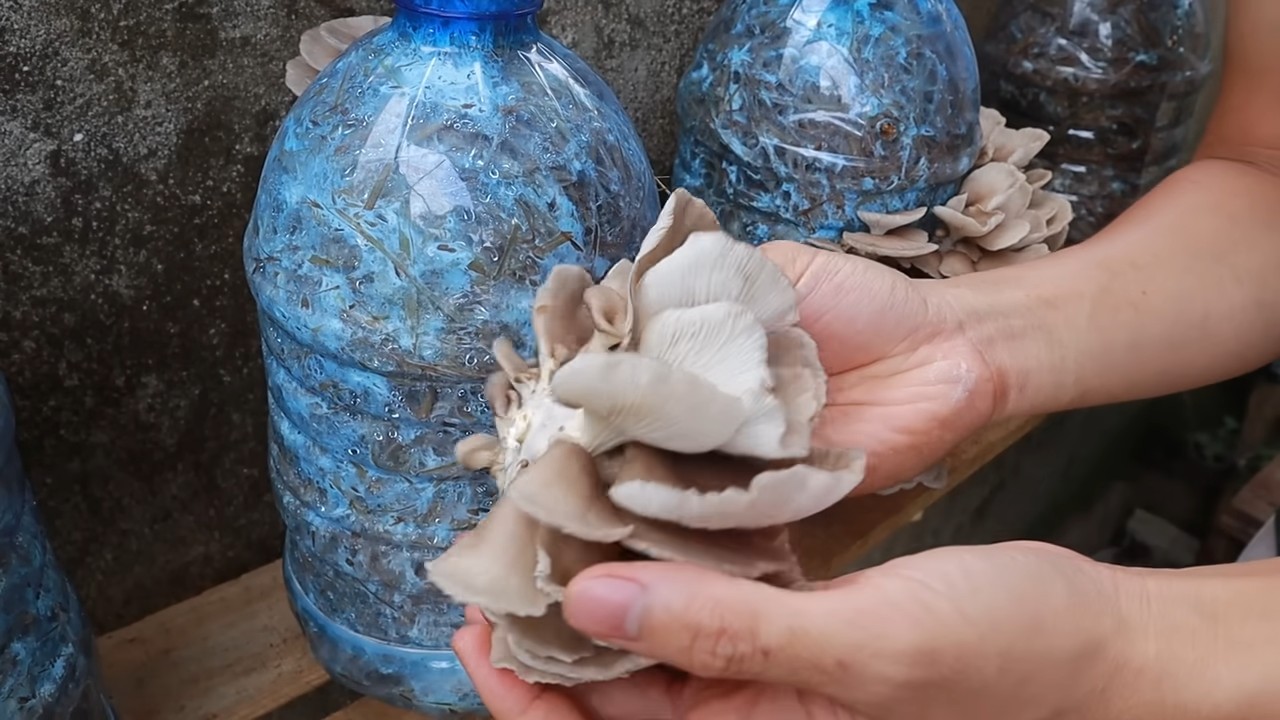
5. Harvest:
The harvest is the most exciting part!
- Harvest time: Harvest the mushrooms when the caps have almost fully opened but are still slightly curved downwards.
- Harvesting the mushrooms: Gently twist the mushrooms off or cut them with a sharp knife.
- Multiple harvests: You can usually get several harvests from the same substrate. After the first harvest, moisten the substrate again and maintain the fruiting conditions.
Common Problems and Solutions:
Even with mushroom cultivation, problems can occur. Here are some common problems and how you can solve them:
- Mold growth: If you see mold on the substrate, it is likely contaminated. Remove the affected area and try to improve the conditions (better ventilation, less moisture). If the mold infestation is too severe, you will unfortunately have to discard the substrate.
- No mushrooms: If no mushrooms form, it could be due to various factors: too little light, too little moisture, the wrong temperature, or poor quality spawn. Check the conditions and adjust them if necessary.
- Small mushrooms: If the mushrooms remain small, it could be due to a lack of nutrients. You can try to enrich the substrate with some coffee grounds or other organic materials.
Additional Tips for a Successful Mushroom Cultivation:
Here are a few more tips that can help you optimize your mushroom cultivation:
Inform yourself: There are many resources online and in books that can help you with mushroom cultivation. Use them!
Cleanliness is key: Pay attention to absolute cleanliness to avoid contamination. Thoroughly disinfect your workspace, your tools, and your hands.
Patience is important: Mushroom cultivation takes time and patience. Don’t be discouraged if it doesn’t work right away.
Experiment: Try different substrates and conditions to find out what works best for you.
Conclusion
So, there you have it! Growing mushrooms at home isn’t some mystical, unattainable feat reserved for expert mycologists. It’s a surprisingly accessible and rewarding endeavor that can bring the earthy, umami goodness of fresh, homegrown mushrooms right to your kitchen table. We’ve walked you through a simple, effective method that minimizes complexity and maximizes your chances of success.
Why is this DIY trick a must-try? Because it empowers you to take control of your food source, reduces your reliance on grocery store produce (often shipped from far away), and connects you with the fascinating world of fungi. Imagine the satisfaction of harvesting your own oyster mushrooms, shiitakes, or even the elusive lion’s mane, knowing you nurtured them from start to finish. The flavor of freshly grown mushrooms is simply unparalleled – richer, more intense, and bursting with a freshness you won’t find anywhere else.
Beyond the taste, growing mushrooms at home is an educational and engaging activity. It’s a fantastic way to learn about the life cycle of fungi, the importance of sustainable practices, and the interconnectedness of nature. It’s also a great project to share with kids, sparking their curiosity and fostering a love for science and the environment.
But the benefits don’t stop there. Consider the cost savings. While initial setup might require a small investment, the long-term yield of multiple mushroom flushes will quickly offset the expense. Plus, you’ll be reducing your carbon footprint by opting for locally grown, sustainable food.
Ready to take your mushroom cultivation to the next level? Here are a few suggestions and variations to explore:
* Experiment with different substrates: While we focused on straw or wood chips, you can also try coffee grounds, cardboard, or even old cotton clothing. Each substrate will impart a slightly different flavor and texture to your mushrooms.
* Explore different mushroom varieties: Oyster mushrooms are a great starting point, but don’t be afraid to branch out to shiitakes, lion’s mane, or even wine caps. Each variety has its unique growing requirements and flavor profile.
* Consider using a grow tent: A grow tent provides a controlled environment for your mushrooms, allowing you to regulate temperature, humidity, and light. This can significantly improve your yields and reduce the risk of contamination.
* Incorporate your spent substrate into your garden: Once your mushroom substrate has exhausted its ability to produce mushrooms, it makes an excellent soil amendment for your garden. It’s rich in nutrients and beneficial microbes that will help your plants thrive.
We wholeheartedly encourage you to embark on this exciting journey of growing mushrooms at home. It’s a rewarding experience that will not only enhance your culinary creations but also deepen your appreciation for the natural world. Don’t be afraid to experiment, learn from your mistakes, and most importantly, have fun!
Now, we want to hear from you! Share your experiences, tips, and tricks in the comments below. Let us know what varieties you’re growing, what substrates you’re using, and any challenges you’ve encountered along the way. Together, we can create a thriving community of home mushroom growers and spread the joy of this amazing DIY project. Let’s cultivate a world where everyone can enjoy the deliciousness and benefits of fresh, homegrown mushrooms!
Frequently Asked Questions (FAQ)
What are the easiest types of mushrooms to grow at home for beginners?
Oyster mushrooms are widely considered the easiest mushrooms to grow at home for beginners. They are relatively fast-growing, tolerant of a wide range of conditions, and can be grown on a variety of substrates, including straw, coffee grounds, and even cardboard. Shiitake mushrooms are another good option, although they require a bit more patience as they take longer to fruit. Lion’s mane mushrooms are also gaining popularity among home growers due to their unique flavor and health benefits, but they may require a slightly more controlled environment.
How long does it take to grow mushrooms at home?
The time it takes to grow mushrooms at home varies depending on the variety and the growing conditions. Oyster mushrooms can typically be harvested within a few weeks of inoculation, while shiitake mushrooms may take several months. Factors such as temperature, humidity, and light can also affect the growth rate. It’s important to research the specific requirements of the mushroom variety you’re growing and provide the optimal conditions for fruiting.
What are the most common mistakes people make when growing mushrooms at home?
One of the most common mistakes is improper sterilization or pasteurization of the substrate. This can lead to contamination by mold or other unwanted fungi, which can outcompete the desired mushrooms. Another common mistake is insufficient humidity. Mushrooms require a high level of humidity to fruit properly, so it’s important to maintain a moist environment. Overwatering can also be a problem, as it can lead to waterlogging and rot. Finally, neglecting proper ventilation can lead to a buildup of carbon dioxide, which can inhibit mushroom growth.
How do I prevent contamination when growing mushrooms at home?
Preventing contamination is crucial for successful mushroom cultivation. Start by thoroughly sterilizing or pasteurizing your substrate to kill any existing microorganisms. Use sterile techniques when inoculating the substrate with mushroom spawn, such as wearing gloves and using a clean workspace. Maintain a clean growing environment and avoid introducing contaminants such as dust, dirt, or insects. Regularly inspect your mushrooms for signs of contamination, such as mold or discoloration, and remove any affected areas immediately.
What are the best substrates for growing different types of mushrooms?
The best substrate for growing mushrooms depends on the variety. Oyster mushrooms can be grown on a wide range of substrates, including straw, coffee grounds, cardboard, and wood chips. Shiitake mushrooms are typically grown on hardwood logs or sawdust. Lion’s mane mushrooms can be grown on sawdust or supplemented hardwood substrates. It’s important to choose a substrate that is appropriate for the specific mushroom variety you’re growing and that is free from contaminants.
How do I know when my mushrooms are ready to harvest?
The signs of maturity vary depending on the mushroom variety. Oyster mushrooms are typically ready to harvest when the caps are fully expanded and the edges are still slightly curled under. Shiitake mushrooms are ready to harvest when the caps have flattened out and the gills are visible. Lion’s mane mushrooms are ready to harvest when the spines are fully developed and have a slightly yellowish tint. It’s important to harvest your mushrooms at the right time to ensure optimal flavor and texture.
Can I grow mushrooms indoors without a special setup?
Yes, you can grow mushrooms indoors without a special setup, although a controlled environment can improve your yields. A simple setup might involve a plastic tub or container with a lid, a humidifier to maintain humidity, and a grow light to provide light. You can also use a pre-made mushroom growing kit, which typically includes everything you need to get started.
Are there any health benefits to eating homegrown mushrooms?
Yes, homegrown mushrooms are packed with nutrients and offer a variety of health benefits. They are a good source of protein, fiber, vitamins, and minerals. They also contain antioxidants and other compounds that may help boost the immune system, reduce inflammation, and protect against chronic diseases. Growing your own mushrooms ensures that you are consuming fresh, high-quality produce that is free from pesticides and other harmful chemicals.
What do I do with the spent substrate after harvesting mushrooms?
Spent mushroom substrate is an excellent soil amendment for your garden. It is rich in nutrients and beneficial microbes that can help improve soil fertility and plant growth. You can add it directly to your garden beds or compost it for later use. Spent substrate is particularly beneficial for plants that prefer acidic soil, such as blueberries and azaleas.
Is it safe to eat mushrooms that I have grown at home?
Yes, it is generally safe to eat mushrooms that you have grown at home, provided that you have properly identified the variety and followed safe growing practices. It’s crucial to only consume mushrooms that you are 100% certain are edible. If you are unsure about the identity of a mushroom, it’s best to err on the side of caution and discard it. Always cook mushrooms thoroughly before eating to kill any potential bacteria or toxins.
Leave a Comment