

Grow Mint Indoors? Absolutely! Imagine stepping into your kitchen and snipping fresh, fragrant mint leaves for your tea, mojito, or even a zesty salad dressing, all without ever leaving the comfort of your home. That’s the magic of indoor gardening, and it’s easier than you might think! For centuries, cultivating herbs indoors has been a way for people to connect with nature, even in urban environments. From ancient Egyptians growing herbs for medicinal purposes to medieval monks tending their monastery gardens, the desire to bring the outdoors in is deeply rooted in our history.
But why should you learn to grow mint indoors? Well, for starters, it’s incredibly convenient. No more last-minute grocery store runs for that sprig of mint you need! Plus, growing your own herbs is a fantastic way to ensure you’re using fresh, organic ingredients, free from harmful pesticides. And let’s be honest, there’s something incredibly satisfying about nurturing a plant from a tiny seedling to a thriving herb. In this article, I’m going to share some simple yet effective DIY tricks and hacks that will have you harvesting your own homegrown mint in no time. Get ready to unleash your inner gardener and transform your home into a fragrant, green oasis!

Growing Mint Indoors: A Beginner’s Guide to Fresh Flavor All Year Round
Hey there, fellow plant enthusiasts! Are you craving the refreshing taste of mint in your tea, cocktails, or culinary creations, but don’t have a garden or the right climate? Don’t worry, I’ve got you covered! Growing mint indoors is surprisingly easy and rewarding. I’m going to walk you through everything you need to know to cultivate your own thriving mint patch right in your home. Get ready for a constant supply of fresh, fragrant mint!
Choosing the Right Mint Variety
First things first, let’s talk about mint varieties. There are tons of different types, each with its own unique flavor profile. Some popular choices for indoor growing include:
* Peppermint: The classic, strong mint flavor perfect for teas and desserts.
* Spearmint: A milder, sweeter mint often used in chewing gum and sauces.
* Chocolate Mint: A fun variety with a hint of chocolate flavor – great for desserts!
* Apple Mint: A fruity, slightly sweet mint ideal for salads and drinks.
I recommend starting with peppermint or spearmint, as they’re generally the easiest to grow. You can find mint plants at most garden centers or even some grocery stores. Just make sure the plant looks healthy and vibrant before you bring it home.
What You’ll Need
Before we dive into the planting process, let’s gather all the necessary supplies. Here’s what you’ll need:
* Mint plant or cuttings: As mentioned above, you can purchase a small mint plant or propagate your own from cuttings (more on that later!).
* Pot with drainage holes: Choose a pot that’s at least 6 inches in diameter to give your mint room to grow. Drainage is crucial to prevent root rot.
* Well-draining potting mix: Avoid using garden soil, as it can become compacted and doesn’t drain well. A good quality potting mix specifically formulated for herbs or vegetables is ideal.
* Watering can or spray bottle: For gentle and even watering.
* Sunny windowsill or grow light: Mint needs plenty of light to thrive.
* Optional: Fertilizer (organic liquid fertilizer is best), pruning shears.
Planting Your Mint
Now for the fun part – planting! Follow these steps to get your mint off to a great start:
1. Prepare the pot: Fill the pot with potting mix, leaving about an inch of space at the top. Gently pat down the soil to remove any air pockets.
2. Plant the mint: If you’re using a purchased plant, carefully remove it from its container. Gently loosen the roots with your fingers to encourage them to spread out. Place the plant in the center of the pot and add more potting mix around it, ensuring that the top of the root ball is level with the soil surface.
3. Water thoroughly: Water the newly planted mint until water drains out of the drainage holes. This will help settle the soil and hydrate the roots.
4. Find the perfect spot: Place your potted mint on a sunny windowsill that receives at least 6 hours of direct sunlight per day. If you don’t have a sunny windowsill, you can use a grow light to supplement the light.
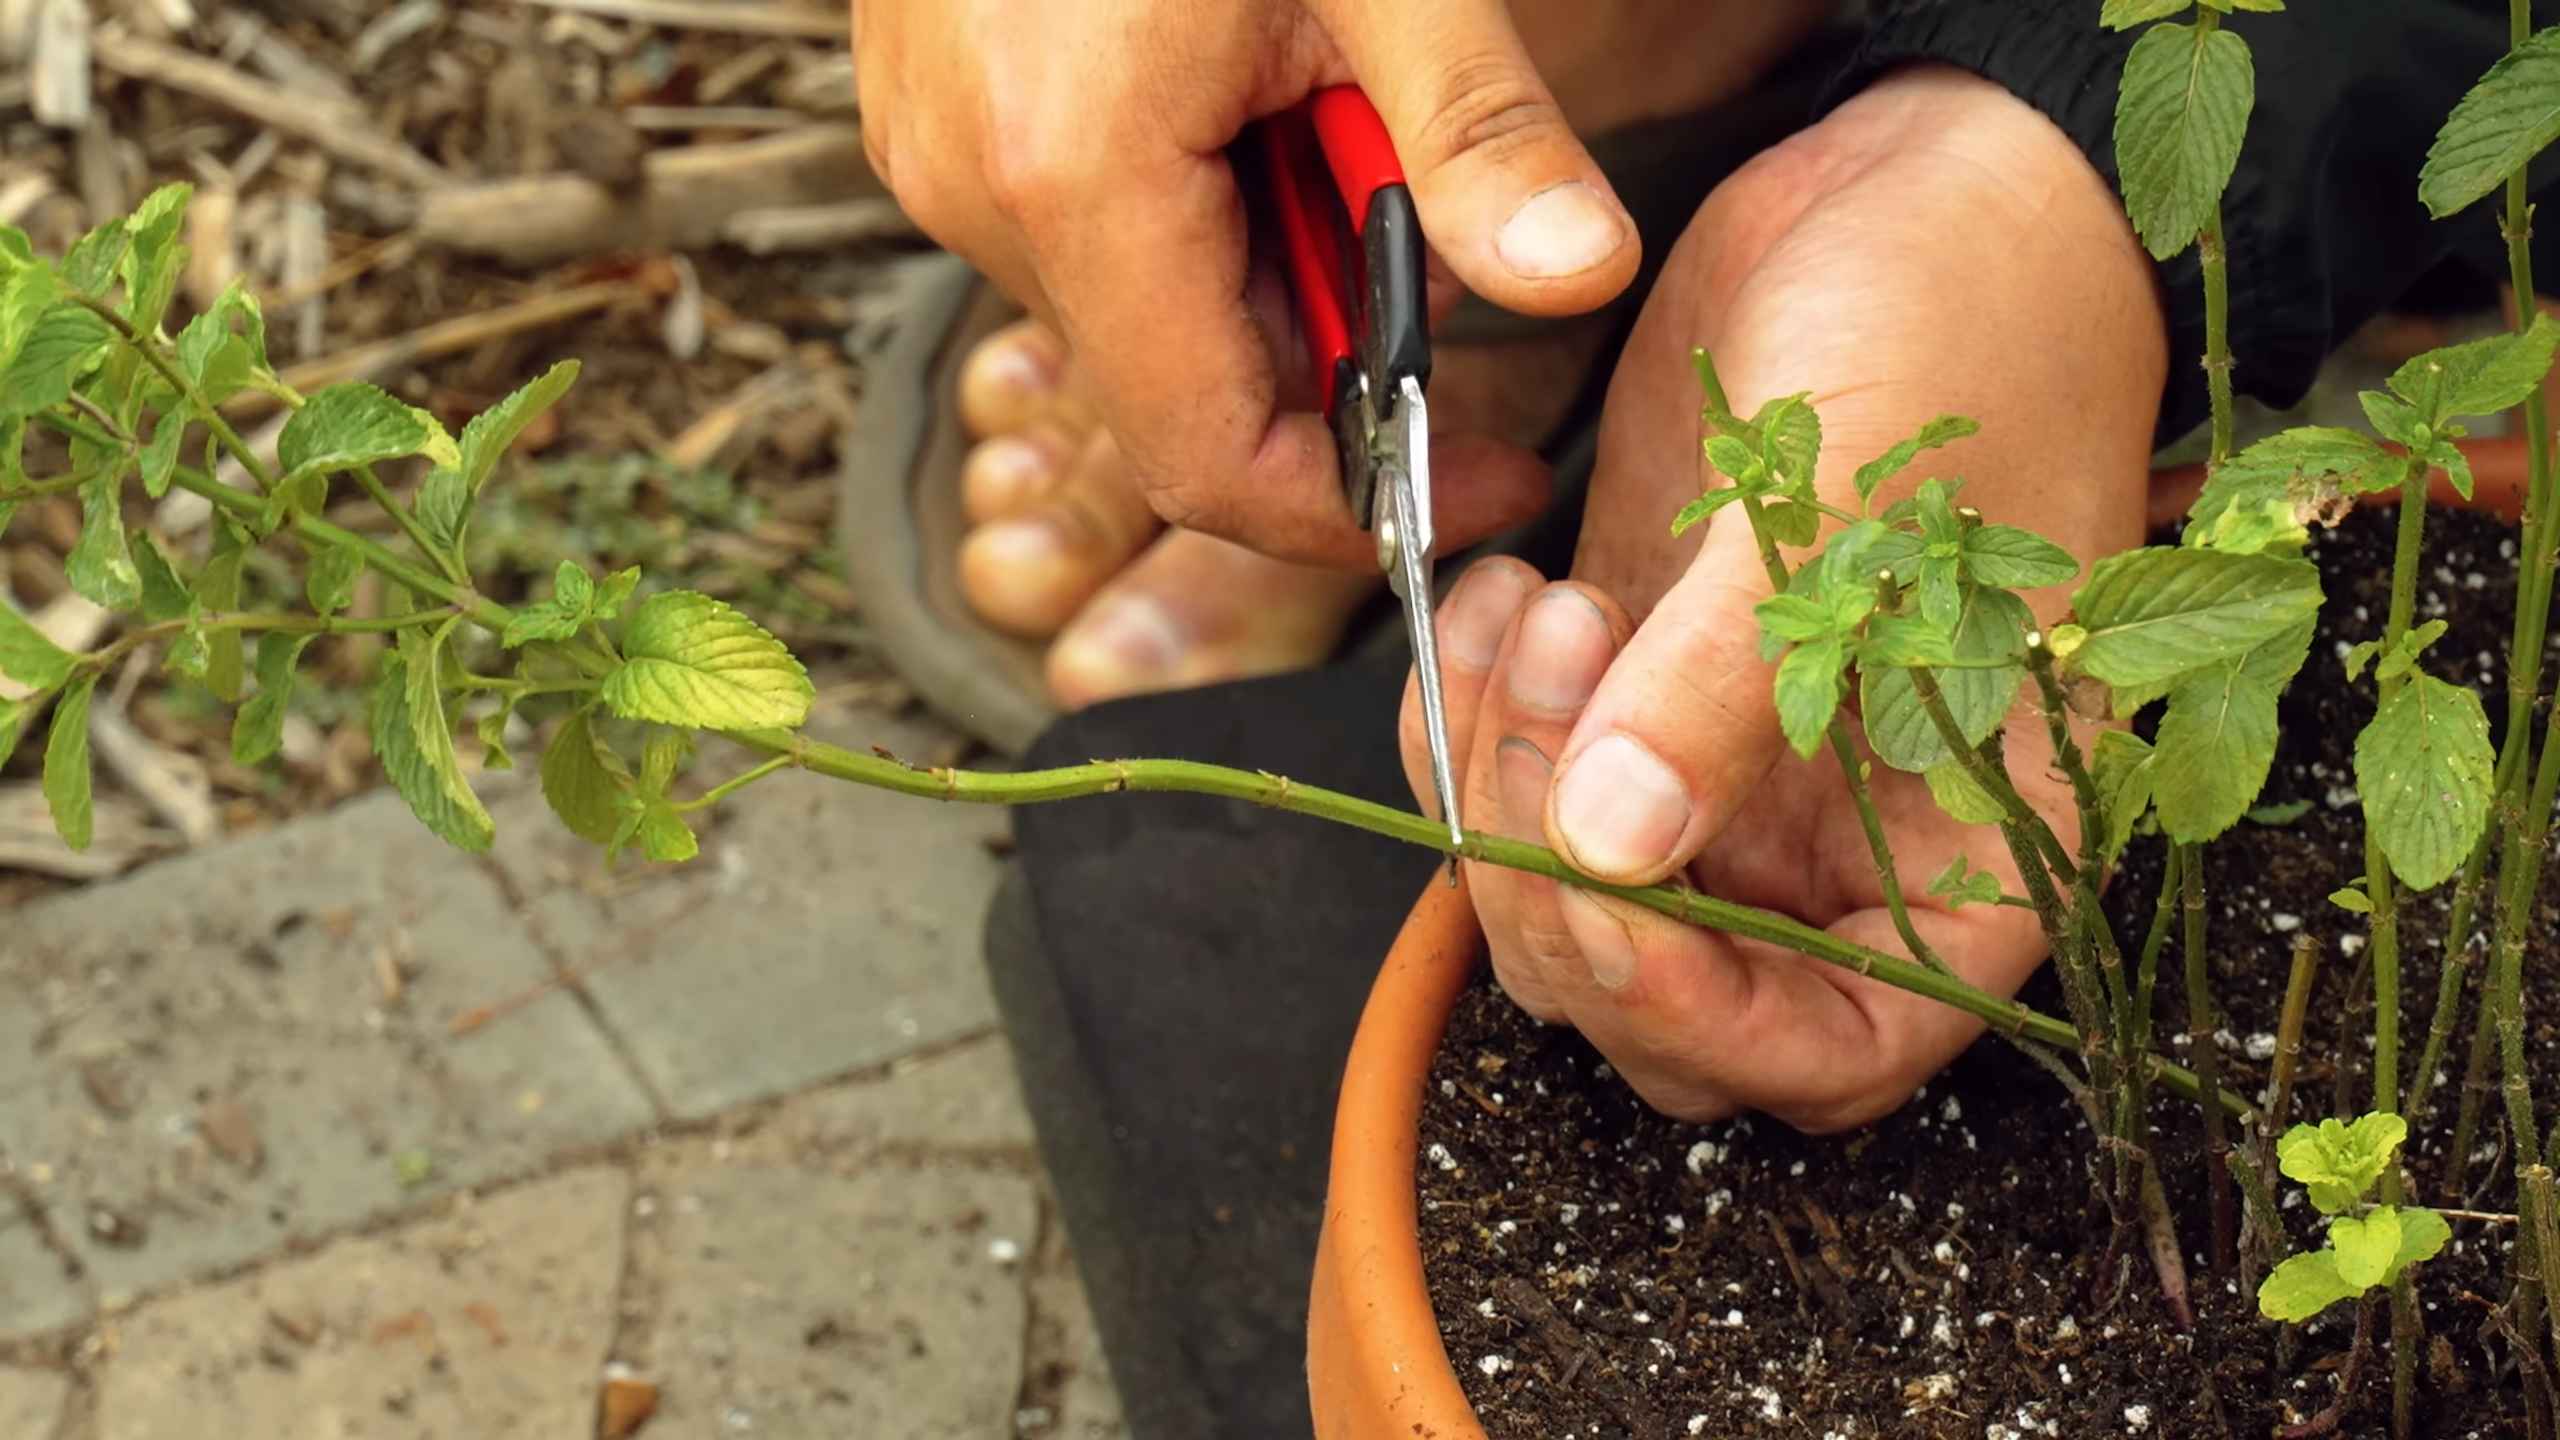
Propagating Mint from Cuttings
Want to expand your mint collection without spending more money? Propagating mint from cuttings is a simple and effective way to create new plants. Here’s how:
1. Select healthy stems: Choose stems that are about 4-6 inches long and have several leaves. Avoid stems that are flowering, as they won’t root as easily.
2. Prepare the cuttings: Remove the leaves from the bottom 1-2 inches of the stem. This will expose the nodes where roots will form.
3. Rooting in water: Place the cuttings in a glass or jar filled with water, making sure that the leaves are above the waterline. Place the jar in a bright, indirect light location.
4. Wait for roots to develop: Change the water every few days to keep it fresh. Within a week or two, you should see roots starting to emerge from the nodes.
5. Plant the rooted cuttings: Once the roots are about an inch long, you can plant the cuttings in a pot filled with potting mix, following the same steps as above.
Caring for Your Indoor Mint
Once your mint is planted, it’s important to provide it with the right care to keep it healthy and productive. Here are some key tips:
* Watering: Mint likes to be kept consistently moist, but not soggy. Water when the top inch of soil feels dry to the touch. Avoid overwatering, as this can lead to root rot. I usually check the soil moisture every other day.
* Light: As mentioned earlier, mint needs plenty of light. If your mint isn’t getting enough sunlight, the leaves may become pale and the plant may become leggy. Supplement with a grow light if needed.
* Fertilizing: Feed your mint with a diluted organic liquid fertilizer every 2-4 weeks during the growing season (spring and summer). This will provide it with the nutrients it needs to thrive.
* Pruning: Regular pruning is essential for keeping your mint bushy and preventing it from becoming leggy. Pinch off the tips of the stems to encourage branching. You can also harvest leaves as needed for cooking or tea.
* Pest control: Indoor mint plants are generally less susceptible to pests than outdoor plants, but they can still be affected by aphids, spider mites, or whiteflies. If you notice any pests, try spraying the plant with a mixture of water and mild dish soap. You can also use insecticidal soap or neem oil.
* Repotting: Mint is a fast-growing plant, so you may need to repot it into a larger container every year or two. Choose a pot that’s a few inches larger in diameter than the current pot.
Harvesting Your Mint
The best part about growing your own mint is being able to harvest fresh leaves whenever you need them! Here’s how to harvest your mint properly:
1. Choose healthy leaves: Select leaves that are green and vibrant. Avoid leaves that are yellow, brown, or damaged.
2. Harvest in the morning: The essential oils in mint are most concentrated in the morning, so that’s the best time to harvest for maximum flavor.
3. Use sharp scissors or pruning shears: Cut the stems just above a leaf node. This will encourage new growth.
4. Don’t harvest more than one-third of the plant at a time: This will allow the plant to recover quickly.
5. Use fresh or dry for later: You can use the harvested mint leaves fresh or dry them for later use. To dry mint, simply hang the stems upside down in a cool, dry place until the leaves are brittle. You can then crumble the leaves and store them in an airtight container.
Troubleshooting Common Problems
Even with the best care, you may encounter some problems when growing mint indoors. Here are some common issues and how to address them:
* Yellowing leaves: This can be caused by overwatering, underwatering, nutrient deficiency, or lack of light. Adjust your watering schedule, fertilize the plant, and make sure it’s getting enough light.
* Leggy growth: This is usually caused by insufficient light. Move the plant to a sunnier location or supplement with a grow light.
* Root rot: This is caused by overwatering. Make sure the pot has drainage holes and allow the soil to dry out slightly between waterings.
* Pests: As mentioned earlier, indoor mint plants can be affected by pests. Treat infestations with insecticidal soap or neem oil.
Enjoying Your Homegrown Mint
Now that you’ve successfully grown your own mint indoors, it’s time to enjoy the fruits (or rather, leaves!) of your labor. Here are just a few ways to use your fresh mint:
* Tea: Add fresh mint leaves to hot water for a refreshing and soothing tea.
* Cocktails: Use mint to make mojitos, mint juleps, or other delicious cocktails.
* Culinary dishes: Add mint to salads, sauces, desserts, and other dishes for a burst of flavor.
* Garnish: Use mint leaves as a garnish for desserts, drinks, and savory dishes.
Growing mint indoors is a rewarding experience that allows you to enjoy fresh, flavorful mint all year round. With a little care and attention, you can have a thriving mint patch right in your home. Happy growing!
Conclusion
So, there you have it! Growing mint indoors is not only achievable, it’s downright rewarding. Imagine fresh, fragrant mint leaves readily available to elevate your cocktails, brighten your salads, or infuse your teas, all year round. No more sad, wilted bunches from the grocery store – just vibrant, homegrown goodness at your fingertips.
This DIY trick is a must-try for several compelling reasons. First, it’s incredibly cost-effective. A single mint plant can provide you with a continuous supply of fresh herbs, saving you money on repeated grocery store purchases. Second, it’s environmentally friendly. By growing your own mint, you’re reducing your carbon footprint associated with transportation and packaging. Third, it’s therapeutic. Tending to your indoor mint garden can be a relaxing and fulfilling activity, providing a welcome respite from the stresses of daily life. Finally, and perhaps most importantly, it’s delicious! The flavor of homegrown mint is simply unmatched.
Don’t be afraid to experiment with different varieties of mint. Peppermint, spearmint, chocolate mint, and even apple mint each offer unique flavor profiles that can add exciting dimensions to your culinary creations. Consider using different types of containers, from simple terracotta pots to stylish self-watering planters, to find what works best for your space and aesthetic. You can also explore different lighting options, supplementing natural light with grow lights if necessary, to ensure your mint thrives even during the darker months. Another variation is to try propagating mint from cuttings. This is a great way to expand your mint collection without having to purchase new plants. Simply take a cutting from an existing mint plant, place it in water until roots develop, and then plant it in soil.
We’re confident that you’ll find growing mint indoors to be a surprisingly simple and satisfying experience. The key is to provide your mint with adequate light, water, and well-draining soil. With a little bit of care and attention, you’ll be enjoying fresh, flavorful mint in no time.
We wholeheartedly encourage you to give this DIY trick a try. It’s a small investment of time and effort that yields a significant return in terms of flavor, convenience, and overall well-being. Once you’ve experienced the joy of harvesting your own fresh mint, you’ll never want to go back to store-bought again.
And most importantly, we want to hear about your experience! Share your tips, tricks, and triumphs in the comments below. Let us know what varieties of mint you’re growing, what containers you’re using, and what delicious recipes you’re creating. Your insights can help other readers embark on their own indoor mint-growing adventures. Let’s build a community of indoor gardeners and share the joy of fresh, homegrown herbs! So go ahead, get your hands dirty, and discover the magic of growing mint indoors. You won’t regret it!
Frequently Asked Questions (FAQ)
1. What is the best type of mint to grow indoors?
The best type of mint to grow indoors depends on your personal preferences and intended use. Spearmint and peppermint are two of the most popular and readily available varieties. Spearmint has a milder, sweeter flavor that’s perfect for teas, cocktails, and salads. Peppermint has a stronger, more intense flavor that’s ideal for desserts, candies, and medicinal purposes. Other varieties to consider include chocolate mint (which has a hint of chocolate flavor), apple mint (which has a fruity aroma), and orange mint (which has a citrusy scent). Experiment with different varieties to find your favorites!
2. What kind of pot and soil should I use for growing mint indoors?
For pots, choose containers that are at least 6 inches in diameter to allow for adequate root growth. Terracotta pots are a good option because they allow for good drainage, but plastic pots are also fine. Make sure the pot has drainage holes to prevent waterlogging. As for soil, mint prefers well-draining soil that is rich in organic matter. A good potting mix specifically formulated for herbs is ideal. You can also amend regular potting soil with compost or other organic materials to improve its drainage and fertility. Avoid using garden soil, as it can be too heavy and may contain pests or diseases.
3. How much sunlight does indoor mint need?
Mint needs at least 6 hours of sunlight per day to thrive. Place your mint plant in a sunny window that receives direct sunlight. If you don’t have a sunny window, you can supplement with a grow light. LED grow lights are a good option because they are energy-efficient and don’t produce much heat. Position the grow light a few inches above the plant and leave it on for 12-16 hours per day. Rotate the plant regularly to ensure that all sides receive adequate light.
4. How often should I water my indoor mint plant?
Water your mint plant when the top inch of soil feels dry to the touch. Water thoroughly until water drains out of the drainage holes. Avoid overwatering, as this can lead to root rot. Mint prefers consistently moist soil, but it doesn’t like to sit in standing water. During the warmer months, you may need to water your mint plant more frequently. Check the soil moisture regularly and adjust your watering schedule accordingly.
5. How do I fertilize my indoor mint plant?
Fertilize your mint plant every 2-4 weeks during the growing season (spring and summer) with a balanced liquid fertilizer diluted to half strength. Avoid over-fertilizing, as this can lead to leggy growth and a loss of flavor. You can also use a slow-release fertilizer at the beginning of the growing season. Follow the instructions on the fertilizer package for application rates.
6. How do I harvest mint leaves from my indoor plant?
Harvest mint leaves regularly to encourage bushier growth. Simply pinch off the top leaves or stems of the plant. You can harvest up to one-third of the plant at a time without harming it. The best time to harvest mint leaves is in the morning, after the dew has dried. The leaves will be at their most flavorful at this time.
7. How do I prevent pests and diseases on my indoor mint plant?
Inspect your mint plant regularly for pests and diseases. Common pests that can affect mint include aphids, spider mites, and whiteflies. If you find pests, you can try washing them off with a strong stream of water or using an insecticidal soap. Diseases that can affect mint include powdery mildew and rust. To prevent diseases, make sure your mint plant has good air circulation and avoid overwatering. If you notice signs of disease, remove the affected leaves and treat the plant with a fungicide.
8. Can I propagate mint from cuttings?
Yes, propagating mint from cuttings is a simple and effective way to expand your mint collection. Take a cutting from an existing mint plant that is about 4-6 inches long. Remove the lower leaves from the cutting. Place the cutting in a glass of water and wait for roots to develop. This usually takes about 1-2 weeks. Once the roots are about an inch long, you can plant the cutting in soil.
9. My mint plant is getting leggy. What should I do?
Leggy growth in mint plants is often caused by insufficient light. Move your mint plant to a sunnier location or supplement with a grow light. You can also prune the plant back to encourage bushier growth. Simply cut back the stems to just above a leaf node.
10. Is growing mint indoors worth the effort?
Absolutely! Growing mint indoors is a rewarding experience that provides you with a continuous supply of fresh, flavorful herbs. It’s also a cost-effective and environmentally friendly way to enjoy mint. With a little bit of care and attention, you can easily grow mint indoors and enjoy its many benefits.
Leave a Comment