

Grow Melons Easily Backyard – sounds like a dream, right? Imagine stepping out your back door and harvesting juicy, sweet melons you nurtured yourself. It’s more achievable than you think, and this DIY guide is your secret weapon! For centuries, melons have been cultivated across the globe, from the watermelons of ancient Egypt, depicted in hieroglyphics, to the cantaloupes enjoyed in medieval Europe. They’ve always been a symbol of abundance and deliciousness.
But let’s be honest, growing melons can seem intimidating. They need space, sunshine, and the right conditions. That’s where these DIY tricks and hacks come in. I’m going to show you how to grow melons easily backyard, even if you have limited space or a less-than-perfect green thumb.
Why do you need these tricks? Because store-bought melons simply can’t compare to the flavor of a homegrown one, ripened to perfection on the vine. Plus, gardening is therapeutic! It’s a fantastic way to de-stress, connect with nature, and enjoy the satisfaction of creating something delicious. So, let’s ditch the grocery store melons and embark on this exciting gardening adventure together! I promise, with these simple steps, you’ll be enjoying your own backyard bounty in no time.
Growing Melons Like a Pro: My Backyard Secret Weapon
Okay, melon lovers, gather ’round! I’m about to spill my secrets on how to grow juicy, delicious melons right in your backyard, even if you think you have a black thumb. Forget those bland, overpriced grocery store melons – we’re talking homegrown goodness that will blow your mind. This isn’t rocket science, but it does require a little planning and some elbow grease. Trust me, the reward is SO worth it.
Choosing Your Melon Variety
Before we even think about digging, let’s talk melons. There are tons of varieties, and the best one for you depends on your climate and personal preference. Here are a few of my favorites:
* Cantaloupe: Classic, sweet, and relatively easy to grow. Look for varieties like ‘Athena’ or ‘Hales Best Jumbo’.
* Watermelon: The king of summer! ‘Sugar Baby’ is a good choice for smaller gardens, while ‘Crimson Sweet’ is a crowd-pleaser.
* Honeydew: Mild and refreshing. ‘Honey Globe’ is a reliable option.
* Galia: A cross between cantaloupe and honeydew, with a unique flavor.
* Personal-Sized Melons: These are great if you have limited space or just want a manageable harvest. Look for varieties like ‘Mini Love’ watermelon or ‘Sugar Kiss’ cantaloupe.
Pro Tip: Check your local nursery or seed catalog for varieties that are well-suited to your region. They’ll have the best recommendations for your specific climate.
Preparing Your Melon Patch: Location, Location, Location!
Melons are sun-worshippers, plain and simple. They need at least 6-8 hours of direct sunlight per day to thrive. So, choose a spot in your yard that gets plenty of sunshine.
* Sunlight: As I mentioned, 6-8 hours of direct sunlight is a must.
* Soil: Melons love well-drained, fertile soil. Amend your soil with compost or aged manure to improve drainage and add nutrients.
* Space: Melons need room to spread out. Watermelons especially can get quite large, so give them plenty of space. Check the seed packet for specific spacing recommendations.
* Protection from Wind: Strong winds can damage melon vines, so choose a location that is sheltered from the wind if possible.
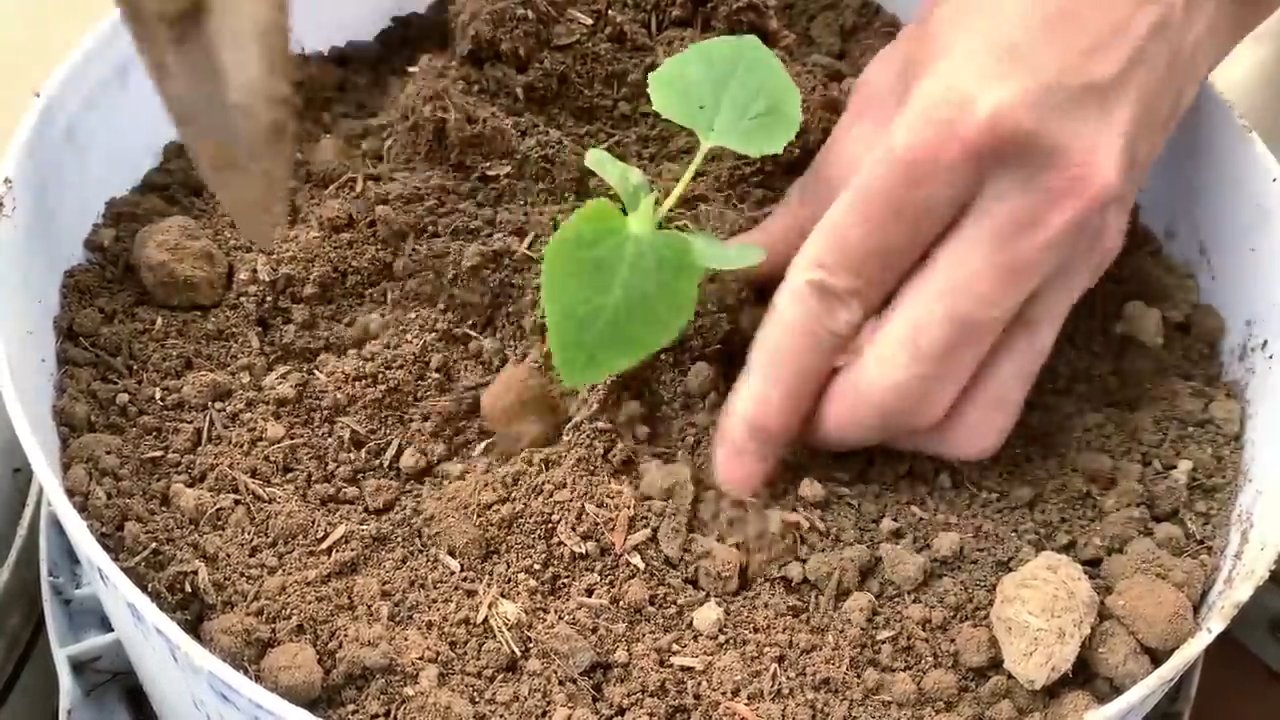
Step-by-Step Planting Guide
Okay, now for the fun part – getting those melon seeds in the ground!
1. Start Seeds Indoors (Optional): I like to get a head start by starting my melon seeds indoors about 4-6 weeks before the last expected frost. This gives them a jumpstart on the growing season.
* Use seed starting trays or small pots filled with seed starting mix.
* Plant the seeds about ½ inch deep.
* Keep the soil moist but not soggy.
* Provide plenty of light, either from a sunny window or a grow light.
2. Prepare the Soil: Whether you’re starting seeds indoors or planting directly in the ground, you’ll need to prepare your soil.
* Clear the area of any weeds or debris.
* Amend the soil with compost or aged manure. I usually add a generous amount – about 2-3 inches.
* Till the soil to a depth of 12 inches to loosen it up.
* Create raised mounds or hills for planting. This helps with drainage and warms the soil faster.
3. Planting Seeds or Transplants: Once the soil is warm and the danger of frost has passed, it’s time to plant!
* Direct Sowing: Plant seeds directly in the mounds, spacing them according to the seed packet instructions. I usually plant 2-3 seeds per mound and then thin them out to the strongest seedling.
* Transplanting: Gently remove the seedlings from their pots and plant them in the mounds, spacing them according to the seed packet instructions. Be careful not to damage the roots.
4. Water Thoroughly: After planting, water the seedlings or seeds thoroughly. This helps to settle the soil and get them off to a good start.
5. Mulch: Apply a layer of mulch around the plants to help retain moisture, suppress weeds, and keep the soil warm. I like to use straw or shredded leaves.
Watering and Feeding Your Melon Patch
Melons need consistent watering, especially during hot, dry weather.
* Watering: Water deeply and regularly, especially when the fruits are developing. Aim for about 1-2 inches of water per week. Avoid overhead watering, as this can lead to fungal diseases. Drip irrigation or soaker hoses are ideal.
* Fertilizing: Melons are heavy feeders, so they need regular fertilization.
* At Planting: Use a balanced fertilizer (e.g., 10-10-10) at planting time.
* During Growth: Side-dress the plants with a nitrogen-rich fertilizer when the vines start to run.
* When Fruits Set: Switch to a fertilizer that is higher in phosphorus and potassium to promote fruit development.
* Organic Options: Fish emulsion and seaweed extract are great organic options for fertilizing melons.
Dealing with Pests and Diseases
Unfortunately, melons can be susceptible to pests and diseases. Here are a few common problems and how to deal with them:
* Squash Bugs: These pesky bugs can suck the sap from melon vines, causing them to wilt and die. Handpick them off the plants or use insecticidal soap.
* Cucumber Beetles: These beetles can spread diseases and damage melon leaves. Use row covers to protect young plants or spray with neem oil.
* Powdery Mildew: This fungal disease can cause white, powdery spots on melon leaves. Improve air circulation by pruning the vines and spray with a fungicide if necessary.
* Fusarium Wilt: This soilborne disease can cause melon vines to wilt and die. Choose disease-resistant varieties and practice crop rotation.
My Secret Weapon: Companion Planting! I’ve found that planting certain herbs and flowers near my melons can help deter pests and attract beneficial insects. Some good companion plants for melons include:
* Marigolds: Repel nematodes and other pests.
* Nasturtiums: Attract aphids away from melon plants.
* Basil: Repels flies and mosquitoes.
* Oregano: Attracts beneficial insects.
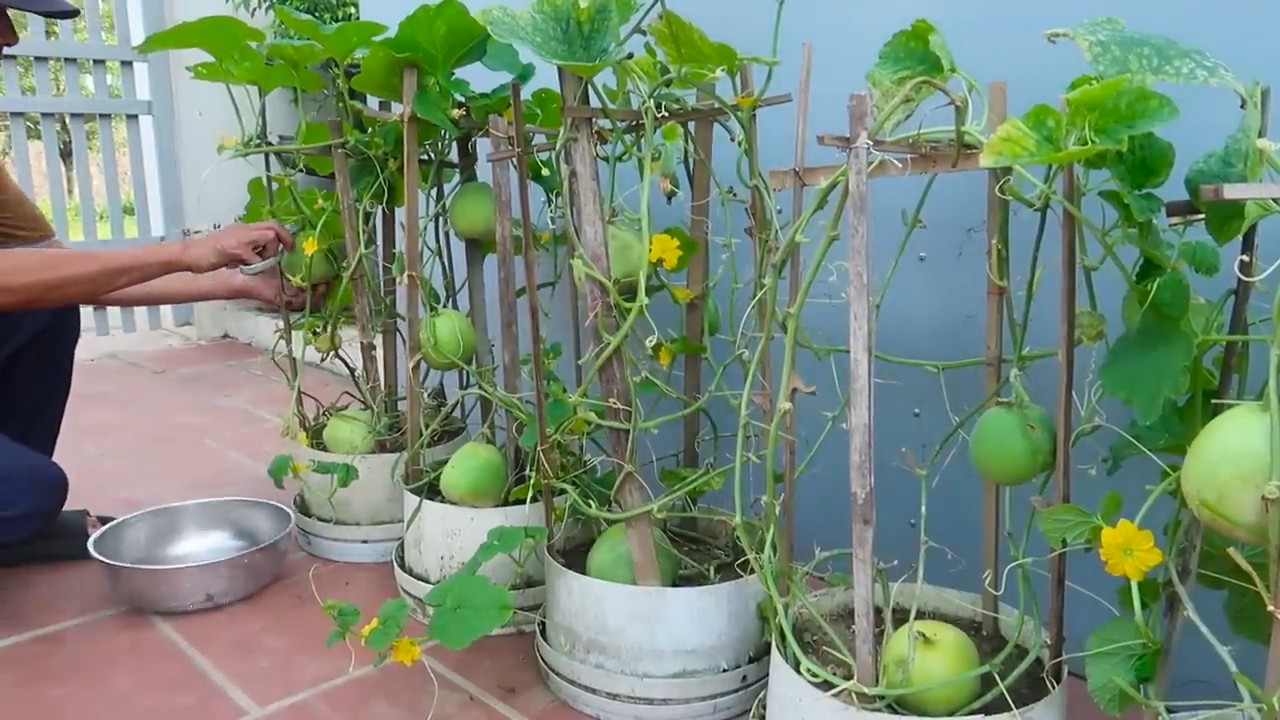
Supporting Your Melon Vines
As your melon vines grow, they may need some support to keep the fruits off the ground. This is especially important for larger melon varieties like watermelons.
* Trellises: Trellises are a great way to support melon vines and save space. Choose a sturdy trellis that can handle the weight of the melons.
* Slings: For larger melons, you can use slings made from old pantyhose or netting to support the fruits. Tie the slings to the trellis or a sturdy stake.
* Straw: You can also place a thick layer of straw under the melons to keep them off the ground and prevent them from rotting.
Harvesting Your Melons: The Moment of Truth!
Knowing when to harvest your melons is crucial for getting that perfect, sweet flavor. Here are a few tips:
* Cantaloupe: The stem should slip easily from the melon when it’s ripe. The skin will also turn a golden color and have a fragrant aroma.
* Watermelon: The tendril closest to the melon should be brown and dry. The underside of the melon (where it rests on the ground) should be a creamy yellow color. You can also thump the melon – a ripe watermelon will sound hollow.
* Honeydew: The skin will turn a creamy yellow color and have a slightly waxy feel. The blossom end of the melon will be slightly soft.
Important: Once you harvest a melon, it won’t continue to ripen. So, make sure it’s fully ripe before you pick it.
Enjoying Your Homegrown Melons
Congratulations! You’ve successfully grown your own melons. Now it’s time to enjoy the fruits of your labor.
* Chill: Chill your melons in the refrigerator for a few hours before serving.
* Slice and Serve: Slice the melons into wedges or cubes and serve them as a refreshing snack or dessert.
* Get Creative: Use your melons in salads, smoothies, or even grilled dishes.
My Favorite Melon Recipe: Watermelon Feta Salad
This salad is the perfect combination of sweet, salty, and refreshing.
Ingredients:
* 4 cups cubed watermelon
* 1/2 cup crumbled feta cheese
* 1/4 cup thinly sliced red onion
* 2 tablespoons fresh mint leaves, chopped
* 2 tablespoons olive oil
* 1 tablespoon lime juice
Conclusion
So, there you have it! Growing melons in your backyard doesn’t have to be a daunting task. By implementing this simple yet effective DIY trick, you’re setting yourself up for a bountiful harvest of juicy, flavorful melons. We’ve shown you how to optimize your growing conditions, protect your precious fruits, and ultimately, enjoy the sweet reward of your labor.
This method isn’t just about convenience; it’s about maximizing your yield and ensuring the health of your melon plants. Think about it: no more melons rotting on the ground, no more battling pests that feast on your developing fruit, and no more wasted space in your garden. This DIY approach elevates your melon-growing game, transforming you from a novice gardener to a melon-growing maestro.
But the beauty of gardening lies in its adaptability. Feel free to experiment with different variations of this trick to suit your specific needs and preferences. For instance, if you live in a particularly windy area, you might consider using sturdier supports or creating a windbreak around your melon patch. If you’re growing smaller melon varieties, like cantaloupe, you can adjust the size of the supports accordingly.
Consider using different materials for your supports. While we’ve suggested readily available options like repurposed crates or sturdy plastic containers, you could also explore using woven baskets for a more rustic aesthetic. You can even get creative with the design of your supports, adding decorative elements to enhance the visual appeal of your garden.
Another variation to consider is the type of mulch you use around your melon plants. While organic mulches like straw or wood chips are excellent for retaining moisture and suppressing weeds, you could also experiment with using plastic mulch, which can help warm the soil and promote faster growth. Just be sure to remove the plastic mulch after the growing season to prevent soil contamination.
Remember, the key to successful melon growing is observation and adaptation. Pay close attention to your plants, monitor their growth, and adjust your techniques as needed. Don’t be afraid to experiment and try new things. After all, gardening is a journey of discovery, and there’s always something new to learn.
We are confident that this DIY trick will revolutionize your melon-growing experience. Imagine biting into a perfectly ripe, homegrown melon, knowing that you nurtured it from seed to fruit. The satisfaction is unparalleled.
So, what are you waiting for? Gather your materials, prepare your garden, and get ready to embark on a melon-growing adventure. We encourage you to try this DIY trick and share your experiences with us. Let us know what worked for you, what challenges you faced, and any tips or tricks you discovered along the way. Together, we can create a community of passionate melon growers, sharing our knowledge and helping each other achieve gardening success.
Don’t forget to document your progress with photos and videos. Share your creations on social media using relevant hashtags like #DIYMelonGrowing, #BackyardGardening, and #HomegrownMelons. Let’s inspire others to embrace the joy of growing their own food and experience the deliciousness of homegrown melons.
This DIY method for growing melons easily in your backyard is more than just a gardening technique; it’s a gateway to a more sustainable and fulfilling lifestyle. It’s a way to connect with nature, nourish your body, and create a beautiful and productive space in your own backyard. So, go ahead, give it a try, and discover the magic of homegrown melons. Happy gardening!
Frequently Asked Questions (FAQ)
What types of melons are best suited for this DIY trick?
This DIY trick is versatile and can be used for a wide variety of melon types. Watermelons, cantaloupes, honeydew melons, and even smaller varieties like Galia melons can all benefit from this method. However, keep in mind that larger watermelon varieties may require sturdier supports to accommodate their weight. When selecting your melon variety, consider your local climate and growing season. Choose varieties that are known to thrive in your area. Also, consider the size of your garden and the amount of space you have available. Smaller melon varieties may be a better choice if you have limited space.
How high should the supports be for the melons?
The height of the supports will depend on the size of the melon variety you are growing. As a general rule, the supports should be tall enough to keep the melons off the ground and allow for adequate air circulation. For smaller melon varieties like cantaloupes, supports that are 12-18 inches high may be sufficient. For larger watermelon varieties, you may need supports that are 24-36 inches high. It’s always better to err on the side of caution and provide supports that are slightly taller than necessary. You can always adjust the height of the supports as the melons grow.
What if I don’t have access to crates or containers? What other materials can I use for supports?
If you don’t have access to crates or containers, don’t worry! There are plenty of other materials you can use for supports. Sturdy plastic buckets, wooden pallets, or even large rocks can all be used to elevate your melons off the ground. You can also build your own supports using scrap wood or metal. Get creative and use whatever materials you have on hand. Just make sure that the supports are strong enough to support the weight of the melons and that they are stable enough to withstand wind and other weather conditions. Woven baskets can also be used for a more decorative look.
How often should I water my melon plants when using this DIY trick?
Watering frequency will depend on several factors, including the type of melon, the climate, and the soil conditions. As a general rule, melon plants need consistent moisture, especially during fruit development. Water deeply and regularly, aiming to keep the soil consistently moist but not waterlogged. Check the soil moisture regularly by sticking your finger into the soil. If the top inch of soil feels dry, it’s time to water. Avoid overhead watering, as this can increase the risk of fungal diseases. Instead, water at the base of the plants, using a soaker hose or drip irrigation system.
How do I protect my melons from pests and diseases when using this DIY trick?
Elevating your melons off the ground can help reduce the risk of pest and disease problems, but it’s still important to take preventative measures. Regularly inspect your plants for signs of pests or diseases. If you spot any problems, take action immediately. Use organic pest control methods, such as insecticidal soap or neem oil, to control pests. Remove any diseased leaves or fruits to prevent the spread of disease. Ensure good air circulation around your plants by spacing them properly and pruning away any excess foliage. You can also use row covers to protect your plants from pests early in the growing season.
Can I use this DIY trick for other types of fruits and vegetables?
Yes, this DIY trick can be adapted for other types of fruits and vegetables that are prone to rotting or pest problems when they come into contact with the ground. Cucumbers, pumpkins, and even some types of squash can benefit from being elevated off the ground. The key is to choose supports that are appropriate for the size and weight of the fruit or vegetable you are growing. You may also need to adjust the height of the supports depending on the specific needs of the plant.
What kind of fertilizer should I use for my melon plants?
Melon plants are heavy feeders and require a balanced fertilizer to thrive. Choose a fertilizer that is specifically formulated for fruits and vegetables. Look for a fertilizer that is high in phosphorus and potassium, which are essential for fruit development. Apply the fertilizer according to the package directions. You can also supplement with organic fertilizers, such as compost or manure. Avoid over-fertilizing, as this can lead to excessive foliage growth and reduced fruit production.
How do I know when my melons are ripe and ready to harvest?
Knowing when your melons are ripe and ready to harvest can be tricky, but there are a few telltale signs to look for. For watermelons, look for a dull thud when you tap the melon. The tendril closest to the melon should also be dry and brown. For cantaloupes, the melon should slip easily from the vine when gently tugged. The skin should also have a sweet aroma. For honeydew melons, the skin should turn from green to a creamy yellow color. The melon should also feel slightly soft to the touch.

Leave a Comment