

Grow Huge Pumpkins Recycled: Ever dreamt of having the biggest, most impressive pumpkin on the block? Imagine the look on your neighbor’s faces when they see your giant gourd! It’s not just a dream; it’s an achievable reality with a little know-how and a dash of DIY spirit. For centuries, pumpkins have been a symbol of abundance, harvest, and festive celebrations, deeply rooted in cultures worldwide. From ancient Native American traditions to modern-day Halloween extravaganzas, the pumpkin holds a special place in our hearts and gardens.
But let’s be honest, growing a prize-winning pumpkin can seem daunting. That’s where this DIY guide comes in! We’re not just talking about any pumpkin; we’re talking about pumpkins so big, they’ll need their own zip code. And the best part? We’re going to show you how to grow huge pumpkins recycled, using materials you probably already have lying around your home. Why spend a fortune on fancy fertilizers and equipment when you can harness the power of repurposing?
This article is packed with simple, effective tricks and hacks to help you cultivate a pumpkin that’s the envy of every gardener. I’m going to share my secrets to success, from soil preparation to watering techniques, all with a focus on sustainability and resourcefulness. So, grab your gardening gloves, and let’s get ready to grow huge pumpkins recycled and create a show-stopping centerpiece for your fall festivities!
Growing Giant Pumpkins: My Recycled Container Method
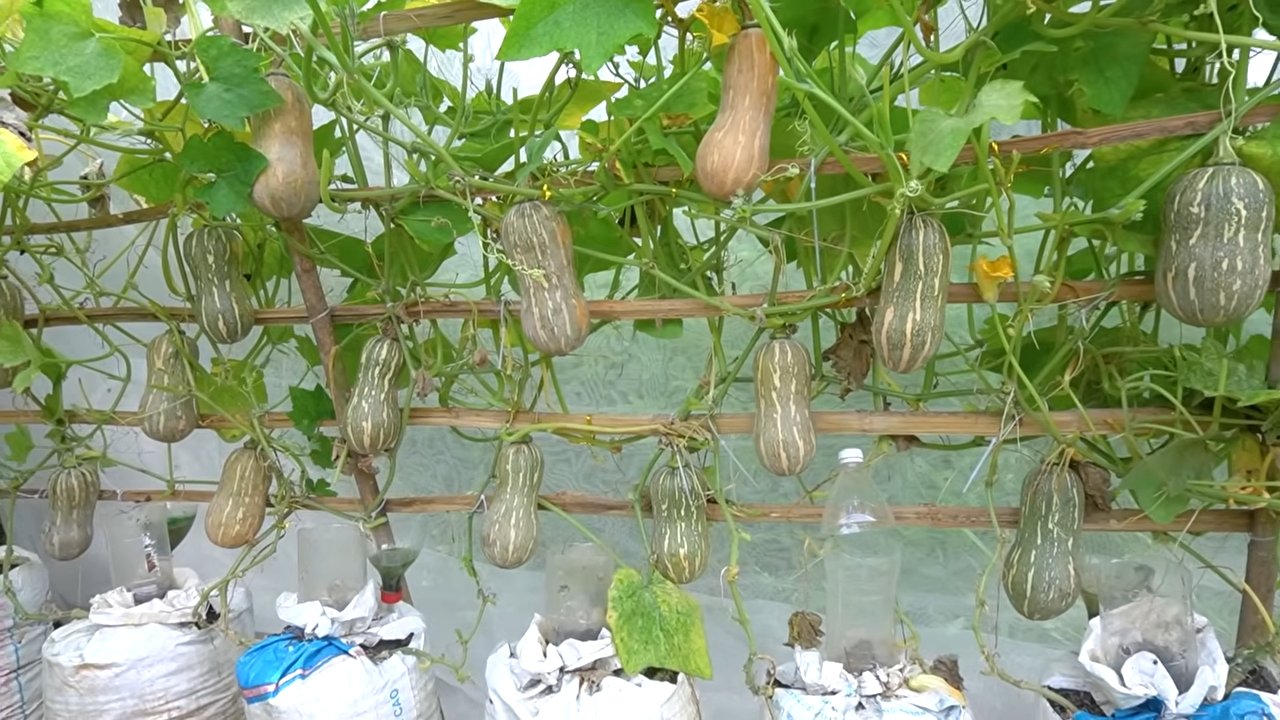
Okay, pumpkin fanatics! So, you want to grow a pumpkin so big it needs its own zip code? I get it! I’ve been there, and I’m here to share my secret weapon: growing giant pumpkins in recycled containers. It sounds crazy, right? But trust me, it works, and it’s a fantastic way to reuse those bulky items you’d otherwise toss.
Why Recycled Containers?
Before we dive in, let’s talk about why this method works. Giant pumpkins need a *lot* of space for their roots to spread. Traditional gardens often don’t provide enough room, leading to stunted growth. Large recycled containers, like IBC totes (Intermediate Bulk Containers), kiddie pools, or even modified livestock troughs, offer the necessary volume for those roots to thrive. Plus, they provide better drainage and temperature control than planting directly in the ground, especially in areas with poor soil.
Choosing Your Container
The size of your container is crucial. You’re aiming for a minimum of 300 gallons, but bigger is always better! Here are some options I’ve used successfully:
* IBC Totes: These are my personal favorite. They’re durable, readily available (check local farms, construction sites, or online marketplaces), and hold a massive amount of soil. Just make sure they previously contained non-toxic materials!
* Kiddie Pools: A classic! They’re affordable and easy to find. Just be aware that they might not be as durable as other options.
* Livestock Troughs: These are incredibly sturdy and offer excellent drainage. They can be a bit pricier, but they’ll last for years.
* Large Plastic Barrels: Cut in half, these can provide two decent-sized containers. Again, ensure they previously held non-toxic materials.
* Homemade Wooden Boxes: If you’re handy, you can build your own container to the exact dimensions you need.
Important Considerations:
* Drainage: Whatever container you choose, make sure it has adequate drainage holes. You don’t want your pumpkin roots sitting in soggy soil.
* Sunlight: Pick a location that receives at least 6-8 hours of direct sunlight per day.
* Accessibility: Remember, you’ll need to be able to water and fertilize your pumpkin easily. Choose a location that’s accessible with a hose and watering can.
* Weight: A container filled with soil and a giant pumpkin will be incredibly heavy. Make sure the ground underneath is level and stable.
Preparing Your Container
Okay, you’ve got your container. Now it’s time to get it ready for pumpkin-growing glory!
1. Cleaning: Thoroughly clean your container with soap and water to remove any dirt, debris, or residue. If you’re using an IBC tote, pay special attention to the inside corners.
2. Drainage: If your container doesn’t have drainage holes, drill several large holes (at least 1 inch in diameter) in the bottom. Space them evenly around the container. For kiddie pools, you might want to reinforce the bottom with plywood before drilling to prevent cracking.
3. Lining (Optional): I like to line my containers with landscape fabric. This helps prevent soil from washing out through the drainage holes and keeps weeds from growing up from below.
4. Location, Location, Location: Before you fill your container, move it to its final location. Trust me, you won’t be able to move it once it’s full of soil and a giant pumpkin!
Creating the Perfect Soil Mix
The soil mix is arguably the most important factor in growing a giant pumpkin. You need a mix that’s well-draining, nutrient-rich, and provides plenty of aeration for the roots. Here’s my go-to recipe:
* 50% Compost: Use a high-quality compost that’s rich in organic matter. I prefer a mix of composted manure, leaves, and vegetable scraps.
* 25% Topsoil: Use a good quality topsoil that’s free of rocks and debris.
* 25% Peat Moss or Coco Coir: This helps retain moisture and provides aeration. Coco coir is a more sustainable option than peat moss.
* Amendments: Add the following amendments to your soil mix:
* Bone Meal: Provides phosphorus, which is essential for root development. Use about 1 cup per 50 gallons of soil mix.
* Blood Meal: Provides nitrogen, which is essential for leaf growth. Use about 1/2 cup per 50 gallons of soil mix.
* Greensand: Provides potassium and trace minerals. Use about 1 cup per 50 gallons of soil mix.
* Mycorrhizae: These beneficial fungi help the pumpkin roots absorb nutrients more efficiently. Follow the instructions on the package.
Mixing the Soil:
1. Combine all the ingredients in a large pile or wheelbarrow.
2. Thoroughly mix everything together until it’s evenly distributed.
3. Moisten the soil mix with water until it’s damp but not soggy.
Planting Your Pumpkin Seed
Now for the exciting part!
1. Starting Indoors (Recommended): I highly recommend starting your pumpkin seed indoors about 3-4 weeks before the last expected frost. This gives it a head start and protects it from pests and diseases.
* Soaking the Seed: Gently file the edges of the seed to help water penetrate. Soak the seed in warm water for 2-4 hours before planting.
* Planting: Plant the seed in a small pot filled with seed-starting mix. Plant it about 1 inch deep, with the pointed end facing down.
* Warmth and Light: Keep the soil moist and warm (around 80-85°F). Use a heat mat if necessary. Provide plenty of light, either from a sunny window or a grow light.
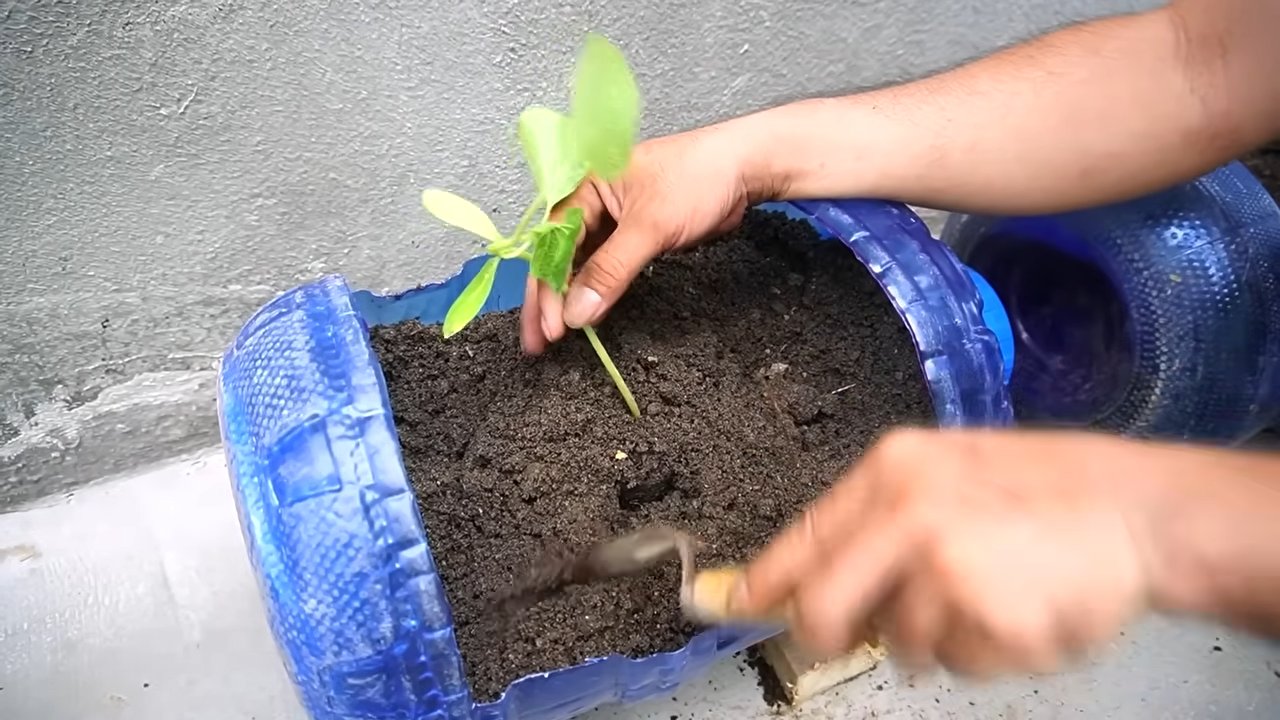
2. Transplanting: Once the seedling has developed a few true leaves, it’s time to transplant it into your recycled container.
* Hardening Off: Before transplanting, gradually acclimate the seedling to outdoor conditions by exposing it to increasing amounts of sunlight and wind over a period of 7-10 days.
* Planting: Dig a hole in the center of your container that’s large enough to accommodate the root ball. Gently remove the seedling from its pot and place it in the hole. Backfill with soil and water thoroughly.
3. Direct Sowing (Alternative): If you live in a warm climate with a long growing season, you can direct sow the pumpkin seed directly into your container. Follow the same steps for soaking the seed and planting depth.
Caring for Your Giant Pumpkin
This is where the real work begins! Growing a giant pumpkin requires consistent care and attention.
1. Watering: Giant pumpkins need a lot of water, especially during hot weather. Water deeply and regularly, aiming to keep the soil consistently moist but not soggy. I typically water every day or two, depending on the weather.
2. Fertilizing: Feed your pumpkin regularly with a balanced fertilizer. I use a combination of liquid seaweed extract, fish emulsion, and compost tea. Follow the instructions on the fertilizer packaging. During the early stages of growth, focus on fertilizers high in nitrogen to promote leaf growth. Once the pumpkin starts to develop, switch to fertilizers higher in phosphorus and potassium to promote fruit development.
3. Pruning: Pruning is essential for directing the plant’s energy into growing a single, massive pumpkin.
* Vine Training: Train the main vine to grow in a straight line away from the container. This will help prevent the pumpkin from becoming too heavy and damaging the container.
* Secondary Vines: Remove all secondary vines that grow off the main vine. This will help the plant focus its energy on growing the main vine and the pumpkin.
* Female Flowers: Once the main vine has reached a length of about 10-15 feet, start looking for female flowers. These flowers have a small pumpkin-like structure behind them. Choose the most promising female flower and hand-pollinate it.
4. Hand-Pollination: Hand-pollination is crucial for ensuring that the female flower is successfully pollinated.
* Timing: The best time to hand-pollinate is early in the morning, before the bees become active.
* Procedure: Use a small paintbrush to collect pollen from a male flower (a flower without a pumpkin-like structure behind it). Gently brush the pollen onto the stigma of the female flower.
* Marking: Mark the pollinated flower with a piece of ribbon or tape so you know which one to watch.
5. Pumpkin Selection: After hand-pollinating several female flowers, choose the most promising pumpkin to focus on.
Conclusion
So, there you have it! Transforming your pumpkin patch with this simple, yet incredibly effective, recycled container trick is more than just a gardening hack; it’s a pathway to potentially growing the biggest, most impressive pumpkins you’ve ever seen. We’ve walked you through the process, highlighting how this method not only conserves water and nutrients but also provides a protected microclimate that encourages explosive growth.
Think about it: no more struggling with inconsistent watering, no more worrying about nutrient runoff, and a significantly reduced risk of pest infestations. This DIY approach is a game-changer for anyone serious about pumpkin growing, whether you’re aiming for a prize-winning giant or simply want to enjoy a bountiful harvest for fall decorations and delicious pumpkin pies.
But the beauty of this method lies in its adaptability. Feel free to experiment with different types of recycled containers. Large plastic storage bins, repurposed livestock troughs, or even creatively modified kiddie pools can all work wonders. Consider adding a layer of mulch around the base of the container to further insulate the soil and retain moisture. You can also incorporate companion planting around the container, using herbs like basil or marigolds to deter pests naturally.
Don’t be afraid to tweak the soil mix to suit your specific climate and pumpkin variety. Adding extra compost or well-rotted manure can provide an additional boost of nutrients. Remember to monitor the moisture levels regularly, especially during hot weather, and adjust your watering schedule accordingly.
The key takeaway here is that growing huge pumpkins with recycled materials is not only achievable but also incredibly rewarding. It’s a sustainable and cost-effective way to maximize your pumpkin-growing potential and impress your friends and neighbors with your gardening prowess.
We wholeheartedly encourage you to give this DIY trick a try. The results speak for themselves, and the satisfaction of nurturing a massive pumpkin from a humble seed is truly unparalleled. And most importantly, we want to hear about your experiences! Share your photos, tips, and stories in the comments below. Let’s build a community of pumpkin-growing enthusiasts and learn from each other’s successes and challenges. Together, we can unlock the secrets to growing the biggest and best pumpkins imaginable. So, get out there, get creative, and get growing! Let’s see those giant pumpkins!
Frequently Asked Questions (FAQ)
What types of recycled containers are best for growing huge pumpkins?
The ideal recycled container should be large, sturdy, and capable of holding a significant amount of soil. Options include large plastic storage bins (at least 50 gallons), repurposed livestock troughs, old bathtubs (with drainage holes added), or even creatively modified kiddie pools. The key is to ensure the container is clean, free of harmful chemicals, and has adequate drainage to prevent waterlogging. Avoid containers that previously held toxic substances. Consider the material of the container as well; darker colors can absorb more heat, which might be beneficial in cooler climates but detrimental in hotter ones.
How much soil do I need for each container?
The amount of soil required depends on the size of the container, but generally, you’ll need enough to fill it almost to the top, leaving a few inches of space for watering and mulching. A good rule of thumb is to aim for at least 50 gallons of soil per plant. Use a high-quality potting mix amended with compost, well-rotted manure, and other organic matter to provide essential nutrients and improve drainage. A slightly acidic soil pH (around 6.0 to 6.8) is ideal for pumpkin growth.
How often should I water my pumpkins grown in recycled containers?
Watering frequency depends on factors like climate, soil type, and the size of the plant. Generally, pumpkins need consistent moisture, especially during hot weather and fruit development. Check the soil moisture regularly by sticking your finger a few inches into the soil. If it feels dry, it’s time to water. Water deeply and thoroughly, ensuring the entire root zone is saturated. Avoid overhead watering, as this can promote fungal diseases. Consider using a soaker hose or drip irrigation system to deliver water directly to the roots.
What kind of fertilizer should I use, and how often should I fertilize?
Pumpkins are heavy feeders and require regular fertilization to support their rapid growth. Start with a balanced fertilizer (e.g., 10-10-10) at planting time, and then switch to a fertilizer higher in phosphorus and potassium (e.g., 5-15-15) once the plant starts to flower and set fruit. Fertilize every 2-3 weeks, following the instructions on the fertilizer package. You can also supplement with organic fertilizers like compost tea or fish emulsion. Avoid over-fertilizing, as this can lead to excessive foliage growth at the expense of fruit production.
How do I protect my pumpkins from pests and diseases?
Regularly inspect your plants for signs of pests or diseases. Common pumpkin pests include squash bugs, squash vine borers, and aphids. Control pests with organic methods like handpicking, insecticidal soap, or neem oil. Prevent diseases by providing good air circulation, avoiding overhead watering, and using disease-resistant varieties. If diseases do occur, treat them promptly with appropriate fungicides. Consider using row covers early in the season to protect young plants from pests.
Can I move the recycled container once the pumpkin plant is growing?
Moving a large container with a mature pumpkin plant is generally not recommended, as it can damage the roots and stress the plant. Choose a location for your container that receives at least 6-8 hours of sunlight per day and is protected from strong winds. If you need to move the container, do so before planting or when the plant is very young.
What are some tips for maximizing pumpkin size?
To maximize pumpkin size, focus on providing optimal growing conditions, including plenty of sunlight, water, and nutrients. Prune the plant to allow only one or two pumpkins to develop per vine. This will concentrate the plant’s energy into growing fewer, larger fruits. Hand-pollinate the female flowers to ensure successful fruit set. Protect the developing pumpkins from pests and diseases. Consider using a shade cloth to protect the pumpkins from excessive sun exposure during hot weather.
How do I know when my pumpkin is ripe?
A ripe pumpkin will have a deep, solid color and a hard rind that is resistant to scratching. The stem will also be dry and hardened. Tap the pumpkin; it should sound hollow. The time from planting to harvest varies depending on the variety, but generally, pumpkins are ready to harvest in 90-120 days.
What if I don’t have a lot of space? Can I still use this method?
While growing huge pumpkins requires a significant amount of space, you can still adapt this method for smaller varieties. Choose smaller pumpkin varieties and use smaller recycled containers. You may need to prune the vines more aggressively to keep the plant manageable. Even with limited space, you can still enjoy the benefits of growing pumpkins in recycled containers, such as improved water and nutrient retention.
Can I use this method for other types of vegetables?
Yes, this method can be adapted for growing other types of vegetables, especially those that require a lot of water and nutrients, such as tomatoes, cucumbers, and squash. The key is to choose a container size that is appropriate for the specific vegetable and to provide the necessary support for the plant.
Leave a Comment