

Grow Dill Indoors? Absolutely! Imagine fresh, fragrant dill readily available right in your kitchen, ready to elevate your culinary creations. No more last-minute trips to the grocery store or settling for dried herbs that lack that vibrant, fresh flavor. I’m excited to share some simple yet effective DIY tricks that will have you harvesting your own dill in no time, regardless of the season or your outdoor space.
Dill, with its feathery leaves and distinctive aroma, has been cherished for centuries. Its use dates back to ancient Egypt and Greece, where it was valued for both its culinary and medicinal properties. The Romans even believed it brought good fortune! Today, dill remains a staple in many cuisines, from Scandinavian gravlax to Mediterranean salads. But why rely on store-bought dill when you can easily grow dill indoors and enjoy its fresh, potent flavor whenever you desire?
Many people struggle with growing herbs, especially indoors. They face challenges like inadequate sunlight, improper watering, and pest infestations. This DIY guide tackles these common issues head-on, providing you with practical tips and tricks to create the perfect indoor environment for your dill to thrive. I’ll walk you through everything from selecting the right pot and soil to providing optimal lighting and preventing common problems. Get ready to unlock the secrets to a bountiful indoor dill harvest and elevate your cooking with the freshest, most flavorful herb imaginable!

Growing Dill Indoors: A Beginner’s Guide
Hey there, fellow plant enthusiasts! Ever dreamt of having fresh, fragrant dill right at your fingertips, no matter the season? Well, you’re in the right place! I’m going to walk you through everything you need to know to successfully grow dill indoors. It’s easier than you might think, and the reward of snipping fresh dill for your recipes is totally worth it. Let’s get started!
What You’ll Need
Before we dive into the nitty-gritty, let’s gather our supplies. Having everything ready beforehand will make the process smooth and enjoyable. Here’s your checklist:
- Dill Seeds: Choose a variety suitable for containers. ‘Fernleaf’ is a popular compact choice.
- Potting Mix: Opt for a well-draining potting mix specifically formulated for containers. Avoid using garden soil, as it can compact and hinder drainage.
- Container: Select a pot that’s at least 6-8 inches in diameter and depth. Dill has a taproot, so adequate depth is crucial. Make sure it has drainage holes!
- Grow Lights (Optional but Recommended): Dill needs plenty of light, so if you don’t have a sunny windowsill, a grow light is a must.
- Watering Can or Spray Bottle: For gentle watering.
- Small Shovel or Trowel: For handling the potting mix.
- Seed Starting Tray (Optional): For starting seeds indoors before transplanting.
- Plant Labels: To keep track of what you’ve planted.
Step-by-Step Planting Guide
Now that we have our supplies, let’s get our hands dirty! I’ll guide you through each step to ensure your dill gets off to a great start.
- Prepare Your Container: Fill your chosen container with the well-draining potting mix, leaving about an inch of space at the top. Gently pat down the soil to remove any large air pockets.
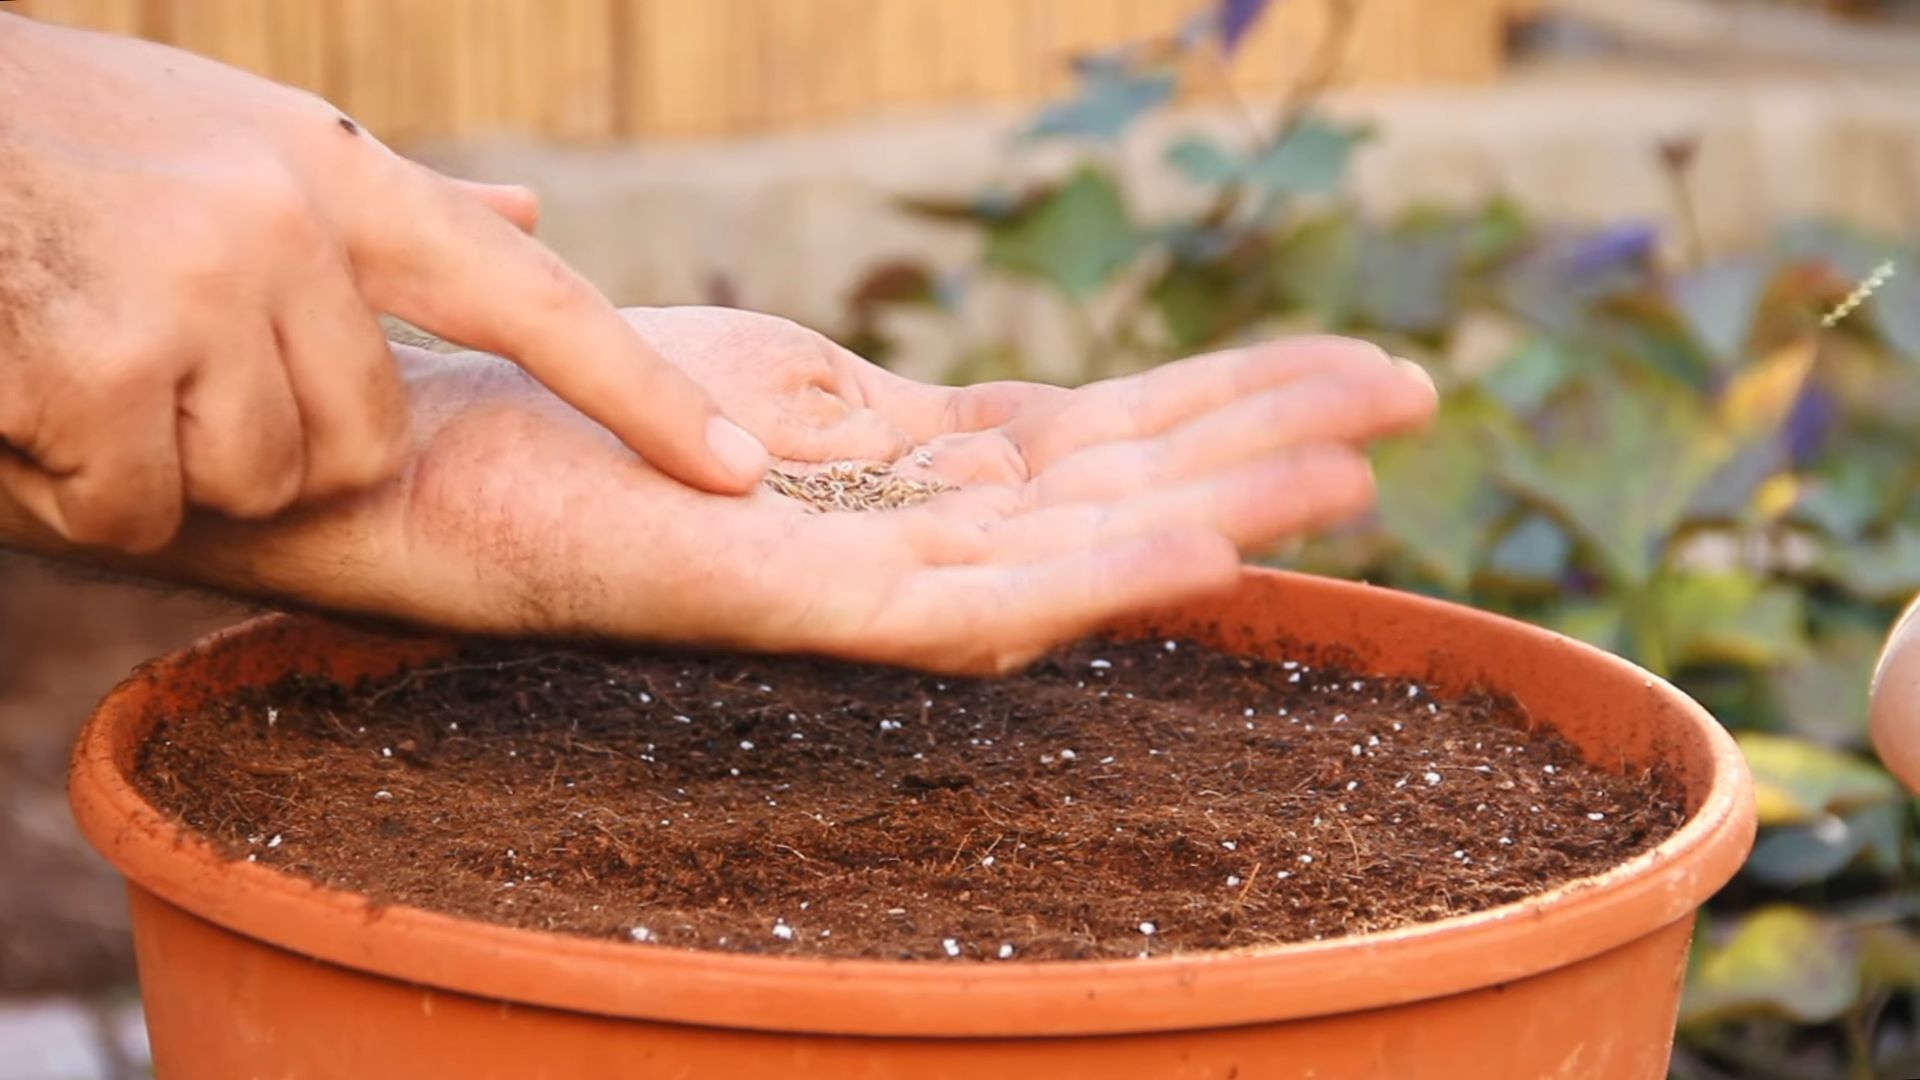
- Sow the Seeds: Dill seeds are relatively small, so sprinkle them evenly over the surface of the soil. Aim for about 2-3 seeds per inch. Don’t overcrowd them!
- Cover the Seeds: Lightly cover the seeds with a thin layer of potting mix, about ¼ inch deep. Dill seeds need light to germinate, so don’t bury them too deep.
- Water Gently: Use a watering can or spray bottle to gently moisten the soil. Avoid overwatering, as this can lead to seed rot. The soil should be damp but not soggy.
- Provide Light and Warmth: Place your container in a warm location with plenty of light. A south-facing windowsill is ideal, but if you don’t have one, use a grow light. Dill needs at least 6 hours of direct light per day. The ideal temperature for germination is between 70-75°F (21-24°C).
- Maintain Moisture: Keep the soil consistently moist but not waterlogged. Check the soil moisture daily and water when the top inch feels dry to the touch.
- Wait for Germination: Dill seeds typically germinate within 7-14 days. Be patient! Once the seedlings emerge, thin them out, leaving the strongest seedlings about 2-3 inches apart.
Caring for Your Indoor Dill
Once your dill seedlings have sprouted, it’s time to focus on providing them with the care they need to thrive. Here’s what you need to know:
- Light: As I mentioned before, dill needs plenty of light. If you’re using a grow light, position it a few inches above the plants and keep it on for 12-16 hours per day.
- Watering: Water your dill regularly, allowing the top inch of soil to dry out between waterings. Avoid overwatering, as this can lead to root rot. Check the soil moisture daily and adjust your watering schedule as needed.
- Fertilizing: Dill doesn’t need a lot of fertilizer, but a light feeding every few weeks can help promote healthy growth. Use a balanced liquid fertilizer diluted to half strength.
- Temperature: Dill prefers temperatures between 60-70°F (15-21°C). Avoid exposing your plants to extreme temperatures or drafts.
- Air Circulation: Good air circulation is important for preventing fungal diseases. Make sure your plants have plenty of space around them and avoid overcrowding.
- Pest Control: Keep an eye out for common pests like aphids and spider mites. If you notice any pests, treat them with insecticidal soap or neem oil.
Harvesting Your Dill
The best part of growing dill indoors is, of course, harvesting it! You can start harvesting dill leaves once the plants are about 6-8 inches tall.
- Harvesting Leaves: Use scissors or pruning shears to snip off the leaves as needed. Start by harvesting the outer leaves, leaving the inner leaves to continue growing.
- Harvesting Seeds: If you want to harvest dill seeds, allow the plants to flower. Once the flowers have dried and turned brown, you can cut off the seed heads and dry them completely. Then, you can collect the seeds and store them in an airtight container.
- Succession Planting: To ensure a continuous supply of fresh dill, sow new seeds every few weeks. This is called succession planting, and it’s a great way to keep your herb garden productive.
Troubleshooting Common Dill Problems
Even with the best care, you might encounter some problems while growing dill indoors. Here are some common issues and how to address them:
- Yellowing Leaves: This can be caused by overwatering, underwatering, or nutrient deficiencies. Check the soil moisture and adjust your watering schedule accordingly. If the leaves are yellowing due to nutrient deficiencies, fertilize your plants with a balanced liquid fertilizer.
- Leggy Growth: This is usually caused by insufficient light. Make sure your plants are getting enough light, either from a sunny windowsill or a grow light.
- Powdery Mildew: This is a fungal disease that can affect dill plants. It appears as a white, powdery coating on the leaves. To prevent powdery mildew, ensure good air circulation and avoid overwatering. If you notice powdery mildew, treat your plants with a fungicide.
- Aphids: These small, sap-sucking insects can infest dill plants. They can be controlled with insecticidal soap or neem oil.
Choosing the Right Dill Variety
While all dill is delicious, some varieties are better suited for indoor growing than others. Here are a few of my favorites:
- Fernleaf Dill: This is a compact variety that’s perfect for containers. It has a bushy growth habit and produces plenty of flavorful leaves.
- Dukat Dill: This variety is known for its strong flavor and aroma. It’s also relatively compact, making it a good choice for indoor growing.
- Bouquet Dill: This variety is a bit taller than the others, but it’s still suitable for containers. It produces large, flavorful leaves and is a good choice for harvesting seeds.
Tips for Maximizing Your Dill Harvest
Want to get the most out of your indoor dill plants? Here are a few extra tips:
- Pinch off the flower buds: Dill is an annual plant, meaning it completes its life cycle in one year. Once it starts to flower, it will focus its energy on producing seeds, which can reduce the flavor of the leaves. To prolong the harvest, pinch off the flower buds as soon as you see them.
- Rotate your plants: To ensure even growth, rotate your plants regularly. This will help them get light on all sides.
- Provide support: As your dill plants grow taller, they may need some support. You can use a small stake or trellis to keep them from flopping over.
- Don’t be afraid to experiment: Growing dill indoors is a learning process. Don’t be afraid to experiment with different techniques and find what works best for you.
Using Your Fresh Dill
Now that you have a bountiful supply of fresh dill, it’s time to put it to good use! Here are a few ideas:
- Add it to salads: Fresh dill adds a bright, refreshing flavor to salads.
- Use it as a garnish: Dill is a beautiful and flavorful garnish for soups, stews, and other dishes.
- Make dill sauce: Dill sauce is a classic accompaniment to fish and other seafood.
- Add it to dips and spreads: Dill adds a delicious flavor to dips and spreads like tzatziki and cream cheese.
Conclusion
So, there you have it! Growing dill indoors is not only achievable but also incredibly rewarding. Imagine having fresh, fragrant dill readily available, regardless of the season. No more last-minute trips to the grocery store or settling for dried herbs that lack the vibrant flavor of fresh dill. This DIY trick transforms your kitchen into a miniature herb garden, bringing a touch of nature and a burst of flavor to your culinary creations.
Why is this a must-try? Because it empowers you to control the quality and freshness of your dill. Store-bought herbs can often be wilted or past their prime, but with your own indoor dill garden, you’ll always have access to the most flavorful sprigs. Plus, it’s a sustainable and cost-effective way to enjoy this versatile herb. Think of all the delicious dishes you can elevate with your homegrown dill: creamy dill sauces, flavorful dill pickles, refreshing dill-infused salads, and so much more.
But the benefits don’t stop there. Growing dill indoors is also a therapeutic and enjoyable hobby. Tending to your plants can be a relaxing and meditative experience, providing a welcome escape from the stresses of daily life. Watching your dill seedlings sprout and flourish is incredibly satisfying, and the fragrant aroma of fresh dill will fill your home with a delightful scent.
Ready to take your indoor dill growing to the next level? Consider experimenting with different varieties of dill. ‘Bouquet’ dill is a popular choice for its compact size and abundant foliage, while ‘Fernleaf’ dill is known for its feathery leaves and slow-bolting nature. You can also try growing dill alongside other herbs, such as parsley, chives, and mint, to create a thriving indoor herb garden.
Another variation to consider is using different types of containers. While a standard pot works perfectly well, you could also try growing dill in a self-watering planter or a hydroponic system. These options can help to simplify the watering process and ensure that your dill receives the optimal amount of moisture.
Don’t be afraid to get creative and personalize your indoor dill garden. Add decorative stones, pebbles, or figurines to your pots to create a visually appealing display. You can also use different colored pots to add a pop of color to your kitchen.
We strongly encourage you to try this DIY trick and experience the joy of growing your own dill indoors. It’s a simple, rewarding, and delicious way to enhance your culinary creations and bring a touch of nature into your home. Once you’ve harvested your first batch of homegrown dill, we’d love to hear about your experience. Share your tips, tricks, and favorite dill recipes in the comments below. Let’s create a community of indoor dill enthusiasts! Your success story might inspire others to embark on their own indoor gardening journey. So, grab your seeds, pots, and soil, and get ready to grow some delicious dill! Remember, fresh, flavorful dill is just a few steps away. Happy growing!
Frequently Asked Questions (FAQ)
What is the best time of year to start growing dill indoors?
You can start growing dill indoors at any time of year, as you’re controlling the environment. However, starting in early spring or late winter can be advantageous, as the seedlings will have more natural light to support their growth. If you’re starting at other times of the year, ensure you provide adequate supplemental lighting.
What kind of soil is best for growing dill indoors?
Dill thrives in well-draining soil that is rich in organic matter. A good potting mix specifically formulated for herbs is ideal. You can also create your own mix by combining equal parts of potting soil, compost, and perlite or vermiculite. This will provide the necessary nutrients and drainage for healthy dill growth. Avoid using garden soil, as it can be too heavy and may contain pests or diseases.
How much light does dill need when grown indoors?
Dill requires at least 6 hours of direct sunlight per day to thrive. If you don’t have a sunny windowsill, you’ll need to supplement with artificial lighting. A fluorescent grow light or an LED grow light can provide the necessary light spectrum for healthy dill growth. Position the light about 6-12 inches above the plants and keep it on for 12-16 hours per day. Rotate the plants regularly to ensure even light exposure.
How often should I water my indoor dill plants?
Water your dill plants when the top inch of soil feels dry to the touch. Avoid overwatering, as this can lead to root rot. Ensure that your pots have drainage holes to allow excess water to escape. When watering, water deeply until water drains out of the bottom of the pot. Allow the soil to dry out slightly between waterings.
How do I fertilize my indoor dill plants?
Dill is not a heavy feeder, but it will benefit from occasional fertilization. Use a balanced liquid fertilizer diluted to half strength every 2-4 weeks during the growing season. Avoid over-fertilizing, as this can lead to leggy growth and a decrease in flavor. Organic fertilizers, such as compost tea or fish emulsion, are also excellent options.
When can I harvest my indoor dill?
You can start harvesting dill leaves once the plants are about 6-8 inches tall. Snip off the leaves as needed, being careful not to remove more than one-third of the plant at a time. This will encourage continued growth. For dill seeds, allow the flower heads to dry completely on the plant. Once dry, shake the seeds out of the heads and store them in an airtight container.
Why is my dill plant turning yellow?
Yellowing leaves can be a sign of several problems, including overwatering, underwatering, nutrient deficiencies, or pest infestations. Check the soil moisture and adjust your watering accordingly. If the soil is consistently wet, allow it to dry out completely before watering again. If the soil is dry, water deeply. Fertilize your plants with a balanced fertilizer to address any nutrient deficiencies. Inspect your plants for pests and treat them accordingly.
How do I prevent pests and diseases from affecting my indoor dill plants?
To prevent pests and diseases, start with healthy, disease-free seeds or seedlings. Use a well-draining potting mix and avoid overwatering. Provide adequate ventilation and sunlight. Regularly inspect your plants for signs of pests or diseases. If you find any pests, treat them with insecticidal soap or neem oil. If you find any diseases, remove the affected leaves and treat the plants with a fungicide.
Can I grow dill from seed indoors?
Yes, growing dill from seed indoors is a great way to start your indoor dill garden. Sow the seeds directly into your pots, about ¼ inch deep. Keep the soil moist and warm until the seeds germinate, which usually takes about 7-14 days. Once the seedlings emerge, provide them with plenty of light and water.
My dill plant is bolting (flowering) too quickly. What can I do?
Bolting, or premature flowering, can occur when dill plants are stressed by heat, drought, or lack of light. To prevent bolting, provide your plants with adequate light and water. Keep the soil consistently moist but not waterlogged. If your plants are exposed to high temperatures, try moving them to a cooler location. You can also pinch off the flower buds to encourage continued leaf production. While bolting changes the flavor profile slightly, the leaves are still edible.
Leave a Comment