

Grow Cucumbers Indoors Easily? Absolutely! Imagine biting into a crisp, refreshing cucumber you nurtured from seed, right in your own home, even when the snow is falling outside. Sounds like a dream, right? Well, it’s a dream within reach, and I’m here to show you how!
For centuries, humans have cultivated cucumbers, tracing their origins back to India. They’ve been a staple in diets and even held symbolic significance in various cultures. But traditionally, growing these refreshing fruits meant having a garden and battling the elements. Not anymore!
In today’s fast-paced world, many of us lack the space or time for a traditional garden. But that doesn’t mean we have to miss out on the joy of fresh, homegrown produce. That’s where this DIY guide comes in. I’m going to share some simple, effective tricks and hacks that will allow you to grow cucumbers indoors easily, regardless of your experience level.
Think about it: fresh, organic cucumbers readily available for salads, snacks, or even homemade pickles. No more relying on store-bought varieties with questionable origins. Plus, the vibrant green vines will add a touch of natural beauty to your living space. So, let’s dive in and unlock the secrets to indoor cucumber cultivation!
Easily Grow Cucumbers at Home Yourself: A Step-by-Step Guide
Hello, dear garden friends! Are you also tired of the expensive and often tasteless cucumbers from the supermarket? Me too! That’s why today I’m showing you how you can easily grow your own crisp cucumbers indoors. Don’t worry, it’s easier than you think! Let’s get started!
What you need for indoor cucumber growing
Before we start, here is a list of all the things you’ll need. Don’t worry, you probably have most of these items at home already!
- Cucumber seeds: Choose a variety that is suitable for growing in a pot. Bush cucumbers or mini-cucumbers are ideal. I personally really like “Patio Snacker” or “Spacemaster.”
- Starter pots: Small pots or seed trays for germinating the seeds.
- Seed starting mix: Special soil for starting seeds that is low in nutrients and loose.
- Large pots: At least 20 liters (5 gallons) in volume per plant. The bigger, the better!
- Potting soil: High-quality potting soil with good drainage. I like to mix in some compost.
- Stake or trellis: Cucumbers are climbing plants and need support.
- Fertilizer: Liquid fertilizer for vegetables or tomatoes.
- Watering can or spray bottle: For watering the plants.
- A bright windowsill or grow light: Cucumbers need a lot of light!
- Optional: A heating mat for starting seeds to speed up germination.
Phase 1: Starting the Cucumber Seeds
Starting the seeds is the first and most important step. Here we lay the foundation for a successful cucumber harvest.
- Preparation of the starter pots: Fill the starter pots with seed starting mix. Lightly press the soil down.
- Sowing the seeds: Place 1-2 cucumber seeds in each pot. Cover the seeds with about 1 cm (0.4 inches) of soil.
- Watering: Gently moisten the soil with a spray bottle. The soil should be damp, but not wet.
- Location: Place the starter pots in a warm and bright location. A heating mat under the pots can speed up germination.
- Patience: Now it’s time to wait! The seeds usually germinate within 5-10 days. Make sure the soil always stays moist.
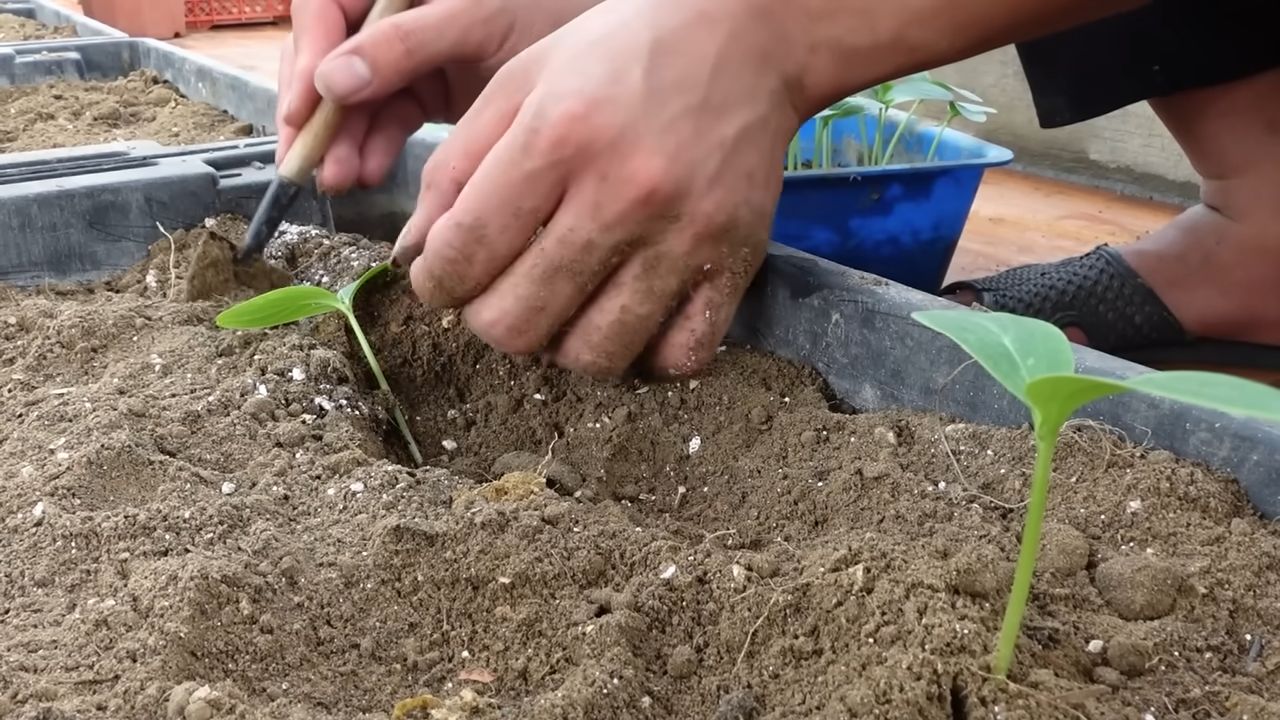
Phase 2: Pricking Out the Cucumber Plants
As soon as the cucumber plants have developed their first true leaves (after the initial seed leaves), it’s time for pricking out. This means we move the small seedlings into larger pots.
- Preparation of the large pots: Fill the large pots with potting soil. Leave about 5 cm (2 inches) of space at the top.
- Lifting the seedlings: Carefully loosen the cucumber seedlings from the starter pots. Be careful not to damage the roots.
- Planting the seedlings: Place the cucumber seedlings in the large pots. The top of the root ball should be level with the soil surface.
- Watering: Gently water the plants.
- Location: Place the pots in a bright and warm location.
Phase 3: Caring for the Cucumber Plants
Now the real work begins! The cucumber plants need regular care to grow well and produce lots of fruit.
- Watering: Water the cucumber plants regularly. The soil should always be moist, but not wet. Avoid waterlogging! It’s best to water in the morning so the leaves can dry during the day.
- Fertilizing: Fertilize the cucumber plants every 2-3 weeks with a liquid fertilizer for vegetables or tomatoes. Follow the dosage instructions on the package.
- Support/Trellis: Give the cucumber plants a trellis. They need something to hold onto to grow upwards. A stake or a small trellis is ideal.
- Pruning Suckers: Regularly remove the side shoots that grow in the leaf axils. This is called pruning suckers and it promotes the growth of the main stems and fruit production.
- Pollination: Cucumbers are not self-pollinating. This means they need help from bees or other insects to form fruit. Since we are growing the cucumbers indoors, we have to lend a hand ourselves. Take a small paintbrush and transfer the pollen from the male flowers (thin stem) to the female flowers (small cucumber at the base of the flower).
- Ventilation: Ensure good air circulation to prevent fungal diseases. Open the windows regularly or set up a fan.
- Observation: Keep an eye out for pests or diseases. If you find an infestation, you should act quickly. There are many organic remedies you can use.
Phase 4: Harvesting the Cucumbers
The time has finally come! The first cucumbers are ripe and can be harvested.
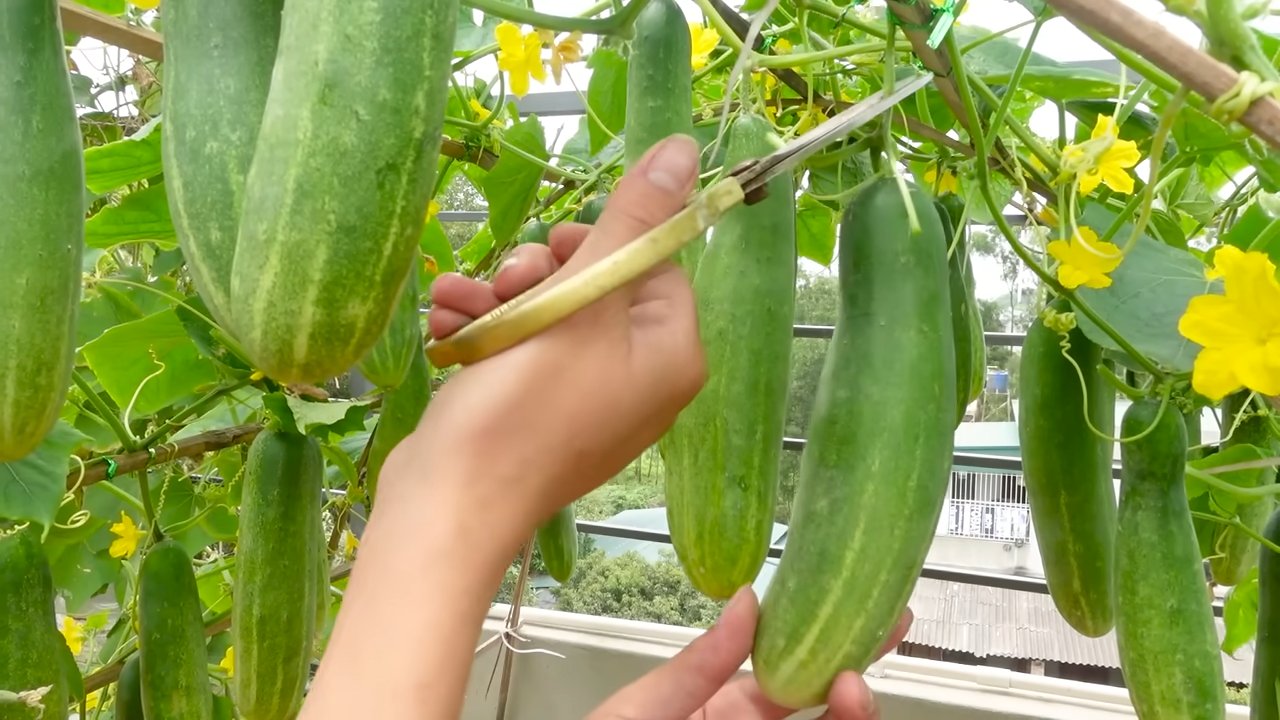
- Harvest time: Harvest the cucumbers when they have reached the desired size and feel firm. The color should be uniform.
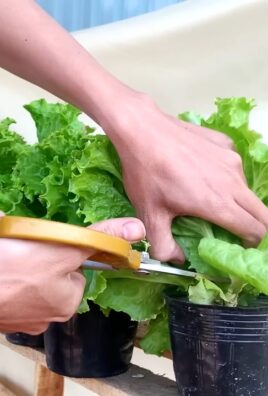
- Harvesting method: Cut the cucumbers with a sharp knife or scissors. Leave a small stem on the cucumber.
- Regular harvesting: Harvest the cucumbers regularly to stimulate fruit production. The more you harvest, the more cucumbers will grow back.
Additional Tips for Successful Indoor Cucumber Growing
Here are a few more tips that will help you maximize your cucumber harvest:
- Light: Cucumbers need a lot of light. If you don’t have a bright windowsill, you should use a grow light.
- Temperature: The ideal temperature for cucumbers is between 20 and 25 degrees Celsius (68-77°F).
- Humidity: Cucumbers like high humidity. You can increase the humidity by regularly spraying the plants with water or placing a bowl of water near the plants.
- Variety selection: Choose a cucumber variety that is suitable for growing in a pot. Bush cucumbers or mini-cucumbers are ideal.
- Patience: Be patient! It can take several weeks for the first cucumbers to ripen.
I hope this guide helps you grow your own delicious cucumbers indoors. It’s truly a great feeling to harvest and enjoy your own fruit. Good luck and have fun gardening! Let me know how it goes for you! I look forward to your comments and questions.
Conclusion
So, there you have it! Growing cucumbers indoors easily is not just a pipe dream; it’s an achievable reality with a little planning and the right approach. We’ve walked you through the essential steps, from selecting the perfect cucumber variety to providing the ideal environment and ensuring proper pollination. The beauty of this DIY project lies in its accessibility. You don’t need acres of land or a greenhouse to enjoy fresh, homegrown cucumbers. A sunny windowsill, a grow light, and a bit of dedication are all you need to embark on this rewarding journey.
Why is this DIY trick a must-try? Because it offers a multitude of benefits. Imagine the satisfaction of harvesting crisp, juicy cucumbers right from your own home, knowing exactly where they came from and what went into their growth. No more worrying about pesticides or questionable farming practices. You’re in complete control, providing your family with healthy, delicious produce. Beyond the health benefits, growing cucumbers indoors is a fantastic way to connect with nature, even in the heart of the city. It’s a therapeutic activity that can reduce stress and bring a sense of accomplishment.
But the fun doesn’t stop there! Feel free to experiment with different cucumber varieties. Bush cucumbers are particularly well-suited for indoor growing due to their compact size. Try ‘Spacemaster’ or ‘Bush Champion’ for excellent results. You can also explore different growing mediums. While we recommended a well-draining potting mix, hydroponics is another option for those looking for a more advanced and efficient growing method. Consider adding companion plants like marigolds or basil to your indoor cucumber garden. These plants can help deter pests and attract beneficial insects, creating a healthier and more vibrant ecosystem.
Don’t be afraid to get creative with your trellising system. While a simple bamboo stake or tomato cage will do the trick, you can also build a more elaborate trellis using recycled materials or purchase a decorative trellis from your local garden center. The possibilities are endless!
We are confident that you can successfully grow cucumbers indoors easily. The key is to be patient, observant, and willing to learn from your mistakes. Every plant is different, and what works for one gardener may not work for another. Don’t be discouraged if you encounter challenges along the way. Simply adjust your approach and keep experimenting until you find what works best for you.
Now, it’s your turn! We encourage you to give this DIY trick a try and experience the joy of growing your own cucumbers indoors. Share your experiences with us in the comments below. We’d love to hear about your successes, your challenges, and any tips or tricks you’ve discovered along the way. Let’s create a community of indoor cucumber growers and inspire others to embrace the joys of homegrown produce. Happy gardening!
Frequently Asked Questions (FAQ)
What are the best cucumber varieties to grow indoors?
Choosing the right cucumber variety is crucial for indoor success. Bush or compact varieties are generally preferred because they require less space and are easier to manage. Some excellent choices include ‘Spacemaster,’ ‘Bush Champion,’ ‘Salad Bush,’ and ‘Patio Snacker.’ These varieties are known for their high yields and disease resistance, making them ideal for indoor growing. Consider also parthenocarpic varieties, which don’t require pollination to produce fruit. This is especially helpful indoors where pollinators may be scarce.
How much sunlight do indoor cucumbers need?
Cucumbers are sun-loving plants and require at least 6-8 hours of direct sunlight per day. If you don’t have a south-facing window that provides sufficient sunlight, you’ll need to supplement with grow lights. LED grow lights are a great option because they are energy-efficient and provide the full spectrum of light that cucumbers need to thrive. Position the grow lights about 6-12 inches above the plants and adjust as they grow. Monitor your plants closely for signs of insufficient light, such as leggy growth or pale leaves.
How often should I water my indoor cucumber plants?
Watering is a critical aspect of cucumber care. Cucumbers need consistent moisture, but they don’t like to sit in soggy soil. Water your plants deeply whenever the top inch of soil feels dry to the touch. Avoid overwatering, as this can lead to root rot. Ensure that your pots have adequate drainage holes to prevent water from accumulating at the bottom. During hot weather, you may need to water your plants more frequently. Consider using a moisture meter to accurately gauge the moisture level in the soil.
How do I pollinate my indoor cucumber plants?
If you’re growing non-parthenocarpic cucumber varieties, you’ll need to hand-pollinate the flowers to ensure fruit production. Cucumbers have separate male and female flowers. The female flowers have a small cucumber-like structure at the base, while the male flowers do not. To hand-pollinate, use a small paintbrush or cotton swab to collect pollen from the male flowers and transfer it to the female flowers. Do this in the morning when the flowers are open. You can also gently shake the plants to help distribute the pollen. Repeat this process every day until you see fruit developing.
What are some common pests and diseases that affect indoor cucumbers?
Indoor cucumbers can be susceptible to pests such as aphids, spider mites, and whiteflies. Regularly inspect your plants for signs of infestation, such as yellowing leaves, webbing, or sticky residue. Treat infestations promptly with insecticidal soap or neem oil. Preventative measures include maintaining good air circulation and keeping your growing area clean. Common diseases that can affect indoor cucumbers include powdery mildew and fungal infections. Ensure proper ventilation and avoid overwatering to prevent these diseases. If you notice signs of disease, treat your plants with a fungicide.
What type of fertilizer should I use for indoor cucumbers?
Cucumbers are heavy feeders and require regular fertilization to produce abundant fruit. Use a balanced fertilizer with a higher phosphorus content to promote flowering and fruiting. A fertilizer with an NPK ratio of 5-10-5 or 10-10-10 is a good choice. Fertilize your plants every 2-3 weeks, following the instructions on the fertilizer label. You can also supplement with compost tea or other organic fertilizers. Avoid over-fertilizing, as this can lead to nutrient burn.
How do I know when my cucumbers are ready to harvest?
Cucumbers are typically ready to harvest when they reach the desired size and color for the variety you are growing. Check the seed packet or plant tag for specific information on harvest time. Generally, cucumbers should be firm to the touch and have a deep green color. Avoid letting them get too large, as they can become bitter and seedy. Use a sharp knife or scissors to cut the cucumbers from the vine, leaving a small stem attached.
Can I grow cucumbers indoors year-round?
Yes, you can grow cucumbers indoors year-round, provided you have the right conditions. Consistent temperature, adequate light, and proper watering are essential for year-round success. You may need to adjust your growing practices depending on the season. For example, you may need to use grow lights more extensively during the winter months. With a little planning and care, you can enjoy fresh, homegrown cucumbers all year long.
Leave a Comment