

Grow Brussels Sprouts like a pro, even if you’ve never touched a trowel before! Have you ever looked at those perfect little cabbages in the grocery store and thought, “I wish I could do that?” Well, you absolutely can! This isn’t just about growing vegetables; it’s about connecting with nature, enjoying fresh, homegrown goodness, and feeling the immense satisfaction of nurturing life from a tiny seed.
For centuries, Brussels sprouts have been a staple in European cuisine, with evidence suggesting their cultivation began in (you guessed it!) Brussels, Belgium, as far back as the 13th century. They’ve come a long way since then, and while they might have a reputation for being a bit… divisive… when cooked right (and especially when freshly harvested from your own garden!), they’re absolutely delicious.
But why should you bother learning how to grow Brussels sprouts yourself? Simple: store-bought sprouts often lack the vibrant flavor and crisp texture of homegrown ones. Plus, gardening is a fantastic stress reliever, a great way to get some exercise, and a rewarding hobby that provides you with healthy, organic food. In this article, I’m going to share some easy-to-follow DIY tricks and hacks that will help you cultivate a thriving Brussels sprout patch, even if you’re a complete beginner. Get ready to impress your friends and family with your green thumb!
Rosenkohl selbst anbauen: Ein umfassender DIY-Leitfaden
Hallo Gartenfreunde! Rosenkohl, diese kleinen, kohlartigen Kugeln, sind nicht nur super gesund, sondern auch überraschend einfach selbst anzubauen. Ich zeige euch, wie ihr mit etwas Geduld und den richtigen Handgriffen eine reiche Ernte erzielen könnt. Los geht’s!
Was du brauchst:
* Rosenkohlsamen oder Jungpflanzen
* Anzuchterde (falls du mit Samen startest)
* Töpfe oder Anzuchtschalen (für die Voranzucht)
* Gartenkalk (optional, zur Bodenverbesserung)
* Kompost oder gut verrotteter Mist
* Gemüsedünger (organisch oder mineralisch)
* Gießkanne oder Gartenschlauch
* Pflanzstäbe (zur Stabilisierung)
* Netz oder Vlies (zum Schutz vor Schädlingen)
* Gartenschere oder Messer
Die Vorbereitung: Der Schlüssel zum Erfolg
Bevor wir mit dem eigentlichen Anbau beginnen, ist eine gute Vorbereitung das A und O. Rosenkohl ist zwar robust, aber ein guter Start erleichtert alles ungemein.
* Der richtige Zeitpunkt: Rosenkohl braucht eine lange Wachstumsperiode. Die Aussaat für die Voranzucht beginnt idealerweise im März oder April. Die Jungpflanzen können dann ab Mai ins Freiland gesetzt werden. Für eine späte Ernte im Winter kannst du auch noch im Mai oder Juni direkt ins Freiland säen.
* Der ideale Standort: Rosenkohl liebt die Sonne! Wähle einen sonnigen Standort mit mindestens sechs Stunden direkter Sonneneinstrahlung pro Tag. Der Boden sollte gut durchlässig, humusreich und nährstoffreich sein.
* Bodenverbesserung: Rosenkohl ist ein Starkzehrer. Das bedeutet, er braucht viele Nährstoffe. Bereite den Boden vor dem Pflanzen gut vor, indem du Kompost oder gut verrotteten Mist einarbeitest. Bei Bedarf kannst du auch etwas Gartenkalk hinzufügen, um den pH-Wert des Bodens zu optimieren. Rosenkohl bevorzugt einen leicht alkalischen Boden (pH-Wert zwischen 6,5 und 7,5).
Aussaat und Voranzucht (optional):
Wenn du mit Samen startest, ist die Voranzucht im Haus oder Gewächshaus empfehlenswert.
1. Aussaat: Fülle Anzuchtschalen oder kleine Töpfe mit Anzuchterde. Säe die Rosenkohlsamen etwa 1 cm tief in die Erde.
2. Bewässerung: Befeuchte die Erde vorsichtig mit einer Sprühflasche oder Gießkanne. Die Erde sollte feucht, aber nicht nass sein.
3. Standort: Stelle die Anzuchtschalen an einen hellen und warmen Ort (ca. 18-20°C).
4. Keimung: Die Samen keimen in der Regel innerhalb von 7-14 Tagen.
5. Pikieren: Sobald die Sämlinge ihre ersten richtigen Blätter entwickelt haben (nach den Keimblättern), kannst du sie pikieren. Das bedeutet, du setzt jeden Sämling einzeln in einen größeren Topf mit frischer Anzuchterde. Dadurch haben die Pflanzen mehr Platz zum Wachsen.
Das Auspflanzen ins Freiland:
Sobald die Jungpflanzen kräftig genug sind (ca. 15-20 cm hoch) und keine Frostgefahr mehr besteht (ab Mitte Mai), können sie ins Freiland gepflanzt werden.
1. Abhärten: Bevor du die Jungpflanzen ins Freiland setzt, solltest du sie einige Tage lang abhärten. Das bedeutet, du stellst sie tagsüber für ein paar Stunden ins Freie, um sie an die Sonne und die Temperaturen zu gewöhnen.
2. Pflanzabstand: Rosenkohl braucht ausreichend Platz zum Wachsen. Halte einen Pflanzabstand von etwa 60-70 cm zwischen den Pflanzen und 70-80 cm zwischen den Reihen ein.
3. Pflanzlöcher: Grabe Pflanzlöcher, die etwas größer sind als die Wurzelballen der Jungpflanzen.
4. Einsetzen: Setze die Jungpflanzen vorsichtig in die Pflanzlöcher. Achte darauf, dass die Wurzelballen nicht beschädigt werden.
5. Auffüllen: Fülle die Pflanzlöcher mit Erde auf und drücke sie leicht an.
6. Bewässerung: Gieße die Jungpflanzen nach dem Pflanzen gründlich an.
Die Pflege: Damit der Rosenkohl prächtig gedeiht
Rosenkohl ist relativ pflegeleicht, aber ein paar Dinge solltest du beachten, um eine reiche Ernte zu erzielen.
* Bewässerung: Rosenkohl braucht regelmäßig Wasser, besonders während trockener Perioden. Achte darauf, dass der Boden immer leicht feucht ist. Vermeide aber Staunässe.
* Düngung: Dünge den Rosenkohl regelmäßig mit einem Gemüsedünger. Beginne etwa 2-3 Wochen nach dem Auspflanzen und wiederhole die Düngung alle 4-6 Wochen.
* Unkrautbekämpfung: Halte den Boden um den Rosenkohl herum unkrautfrei. Unkraut konkurriert mit dem Rosenkohl um Nährstoffe und Wasser.
* Schutz vor Schädlingen: Rosenkohl ist anfällig für verschiedene Schädlinge, wie z.B. Kohlweißlinge, Kohlfliegen und Blattläuse. Schütze deine Pflanzen mit einem Netz oder Vlies. Du kannst auch natürliche Schädlingsbekämpfungsmittel verwenden, wie z.B. Brennnesseljauche oder Neemöl.
* Stützen: Wenn die Rosenkohlpflanzen größer werden, können sie bei starkem Wind umknicken. Stütze die Pflanzen mit Pflanzstäben, um sie zu stabilisieren.
* Ausgeizen: Entferne die unteren Blätter der Rosenkohlpflanzen, sobald sie gelb werden oder braune Flecken bekommen. Dies fördert die Belüftung und beugt Krankheiten vor.
Die Ernte: Endlich Rosenkohl!
Die Erntezeit für Rosenkohl beginnt in der Regel im Herbst (Oktober/November) und kann sich bis in den Winter hineinziehen.
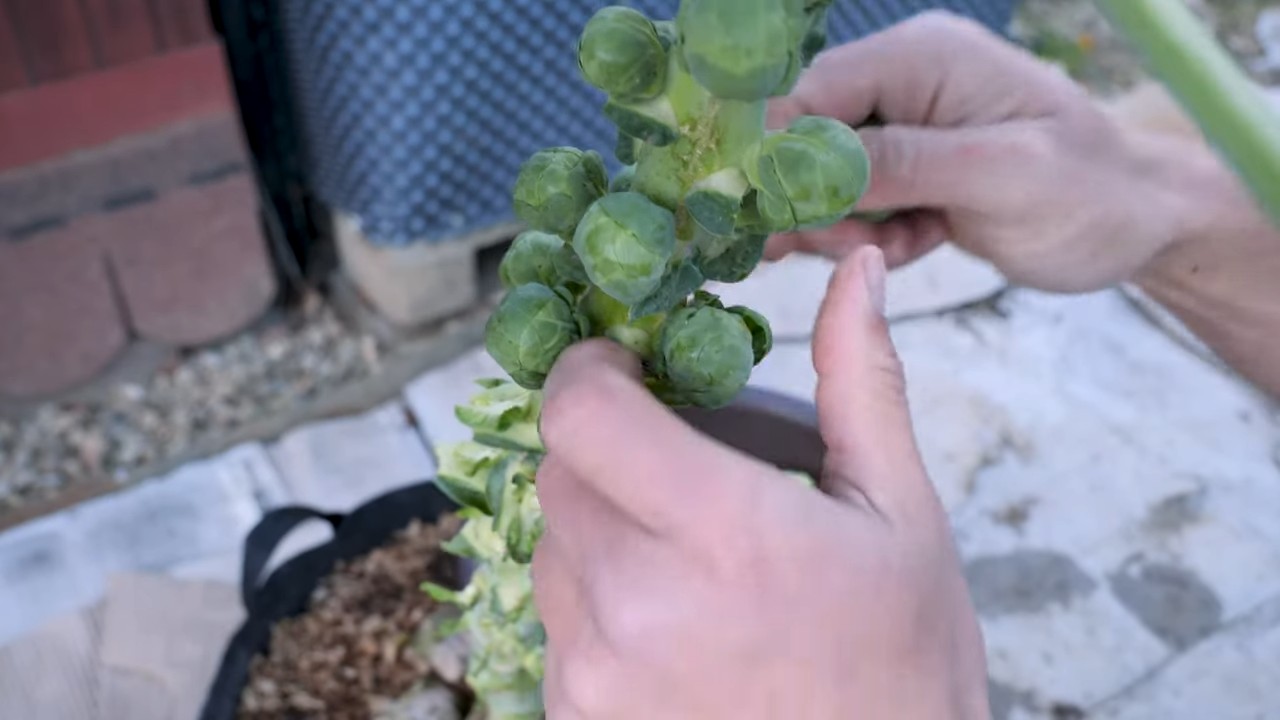
1. Reife: Die Rosenkohlröschen sind reif, wenn sie fest und geschlossen sind und einen Durchmesser von etwa 2-4 cm haben.
2. Ernten: Schneide die reifen Rosenkohlröschen mit einer Gartenschere oder einem Messer ab. Beginne mit den unteren Röschen und arbeite dich nach oben vor.
3. Lagerung: Rosenkohl kann im Kühlschrank für einige Tage gelagert werden. Am besten schmeckt er jedoch frisch geerntet. Du kannst Rosenkohl auch einfrieren, um ihn länger haltbar zu machen.
Zusätzliche Tipps und Tricks:
* Fruchtfolge: Baue Rosenkohl nicht jedes Jahr am selben Standort an. Wechsle den Standort, um Krankheiten und Schädlingen vorzubeugen.
* Mischkultur: Pflanze Rosenkohl in Mischkultur mit anderen Gemüsesorten, wie z.B. Salat, Spinat oder Radieschen. Diese Pflanzen können Schädlinge abwehren und den Boden verbessern.
* Winterschutz: In sehr kalten Regionen kann es sinnvoll sein, den Rosenkohl im Winter mit Vlies oder Reisig abzudecken, um ihn vor Frost zu schützen.
* Sortenwahl: Es gibt verschiedene Rosenkohlsorten mit unterschiedlichen Reifezeiten und Eigenschaften. Wähle eine Sorte, die für dein Klima und deine Bedürfnisse geeignet ist.
Häufige Probleme und Lösungen:
* Kohlhernie: Kohlhernie ist eine Pilzkrankheit, die die Wurzeln des Rosenkohls befällt. Vorbeugend hilft eine gute Fruchtfolge und die Verwendung von resistenten Sorten.
* Kohlweißling: Die Raupen des Kohlweißlings fressen die Blätter des Rosenkohls. Schütze deine Pflanzen mit einem Netz oder Vlies.
* Kohlfliege: Die Larven der Kohlfliege fressen an den Wurzeln des Rosenkohls. Schütze deine Pflanzen mit einem Netz oder Vlies oder verwende Nematoden zur Bekämpfung.
* Blattläuse: Blattläuse saugen den Pflanzensaft des Rosenkohls. Bekämpfe sie mit natürlichen Schädlingsbekämpfungsmitteln, wie z.B. Brennnesseljauche oder Neemöl.

Conclusion
So, there you have it! Growing Brussels sprouts at home might seem daunting at first, but with a little patience and the right approach, you can enjoy a bountiful harvest of these nutritious and delicious vegetables right from your own backyard. This DIY method, focusing on [specific technique mentioned in the main article, e.g., proper spacing, soil amendment, pest control], is a game-changer because it addresses the most common challenges gardeners face when cultivating Brussels sprouts: stunted growth, pest infestations, and bitter-tasting sprouts.
Why is this DIY trick a must-try? Because it empowers you to take control of the entire growing process, ensuring your Brussels sprouts receive the optimal conditions they need to thrive. You’ll know exactly what’s going into your soil, what kind of care they’re receiving, and you’ll be able to tailor the environment to their specific needs. This translates to healthier plants, higher yields, and ultimately, more flavorful Brussels sprouts on your dinner table.
But don’t stop there! Experiment with different varieties of Brussels sprouts to find your favorites. Try adding companion plants like marigolds or nasturtiums to deter pests naturally. Consider succession planting to extend your harvest season. You can also explore different ways to prepare your homegrown Brussels sprouts – roasting them with balsamic glaze, shredding them into a salad, or even grilling them for a smoky flavor.
We’ve provided a solid foundation for successfully growing Brussels sprouts, but the real magic happens when you personalize the process and adapt it to your unique garden environment. Remember to observe your plants closely, adjust your watering and fertilizing schedule as needed, and don’t be afraid to experiment.
We are confident that with this guide, you’ll be well on your way to enjoying the satisfaction of harvesting your own delicious, homegrown Brussels sprouts. Now, it’s your turn to get your hands dirty! We encourage you to try this DIY trick and share your experience with us. Let us know what worked for you, what challenges you faced, and any tips or variations you discovered along the way. Your feedback will not only help other gardeners but also contribute to a collective knowledge base that will make growing Brussels sprouts easier and more rewarding for everyone. Share your photos and stories in the comments below – we can’t wait to see your Brussels sprouts success!
Frequently Asked Questions (FAQs)
What is the best time of year to start growing Brussels sprouts?
The best time to start growing Brussels sprouts depends on your climate. In general, Brussels sprouts are a cool-season crop, meaning they thrive in cooler temperatures. For most regions, starting seeds indoors about 6-8 weeks before the last expected frost is ideal. This allows the seedlings to develop a strong root system before being transplanted outdoors. If you live in a region with mild winters, you can also direct sow seeds in late summer or early fall for a winter harvest. Check your local frost dates and adjust your planting schedule accordingly. Remember that Brussels sprouts need a long growing season, typically around 80-100 days, so plan accordingly.
What kind of soil is best for growing Brussels sprouts?
Brussels sprouts prefer well-drained, fertile soil with a pH between 6.0 and 7.5. The soil should be rich in organic matter to provide essential nutrients and retain moisture. Before planting, amend your soil with compost, well-rotted manure, or other organic amendments to improve its structure and fertility. Avoid heavy clay soils, as they can become waterlogged and hinder root development. If you have clay soil, consider adding sand or perlite to improve drainage. A soil test can help you determine the pH and nutrient levels of your soil and identify any deficiencies that need to be addressed.
How much sunlight do Brussels sprouts need?
Brussels sprouts require at least 6 hours of direct sunlight per day to thrive. Choose a planting location that receives full sun throughout the day. If you live in a region with hot summers, providing some afternoon shade can help prevent the plants from overheating. Insufficient sunlight can lead to leggy growth, smaller sprouts, and reduced yields. Monitor your plants closely and adjust their location if necessary to ensure they receive adequate sunlight.
How often should I water Brussels sprouts?
Brussels sprouts need consistent moisture, especially during hot and dry weather. Water deeply and regularly, aiming to keep the soil consistently moist but not waterlogged. The frequency of watering will depend on your climate, soil type, and the age of the plants. Check the soil moisture regularly by inserting your finger into the soil about an inch deep. If the soil feels dry, it’s time to water. Avoid overhead watering, as it can promote fungal diseases. Instead, water at the base of the plants using a soaker hose or drip irrigation system.
What are some common pests and diseases that affect Brussels sprouts?
Brussels sprouts are susceptible to several pests and diseases, including cabbage worms, aphids, flea beetles, clubroot, and downy mildew. Regularly inspect your plants for signs of infestation or disease. Use organic pest control methods, such as handpicking pests, using insecticidal soap, or applying Bacillus thuringiensis (Bt) to control cabbage worms. To prevent clubroot, ensure your soil is well-drained and has a pH above 7.0. Rotate your crops regularly to avoid the buildup of soilborne diseases. Proper spacing and good air circulation can also help prevent fungal diseases like downy mildew.
When are Brussels sprouts ready to harvest?
Brussels sprouts are typically ready to harvest about 80-100 days after planting. The sprouts should be firm, green, and about 1-2 inches in diameter. Start harvesting from the bottom of the plant, working your way upwards. Twist or cut the sprouts off the stem, leaving the leaves intact. The lower leaves can be removed to encourage the plant to focus its energy on producing more sprouts. Brussels sprouts can be harvested over several weeks, as the sprouts mature at different rates.
How can I make my Brussels sprouts taste less bitter?
The bitterness in Brussels sprouts is due to compounds called glucosinolates. Several factors can influence the bitterness of Brussels sprouts, including the variety, growing conditions, and harvest time. Harvesting after a frost can help reduce bitterness, as the cold temperatures convert some of the glucosinolates into sugars. Cooking methods can also affect the bitterness. Roasting, grilling, or sautéing Brussels sprouts can help caramelize the sugars and reduce bitterness. Adding acidic ingredients like lemon juice or balsamic vinegar can also help balance the flavor.
Can I grow Brussels sprouts in containers?
Yes, you can grow Brussels sprouts in containers, but you’ll need a large container with good drainage. Choose a container that is at least 12 inches in diameter and 12 inches deep. Use a high-quality potting mix that is rich in organic matter. Water regularly and fertilize every few weeks with a balanced fertilizer. Container-grown Brussels sprouts may require more frequent watering and fertilizing than those grown in the ground.
What are some good companion plants for Brussels sprouts?
Companion planting can help improve the growth and health of your Brussels sprouts. Some good companion plants for Brussels sprouts include:
* **Marigolds:** Deter nematodes and other pests.
* **Nasturtiums:** Attract aphids away from Brussels sprouts.
* **Rosemary:** Deters cabbage moths.
* **Thyme:** Repels cabbage white butterflies.
* **Garlic:** Repels aphids and other pests.
* **Onions:** Repel aphids and other pests.
* **Chamomile:** Attracts beneficial insects.
Avoid planting Brussels sprouts near other members of the cabbage family, such as broccoli, cauliflower, and kale, as they can attract the same pests and diseases.


Leave a Comment