

Grow Broccoli from Seed and unlock the joy of harvesting your own delicious, nutrient-packed florets right from your backyard! Imagine biting into crisp, fresh broccoli that you nurtured from a tiny seed – the taste is simply unparalleled. For centuries, broccoli has been a culinary staple, tracing its roots back to ancient Roman civilization where it was prized for its health benefits and unique flavor. Today, this superfood remains a favorite, but buying it from the store can sometimes be expensive and the freshness questionable.
That’s where this DIY guide comes in! I’m going to show you how incredibly rewarding and surprisingly easy it is to grow broccoli from seed at home. Forget those wilted, overpriced heads at the supermarket. With a few simple tricks and readily available materials, you can cultivate a thriving broccoli patch, ensuring a constant supply of fresh, organic goodness for your family. Plus, there’s something deeply satisfying about nurturing a plant from seed to harvest. So, grab your gardening gloves, and let’s get started on this exciting journey to homegrown broccoli bliss!
Growing Broccoli from Seed: A Complete DIY Guide
Hey there, fellow gardening enthusiasts! I’m so excited to share my tried-and-true method for growing broccoli from seed. It’s surprisingly easy and rewarding, and nothing beats the taste of homegrown broccoli. Let’s dive in!
Choosing Your Broccoli Variety
Before we get our hands dirty, let’s talk broccoli varieties. There are tons to choose from, each with its own unique characteristics. Here are a few popular options:
* ‘Waltham 29’: A classic, reliable variety known for its large, tight heads. It’s a great all-around choice.
* ‘Calabrese’: Another popular option, ‘Calabrese’ produces a large central head followed by smaller side shoots, extending your harvest.
* ‘DiCicco’: This variety matures quickly, making it ideal for gardeners in areas with shorter growing seasons.
* ‘Purple Sprouting’: If you’re feeling adventurous, try ‘Purple Sprouting’ broccoli. It produces beautiful purple shoots that are delicious and nutritious.
Consider your climate and growing season when making your selection. Check the seed packet for specific recommendations.
When to Start Your Seeds
Timing is crucial for successful broccoli growing. Broccoli thrives in cool weather, so you’ll want to start your seeds indoors about 6-8 weeks before the last expected frost in your area.
* For a spring crop: Start seeds indoors in late winter or early spring.
* For a fall crop: Start seeds indoors in mid-summer.
To determine the best time to start your seeds, find out the average last frost date for your region. You can usually find this information online or by contacting your local agricultural extension office.
Materials You’ll Need
Before we get started, let’s gather our supplies. Here’s what you’ll need:
* Broccoli seeds (of course!)
* Seed starting trays or small pots
* Seed starting mix (a light, well-draining mix is essential)
* Watering can or spray bottle
* Grow lights (optional, but highly recommended)
* Heat mat (optional, but can speed up germination)
* Labels and a permanent marker
* Small trowel or spoon
* Fertilizer (balanced liquid fertilizer)
Starting Your Seeds Indoors: Step-by-Step
Okay, let’s get to the fun part! Here’s how to start your broccoli seeds indoors:
1. Prepare your seed starting trays or pots: Fill your trays or pots with seed starting mix, leaving about half an inch of space at the top. Gently tap the trays to settle the mix.
2. Sow the seeds: Make a small indentation (about ¼ inch deep) in the center of each cell or pot. Place 2-3 broccoli seeds in each indentation. This increases the chances of at least one seed germinating.
3. Cover the seeds: Gently cover the seeds with seed starting mix.
4. Water thoroughly: Use a watering can or spray bottle to thoroughly moisten the soil. Be careful not to overwater, as this can lead to damping off (a fungal disease that can kill seedlings).
5. Label your trays: Use labels and a permanent marker to label each tray with the broccoli variety and the date you planted the seeds. This will help you keep track of your seedlings.
6. Provide warmth and light: Place your seed starting trays on a heat mat (if using) and under grow lights. If you don’t have grow lights, place the trays in a sunny window. However, be aware that seedlings grown in windows may become leggy (tall and spindly) due to insufficient light.
7. Maintain moisture: Keep the soil consistently moist, but not soggy. Check the soil daily and water as needed.
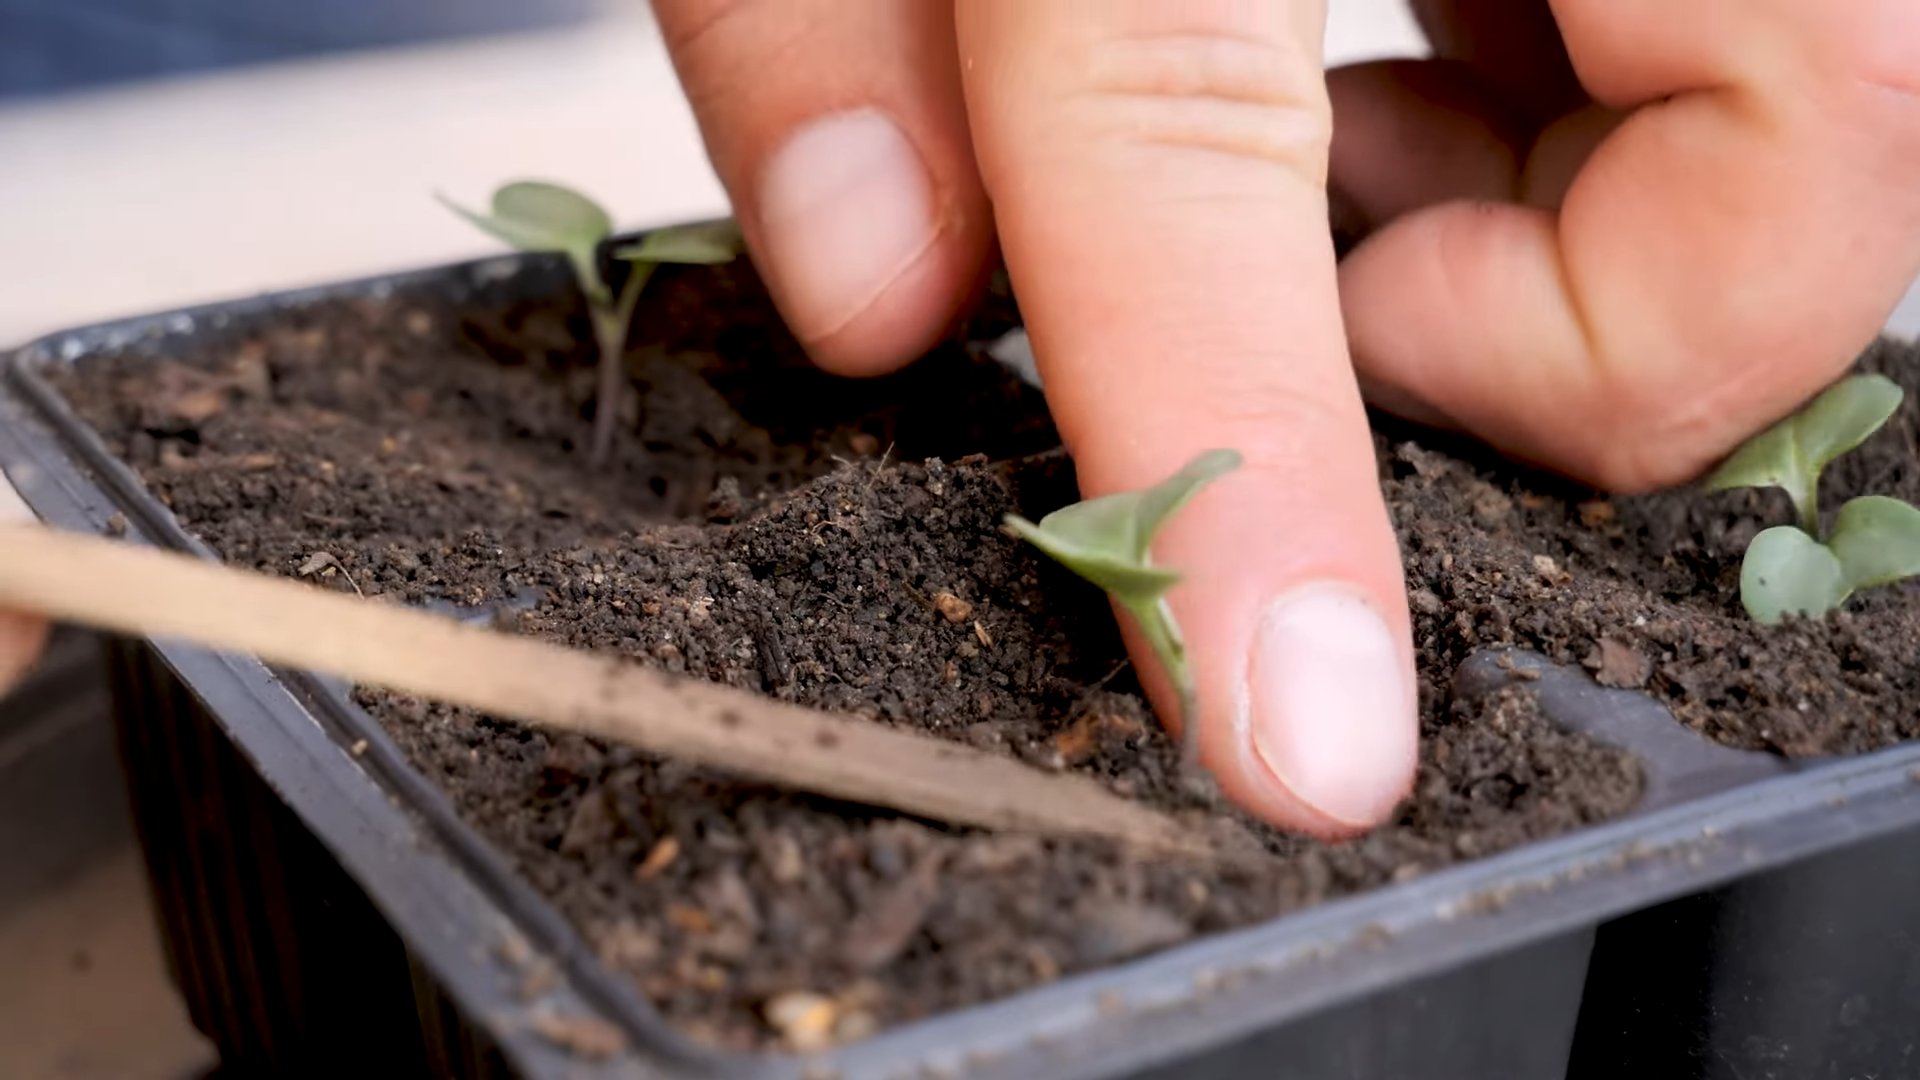
8. Thin the seedlings: Once the seedlings have emerged and have their first true leaves (the second set of leaves), thin them to one seedling per cell or pot. Use small scissors to snip off the weaker seedlings at the soil line. Don’t pull them out, as this can disturb the roots of the remaining seedling.
Hardening Off Your Seedlings
Before transplanting your broccoli seedlings outdoors, you’ll need to harden them off. This process gradually acclimates the seedlings to outdoor conditions, preventing transplant shock.
1. Start slowly: Begin by placing your seedlings outdoors in a sheltered location (such as a porch or patio) for just a few hours each day.
2. Increase exposure: Gradually increase the amount of time the seedlings spend outdoors each day, exposing them to more sunlight and wind.
3. Monitor the weather: Protect your seedlings from extreme weather conditions, such as frost, strong winds, or heavy rain.
4. After a week or two: After a week or two of hardening off, your seedlings should be ready to be transplanted into your garden.
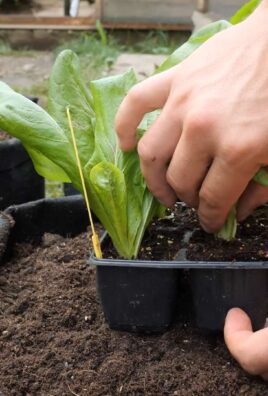
Transplanting Your Broccoli Seedlings
Now for the grand finale: transplanting your broccoli seedlings into the garden!
1. Choose a sunny location: Broccoli needs at least 6 hours of sunlight per day. Choose a location in your garden that receives plenty of sun.
2. Prepare the soil: Broccoli prefers well-drained soil that is rich in organic matter. Amend your soil with compost or other organic matter before planting.
3. Space the seedlings: Space your broccoli seedlings about 18-24 inches apart. This will give them enough room to grow and develop.
4. Dig the holes: Dig holes that are slightly larger than the root balls of your seedlings.
5. Gently remove the seedlings: Gently remove the seedlings from their trays or pots. Be careful not to damage the roots.
6. Place the seedlings in the holes: Place the seedlings in the holes, making sure that the top of the root ball is level with the surrounding soil.
7. Fill the holes: Fill the holes with soil and gently firm the soil around the seedlings.
8. Water thoroughly: Water the seedlings thoroughly after transplanting.
9. Mulch: Apply a layer of mulch around the seedlings to help retain moisture and suppress weeds.
Caring for Your Broccoli Plants
Once your broccoli plants are in the ground, it’s important to provide them with proper care to ensure a bountiful harvest.
* Watering: Water your broccoli plants regularly, especially during dry periods. Broccoli needs consistent moisture to thrive. Aim for about 1-1.5 inches of water per week.
* Fertilizing: Fertilize your broccoli plants every 2-3 weeks with a balanced liquid fertilizer. Follow the instructions on the fertilizer label.
* Weeding: Keep your garden free of weeds, as weeds can compete with your broccoli plants for nutrients and water.
* Pest control: Monitor your broccoli plants for pests, such as cabbage worms, aphids, and flea beetles. Take action to control pests as needed. You can use organic pest control methods, such as insecticidal soap or neem oil.
* Support: If your broccoli plants become top-heavy, you may need to provide them with support. You can use stakes or cages to support the plants.
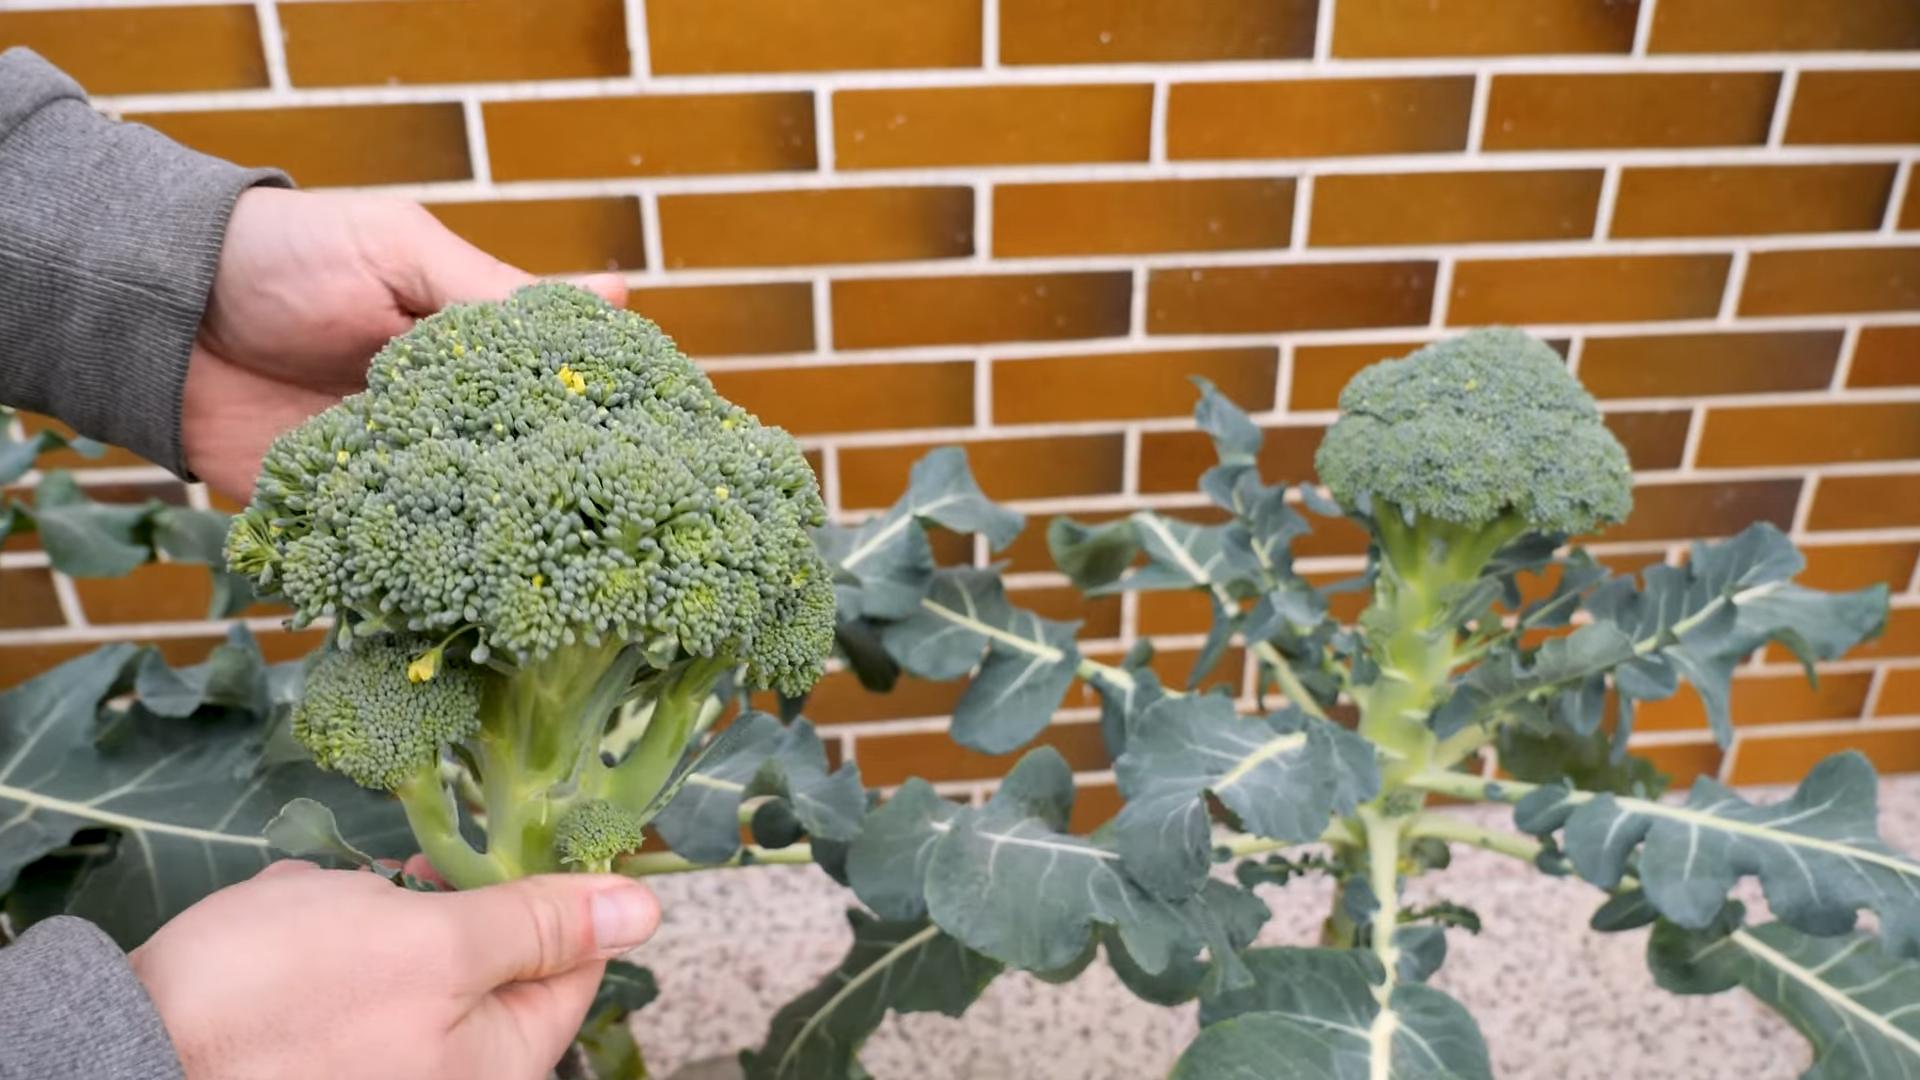
Harvesting Your Broccoli
The moment we’ve all been waiting for: harvesting your homegrown broccoli!
* When to harvest: Harvest your broccoli when the heads are firm and tight, and the flower buds are still closed. If the flower buds start to open, the broccoli will become bitter.
* How to harvest: Use a sharp knife to cut the broccoli head from the plant. Cut the stem at an angle, leaving a few inches of stem attached to the head.
* Side shoots: After harvesting the main head, your broccoli plant may produce smaller side shoots. These side shoots can be harvested as they mature.
Troubleshooting
Even with the best care, you may encounter some problems when growing broccoli. Here are a few common issues and how to address them:
* Damping off: Damping off is a fungal disease that can kill seedlings. To prevent damping off, use a sterile seed starting mix, avoid overwatering, and provide good air circulation.
* Cabbage worms: Cabbage worms are caterpillars that can devour broccoli leaves. To control cabbage worms, handpick them off the plants or use Bacillus thuringiensis (Bt), a natural insecticide.
* Aphids: Aphids are small, sap-sucking insects that can weaken broccoli plants. To control aphids, spray the plants with insecticidal soap or neem oil.
* Flea beetles: Flea beetles are tiny, jumping insects that can create small holes in broccoli leaves. To control flea beetles, use row covers to protect the plants or spray them with pyrethrin.
* Clubroot: Clubroot is a soilborne disease that can cause broccoli roots to become swollen and distorted. To prevent clubroot, practice crop rotation and avoid planting broccoli in the same location year after year.
Enjoying Your Homegrown Broccoli
Conclusion
So, there you have it! Growing broccoli from seed might seem daunting at first, but with a little patience and the right approach, you can cultivate your own supply of fresh, delicious, and nutritious broccoli right in your backyard. This DIY trick isn’t just about saving money (though that’s certainly a perk!); it’s about connecting with your food, understanding the growing process, and enjoying the unparalleled flavor of homegrown produce.
Why is this a must-try? Because store-bought broccoli simply can’t compare to the vibrant taste and crisp texture of broccoli you’ve nurtured from a tiny seed. Plus, you have complete control over the growing process, ensuring your broccoli is free from unwanted pesticides and chemicals. You’re not just growing broccoli; you’re growing a healthier lifestyle.
But the fun doesn’t stop there! Feel free to experiment with different varieties of broccoli. Try sprouting broccoli for a quicker harvest, or explore colorful options like purple or Romanesco broccoli for a visually stunning addition to your garden and your plate. You can also adjust the planting schedule to extend your harvest season, ensuring a continuous supply of fresh broccoli for months. Consider companion planting with herbs like dill or chamomile to deter pests and attract beneficial insects.
Don’t be afraid to get your hands dirty and embrace the learning process. Even if you encounter a few challenges along the way, the satisfaction of harvesting your own homegrown broccoli will be well worth the effort. Remember to document your progress, take pictures, and share your experiences with fellow gardeners.
We encourage you to give this DIY trick a try. Start small, perhaps with just a few seeds, and gradually expand your operation as you gain confidence. The rewards are immense, from the delicious taste of fresh broccoli to the satisfaction of knowing you grew it yourself. So, grab your seeds, prepare your soil, and get ready to embark on a rewarding gardening adventure. We are confident that you will find that growing broccoli from seed is a truly fulfilling experience. Share your successes (and even your challenges!) in the comments below. We’d love to hear about your journey and learn from your experiences. Happy gardening!
Frequently Asked Questions (FAQs)
Q: How long does it take to grow broccoli from seed?
A: The time it takes to grow broccoli from seed to harvest can vary depending on the variety and growing conditions, but generally, it takes between 70 and 100 days. Sprouting broccoli varieties tend to mature faster, often in around 50-60 days. Remember to check the seed packet for specific information on the variety you’re growing. Starting your seeds indoors 6-8 weeks before the last expected frost can give you a head start and shorten the overall growing time.
Q: What are the best conditions for growing broccoli?
A: Broccoli thrives in cool weather and requires at least 6 hours of sunlight per day. The ideal soil temperature for germination is between 60°F and 70°F (15°C and 21°C). The soil should be well-draining and rich in organic matter. Amend your soil with compost or well-rotted manure before planting to provide essential nutrients. Broccoli also needs consistent moisture, so water regularly, especially during dry periods. Aim for about 1-1.5 inches of water per week.
Q: How do I prevent common broccoli pests and diseases?
A: Several pests and diseases can affect broccoli, including cabbage worms, aphids, and clubroot. To prevent these problems, consider the following:
* Crop Rotation: Avoid planting broccoli in the same location year after year.
* Floating Row Covers: Use floating row covers to protect young plants from pests.
* Handpicking: Regularly inspect your plants and handpick any pests you find.
* Insecticidal Soap: Use insecticidal soap to control aphids and other soft-bodied insects.
* Bacillus thuringiensis (Bt): Apply Bt to control cabbage worms.
* Well-Draining Soil: Ensure your soil is well-draining to prevent clubroot.
* Lime: If your soil is acidic, add lime to raise the pH, which can help prevent clubroot.
* Neem Oil: Neem oil can be used as a preventative measure against various pests and diseases.
Q: When is the best time to harvest broccoli?
A: Broccoli is ready to harvest when the central head is firm and tight, with tightly closed flower buds. The ideal head size will vary depending on the variety, but generally, aim for a head that is 4-7 inches in diameter. Use a sharp knife to cut the head from the plant, leaving a few inches of stem. After harvesting the central head, side shoots may develop, providing additional smaller harvests.
Q: Can I grow broccoli in containers?
A: Yes, you can grow broccoli in containers, but you’ll need a large container, at least 5 gallons in size, to accommodate the plant’s root system. Choose a well-draining potting mix and ensure the container receives at least 6 hours of sunlight per day. Water regularly and fertilize every few weeks with a balanced fertilizer. Container-grown broccoli may require more frequent watering and fertilization than broccoli grown in the ground.
Q: What are some good companion plants for broccoli?
A: Several plants can benefit broccoli when planted nearby. Some good companion plants include:
* Marigolds: Deter pests like nematodes and cabbage moths.
* Nasturtiums: Attract aphids away from broccoli.
* Dill: Attract beneficial insects that prey on pests.
* Chamomile: Attract beneficial insects and improve soil health.
* Onions and Garlic: Repel pests.
* Rosemary: Deters cabbage moths.
Q: My broccoli is bolting (flowering prematurely). What can I do?
A: Bolting is often caused by stress, such as heat, drought, or inconsistent watering. Once broccoli bolts, the head becomes bitter and inedible. To prevent bolting:
* Plant at the Right Time: Plant broccoli in early spring or late summer to avoid the hottest months.
* Provide Consistent Moisture: Water regularly to prevent drought stress.
* Mulch: Apply mulch around the plants to help retain moisture and regulate soil temperature.
* Choose Bolt-Resistant Varieties: Some broccoli varieties are more resistant to bolting than others.
Q: How do I store harvested broccoli?
A: To store harvested broccoli, wrap the head loosely in a damp paper towel and place it in a plastic bag in the refrigerator. Broccoli stored this way can last for up to a week. You can also blanch and freeze broccoli for longer storage. To blanch, cut the broccoli into florets and boil them for 3-5 minutes. Then, immediately transfer them to an ice bath to stop the cooking process. Drain well and freeze in airtight containers or freezer bags.
Q: What kind of fertilizer should I use for broccoli?
A: Broccoli is a heavy feeder and benefits from regular fertilization. Use a balanced fertilizer (e.g., 10-10-10) at planting time and then side-dress with a nitrogen-rich fertilizer every few weeks during the growing season. You can also use organic fertilizers like compost tea or fish emulsion. Follow the instructions on the fertilizer package for application rates.
Q: Can I save seeds from my broccoli plants?
A: Saving seeds from broccoli can be challenging because broccoli is a biennial plant, meaning it takes two years to produce seeds. If you want to save seeds, you’ll need to overwinter your broccoli plants and allow them to flower and produce seeds in the second year. However, broccoli is also cross-pollinated, so the seeds may not produce plants that are true to type. If you’re a beginner gardener, it’s generally easier to purchase seeds from a reputable source.

Leave a Comment