

Grow bigger pumpkins than you ever thought possible! Imagine the look on your neighbor’s faces when they see a behemoth of an orange gourd sitting proudly in your garden. It’s not just about bragging rights, though. Growing giant pumpkins is a rewarding challenge, a testament to your gardening skills, and a whole lot of fun.
The history of competitive pumpkin growing is surprisingly rich, dating back to the early 20th century. What started as friendly rivalry between farmers has blossomed into a global phenomenon, with dedicated growers pushing the boundaries of what’s possible. But you don’t need to be a professional to get in on the action!
I know what you’re thinking: “I don’t have a green thumb!” or “My pumpkins always end up small and sad.” Don’t worry, I’ve been there! That’s why I’ve compiled these easy-to-follow DIY tricks and hacks to help you grow bigger pumpkins, even if you’re a beginner. These aren’t just random tips; they’re proven methods that address the common pitfalls of pumpkin cultivation. From soil preparation to strategic pruning, I’ll guide you through every step of the process.
Why do you need these tricks? Because a little know-how can make a HUGE difference! Instead of settling for average-sized pumpkins, you can unlock their full potential and harvest a truly impressive specimen. Plus, it’s a fantastic project to share with your family and friends. So, let’s get started and turn your pumpkin dreams into a reality!

How to Grow Giant Pumpkins: My Secrets for Blue Ribbon Winners
Okay, pumpkin fanatics, let’s talk about growing the biggest, baddest pumpkins on the block! I’ve spent years experimenting, tweaking, and learning from my mistakes (and successes!), and I’m ready to share my secrets with you. Growing a giant pumpkin isn’t just about luck; it’s about science, dedication, and a whole lot of love. Get ready to roll up your sleeves and prepare for some serious pumpkin-growing action!
Choosing the Right Seeds: The Foundation of Your Giant
This is where it all begins. You can’t grow a giant pumpkin from just any old seed. We need to start with the best genetics possible.
* Atlantic Giant Seeds: These are the gold standard. Look for seeds from pumpkins that have weighed over 1000 pounds. The bigger the parent pumpkin, the better the potential.
* Source Reputable Seeds: Don’t just grab a packet from the grocery store. Find a reputable grower or online seed supplier specializing in giant pumpkin seeds. They’ll have seeds with proven genetics.
* Consider Pedigree: Seed sellers often provide the pedigree of the seed, tracing its lineage back through generations of giant pumpkins. The more information you have, the better. Look for seeds with impressive weight records in their family tree.
* Start Early: Giant pumpkin seeds can be hard to find, especially the really good ones. Start your search in the fall or winter to secure the best seeds for the following growing season.
Preparing the Soil: A Feast for Your Future Giant
Giant pumpkins are heavy feeders. They need a nutrient-rich, well-draining soil to thrive. Think of it as building a gourmet buffet for your pumpkin baby.
* Soil Testing: Before you do anything, get your soil tested. This will tell you the pH level and what nutrients are lacking. Your local agricultural extension office can usually provide this service. Aim for a pH of around 6.5 to 7.0.
* Amend, Amend, Amend!: Based on your soil test results, amend your soil with plenty of organic matter. Compost, well-rotted manure, and peat moss are all excellent choices. I personally like to use a combination of all three.
* Add Nutrients: Giant pumpkins need a lot of phosphorus and potassium. Bone meal and wood ash are good natural sources. You can also use a balanced fertilizer specifically formulated for pumpkins. Follow the instructions on the fertilizer label carefully.
* Improve Drainage: Giant pumpkins hate wet feet. Make sure your soil drains well. If you have heavy clay soil, consider adding sand or perlite to improve drainage.
* Create a Mound: Build a raised mound of soil about 12 inches high and several feet wide. This will further improve drainage and provide a warm, sunny spot for your pumpkin to grow.
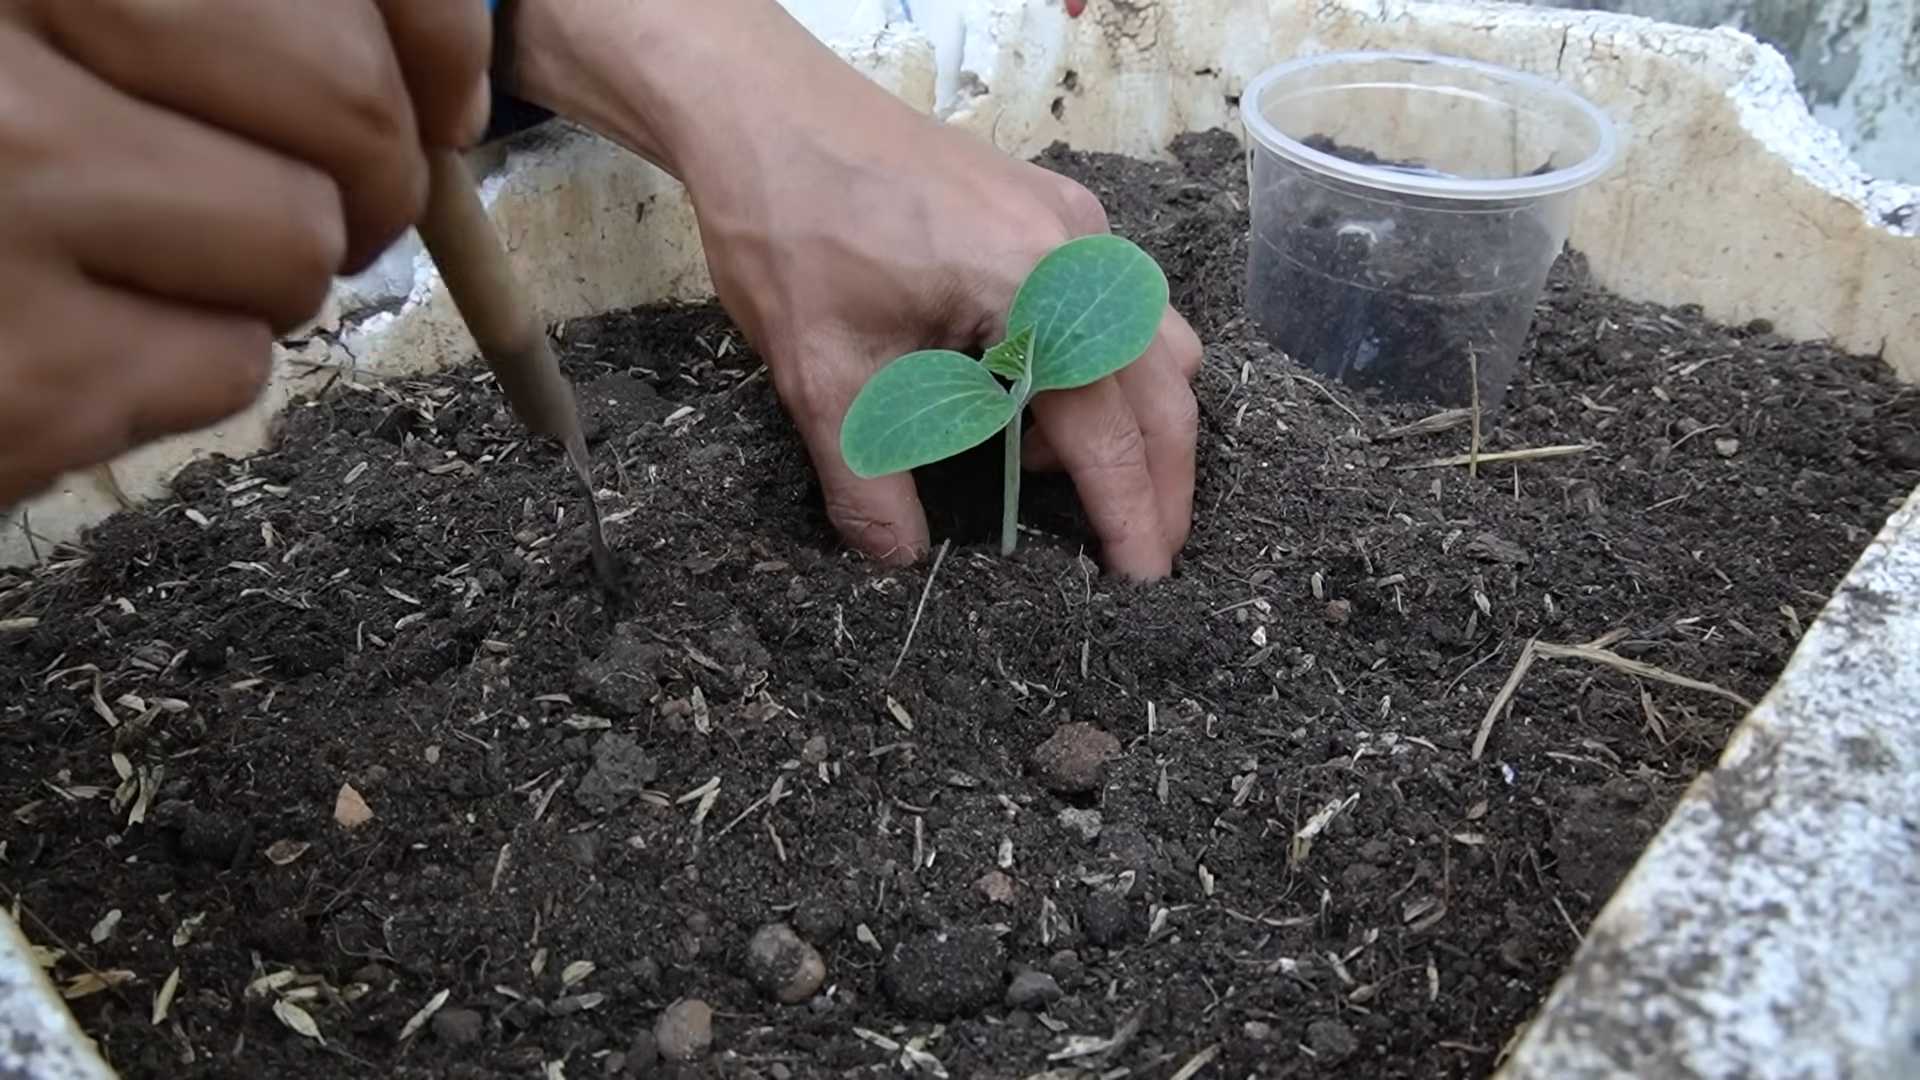
Starting Your Seeds Indoors: Giving Them a Head Start
Because pumpkins are sensitive to frost, starting them indoors gives them a crucial head start.
* Timing is Key: Start your seeds about 3-4 weeks before the last expected frost in your area.
* Use Peat Pots or Biodegradable Pots: This will minimize root disturbance when you transplant them. Giant pumpkins don’t like having their roots messed with.
* Planting Depth: Plant the seed about 1 inch deep, pointy end down.
* Warmth and Light: Keep the soil warm (around 80-85°F) using a heat mat. Once the seedlings emerge, provide them with plenty of light. A grow light is ideal, but a sunny windowsill can also work.
* Water Carefully: Keep the soil moist but not soggy. Overwatering can lead to root rot.
* Harden Off: Before transplanting your seedlings outdoors, you need to harden them off. This means gradually exposing them to outdoor conditions over a period of about a week. Start by placing them outside for a few hours each day, gradually increasing the amount of time they spend outdoors.
Transplanting Your Seedlings: Moving to Their Forever Home
This is a delicate process, so handle your seedlings with care.
* Choose a Sunny Spot: Giant pumpkins need at least 6-8 hours of direct sunlight per day.
* Wait for Warm Weather: Make sure the danger of frost has passed and the soil has warmed up to at least 60°F.
* Prepare the Planting Hole: Dig a hole that is slightly larger than the pot your seedling is in.
* Carefully Remove the Seedling: Gently remove the seedling from the pot, being careful not to damage the roots. If you used a peat pot, you can plant the entire pot.
* Plant at the Same Depth: Plant the seedling at the same depth it was growing in the pot.
* Water Thoroughly: Water the seedling thoroughly after planting.
* Protect from Pests: Use row covers or netting to protect your seedlings from pests like squash bugs and vine borers.
Training the Vine: Guiding Your Pumpkin’s Growth
Training the vine is crucial for maximizing pumpkin size and preventing disease.
* Choose One Main Vine: Select the strongest, healthiest vine and prune away all other vines. This will direct all the plant’s energy into growing that one vine.
* Bury the Vine: As the vine grows, bury sections of it with soil. This will encourage the vine to root along its length, providing additional support and nutrients.
* Direct the Vine: Gently guide the vine in the direction you want it to grow. Avoid letting the vine cross over itself, as this can restrict airflow and increase the risk of disease.
* Prune Secondary Vines: As the main vine grows, it will produce secondary vines. Prune these off regularly to keep the plant’s energy focused on the main vine and the developing pumpkin.
* Protect the Vine from Damage: Be careful not to step on or damage the vine. Giant pumpkin vines are surprisingly fragile.
Pollination: Making Babies (Pumpkins!)
You can let nature take its course, but hand-pollination ensures you get the best possible genetics.
* Identify Female Flowers: Female flowers have a small, immature pumpkin at the base of the flower.
* Identify Male Flowers: Male flowers have a long, slender stem.
* Hand-Pollinate Early in the Morning: The best time to hand-pollinate is early in the morning, before the bees get to them.
* Collect Pollen: Gently remove a male flower and brush the pollen onto the stigma of the female flower.
* Mark the Pollinated Flower: Use a piece of tape or ribbon to mark the pollinated flower. This will help you keep track of which flowers have been pollinated.
* Choose the Best Pumpkin: Once you have several pumpkins developing, choose the one that is growing the fastest and has the best shape. Remove all other pumpkins from the vine.
Watering and Feeding: Keeping Your Pumpkin Hydrated and Happy
Giant pumpkins need a lot of water and nutrients to grow.
* Water Deeply and Regularly: Water deeply and regularly, especially during hot, dry weather. Aim for at least 1-2 inches of water per week.
* Fertilize Regularly: Fertilize your pumpkin regularly with a balanced fertilizer. Follow the instructions on the fertilizer label carefully. I like to alternate between a liquid fertilizer and a granular fertilizer.
* Foliar Feeding: Supplement your regular fertilizing with foliar feeding. This involves spraying the leaves of the plant with a diluted fertilizer solution.
* Monitor Nutrient Levels: Keep an eye on the leaves of your pumpkin plant. Yellowing leaves can indicate a nutrient deficiency.
Protecting Your Pumpkin: Shielding It from the Elements
Giant pumpkins are susceptible to sunburn, pests, and diseases.
* Provide Shade: As your pumpkin grows, it will need shade to protect it from the sun. You can use a shade cloth or build a simple shelter over the pumpkin.
* Control Pests: Monitor your pumpkin plant regularly for pests like squash bugs, vine borers, and aphids. Use appropriate pest control measures to keep them under control.
* Prevent Diseases: Giant pumpkins are susceptible to diseases like powdery mildew and squash vine borer. Use preventative measures to minimize the risk of disease. Good air circulation and proper watering can help.
* Protect from Rot: Place a piece of plywood or cardboard under the pumpkin to prevent it from rotting.
* Insulate from Cold: If temperatures drop unexpectedly, cover your pumpkin with a blanket or tarp to protect it from the cold.
Weighing and Moving Your Giant: The Grand Finale
This is the moment you’ve been waiting for!
* Official Weigh-Off: Find a local pumpkin weigh-off and enter your pumpkin. This is a great way to show off your hard work and compete against other growers.
* Weighing Equipment: You’ll need a scale that can weigh at
Conclusion
So, there you have it! This simple, yet incredibly effective DIY trick is your secret weapon to growing truly gigantic pumpkins. Forget expensive fertilizers and complicated techniques; this method focuses on optimizing the pumpkin’s natural growth potential, leading to results that will astound you. We’ve walked you through the process, highlighting the key steps and providing insights into why each element contributes to the overall success of your pumpkin-growing endeavor.
Why is this a must-try? Because it’s accessible, affordable, and yields impressive results. You don’t need to be a seasoned gardener to implement this technique. It’s perfect for beginners and experienced growers alike, offering a tangible way to boost your pumpkin’s size and health. Imagine the pride you’ll feel when you showcase your prize-winning pumpkin, knowing that you nurtured it to its full potential using this straightforward DIY approach.
But the journey doesn’t end here! Feel free to experiment with variations to tailor the technique to your specific growing conditions and pumpkin variety. For instance, if you live in a particularly hot climate, consider providing extra shade during the hottest part of the day to prevent sunscald. You could also try different types of organic matter to enrich the soil further. Some gardeners swear by adding compost tea directly to the soil around the pumpkin vine, while others incorporate bone meal for an extra boost of phosphorus. The possibilities are endless!
Remember, growing giant pumpkins is as much an art as it is a science. Don’t be afraid to get your hands dirty, observe your pumpkin closely, and adjust your approach as needed. The most important thing is to have fun and enjoy the process.
We are confident that this DIY trick will significantly improve your chances of growing bigger pumpkins than ever before. But we want to hear from you! Try this method out, document your progress, and share your experiences with us. What worked well? What challenges did you encounter? What variations did you try? Your feedback will not only help us refine this technique further but also inspire other gardeners to embark on their own giant pumpkin-growing adventures.
Share your photos and stories on our social media channels using #GiantPumpkinDIY. Let’s create a community of passionate pumpkin growers who are dedicated to pushing the boundaries of what’s possible. Together, we can unlock the secrets to growing truly colossal pumpkins and inspire a new generation of gardeners to embrace the joy of nurturing these magnificent fruits. So, get out there, plant your seeds, and get ready to witness the magic of this DIY trick unfold before your very eyes. Happy growing!
Frequently Asked Questions (FAQ)
What exactly is the “DIY trick” you’re referring to?
The DIY trick we’ve been discussing involves a combination of strategic pruning, targeted fertilization, and consistent watering to maximize the growth potential of your pumpkin. It focuses on directing the plant’s energy towards a single, chosen pumpkin, allowing it to grow to an enormous size. The specific steps include selecting the strongest vine, removing all other pumpkins and blossoms, burying sections of the vine to encourage root growth, and providing a nutrient-rich environment through regular watering and fertilization. It’s a holistic approach that leverages the pumpkin’s natural growth mechanisms.
How much bigger can I expect my pumpkins to grow using this method?
The increase in size will vary depending on several factors, including the pumpkin variety, your local climate, soil quality, and the overall health of your plant. However, you can generally expect a significant increase in size compared to pumpkins grown without this technique. Some gardeners have reported pumpkins that are two to three times larger than their usual yield. While we can’t guarantee a specific weight or size, this DIY trick is designed to optimize growth and help you achieve the biggest pumpkin possible under your specific conditions. Remember, consistent effort and attention to detail are key to maximizing your results.
What kind of fertilizer should I use, and how often should I apply it?
We recommend using a balanced fertilizer with a slightly higher phosphorus content (the middle number in the N-P-K ratio) to promote strong root development and fruit growth. A 10-20-10 or similar formulation is a good starting point. You can also supplement with organic fertilizers like compost tea or bone meal. Apply the fertilizer according to the manufacturer’s instructions, typically every two to three weeks during the active growing season. Be careful not to over-fertilize, as this can damage the plant. Monitor your pumpkin’s growth and adjust the frequency and amount of fertilizer as needed.
Is this trick suitable for all types of pumpkins?
While this DIY trick can be beneficial for most pumpkin varieties, it’s particularly effective for larger pumpkin types, such as Atlantic Giant pumpkins, which are specifically bred for size. Smaller pumpkin varieties may not benefit as dramatically from this technique, as their genetic potential for growth is limited. However, even with smaller varieties, you can still expect to see an improvement in size and overall health. Consider researching the specific needs of your chosen pumpkin variety to tailor the technique accordingly.
What if I don’t have a lot of space in my garden?
Even if you have limited space, you can still try this DIY trick. The key is to focus on training the vine to grow in a specific direction and to prune it regularly to prevent it from spreading too much. You can also use vertical supports, such as trellises or fences, to train the vine upwards, saving valuable ground space. Container gardening is also an option, but you’ll need a very large container (at least 50 gallons) to accommodate the pumpkin’s extensive root system.
How often should I water my pumpkin plant?
Pumpkins need consistent moisture, especially during the active growing season. Water deeply and regularly, aiming to keep the soil consistently moist but not waterlogged. The frequency of watering will depend on your climate and soil type. In hot, dry weather, you may need to water daily, while in cooler, wetter weather, you can water less frequently. A good rule of thumb is to check the soil moisture level regularly and water when the top inch or two feels dry to the touch.
What are some common problems I might encounter, and how can I address them?
Some common problems include powdery mildew, squash bugs, and vine borers. Powdery mildew can be treated with a fungicide or a homemade solution of baking soda and water. Squash bugs can be hand-picked or controlled with insecticidal soap. Vine borers can be difficult to control, but you can try injecting Bacillus thuringiensis (Bt) into the vine or using row covers to prevent the moths from laying eggs. Regularly inspect your plant for signs of pests or diseases and take action promptly to prevent them from spreading.
When is the best time to start this DIY trick?
The best time to start this DIY trick is shortly after the pumpkin plant has established itself and begun to produce blossoms. Once you see several pumpkins forming, select the strongest one and begin pruning the other blossoms and pumpkins. This will allow the plant to focus its energy on the chosen pumpkin from an early stage.
Can I use this method to grow other types of gourds or melons?
While this DIY trick is specifically tailored for pumpkins, the underlying principles of pruning, fertilization, and watering can be applied to other types of gourds and melons as well. However, you may need to adjust the technique based on the specific needs of the plant. For example, some melons may require different nutrient ratios or pruning strategies. Research the specific requirements of the gourd or melon you’re growing to optimize your results.
What if my pumpkin starts to rot before it reaches its full size?
Pumpkin rot can be caused by several factors, including fungal diseases, insect damage, and excessive moisture. To prevent rot, ensure good air circulation around the pumpkin, avoid overhead watering, and treat any signs of fungal disease promptly with a fungicide. You can also place a piece of cardboard or wood under the pumpkin to prevent it from sitting directly on the soil. If rot does occur, remove the affected areas immediately to prevent it from spreading.
Leave a Comment