

Grow Avocados at Home – imagine plucking a perfectly ripe avocado straight from your own tree, ready to transform into creamy guacamole or a delicious addition to your morning toast! It sounds like a dream, right? Well, it doesn’t have to be! For centuries, avocados have been cherished, not just for their incredible taste and nutritional benefits, but also for their cultural significance, particularly in Mesoamerica where they originated. From ancient Aztec feasts to modern-day brunch spreads, the avocado has truly stood the test of time.
But let’s be honest, buying avocados from the store can be a gamble. You’re often faced with rock-hard fruit that takes days to ripen (if it ever does!) or, even worse, avocados that are perfectly ripe for about five minutes before turning into a brown, mushy mess. That’s where the magic of DIY comes in! Learning how to grow avocados at home puts you in control of the entire process, from seed to table.
This article is your ultimate guide to unlocking the secrets of cultivating your own avocado tree, even if you don’t have a sprawling backyard. We’ll explore simple, effective DIY tricks and hacks that will empower you to nurture your very own avocado oasis, regardless of your gardening experience. Get ready to ditch the grocery store avocado roulette and embark on a rewarding journey of homegrown goodness!
Growing Avocados at Home: My Simple DIY Guide
I love avocados! And what could be better than growing your own? It’s easier than you think and super satisfying to watch your little pit grow into a plant. Here is my detailed guide on how you can do it too:
What you need:
- An avocado pit (preferably from a ripe avocado)
- Three to four toothpicks
- A glass or a cup
- Water
- Potting soil
- A pot (for when the pit has rooted)
- Patience!
Preparing the Avocado Pit:
- Carefully remove the pit: After you’ve eaten your avocado, carefully remove the pit. Be sure not to damage it.
- Clean it: Rinse the pit under running water to remove any remaining fruit flesh. This is important to prevent mold from forming.
- Dry it: Pat the pit dry with a paper towel.
Getting the Pit to Sprout (The Toothpick Method):
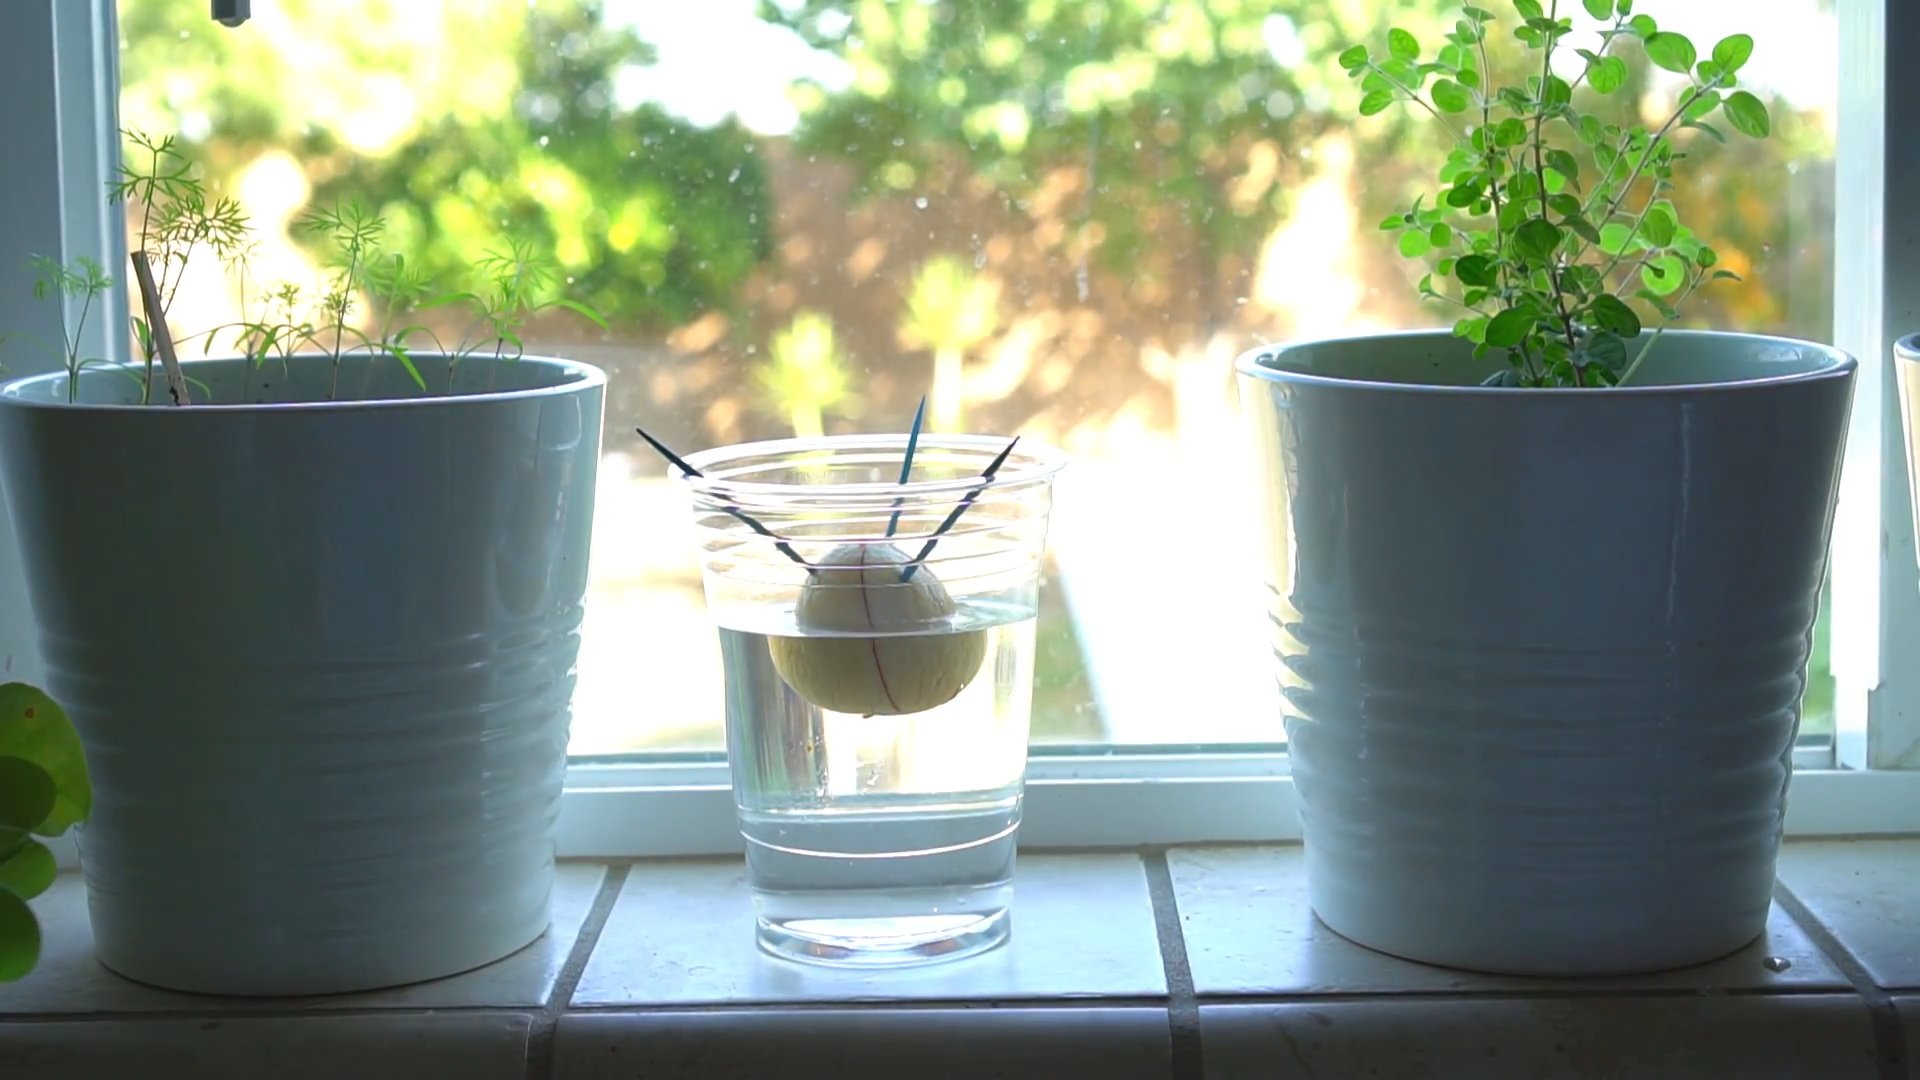
- Insert toothpicks: Insert three to four toothpicks, evenly spaced, into the middle section of the pit. They should go in about half a centimeter deep. These toothpicks will act as a scaffold to suspend the pit in water.
- Prepare the glass: Fill a glass or cup with water. Make sure the glass is wide enough so the pit doesn’t fall in, but narrow enough for the toothpicks to rest on the rim.
- Suspend the pit in water: Place the pit with its wider end facing down into the water. The water should only cover the bottom part of the pit, about one centimeter. The toothpicks should hold the pit on the rim of the glass.
- Choose a location: Place the glass in a warm, bright spot, but not in direct sunlight. A windowsill is ideal.
- Check the water level: Check the water level regularly and top it up as needed. The bottom of the pit should always be in the water.
- Be patient: Now it’s time to wait! It can take several weeks or even months for the pit to sprout roots and a shoot. Be patient and don’t give up.
What happens during germination?
- The pit cracks open: First, you will likely see the pit crack open. This is a good sign!
- Roots form: Then, small, white roots will form, growing down into the water.
- A sprout appears: Finally, a small sprout will emerge from the top of the pit.
When the pit has rooted:
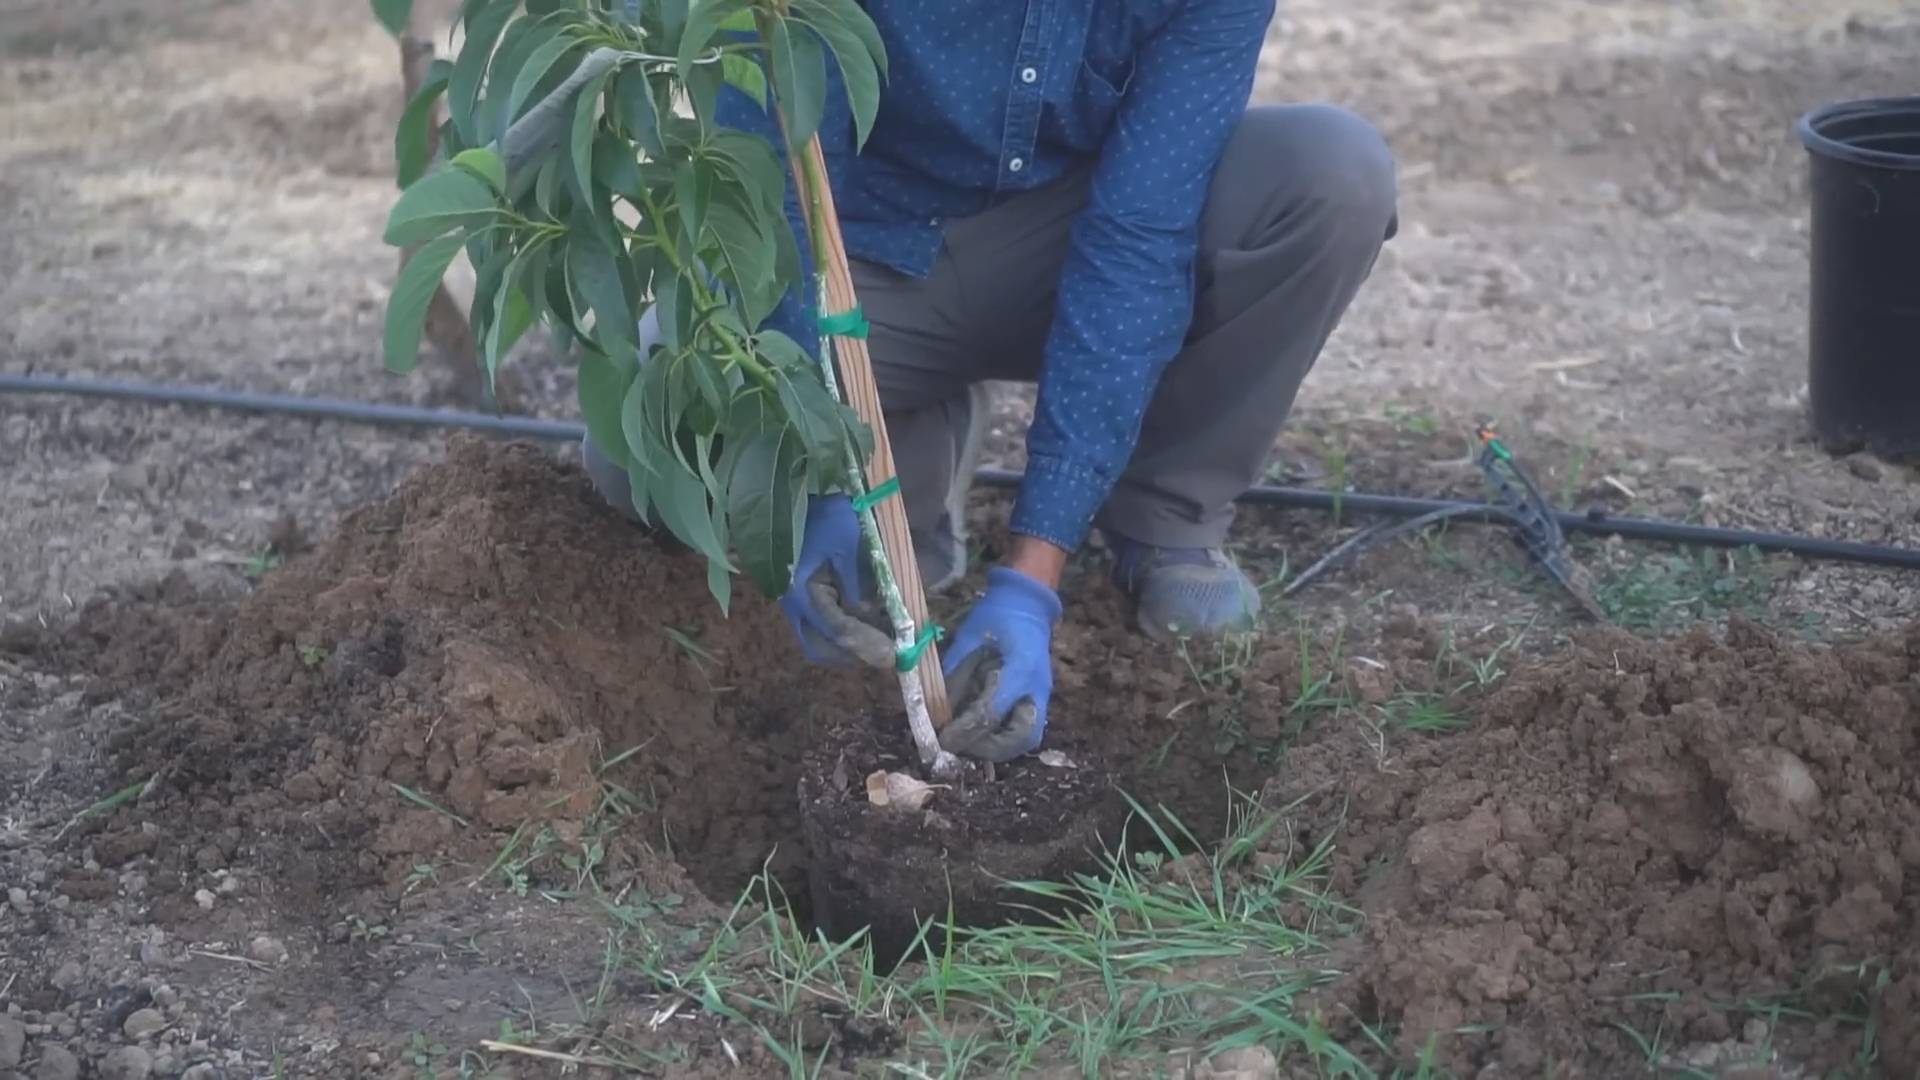
- Wait until the roots are strong enough: Wait until the roots are about 5-8 cm (2-3 inches) long and the sprout is about 15-20 cm (6-8 inches) tall. Then it’s time to plant the little avocado tree in soil.
- Prepare the pot: Choose a pot with a diameter of about 15-20 cm (6-8 inches) and fill it with high-quality potting soil. Make sure the pot has drainage holes so excess water can escape.
- Planting: Make a hole in the soil large enough to accommodate the avocado tree’s roots. Carefully place the pit in the hole and cover the roots with soil. The top part of the pit should still be slightly visible above the soil.
- Watering: Water the avocado tree thoroughly until water runs out of the drainage holes.
- Choose a location: Place the pot in a bright, sunny spot. Avocados love sun!
Caring for Your Avocado Tree:
- Watering: Water the avocado tree regularly, but avoid waterlogging. The soil should always be slightly moist.
- Fertilizing: Fertilize the avocado tree every few weeks with a liquid fertilizer for houseplants.
- Pruning: If the avocado tree gets too tall, you can prune it to encourage bushier growth. Simply snip off the top of the shoot.
- Repotting: When the avocado tree becomes too large for its pot, you will need to repot it into a larger one.
Additional Tips and Tricks:
- Sprout multiple pits at once: Not every pit will sprout, so it’s a good idea to start several at the same time to increase your chances of success.
- Water quality: It’s best to use filtered water or tap water that has been left to sit out to sprout the pit.
- Humidity: Avocados love high humidity. You can increase the humidity by placing the pot on a tray with pebbles and water or by regularly misting the tree with water.
- Overwintering: In colder regions, you will need to bring the avocado tree indoors for the winter. Place it in a bright, cool spot and water it less.
- Patience, patience, patience: It can take several years for your avocado tree to bear fruit. But even without fruit, it’s a beautiful houseplant.
Common Problems and Solutions:
- Pit is molding: If the pit is molding, remove it immediately and try again with a new one. Be sure to clean the pit thoroughly before suspending it in water.
- Leaves are turning brown: Brown leaves can be a sign of too little or too much water. Check the soil’s moisture and adjust your watering accordingly.
- Pests: Avocados can be infested by pests like spider mites or aphids. Treat the tree with a suitable insecticide or a mixture of water and dish soap.
A Few More Thoughts:
I hope this guide helps you grow your own avocados at home. It’s a rewarding project that brings a lot of joy. Remember that it takes time and patience, but in the end, you will be rewarded with a beautiful avocado tree. Good luck!
Why isn’t my avocado pit sprouting?
There are many reasons why an avocado pit might not sprout. Here are some of the most common ones:
- The pit is not viable: Sometimes, the pit is simply not capable of sprouting. This can happen if the avocado was not ripe enough or if the pit was damaged.
- Wrong conditions: The pit needs the right conditions to sprout, such as warmth, moisture, and light.
- Impatience: It can take several weeks or even months for an avocado pit to sprout. Be patient and don’t give up!
Can I harvest avocados from a plant in a pot?
Yes, it is possible to harvest avocados from a potted tree, but it can take several years. Additionally, avocado trees typically require pollination from another avocado variety to bear fruit. So, you might want to plant two different avocado trees to increase the chances of a harvest.
What soil is best for avocados?
Avocados prefer well-draining, slightly acidic soil. A mixture of potting soil, peat moss, and perlite is ideal.
I wish you much success with your avocado project! Let me know if you have any questions
Conclusion
So, there you have it! Growing avocados at home, while requiring patience and a little TLC, is an incredibly rewarding experience. It’s more than just a fun project; it’s about connecting with nature, understanding the life cycle of a plant, and ultimately, enjoying the fruits (literally!) of your labor. This DIY trick transforms a simple avocado pit, often discarded, into a thriving plant, bringing a touch of the tropics right into your living space.
Why is this a must-try? Because it’s sustainable, educational, and visually appealing. You’re reducing waste by repurposing the pit, learning about botany firsthand, and adding a unique, green element to your home decor. Plus, imagine the satisfaction of nurturing a plant from its very beginning! It’s a conversation starter, a stress reliever, and a testament to your green thumb (even if you don’t think you have one!).
But don’t stop there! Experiment with different varieties of avocados. While Hass is the most common, there are many other types, each with its own unique flavor and characteristics. Try growing multiple pits simultaneously to increase your chances of success and potentially even cross-pollinate them in the future. Consider using different types of containers as your avocado plant grows, from simple glass jars to decorative pots that complement your home’s aesthetic.
For a fun variation, try creating an avocado “bonsai.” By carefully pruning the roots and branches, you can train your avocado plant to grow in a smaller, more compact form, perfect for smaller spaces or as a unique centerpiece. You can also experiment with different soil mixtures to see what works best for your specific environment. Some gardeners swear by adding a bit of perlite or vermiculite to improve drainage.
Remember, patience is key. It can take several weeks, even months, for the pit to sprout. Don’t get discouraged if it doesn’t happen immediately. Just keep providing it with fresh water, indirect sunlight, and a little bit of love. And even after it sprouts, it will take several years before your avocado tree is mature enough to produce fruit. But the journey is just as rewarding as the destination.
We wholeheartedly encourage you to try this DIY trick for growing avocados at home. It’s a simple, affordable, and incredibly satisfying project that anyone can do. And once you’ve successfully sprouted your avocado pit, we’d love to hear about your experience! Share your photos, tips, and stories in the comments below. Let’s create a community of avocado enthusiasts and learn from each other’s successes (and even failures!). Let us know what growing method you used, what challenges you faced, and any unique tips you discovered along the way. Your insights could help other aspiring avocado growers achieve their green dreams. So, grab an avocado, enjoy the delicious fruit, and get ready to embark on a rewarding journey of growing your own avocado tree at home! This is a great way to learn about growing avocados at home.
Frequently Asked Questions (FAQ)
How long does it take for an avocado pit to sprout?
The sprouting time for an avocado pit can vary significantly. Generally, it takes anywhere from 2 to 8 weeks, but it could potentially take longer. Several factors influence this, including the freshness of the pit, the temperature, and the humidity levels. Ensure the pit is kept consistently moist and in a warm location to encourage sprouting. Don’t be discouraged if it takes longer than expected; patience is key! If after 8 weeks you see no signs of sprouting, it might be worth trying with a fresh pit.
What’s the best way to prepare the avocado pit for sprouting?
Carefully remove the pit from the avocado without damaging it. Wash off any remaining avocado flesh and gently pat it dry. Identify the “bottom” of the pit (the slightly flatter end) and the “top” (the more pointed end). This is crucial because the roots will emerge from the bottom, and the sprout will emerge from the top. Insert three or four toothpicks evenly spaced around the middle of the pit. These toothpicks will act as a support system, allowing you to suspend the pit in a glass of water.
How much of the avocado pit should be submerged in water?
Only the bottom inch of the avocado pit should be submerged in water. The top portion of the pit should remain exposed to the air. This allows the bottom to absorb water and encourages root growth, while the top can breathe and eventually sprout. Change the water every one to two days to prevent mold and bacteria growth.
What kind of water should I use?
It’s best to use filtered or distilled water for sprouting your avocado pit. Tap water can contain chlorine and other chemicals that may inhibit growth. If you only have access to tap water, let it sit out for 24 hours to allow the chlorine to evaporate before using it.
What kind of light does the sprouting avocado pit need?
The sprouting avocado pit doesn’t need direct sunlight. In fact, too much direct sunlight can be harmful. Place the glass of water with the pit in a location that receives bright, indirect sunlight. A windowsill that faces east or west is usually a good choice.
When should I plant the sprouted avocado pit in soil?
Once the roots are about 2-3 inches long and a sprout has emerged from the top of the pit, it’s time to plant it in soil. Choose a pot that is at least 6 inches in diameter and has drainage holes. Use a well-draining potting mix. Gently remove the pit from the water and plant it in the pot, leaving the top half of the pit exposed.
What kind of soil is best for avocado plants?
Avocado plants thrive in well-draining soil that is slightly acidic. A good potting mix for avocados is a combination of potting soil, perlite, and peat moss. This mixture provides good drainage and aeration, which is essential for healthy root growth.
How often should I water my avocado plant?
Water your avocado plant when the top inch of soil feels dry to the touch. Avoid overwatering, as this can lead to root rot. Ensure the pot has good drainage to prevent water from accumulating at the bottom. During the growing season (spring and summer), you may need to water more frequently than during the dormant season (fall and winter).
How much sunlight does an avocado plant need?
Avocado plants need at least 6 hours of direct sunlight per day. If you’re growing your avocado plant indoors, place it near a sunny window. You may also need to supplement with artificial light, especially during the winter months.
Will my avocado plant produce fruit?
While it’s possible for an avocado plant grown from a pit to produce fruit, it’s not guaranteed. Avocado trees grown from seed often take 5-10 years to mature and produce fruit, and the fruit may not be the same quality as the parent avocado. To increase your chances of getting fruit, you can graft a branch from a known fruiting avocado tree onto your seedling. Grafting ensures that you’re getting a tree that will produce the desired type of avocado. Even with grafting, it can still take several years for the tree to mature and bear fruit.


Leave a Comment