

Grow Asparagus at Home and unlock the secrets to a thriving, delicious garden right outside your door! Have you ever dreamed of snipping fresh, vibrant asparagus spears straight from your own backyard? It’s more achievable than you might think, and this DIY guide is your key to making that dream a reality. For centuries, asparagus has been prized for its delicate flavor and nutritional benefits, gracing the tables of emperors and commoners alike. From ancient Rome, where it was considered a delicacy, to modern-day kitchens, asparagus remains a beloved vegetable.
But why should you bother with growing your own? Well, store-bought asparagus can be expensive and often lacks the freshness and flavor of homegrown varieties. Plus, there’s something incredibly rewarding about nurturing a plant from its humble beginnings to a bountiful harvest. Imagine the satisfaction of serving a meal featuring asparagus you cultivated yourself! This DIY article will provide you with simple, effective tricks and hacks to grow asparagus at home, even if you have limited space or gardening experience. I’ll walk you through everything from selecting the right variety to preparing your soil and protecting your precious spears from pests. So, grab your gardening gloves, and let’s get started on this exciting journey to homegrown asparagus bliss!
Spargel selbst anbauen: Dein umfassender DIY-Leitfaden
Hallo Gartenfreunde! Ich freue mich riesig, euch heute zu zeigen, wie ihr Spargel, dieses königliche Gemüse, ganz einfach zu Hause anbauen könnt. Es mag anfangs etwas einschüchternd wirken, aber glaubt mir, mit der richtigen Vorbereitung und etwas Geduld werdet ihr bald eure eigene Spargelernte genießen können. Los geht’s!
Warum Spargel selbst anbauen?
Bevor wir ins Detail gehen, lasst mich kurz erklären, warum ich so begeistert vom Spargelanbau bin:
* Frische: Nichts schmeckt besser als frisch geernteter Spargel direkt aus dem eigenen Garten.
* Qualität: Ihr habt die volle Kontrolle über die Anbaubedingungen und könnt sicherstellen, dass euer Spargel ohne schädliche Pestizide wächst.
* Kostenersparnis: Spargel kann im Supermarkt teuer sein. Mit einem eigenen Spargelbeet spart ihr langfristig Geld.
* Nachhaltigkeit: Ihr reduziert Transportwege und unterstützt eine umweltfreundliche Anbauweise.
* Befriedigung: Es ist einfach ein tolles Gefühl, etwas Eigenes anzubauen und zu ernten!
Was du für den Spargelanbau brauchst
Bevor wir loslegen, hier eine Liste der Dinge, die du benötigst:
* Spargelpflanzen (auch Spargelspitzen oder Spargelwurzeln genannt): Am besten sind ein- oder zweijährige Pflanzen.
* Spaten oder Grabegabel: Zum Umgraben und Vorbereiten des Bodens.
* Gartenhandschuhe: Zum Schutz deiner Hände.
* Kompost oder gut verrotteter Mist: Zur Bodenverbesserung.
* Organischer Dünger: Für eine optimale Nährstoffversorgung.
* Gießkanne oder Gartenschlauch: Zum Bewässern der Pflanzen.
* Mulchmaterial (z.B. Stroh oder Holzhackschnitzel): Zum Schutz des Bodens und zur Unkrautbekämpfung.
* Geduld: Spargel braucht Zeit, um zu wachsen und zu reifen.
Die richtige Standortwahl
Der Standort ist entscheidend für den Erfolg deines Spargelprojekts. Hier sind einige wichtige Punkte:
* Sonnenschein: Spargel liebt die Sonne! Wähle einen Standort, der mindestens 6-8 Stunden Sonnenlicht pro Tag erhält.
* Boden: Der Boden sollte gut durchlässig, locker und sandig-lehmig sein. Staunässe verträgt Spargel überhaupt nicht.
* Platz: Spargel braucht Platz! Plane etwa 30-45 cm Abstand zwischen den Pflanzen und 1,5-2 Meter zwischen den Reihen ein.
* Windschutz: Ein windgeschützter Standort ist ideal, um die Pflanzen vor starken Winden zu schützen.
Schritt-für-Schritt-Anleitung zum Spargelanbau
Jetzt geht’s ans Eingemachte! Hier ist eine detaillierte Anleitung, wie du deinen eigenen Spargel anbauen kannst:
1. Bodenvorbereitung
Die Bodenvorbereitung ist das A und O für einen erfolgreichen Spargelanbau. Nimm dir dafür ausreichend Zeit und Mühe.
1. Boden umgraben: Grabe den Boden im Herbst oder Frühjahr (vor der Pflanzung) tief um (mindestens 30-40 cm). Entferne dabei alle Steine, Wurzeln und Unkräuter.
2. Boden verbessern: Mische reichlich Kompost oder gut verrotteten Mist in den Boden ein. Das verbessert die Bodenstruktur und versorgt die Pflanzen mit wichtigen Nährstoffen.
3. pH-Wert prüfen: Der ideale pH-Wert für Spargel liegt zwischen 6,5 und 7,5. Du kannst den pH-Wert mit einem Bodentestkit überprüfen und gegebenenfalls mit Kalk oder Schwefel anpassen.
4. Graben ziehen: Ziehe Gräben mit einer Tiefe von etwa 20-25 cm und einer Breite von etwa 30 cm. Der Abstand zwischen den Gräben sollte etwa 1,5-2 Meter betragen.
5. Hügel formen: Forme in den Gräben kleine Hügel aus Erde. Auf diese Hügel werden die Spargelpflanzen gesetzt.
2. Spargelpflanzen setzen
Jetzt ist es Zeit, die Spargelpflanzen in die Erde zu bringen.
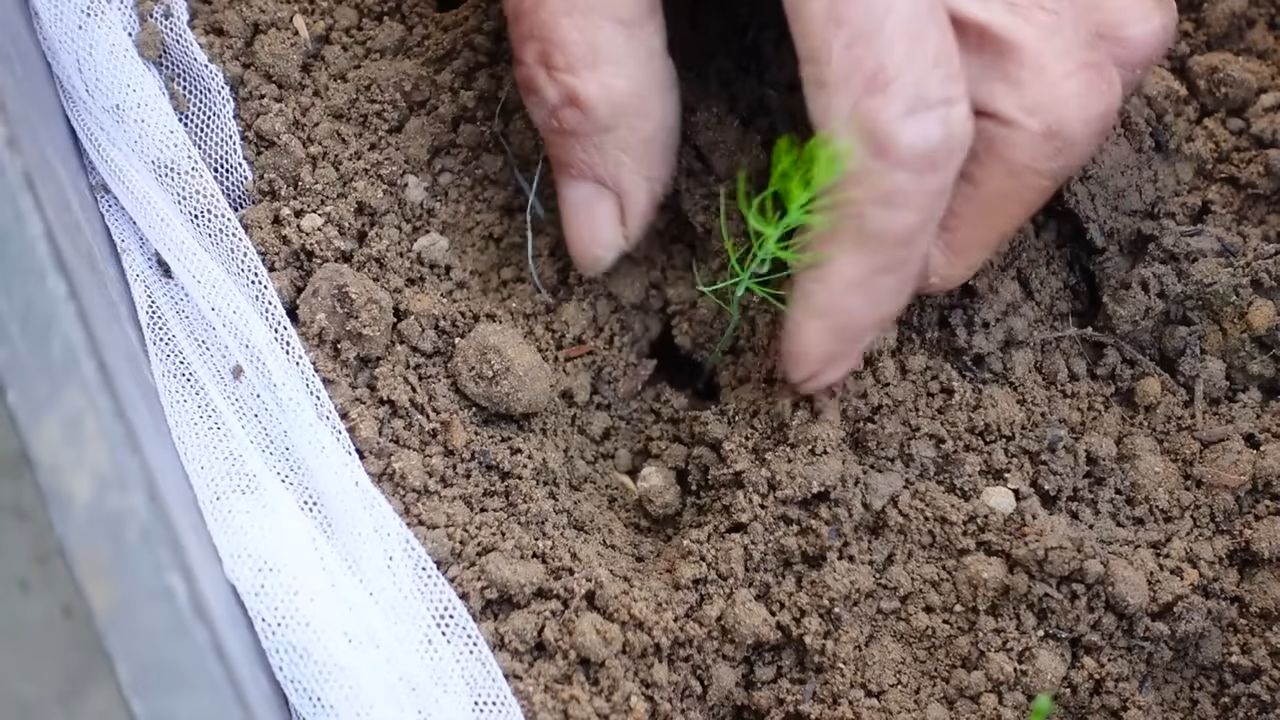
1. Pflanzen vorbereiten: Lockere die Wurzeln der Spargelpflanzen vorsichtig auf.
2. Pflanzen setzen: Setze die Spargelpflanzen auf die Hügel in den Gräben. Die Wurzeln sollten sich gut verteilen können.
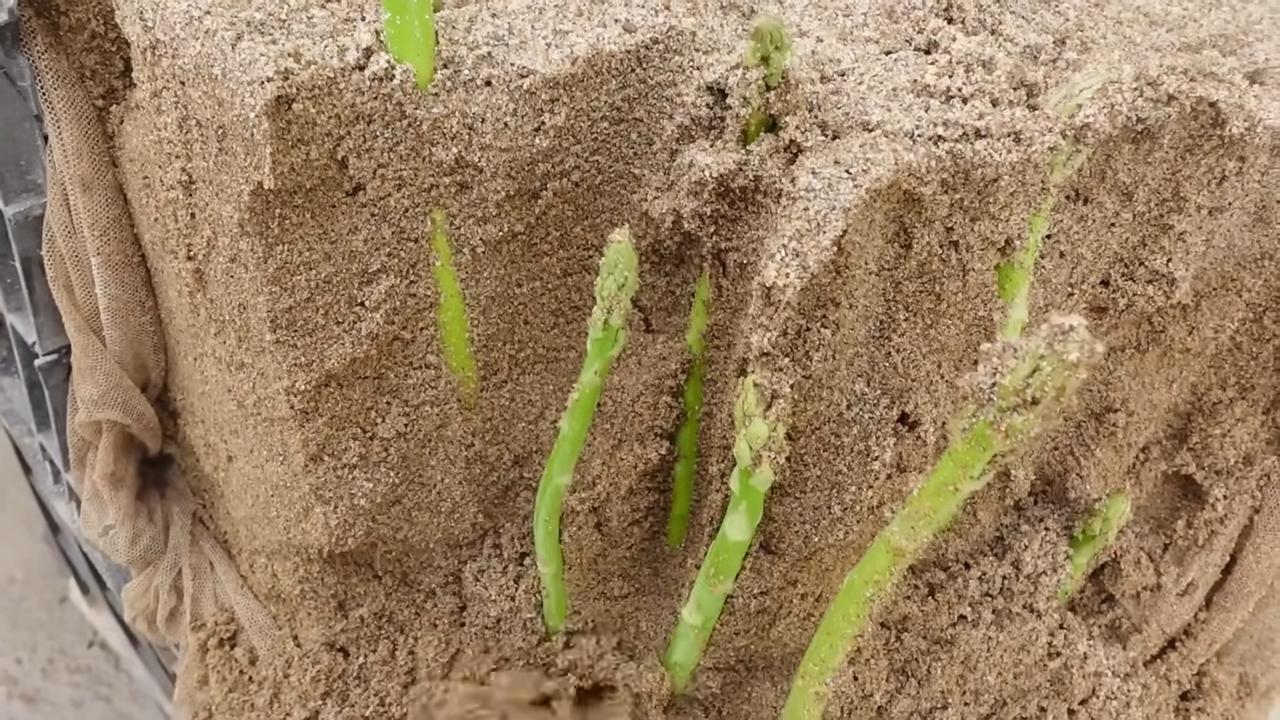
3. Mit Erde bedecken: Bedecke die Wurzeln mit Erde, so dass die Triebspitzen (die Augen) etwa 5-10 cm unter der Erdoberfläche liegen.
4. Angießen: Gieße die Pflanzen nach dem Setzen gründlich an.
3. Pflege des Spargelbeets
Die richtige Pflege ist entscheidend für eine reiche Spargelernte.
1. Bewässerung: Gieße die Pflanzen regelmäßig, besonders in trockenen Perioden. Der Boden sollte immer leicht feucht sein, aber nicht nass.
2. Düngung: Dünge die Pflanzen im Frühjahr und Sommer mit einem organischen Dünger. Achte darauf, dass der Dünger reich an Stickstoff, Phosphor und Kalium ist.
3. Unkrautbekämpfung: Entferne regelmäßig Unkraut aus dem Spargelbeet. Unkraut konkurriert mit den Spargelpflanzen um Nährstoffe und Wasser.
4. Mulchen: Bedecke den Boden mit Mulchmaterial (z.B. Stroh oder Holzhackschnitzel). Das schützt den Boden vor Austrocknung, unterdrückt Unkraut und hält den Boden kühl.
5. Stützen: Wenn die Spargelpflanzen hoch wachsen, können sie bei starkem Wind umknicken. Stütze die Pflanzen gegebenenfalls mit Stäben oder einem Rankgitter.
4. Geduld ist gefragt: Die ersten Jahre
Spargel braucht Zeit, um sich zu etablieren. In den ersten Jahren solltest du noch nicht ernten, damit die Pflanzen kräftig wachsen können.
1. Erstes Jahr: Lasse die Pflanzen im ersten Jahr komplett in Ruhe wachsen. Schneide die Triebe im Herbst nicht ab, sondern lasse sie über den Winter stehen. Sie dienen als Schutz für die Wurzeln.
2. Zweites Jahr: Im zweiten Jahr kannst du die Triebe im Herbst abschneiden, sobald sie gelb werden. Auch in diesem Jahr solltest du noch nicht ernten.
3. Drittes Jahr: Im dritten Jahr kannst du mit der ersten Ernte beginnen, aber sei vorsichtig und ernte nicht zu viel.
5. Die Ernte: Endlich Spargel!
Nach drei Jahren Geduld ist es endlich soweit: Du kannst deinen eigenen Spargel ernten!
1. Erntezeitpunkt: Die Spargelernte beginnt in der Regel im April und endet traditionell am Johannistag (24. Juni).
2. Erntemethode: Steche den Spargel mit einem speziellen Spargelstecher oder einem scharfen Messer etwa 2-3 cm unter der Erdoberfläche ab. Achte darauf, die umliegenden Triebe nicht zu beschädigen.
3. Erntehäufigkeit: Ernte den Spargel regelmäßig, etwa alle 1-2 Tage. Je öfter du erntest, desto mehr Spargel wird nachwachsen.
4. Erntedauer: Im dritten Jahr solltest du die Ernte auf etwa 2-3 Wochen beschränken. In den folgenden Jahren kannst du die Erntezeit auf 6-8 Wochen ausdehnen.
5. Ernteende: Beende die Ernte spätestens am Johannistag (24. Juni). Die Pflanzen brauchen dann Zeit, um sich zu erholen und Kraft für das nächste Jahr zu sammeln.
6. Nach der Ernte
Auch nach der Ernte ist es wichtig, die Spargelpflanzen gut zu pflegen.
1. Düngung: Dünge die Pflanzen nach der Ernte noch einmal mit einem organischen Dünger.
2. Bewässerung: Gieße die Pflanzen weiterhin regelmäßig, besonders in trockenen Perioden.
3. La
Conclusion
So, there you have it! Growing asparagus at home isn’t just a gardening project; it’s an investment in years of delicious, healthy harvests. Forget the flimsy, often overpriced asparagus spears at the grocery store. Imagine stepping into your backyard and harvesting plump, vibrant green stalks, bursting with flavor and freshness. This DIY trick transforms your garden into a source of culinary delight, offering a taste experience far superior to anything commercially available.
Why is this a must-try? Because it empowers you to control the quality and freshness of your food. You know exactly what goes into your asparagus patch – no hidden pesticides or questionable farming practices. Plus, the satisfaction of nurturing a plant from crown to table is incredibly rewarding. It’s a connection to nature, a lesson in patience, and a source of pride all rolled into one.
But the benefits don’t stop there. Growing your own asparagus allows for experimentation. Want to try a different variety? Go for it! Jersey Knight, with its high yields and disease resistance, is a popular choice. Or perhaps you’re intrigued by Purple Passion, known for its sweeter flavor and beautiful color. The possibilities are endless.
Consider these variations to personalize your asparagus growing experience:
* **Companion Planting:** Enhance your asparagus patch by planting beneficial companions like tomatoes, basil, or parsley. These plants can deter pests and improve soil health, creating a thriving ecosystem.
* **Raised Beds:** If you have poor soil or limited space, raised beds are an excellent option. They provide better drainage and allow you to create the ideal growing environment for your asparagus.
* **Succession Planting:** Extend your harvest season by planting different asparagus varieties with varying maturity dates. This ensures a continuous supply of fresh spears throughout the spring.
* **Container Gardening:** While asparagus prefers to be in the ground, you can grow it in large containers if you don’t have a garden. Just make sure the container is at least 2 feet deep and wide to accommodate the roots.
Don’t be intimidated by the initial investment of time and effort. Growing asparagus is a long-term commitment, but the rewards are well worth it. With proper planning and care, your asparagus patch will provide you with years of delicious harvests.
We wholeheartedly encourage you to embark on this gardening adventure. Take the plunge, prepare your soil, plant your crowns, and watch your asparagus thrive. And most importantly, share your experience with us! We’d love to hear about your successes, challenges, and any unique tips you discover along the way. Post photos of your harvest, share your favorite asparagus recipes, and let’s build a community of home-grown asparagus enthusiasts. Let’s all learn how to **grow asparagus at home** together!
Frequently Asked Questions (FAQ)
1. How long does it take to harvest asparagus after planting?
Patience is key when growing asparagus. While you might be eager to harvest those first spears, it’s crucial to allow the plants to establish themselves. Generally, you shouldn’t harvest any spears during the first year after planting. In the second year, you can harvest lightly for a few weeks. By the third year, your asparagus patch should be mature enough for a full harvest season, which typically lasts 6-8 weeks in the spring. Harvesting too early can weaken the plants and reduce future yields.
2. What is the best type of soil for growing asparagus?
Asparagus thrives in well-drained, sandy loam soil with a pH between 6.5 and 7.5. Good drainage is essential to prevent root rot. If your soil is heavy clay, amend it with plenty of organic matter, such as compost or well-rotted manure, to improve drainage and aeration. Adding sand can also help to break up the clay. Before planting, it’s a good idea to conduct a soil test to determine the pH and nutrient levels. Amend the soil as needed based on the test results.
3. How much sunlight does asparagus need?
Asparagus requires at least 6-8 hours of direct sunlight per day to thrive. Choose a planting location that receives full sun throughout the growing season. If you live in a particularly hot climate, some afternoon shade may be beneficial to prevent the plants from overheating. Insufficient sunlight can result in weak, spindly spears and reduced yields.
4. How often should I water asparagus?
Asparagus needs consistent moisture, especially during the growing season. Water deeply and regularly, ensuring that the soil remains moist but not waterlogged. Avoid overhead watering, as this can promote fungal diseases. A soaker hose or drip irrigation system is ideal for delivering water directly to the roots. During dry periods, you may need to water more frequently. Mulching around the plants can help to retain moisture and suppress weeds.
5. What are some common pests and diseases that affect asparagus?
Asparagus beetles are a common pest that can damage the spears and foliage. Handpicking the beetles or using insecticidal soap can help to control infestations. Asparagus rust is a fungal disease that can cause orange pustules on the stems and foliage. Proper spacing and good air circulation can help to prevent rust. Fusarium wilt is another fungal disease that can cause the plants to wilt and die. Planting disease-resistant varieties and practicing crop rotation can help to prevent Fusarium wilt.
6. How do I harvest asparagus spears?
Harvest asparagus spears when they are about 6-8 inches tall and the tips are still tightly closed. Use a sharp knife or asparagus knife to cut the spears at or slightly below the soil surface. Avoid damaging the crown when harvesting. Harvest spears every day or two during the peak of the season. As the harvest season progresses, the spears will become thinner and more fibrous. Stop harvesting when the spears become too thin or when the plants begin to fern out.
7. How do I care for asparagus after the harvest season?
After the harvest season, allow the asparagus plants to fern out and grow tall. The ferns will photosynthesize and store energy in the roots for the following year’s growth. Fertilize the plants with a balanced fertilizer in late spring or early summer. Remove any weeds that may compete with the asparagus for nutrients and water. In the fall, cut the ferns back to the ground after they have turned brown and dried out. Mulch the asparagus bed with organic matter to protect the roots from winter cold.
8. Can I grow asparagus in containers?
Yes, you can grow asparagus in containers, but it requires a large container (at least 2 feet deep and wide) to accommodate the roots. Choose a well-draining potting mix and provide the plants with plenty of sunlight and water. Container-grown asparagus may require more frequent fertilization than asparagus grown in the ground. Be sure to protect the containers from freezing temperatures during the winter.
9. What are the best asparagus varieties to grow at home?
There are many different asparagus varieties to choose from, each with its own unique characteristics. Jersey Knight is a popular choice for its high yields and disease resistance. Purple Passion is known for its sweeter flavor and beautiful color. Mary Washington is a classic variety that is reliable and easy to grow. When choosing a variety, consider your climate, soil type, and personal preferences.
10. How do I store harvested asparagus?
Freshly harvested asparagus is best stored in the refrigerator. Wrap the spears in a damp paper towel and place them in a plastic bag or container. Asparagus can also be stored upright in a jar with a few inches of water. Stored properly, asparagus will stay fresh for up to a week.

Leave a Comment