

DIY Tomato Garden: Imagine biting into a juicy, sun-ripened tomato, bursting with flavor, knowing you grew it yourself! There’s nothing quite like the taste of homegrown tomatoes, and the satisfaction of nurturing them from tiny seedlings to vibrant, fruit-bearing plants. For centuries, cultivating tomatoes has been a cherished tradition, dating back to the Aztecs and Incas who first domesticated these vibrant fruits. From humble beginnings, tomatoes have become a global staple, gracing our salads, sauces, and sandwiches with their deliciousness.
But let’s be honest, sometimes getting those perfect tomatoes can feel like a real challenge. Pests, diseases, and unpredictable weather can all throw a wrench in your gardening plans. That’s where these clever DIY tomato garden tricks and hacks come in! I’m going to share some simple, yet effective, methods to help you maximize your tomato yield, protect your plants, and enjoy a bountiful harvest, even if you’re a beginner gardener.
Why do you need these DIY tricks? Because everyone deserves to experience the joy of growing their own food! Plus, store-bought tomatoes often lack the intense flavor and nutritional value of homegrown varieties. With a little know-how and some easy DIY solutions, you can create a thriving DIY tomato garden that will be the envy of your neighborhood. So, grab your gardening gloves, and let’s get started on this exciting journey to tomato-growing success!
DIY Tomato Garden: From Seed to Sauce (and Everything In Between!)
Hey there, fellow garden enthusiasts! I’m so excited to share my tried-and-true method for creating a thriving tomato garden, even if you’re short on space or experience. Growing your own tomatoes is incredibly rewarding – nothing beats the taste of a sun-ripened, homegrown tomato! This guide will walk you through every step, from choosing the right varieties to troubleshooting common problems. Let’s get our hands dirty!
Choosing Your Tomato Varieties
Before we even think about soil, let’s talk tomatoes! The sheer variety can be overwhelming, but don’t worry, I’ll help you narrow it down. Consider these factors:
* Space: Are you growing in containers or a garden bed? Determinate varieties (bush tomatoes) are more compact and ideal for containers, while indeterminate varieties (vining tomatoes) need more space and support.
* Purpose: What will you be using your tomatoes for? Slicing tomatoes (like Beefsteak) are great for sandwiches, while Roma tomatoes are perfect for sauces. Cherry tomatoes are fantastic for snacking.
* Climate: Check your local climate and choose varieties that are known to thrive in your area. Your local nursery can offer great advice.
* Disease Resistance: Look for varieties labeled with disease resistance codes (like V, F, N, T, A) to help prevent common tomato problems.
Some of my personal favorites include:
* Early Girl: A reliable early producer, great for cooler climates.
* Roma: Perfect for making sauces and pastes.
* Sungold: Incredibly sweet and flavorful cherry tomato.
* Beefsteak: Classic large slicing tomato.
* Celebrity: A good all-around hybrid with disease resistance.
Starting Your Tomato Seeds (or Buying Seedlings)
You have two options here: start your own seeds indoors or buy seedlings from a nursery. Starting from seed gives you more control over the varieties you grow and can be more cost-effective, but it requires a bit more time and effort.
Starting Seeds Indoors (6-8 Weeks Before Last Frost)
1. Gather Your Supplies: You’ll need seed starting trays or small pots, seed starting mix (not regular potting soil!), tomato seeds, a spray bottle, and a grow light (optional, but highly recommended).
2. Prepare Your Seed Starting Trays: Fill your trays or pots with seed starting mix, leaving about half an inch of space at the top. Gently tap the trays to settle the mix.
3. Sow Your Seeds: Make a small indentation (about 1/4 inch deep) in the center of each cell or pot. Place 2-3 seeds in each indentation. This increases your chances of at least one seed germinating.
4. Cover and Water: Gently cover the seeds with seed starting mix. Use a spray bottle to moisten the soil. Avoid overwatering, which can lead to damping off (a fungal disease that kills seedlings).
5. Provide Warmth and Light: Place your trays in a warm location (around 70-75°F) and under a grow light or near a sunny window. If using a window, rotate the trays regularly to prevent the seedlings from leaning towards the light.
6. Keep the Soil Moist: Check the soil daily and water as needed to keep it consistently moist, but not soggy.
7. Thin Seedlings: Once the seedlings have their first true leaves (the second set of leaves that appear after the initial seed leaves), thin them to one seedling per cell or pot. Choose the strongest, healthiest-looking seedling and gently snip off the others at the soil line. Don’t pull them out, as this can disturb the roots of the remaining seedling.
8. Harden Off Seedlings: About a week before you plan to transplant your seedlings outdoors, you’ll need to “harden them off.” This process gradually acclimates them to outdoor conditions. Start by placing them outside in a sheltered location for an hour or two each day, gradually increasing the amount of time they spend outdoors. Protect them from direct sunlight and strong winds.
Buying Seedlings
1. Choose Healthy Seedlings: Look for seedlings that are stocky, green, and have a good root system. Avoid seedlings that are leggy (tall and spindly), yellowing, or have signs of pests or diseases.
2. Check the Roots: Gently remove a seedling from its container and inspect the roots. They should be white or light brown and fill the container without being root-bound (tightly circling the container).
3. Harden Off Seedlings (If Necessary): Even if you buy seedlings, it’s a good idea to harden them off for a few days before transplanting, especially if they’ve been grown in a greenhouse.
Preparing Your Planting Location
Whether you’re using containers or a garden bed, proper soil preparation is crucial for healthy tomato plants.
For Containers
1. Choose the Right Size Container: For determinate varieties, a 5-gallon container is usually sufficient. Indeterminate varieties will need at least a 10-gallon container.
2. Use a High-Quality Potting Mix: Avoid using garden soil in containers, as it can become compacted and doesn’t drain well. Choose a potting mix specifically formulated for containers.
3. Ensure Good Drainage: Make sure your containers have drainage holes to prevent waterlogging.
For Garden Beds
1. Choose a Sunny Location: Tomatoes need at least 6-8 hours of sunlight per day.
2. Improve the Soil: Amend your soil with compost or other organic matter to improve drainage and fertility. Tomatoes prefer well-drained, slightly acidic soil (pH 6.0-6.8).
3. Remove Weeds: Clear the area of weeds and grass.
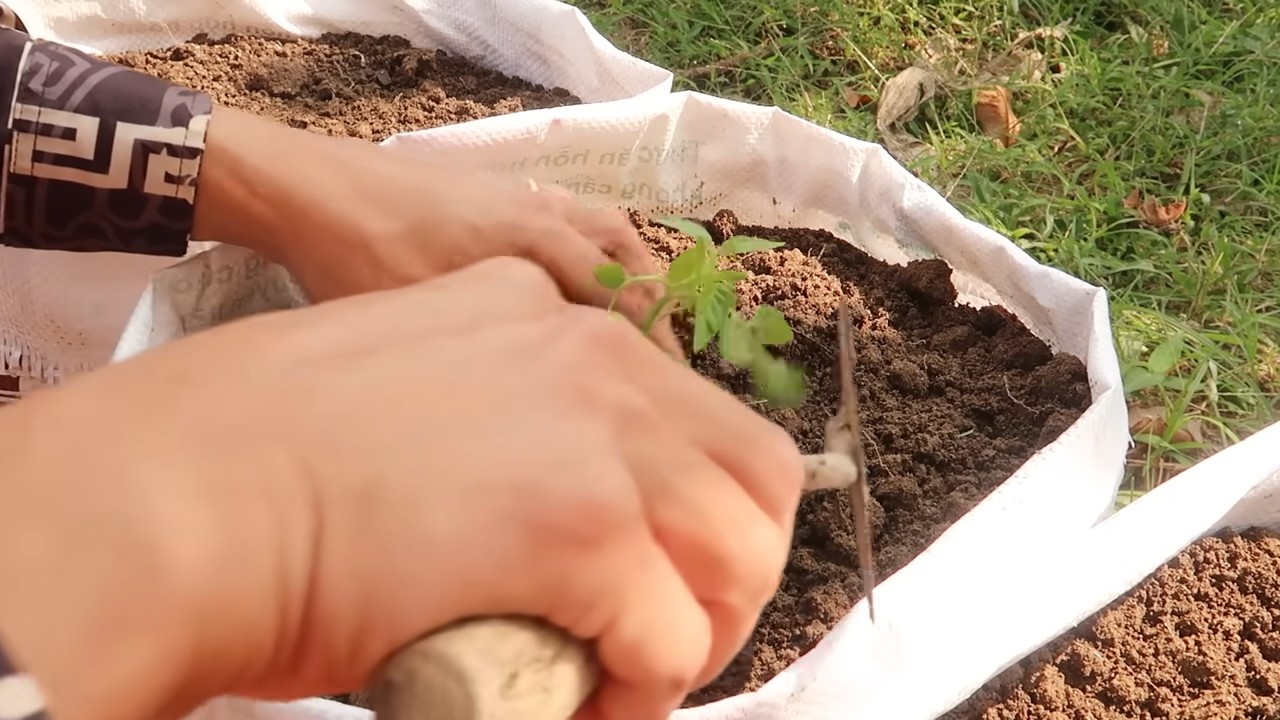
Transplanting Your Tomato Seedlings
Now for the exciting part – getting those tomato plants in the ground!
1. Choose a Cloudy Day: Transplanting on a cloudy day or in the late afternoon will help reduce stress on the seedlings.
2. Dig a Hole: Dig a hole that is deep enough to bury the bottom third of the tomato seedling’s stem. This encourages the plant to develop more roots along the buried stem, resulting in a stronger, healthier plant.
3. Remove Lower Leaves: Gently remove the lower leaves from the stem that will be buried.
4. Plant the Seedling: Place the seedling in the hole and backfill with soil, gently firming it around the base of the plant.
5. Water Thoroughly: Water the newly transplanted seedlings thoroughly.
6. Add Support: Install stakes, cages, or trellises to support the tomato plants as they grow. This is especially important for indeterminate varieties. I prefer using tomato cages because they are easy to install and provide good support.
7. Mulch: Apply a layer of mulch (such as straw, wood chips, or shredded leaves) around the base of the plants to help retain moisture, suppress weeds, and regulate soil temperature.
Caring for Your Tomato Plants
Consistent care is essential for a bountiful tomato harvest.
* Watering: Water deeply and regularly, especially during hot, dry weather. Aim to water at the base of the plant to avoid wetting the foliage, which can increase the risk of disease.
* Fertilizing: Fertilize your tomato plants every 2-3 weeks with a balanced fertilizer or a fertilizer specifically formulated for tomatoes. Follow the instructions on the fertilizer package.
* Pruning: Prune indeterminate tomato plants to remove suckers (the small shoots that grow between the main stem and the branches). This will help improve air circulation and encourage the plant to focus its energy on producing fruit. Determinate varieties generally don’t need pruning.
* Pest and Disease Control: Regularly inspect your tomato plants for pests and diseases. Common tomato pests include aphids, tomato hornworms, and whiteflies. Common tomato diseases include early blight, late blight, and blossom end rot. Treat any problems promptly with appropriate organic or chemical controls. I prefer using organic methods whenever possible.
* Sun Scald Prevention: If you live in a very hot climate, protect your tomatoes from sun scald by providing some shade during the hottest part of the day.
Harvesting Your Tomatoes
The moment you’ve been waiting for!
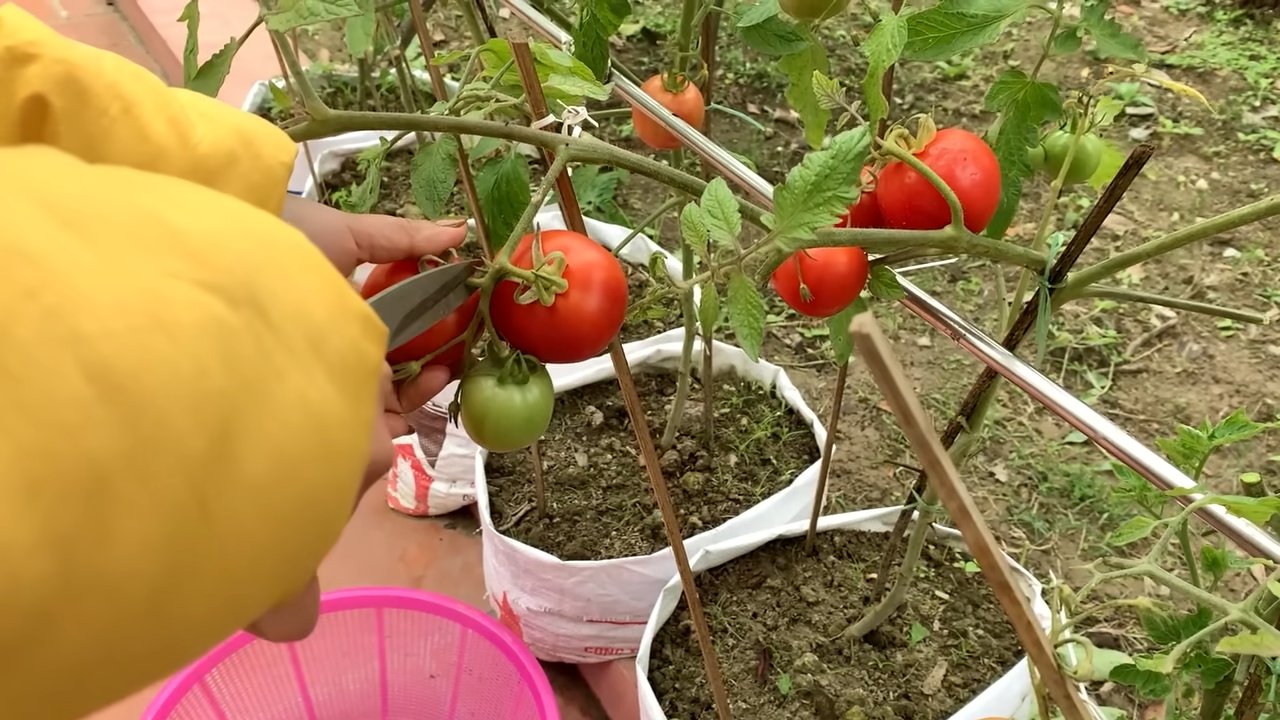
1. Harvest When Ripe: Tomatoes are ripe when they are fully colored and slightly soft to the touch.
2. Gently Twist: Gently twist the tomato from the vine.
3. Enjoy! Enjoy your homegrown tomatoes fresh, in salads, sauces, or any other way you like!
Troubleshooting Common Tomato Problems
Even with the best care, tomato plants can sometimes encounter problems. Here are some common issues and how to address them:
* Blossom End Rot: This is caused by a calcium deficiency and results in a dark, leathery spot on the bottom
Conclusion
So, there you have it! Transforming your outdoor space into a thriving DIY tomato garden is not just a fun project; it’s an investment in fresh, flavorful produce and a more sustainable lifestyle. We’ve walked you through the essential steps, from selecting the perfect spot and choosing the right tomato varieties to building your raised beds and providing the necessary support.
Why is this DIY trick a must-try? Because it puts you in control. You dictate the quality of the soil, the type of fertilizer used (or not used!), and the overall environment in which your tomatoes flourish. Store-bought tomatoes, while convenient, often lack the intense flavor and nutritional value of homegrown ones. Plus, there’s an undeniable satisfaction in harvesting a juicy, sun-ripened tomato that you nurtured from a tiny seedling.
But the beauty of a DIY tomato garden lies in its adaptability. Feel free to experiment with different tomato varieties. Cherry tomatoes are perfect for snacking, while Roma tomatoes are ideal for sauces. Heirloom varieties offer unique flavors and colors, adding visual appeal to your garden.
Consider companion planting to enhance your tomato garden’s health and productivity. Basil, for example, is known to improve the flavor of tomatoes and repel pests. Marigolds can deter nematodes, while carrots can loosen the soil.
Don’t be afraid to get creative with your garden design. Use recycled materials to build your raised beds, or incorporate vertical gardening techniques to maximize space. You can even add a small seating area to create a relaxing oasis where you can enjoy the fruits (or vegetables!) of your labor.
Remember to monitor your plants regularly for signs of pests or diseases. Early detection is key to preventing problems from escalating. Organic pest control methods, such as neem oil or insecticidal soap, are effective and safe for your plants and the environment.
Ultimately, creating a DIY tomato garden is a journey of learning and discovery. There will be successes and setbacks, but the rewards are well worth the effort. The taste of homegrown tomatoes, the satisfaction of nurturing your own plants, and the knowledge that you’re contributing to a more sustainable food system are all compelling reasons to give it a try.
We encourage you to embark on this exciting adventure and share your experiences with us. What tomato varieties are you growing? What challenges have you faced, and how have you overcome them? What tips and tricks have you discovered along the way? Share your photos and stories in the comments below – we can’t wait to see your DIY tomato gardens in action!
Frequently Asked Questions (FAQ)
1. What is the best location for a DIY tomato garden?
Tomatoes need at least 6-8 hours of direct sunlight per day to thrive. Choose a location that receives ample sunlight throughout the day. Also, consider the soil quality. Tomatoes prefer well-drained soil that is rich in organic matter. If your soil is poor, amend it with compost or other organic materials. Good drainage is crucial to prevent root rot. Avoid areas where water tends to pool after rain. Finally, consider accessibility. You’ll want to be able to easily access your garden for watering, weeding, and harvesting.
2. What are the best tomato varieties for a beginner gardener?
For beginners, determinate tomato varieties are often a good choice. These varieties grow to a certain size and then stop, producing all their fruit at once. This makes them easier to manage than indeterminate varieties, which continue to grow and produce fruit throughout the season. Some popular determinate varieties include Roma, Celebrity, and Better Bush. Cherry tomatoes, like Sweet 100 or Sungold, are also relatively easy to grow and provide a prolific harvest. Indeterminate varieties like Beefsteak or Brandywine offer larger, more flavorful fruits but require more staking and pruning.
3. How often should I water my tomato plants?
Water deeply and regularly, especially during hot, dry weather. Aim to water at the base of the plant to avoid wetting the foliage, which can lead to fungal diseases. A good rule of thumb is to water when the top inch of soil feels dry to the touch. The frequency of watering will depend on the weather, soil type, and size of your plants. Mulching around your tomato plants can help retain moisture in the soil and reduce the need for frequent watering.
4. What kind of fertilizer should I use for my tomato plants?
Tomatoes are heavy feeders and benefit from regular fertilization. Use a balanced fertilizer with a ratio of N-P-K (nitrogen, phosphorus, potassium) that is appropriate for tomatoes. Look for fertilizers specifically formulated for tomatoes, or use a general-purpose fertilizer with a slightly higher phosphorus content to promote fruit development. Organic fertilizers, such as compost tea or fish emulsion, are also excellent choices. Avoid over-fertilizing, as this can lead to excessive foliage growth at the expense of fruit production.
5. How do I prevent pests and diseases in my tomato garden?
Prevention is key to managing pests and diseases in your tomato garden. Start by choosing disease-resistant tomato varieties. Practice good garden hygiene by removing any diseased leaves or debris from around your plants. Rotate your crops each year to prevent soilborne diseases from building up. Use organic pest control methods, such as neem oil or insecticidal soap, to control common pests like aphids, whiteflies, and tomato hornworms. Consider using row covers to protect your plants from pests early in the season. Proper spacing between plants will also improve air circulation and reduce the risk of fungal diseases.
6. How do I stake or cage my tomato plants?
Staking or caging your tomato plants is essential to provide support and prevent the fruit from touching the ground. Indeterminate tomato varieties, in particular, require strong support. You can use wooden stakes, metal cages, or even homemade structures made from recycled materials. Insert the stakes or cages into the ground when you plant your seedlings to avoid damaging the roots later on. Tie the tomato stems to the stakes with soft twine or fabric strips. Make sure the support structure is sturdy enough to withstand the weight of the mature plants and their fruit.
7. When is the best time to harvest my tomatoes?
Tomatoes are ready to harvest when they are fully colored and slightly soft to the touch. The exact color will depend on the variety. Gently twist the tomato from the vine, leaving a small piece of the stem attached. Avoid pulling the tomato, as this can damage the plant. The best time to harvest tomatoes is in the morning, after the dew has dried. Store your harvested tomatoes at room temperature, away from direct sunlight. Avoid refrigerating tomatoes, as this can affect their flavor and texture.
8. Can I grow tomatoes in containers?
Yes, you can absolutely grow tomatoes in containers! Choose large containers (at least 15-20 gallons) with good drainage. Use a high-quality potting mix that is specifically formulated for containers. Dwarf or bush tomato varieties are particularly well-suited for container gardening. Provide adequate sunlight, water, and fertilizer. Container-grown tomatoes may require more frequent watering and fertilization than those grown in the ground.
9. What do I do if my tomato plants have yellow leaves?
Yellow leaves on tomato plants can be a sign of several problems, including nutrient deficiencies, overwatering, underwatering, or disease. Check the soil moisture to determine if you are watering correctly. If the soil is consistently wet, reduce the frequency of watering. If the soil is dry, water more deeply. Fertilize your plants with a balanced fertilizer to address any nutrient deficiencies. Inspect the leaves for signs of pests or diseases. If you suspect a disease, remove the affected leaves and treat the plant with an appropriate fungicide.
10. How can I improve the flavor of my homegrown tomatoes?
Several factors can influence the flavor of your homegrown tomatoes. Choose tomato varieties that are known for their flavor. Provide adequate sunlight and water. Avoid over-fertilizing, as this can dilute the flavor. Allow the tomatoes to ripen fully on the vine before harvesting. Consider adding Epsom salts to the soil to improve the flavor and sweetness of your tomatoes. Finally, remember that the flavor of tomatoes can vary depending on the weather and growing conditions.

Leave a Comment