

Clean Wooden Cutting Board Safely: Are you tired of your beautiful wooden cutting board looking less than its best? Do lingering odors and stubborn stains have you wondering if it’s even safe to use? I totally get it! A well-loved wooden cutting board is a kitchen essential, but keeping it clean and sanitized can feel like a daunting task. But don’t worry, I’m here to share some simple, effective, and all-natural DIY tricks that will have your wooden cutting board sparkling and ready for your next culinary adventure.
Wooden cutting boards have been a kitchen staple for centuries, dating back to ancient civilizations. Their natural beauty and durability have made them a favorite among cooks worldwide. However, unlike their plastic counterparts, wooden cutting boards require a little extra TLC to maintain their hygiene and longevity.
In today’s world, where we’re all increasingly conscious of the products we use and the impact they have on our health and the environment, knowing how to clean wooden cutting board safely is more important than ever. Many commercial cleaning products contain harsh chemicals that can leach into your food and harm the environment. That’s why I’m so excited to share these DIY solutions that use simple, readily available ingredients like lemon, salt, and vinegar. These natural remedies are not only effective at killing bacteria and removing stains, but they’re also gentle on your cutting board and safe for your family. So, let’s dive in and discover the secrets to a sparkling clean and safe wooden cutting board!
DIY: Revive Your Wooden Cutting Board and Keep it Food-Safe!
Hey there, fellow DIY enthusiasts! I’m so excited to share my go-to method for cleaning and maintaining wooden cutting boards. We all know how essential these boards are in the kitchen, but they can also be a breeding ground for bacteria if not properly cared for. Don’t worry, though! With a few simple steps and readily available ingredients, you can keep your wooden cutting board sparkling clean, food-safe, and looking its best for years to come.
Why Wooden Cutting Boards Need Special Care
Wooden cutting boards are fantastic because they’re gentle on your knives and offer a beautiful, natural surface for food preparation. However, unlike plastic boards, wood is porous, meaning it can absorb liquids and harbor bacteria if not properly cleaned and maintained. Regular cleaning is crucial, but so is oiling and sanitizing. This process will not only kill germs but also prevent the wood from drying out and cracking.
What You’ll Need
Before we dive in, let’s gather our supplies. You probably have most of these items already in your kitchen!
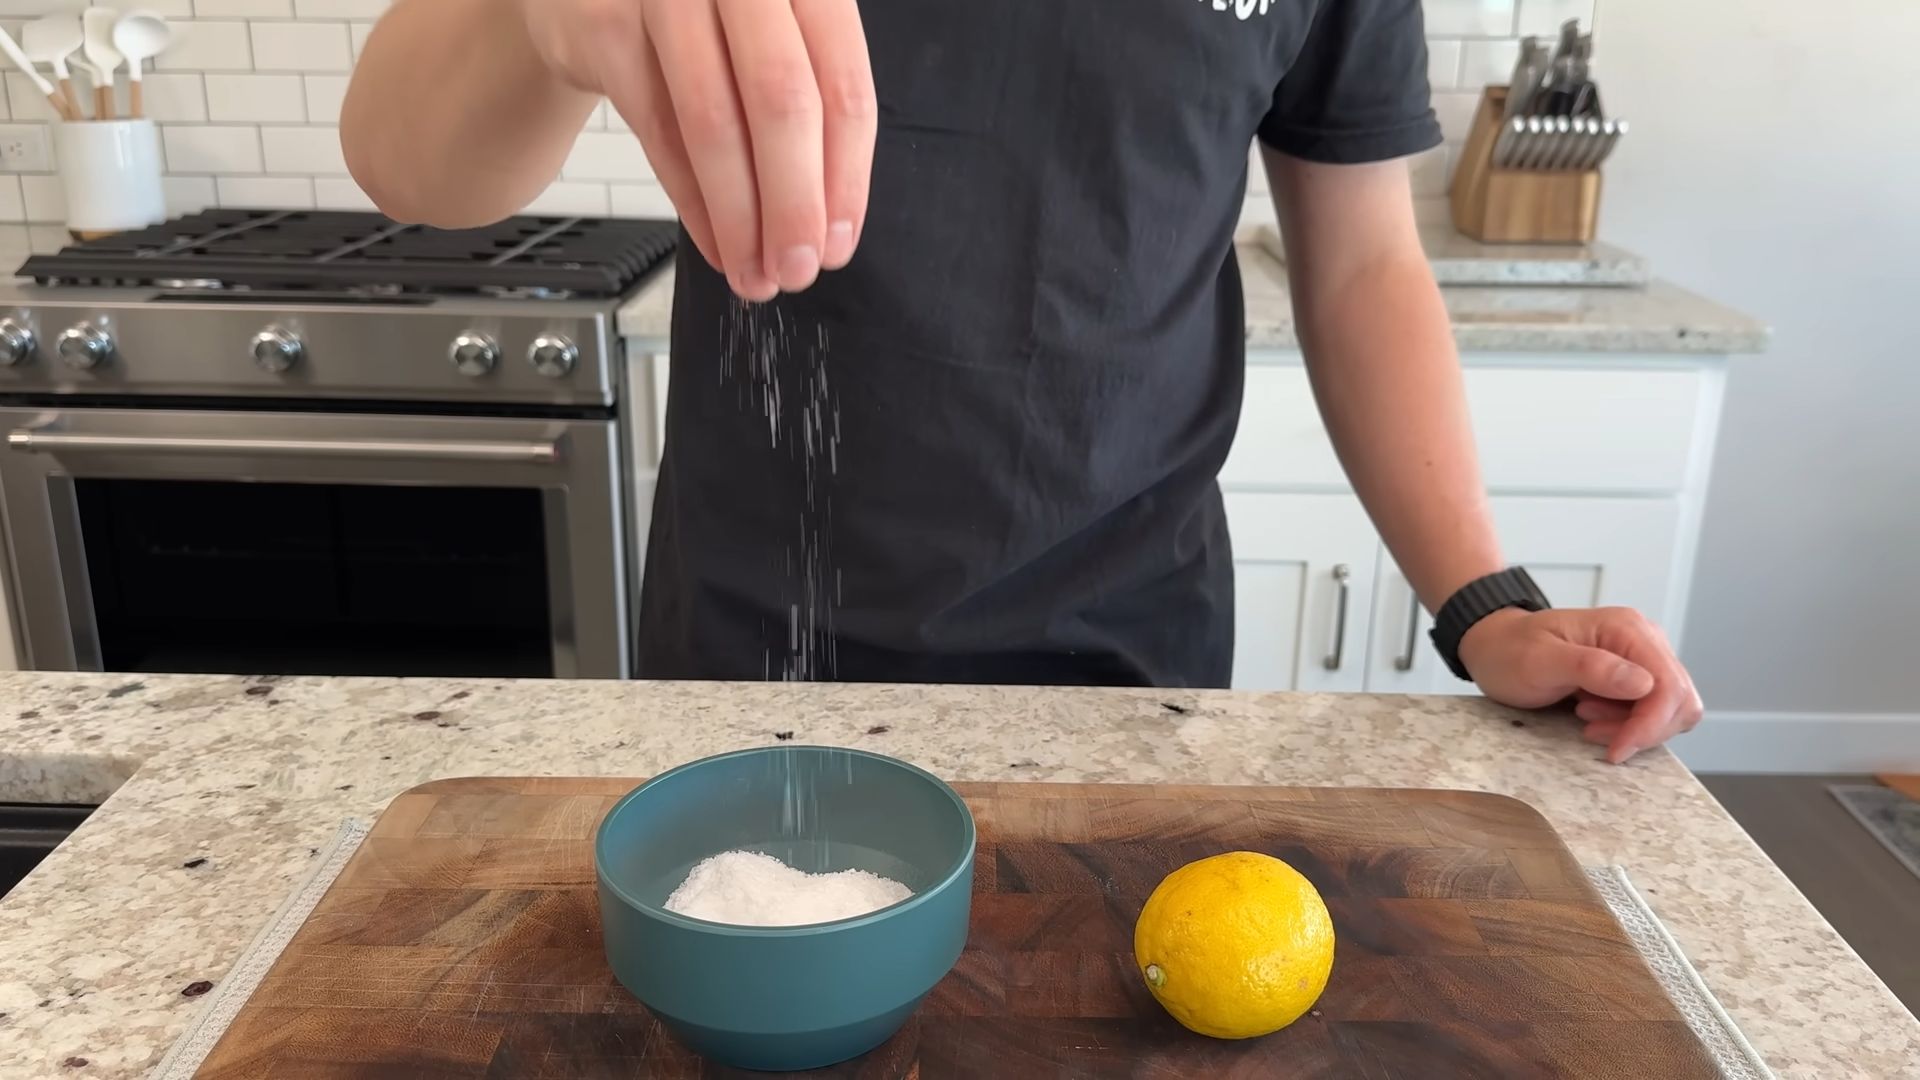
* Coarse Salt: Table salt, sea salt, or kosher salt will work. The coarser the better, as it acts as a gentle abrasive.
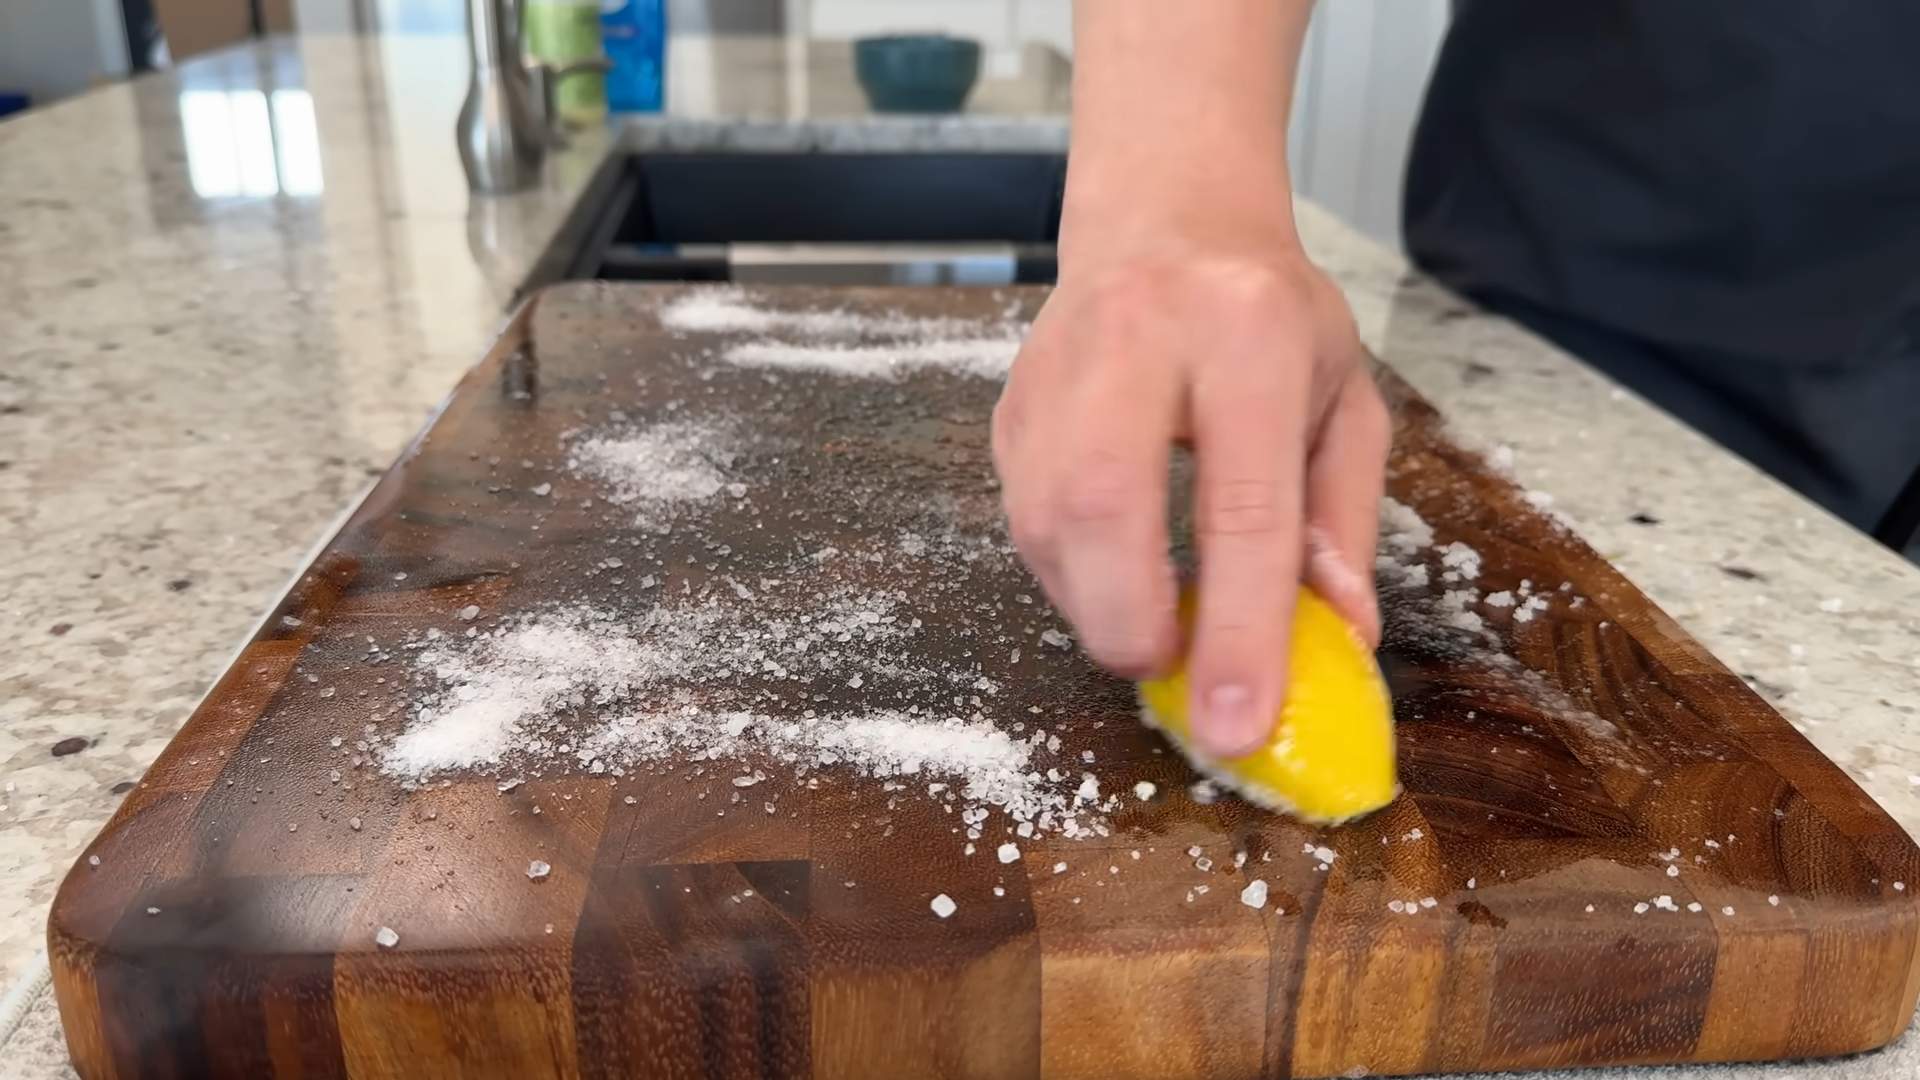
* Lemon: A fresh lemon, cut in half. The acidity of the lemon helps to disinfect and deodorize.
* White Vinegar: A natural disinfectant and degreaser.
* Food-Grade Mineral Oil: This is essential for conditioning the wood and preventing it from drying out. Don’t use vegetable oil or olive oil, as they can go rancid.
* Beeswax (Optional): If you want to create a cutting board conditioner, you’ll need beeswax.
* Double Boiler or Heat-Safe Bowl and Saucepan (Optional): For melting beeswax.
* Clean Rags or Paper Towels: For cleaning, drying, and applying oil.
* Scraper or Spatula: For removing stuck-on food particles.
* Soft Brush (Optional): A soft brush can help scrub away stubborn residue.
Step-by-Step Cleaning and Sanitizing Process
This is where the magic happens! Follow these steps carefully to ensure your wooden cutting board is thoroughly cleaned and sanitized.
1. Remove Loose Food Particles: Before you start cleaning, use a scraper or spatula to remove any loose food particles from the surface of the cutting board. This will make the cleaning process much more effective.
2. Salt Scrub: Sprinkle a generous amount of coarse salt over the entire surface of the cutting board. Don’t be shy! You want a good layer of salt to act as an abrasive.
3. Lemon Power: Take one half of the lemon and use it to scrub the salt into the cutting board. Apply firm pressure and scrub in a circular motion, ensuring you cover every inch of the surface. The lemon juice will help to dissolve grease and grime, while the salt will gently scrub away any stuck-on food.
4. Let it Sit: Once you’ve scrubbed the entire board, let the salt and lemon mixture sit for about 5-10 minutes. This allows the lemon juice to work its disinfecting magic.
5. Rinse Thoroughly: Rinse the cutting board thoroughly with warm water. Make sure to remove all traces of salt and lemon.
6. Vinegar Rinse (Optional): For extra sanitizing power, you can rinse the cutting board with a diluted white vinegar solution. Mix equal parts white vinegar and water in a spray bottle, spray the cutting board, and let it sit for a minute or two before rinsing again with warm water.
7. Dry Completely: This is crucial! Use a clean rag or paper towel to dry the cutting board thoroughly. Make sure to get into all the nooks and crannies. You can also let it air dry, but make sure it’s completely dry before moving on to the next step.
Oiling Your Cutting Board: The Key to Longevity
Once your cutting board is clean and dry, it’s time to oil it. Oiling is essential for preventing the wood from drying out, cracking, and absorbing unwanted odors.
1. Apply Mineral Oil: Pour a generous amount of food-grade mineral oil onto the cutting board.
2. Spread Evenly: Use a clean rag or paper towel to spread the oil evenly over the entire surface of the cutting board, including the edges and bottom.
3. Let it Soak: Allow the oil to soak into the wood for at least a few hours, or even overnight. The longer it soaks, the better. You’ll notice the wood will start to look less dry and more vibrant.
4. Wipe Off Excess Oil: After the oil has soaked in, use a clean rag or paper towel to wipe off any excess oil. You don’t want the surface to be sticky or greasy.
5. Repeat as Needed: Depending on how dry your cutting board is, you may need to repeat the oiling process a few times. I usually oil my cutting board once a month, or more often if it starts to look dry.
Creating Your Own Cutting Board Conditioner (Optional)
For an extra layer of protection and a beautiful finish, you can create your own cutting board conditioner using beeswax and mineral oil. This conditioner will help to seal the wood and protect it from moisture.
1. Melt the Beeswax: In a double boiler or heat-safe bowl set over a saucepan of simmering water, melt the beeswax. Use a ratio of approximately 1 part beeswax to 4 parts mineral oil.
2. Add Mineral Oil: Once the beeswax is completely melted, slowly add the mineral oil, stirring constantly until the mixture is smooth and well combined.
3. Let it Cool: Remove the mixture from the heat and let it cool completely. As it cools, it will solidify into a balm-like consistency.
4. Apply the Conditioner: Use a clean rag or paper towel to apply a thin layer of the conditioner to the cutting board.
5. Let it Sit: Allow the conditioner to sit on the cutting board for about 30 minutes.
6. Buff the Surface: Use a clean rag to buff the surface of the cutting board, removing any excess conditioner and leaving a smooth, protective finish.
Tips for Maintaining Your Wooden Cutting Board
Here are a few extra tips to help you keep your wooden cutting board in tip-top shape:
* Wash After Each Use: Always wash your cutting board with warm, soapy water after each use.
* Avoid Dishwashers: Never put your wooden cutting board in the dishwasher. The high heat and harsh detergents can damage the wood.
* Dry Thoroughly: Always dry your cutting board thoroughly after washing.
* Store Properly: Store your cutting board on its side to allow air to circulate and prevent moisture buildup.
* Address Scratches: Minor scratches can be sanded down with fine-grit sandpaper. Be sure to re-oil the board after sanding.
* Sanitize Regularly: Sanitize your cutting board regularly using the lemon and salt method or a diluted vinegar solution.
* Don’t Cut Raw Meat and Vegetables on the Same Board: To prevent cross-contamination, use separate cutting boards for raw meat and vegetables. If you only have one board, be sure to thoroughly clean and sanitize it after cutting raw meat.
* Consider a Dedicated Board for Strong Smells: Garlic, onions, and other strong-smelling foods can leave lingering odors on your cutting board. Consider using a dedicated board for these types of ingredients.
* Regular Oiling is Key: Don’t underestimate the importance of regular oiling. It’s the best way to keep your wooden cutting board looking and performing its best.
Troubleshooting
* My cutting board smells bad: This usually indicates bacteria growth. Follow the cleaning and sanitizing steps outlined above, paying special attention to the lemon and salt scrub. You can also try using a baking soda paste to absorb odors.
* My cutting board is cracked: Cracking is a sign of dryness. Make sure you’re oiling your cutting board regularly. If the cracks are severe, you may need to replace the board.
* My cutting board is warped: Warping can occur if the board is exposed to excessive moisture or heat. Try placing the board on a flat surface with weights on top to help it flatten out. Oiling the board can also help to restore its shape.
* My cutting board is stained: Stains can be difficult to remove, but you can try using a baking soda paste or a diluted bleach solution (use with caution and rinse thoroughly).
Final Thoughts
Cleaning and maintaining your wooden cutting board might seem like a chore, but it’s an essential part of keeping your kitchen safe and your tools in good condition. By following these simple steps, you can ensure that your wooden cutting board remains a beautiful and functional part of your kitchen for years to come. Happy cleaning!
Conclusion
So, there you have it! Mastering the art of safely cleaning your wooden cutting board doesn’t require harsh chemicals or expensive gadgets. This simple, effective DIY trick, using ingredients you likely already have in your pantry, is a game-changer for maintaining a hygienic and beautiful kitchen. We’ve shown you how to banish bacteria, eliminate lingering odors, and keep your wooden cutting board looking its best, all without compromising its integrity or your family’s health.
Why is this DIY method a must-try? Because it’s not just about cleaning; it’s about preserving. It’s about extending the life of your cherished wooden cutting board, a kitchen essential that likely holds memories of countless meals prepared with love. It’s about creating a safer food preparation environment, free from the potential dangers of chemical residues. And it’s about embracing a more sustainable approach to kitchen care, reducing your reliance on disposable products and harsh cleaning agents.
But don’t stop there! Feel free to experiment and personalize this method to suit your specific needs and preferences. For instance, if you’re dealing with particularly stubborn odors, consider adding a few drops of tea tree oil to your lemon juice and salt mixture for its natural antibacterial and antifungal properties. Or, if you prefer a coarser scrub, swap the fine sea salt for kosher salt. You can also use white vinegar instead of lemon juice, though the lemon provides a more pleasant scent. Remember to always test any new ingredient on a small, inconspicuous area of your cutting board first to ensure it doesn’t cause any discoloration or damage.
Beyond the basic cleaning, consider incorporating regular oiling into your cutting board maintenance routine. A food-grade mineral oil or beeswax blend will help to replenish the natural oils in the wood, preventing it from drying out and cracking. Oiling your cutting board after each deep clean will keep it supple and resistant to moisture, further extending its lifespan.
We’re confident that once you try this DIY trick for cleaning your wooden cutting board, you’ll be amazed by the results. It’s a simple, cost-effective, and environmentally friendly way to keep your kitchen clean and your family safe. So, ditch the harsh chemicals and embrace the power of natural ingredients.
Now, we want to hear from you! Give this DIY method a try and share your experience with us in the comments below. Did you find it effective? Did you make any modifications? What are your favorite tips for caring for your wooden cutting board? Your feedback is invaluable and helps us to create even better content for our community. Let’s work together to keep our kitchens clean, safe, and sustainable, one wooden cutting board at a time. We encourage you to share this simple yet effective method of how to clean wooden cutting board safely with your friends and family so they can benefit from it too.
Frequently Asked Questions (FAQs)
1. How often should I clean my wooden cutting board using this DIY method?
The frequency of cleaning depends on how often you use your cutting board. For daily use, a quick wipe down with warm, soapy water after each use is sufficient. However, for a deeper clean using the lemon and salt method, aim for at least once a week, or more often if you’ve been cutting raw meat, poultry, or fish. If you notice any lingering odors or stains, that’s a clear sign it’s time for a deep clean.
2. Can I use any type of salt for this cleaning method?
While fine sea salt is generally recommended for its gentle abrasive properties, you can use other types of salt as well. Kosher salt, with its larger crystals, provides a more aggressive scrub, which can be helpful for removing stubborn stains. However, be careful not to apply too much pressure, as it could scratch the wood. Table salt is generally not recommended, as it can be too fine and may not provide enough scrubbing power.
3. What if I don’t have lemons? Can I use something else?
Yes, you can substitute lemon juice with white vinegar. Vinegar is a natural disinfectant and deodorizer, making it a suitable alternative. However, lemon juice has a more pleasant scent and may be slightly more effective at removing certain types of stains. If using vinegar, be sure to rinse the cutting board thoroughly with water afterward to remove any lingering vinegar smell.
4. Is it safe to use this method on all types of wooden cutting boards?
This method is generally safe for most types of wooden cutting boards, including those made from hardwoods like maple, walnut, and cherry. However, it’s always a good idea to test a small, inconspicuous area first to ensure that the lemon juice or vinegar doesn’t cause any discoloration or damage. Avoid using this method on cutting boards made from softwoods like pine, as they are more susceptible to scratching and damage.
5. How do I properly dry my wooden cutting board after cleaning?
Proper drying is crucial to prevent warping and cracking. After cleaning, rinse the cutting board thoroughly with warm water and pat it dry with a clean towel. Then, stand the cutting board on its side in a well-ventilated area to allow it to air dry completely. Avoid laying the cutting board flat on a surface, as this can trap moisture and lead to warping.
6. Can I put my wooden cutting board in the dishwasher?
No, never put your wooden cutting board in the dishwasher. The high heat and harsh detergents can cause the wood to warp, crack, and dry out. Dishwashers will strip the natural oils from the wood, shortening its lifespan significantly. Hand washing is always the best option for cleaning wooden cutting boards.
7. How do I oil my wooden cutting board, and how often should I do it?
To oil your wooden cutting board, apply a generous amount of food-grade mineral oil or beeswax blend to the entire surface of the board. Use a clean cloth or paper towel to rub the oil into the wood, working with the grain. Allow the oil to soak in for several hours, or preferably overnight. Then, wipe off any excess oil with a clean cloth. The frequency of oiling depends on how often you use and wash your cutting board. As a general rule, oil your cutting board at least once a month, or more often if it starts to look dry or feels rough to the touch.
8. My wooden cutting board has deep scratches. Can I still clean it using this method?
Yes, you can still clean your wooden cutting board using this method, even if it has deep scratches. However, deep scratches can harbor bacteria, so it’s important to clean them thoroughly. You may need to use a slightly more abrasive scrub and pay extra attention to cleaning the scratches. If the scratches are very deep, you may consider sanding the cutting board to smooth out the surface before cleaning and oiling it.
9. How do I get rid of stubborn odors on my wooden cutting board?
For stubborn odors, try making a paste of baking soda and water and applying it to the affected area. Let the paste sit for several hours, or even overnight, before rinsing it off. You can also try soaking the cutting board in a solution of water and vinegar for a few hours. Another option is to rub the cutting board with a cut onion, which is known for its odor-absorbing properties.
10. What are the best practices for maintaining a wooden cutting board to prevent bacteria growth?
To minimize bacteria growth, always clean your wooden cutting board thoroughly after each use, especially after cutting raw meat, poultry, or fish. Use separate cutting boards for raw and cooked foods to prevent cross-contamination. Avoid leaving food residue on the cutting board for extended periods. Regularly oil your cutting board to prevent it from drying out and cracking, as cracks can harbor bacteria. And finally, consider sanitizing your cutting board periodically with a diluted bleach solution (1 tablespoon of bleach per gallon of water) to kill any remaining bacteria. Rinse thoroughly after sanitizing.

Leave a Comment