

Bright white toilet bowls – the holy grail of bathroom cleanliness, right? We’ve all been there, scrubbing away at stubborn stains, feeling like we’re fighting a losing battle. But what if I told you achieving that sparkling, pristine look was easier than you think, and you probably already have the secret weapon hiding in your cleaning cupboard?
For generations, keeping homes clean has been a symbol of pride and well-being. From ancient civilizations using natural remedies to modern-day cleaning products, the quest for a spotless home is a timeless pursuit. And let’s be honest, a gleaming toilet bowl is a key indicator of overall bathroom hygiene. It’s not just about aesthetics; it’s about creating a healthy and inviting space for ourselves and our families.
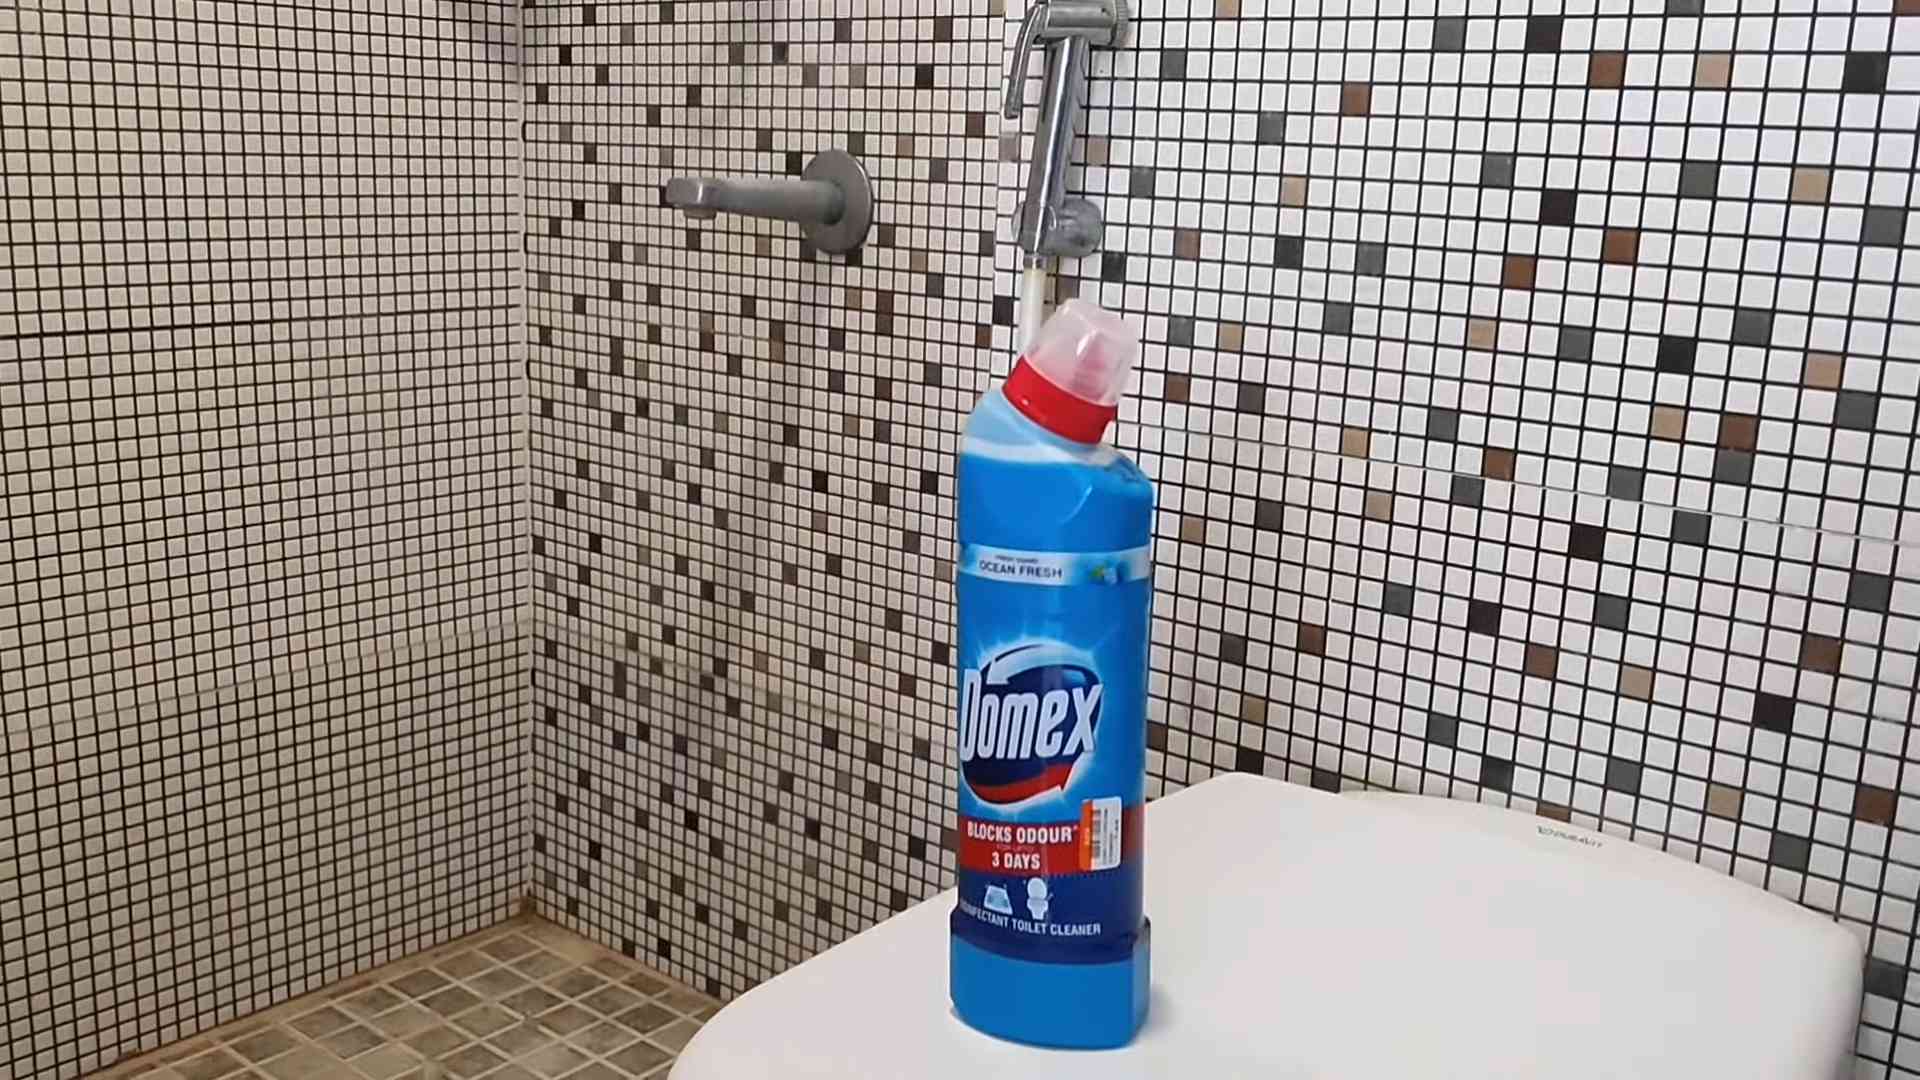
This DIY article is your ultimate guide to transforming your dull, stained toilet into a bright white toilet that you’ll be proud to show off. We’re ditching the harsh chemicals and expensive cleaners in favor of a simple, effective, and budget-friendly solution using Domex. Why Domex, you ask? Well, its powerful bleaching action is renowned for tackling tough stains and killing germs, making it the perfect ally in our quest for a sparkling clean toilet. I’m going to share my tried-and-tested method, so you can say goodbye to endless scrubbing and hello to a toilet bowl that shines!
DIY: Achieving a Sparkling White Toilet with Domex (and a Little Elbow Grease!)
Okay, let’s face it, cleaning the toilet isn’t exactly anyone’s favorite chore. But a sparkling clean toilet bowl is a sign of a happy and healthy home, right? I’m going to walk you through my tried-and-true method for getting your toilet bowl gleaming white using Domex (or your preferred bleach-based cleaner) and some simple tools. This isn’t just about pouring cleaner and flushing; we’re going for deep clean that lasts!
What You’ll Need:
Before we dive in, let’s gather our supplies. Having everything ready will make the process much smoother.
* Domex (or your preferred bleach-based toilet bowl cleaner): This is the star of the show! Make sure you choose a formula designed for toilet bowls.
* Toilet brush: A good, sturdy toilet brush is essential. I recommend one with a rim cleaner attachment for those hard-to-reach spots.
* Rubber gloves: Protect your hands! Bleach can be harsh on the skin.
* Eye protection (optional but recommended): Splashes happen! Safety first.
* Old toothbrush: For scrubbing those stubborn stains and tight corners.
* Pumice stone (optional): For tackling really tough mineral deposits or hard water stains. Use with caution!
* Spray bottle with water: For rinsing and diluting if needed.
* Paper towels or cleaning cloths: For wiping down the exterior of the toilet.
* Toilet bowl cleaner with bleach (alternative): For extra stubborn stains.
* Ventilation: Open a window or turn on the bathroom fan. Bleach fumes can be strong.
Step-by-Step Toilet Cleaning Guide
Alright, let’s get down to business! Follow these steps for a sparkling clean toilet bowl.
1. Prepare the Area: Put on your rubber gloves and eye protection (if using). Open a window or turn on the bathroom fan to ensure good ventilation. Remove any items from around the toilet that might get splashed or damaged.
2. Flush the Toilet: Give the toilet a good flush to remove any loose debris.
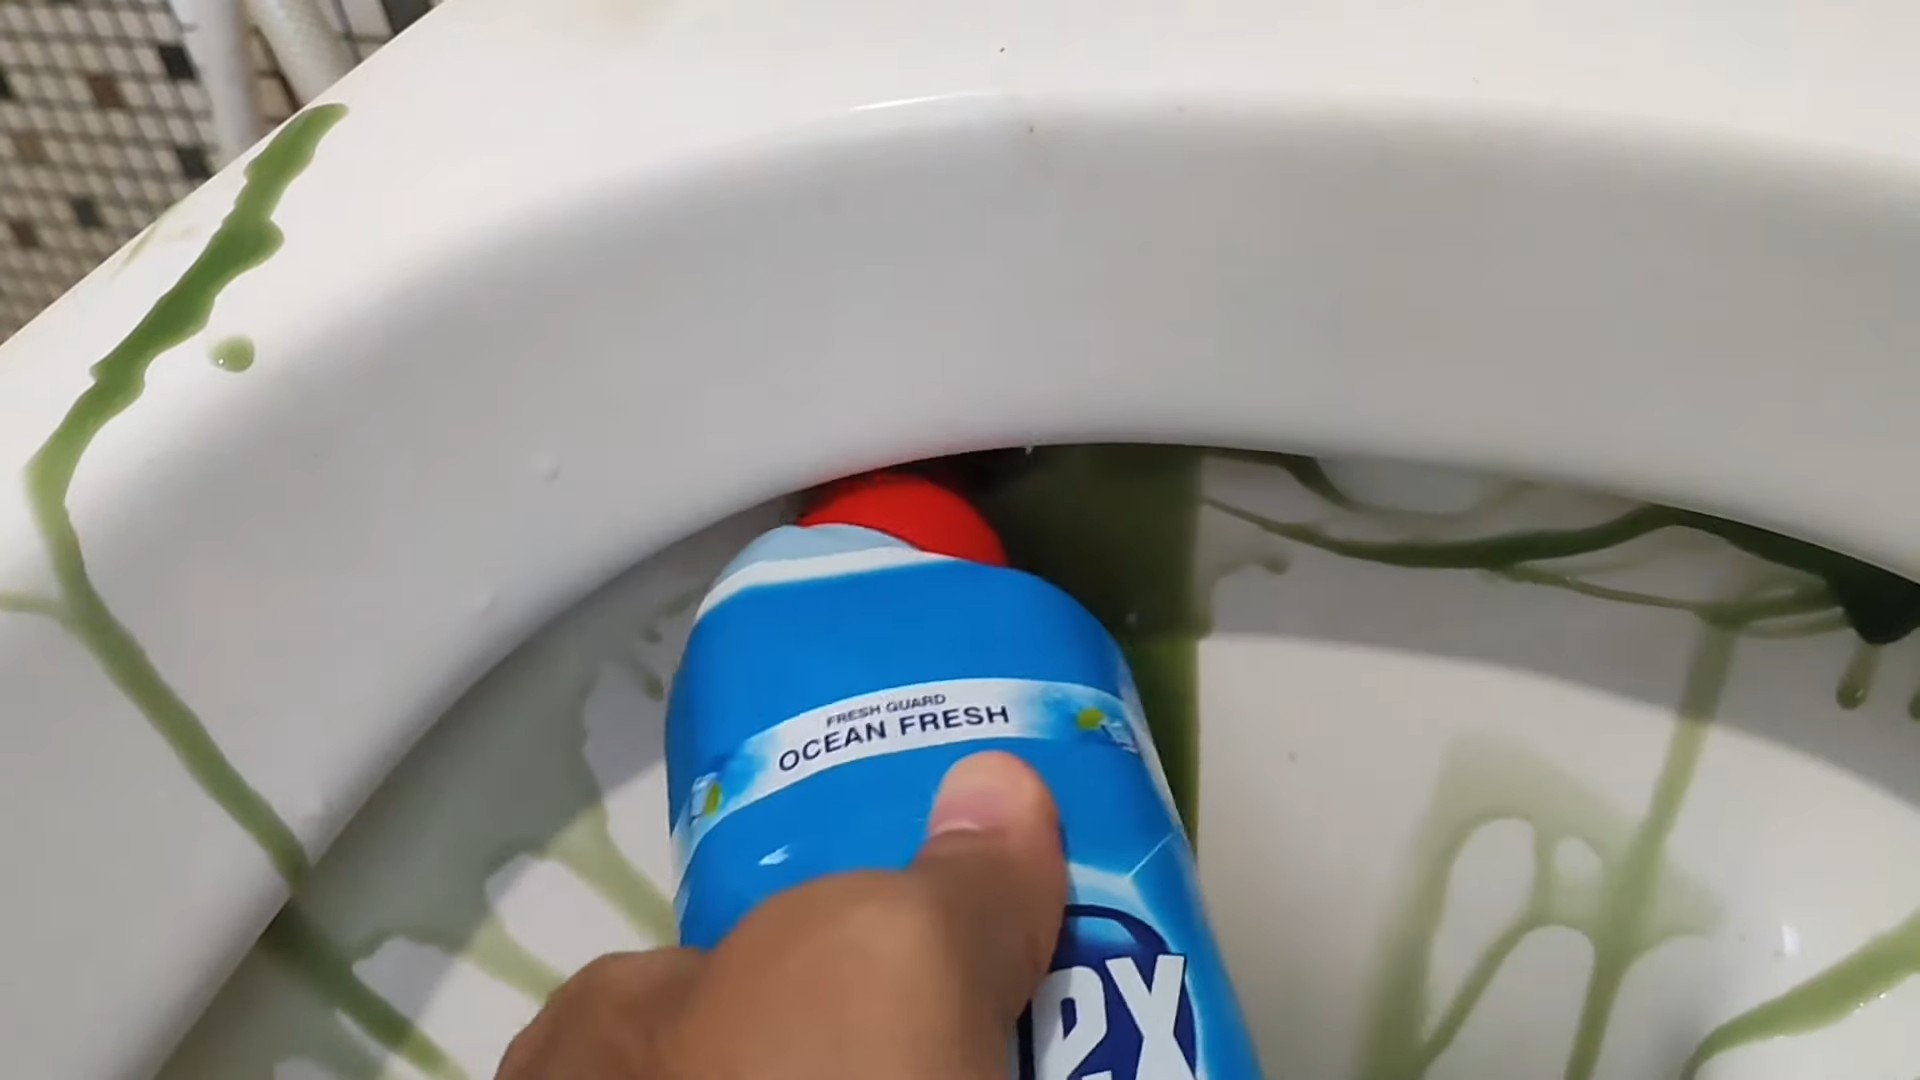
3. Apply Domex (or your chosen cleaner): Carefully squirt Domex under the rim of the toilet bowl, ensuring that it coats the entire surface. Pay special attention to areas where stains tend to accumulate. I usually let it sit for a few minutes to really get to work.
4. Let it Soak (the key to success!): This is crucial! Let the Domex sit in the bowl for at least 15-20 minutes. For heavily stained toilets, you can even let it soak for a few hours or overnight. The longer it sits, the more effectively it will break down stains and kill germs. This soaking time is what separates a quick clean from a deep clean.
5. Scrub the Bowl: After the soaking period, grab your toilet brush and scrub the entire bowl thoroughly. Pay close attention to the areas under the rim, around the water line, and any areas with visible stains. Use the rim cleaner attachment on your brush to get into those hard-to-reach spots.
6. Tackle Stubborn Stains with the Old Toothbrush: For those really stubborn stains or tight corners, grab your old toothbrush. Dip it in the Domex solution in the bowl and scrub vigorously. This is especially helpful for cleaning around the jets under the rim.
7. Pumice Stone Power (Use with Caution!): If you have hard water stains or mineral deposits that just won’t budge, a pumice stone can be your best friend. However, use it with extreme caution! Wet the pumice stone and gently rub it on the stain. Avoid applying too much pressure, as it can scratch the porcelain. Test it in an inconspicuous area first to make sure it doesn’t damage the surface.
8. Flush Again: After scrubbing, flush the toilet to rinse away the Domex and loosened debris.
9. Inspect and Repeat (If Necessary): Take a good look at the bowl. If you see any remaining stains, repeat steps 3-8. Sometimes, a second application and scrubbing are needed for really tough stains.
10. Clean the Exterior: Now that the inside is sparkling, let’s clean the outside of the toilet. Spray a cleaning solution onto a paper towel or cleaning cloth and wipe down the entire exterior, including the tank, lid, seat, and base. Pay attention to areas that are frequently touched, like the flush handle and seat.
11. Dry the Toilet: Use a clean, dry paper towel or cloth to dry the exterior of the toilet. This will prevent water spots and leave it looking extra shiny.
12. Admire Your Work! Step back and admire your sparkling clean toilet bowl! You did it!
Dealing with Specific Stain Types
Sometimes, you’ll encounter specific types of stains that require a little extra attention. Here’s how I handle some common toilet bowl stain challenges:
* Hard Water Stains (Those Pesky Rings!): Hard water stains are often caused by mineral deposits. As mentioned earlier, a pumice stone can be effective, but use it carefully. You can also try a toilet bowl cleaner specifically designed for hard water stains. These cleaners often contain acids that help dissolve the mineral deposits.
* Rust Stains (Orange or Brown Discoloration): Rust stains can be caused by iron in the water. Try using a rust stain remover specifically designed for bathrooms. You can also try a paste made from baking soda and vinegar. Apply the paste to the stain, let it sit for a few minutes, and then scrub with a brush.
* Mold and Mildew (Black or Green Spots): Mold and mildew thrive in damp environments. Make sure your bathroom is well-ventilated. For mold and mildew stains, use a bleach-based cleaner or a mold and mildew remover. Spray the cleaner onto the affected area, let it sit for a few minutes, and then scrub with a brush.
Maintaining a Clean Toilet Bowl
The key to keeping your toilet bowl sparkling white is regular maintenance. Here are a few tips to help you keep it clean between deep cleans:
* Flush After Every Use: This seems obvious, but it’s important to flush after every use to prevent stains from setting in.
* Use a Toilet Bowl Cleaner Regularly: Squirt a small amount of toilet bowl cleaner into the bowl a few times a week to help prevent stains from forming.
* Consider a Toilet Bowl Cleaning Tablet: These tablets release a small amount of cleaner into the bowl with each flush, helping to keep it clean and fresh. However, be sure to choose a tablet that is safe for your plumbing system.
* Clean Spills Immediately: If you spill anything in the toilet bowl, clean it up immediately to prevent stains from setting in.
* Ventilate Your Bathroom: Good ventilation helps to prevent mold and mildew growth.
Safety First!
Working with bleach can be dangerous if you’re not careful. Here are a few safety precautions to keep in mind:
* Always wear rubber gloves and eye protection.
* Work in a well-ventilated area.
* Never mix bleach with other cleaning products, especially ammonia. This can create toxic fumes.
* Keep bleach out of reach of children and pets.
* If you get bleach on your skin or in your eyes, rinse immediately with plenty of water.
By following these steps and tips, you can achieve a sparkling white toilet bowl that you’ll be proud of. Remember, consistency is key! Regular cleaning and maintenance will help prevent stains from building up and keep your toilet bowl looking its best. Happy cleaning!
Conclusion
So, there you have it! Achieving a bright white toilet without harsh chemicals is not only possible, it’s surprisingly simple. This DIY cleaning trick, focusing on natural ingredients and a little elbow grease, offers a fantastic alternative to commercial cleaners laden with potentially harmful substances. We’ve shown you how to leverage the power of readily available household items to tackle stains, eliminate odors, and restore your toilet bowl to its gleaming best.
Why is this DIY method a must-try? Firstly, it’s cost-effective. You’re likely to have most, if not all, of the ingredients already in your pantry or cleaning cupboard. Secondly, it’s environmentally friendly. By reducing your reliance on harsh chemicals, you’re contributing to a healthier planet. Thirdly, it’s gentle on your plumbing. Harsh chemicals can corrode pipes over time, leading to costly repairs. This DIY approach is much kinder to your system. Finally, and perhaps most importantly, it works! You can achieve a truly bright white toilet using this method.
But don’t stop there! Feel free to experiment with variations to suit your specific needs and preferences. For stubborn stains, consider adding a paste of baking soda and hydrogen peroxide directly to the affected area and letting it sit for an extended period before scrubbing. If you prefer a scented clean, a few drops of your favorite essential oil (tea tree, lavender, or lemon are excellent choices) can be added to the cleaning mixture. Remember to always test any new cleaning solution in an inconspicuous area first.
This DIY toilet cleaning method is a game-changer for anyone seeking a natural, effective, and affordable way to maintain a sparkling clean bathroom. It’s time to ditch the harsh chemicals and embrace the power of DIY. We are confident that you will be amazed by the results.
We wholeheartedly encourage you to try this DIY trick for achieving a bright white toilet. Once you’ve experienced the satisfaction of a sparkling clean toilet bowl without the use of harsh chemicals, we’d love to hear about it! Share your experiences, tips, and variations in the comments below. Let’s build a community of eco-conscious cleaners who are passionate about achieving a bright white toilet the natural way! Your insights could help others discover the benefits of this simple yet effective method. Let us know what worked best for you, any challenges you encountered, and any modifications you made to the recipe. Together, we can revolutionize the way we clean our bathrooms, one toilet bowl at a time.
Frequently Asked Questions (FAQs)
Q: Is this DIY method safe for all types of toilets?
A: Generally, yes. The ingredients used in this DIY method – baking soda, vinegar, and mild dish soap – are considered safe for most toilet types, including porcelain and vitreous china. However, if you have a toilet made of a more delicate or unusual material, it’s always best to test the cleaning solution in an inconspicuous area first to ensure it doesn’t cause any damage or discoloration. For example, antique or vintage toilets might require extra caution.
Q: How often should I use this DIY cleaning method?
A: The frequency of cleaning depends on your household’s usage and personal preferences. For regular maintenance, cleaning your toilet with this DIY method once or twice a week should be sufficient to keep it clean and prevent the buildup of stains and odors. If you notice stains or buildup more frequently, you may need to clean it more often. Consider incorporating this DIY cleaning routine into your regular bathroom cleaning schedule.
Q: What if I have hard water stains in my toilet bowl?
A: Hard water stains can be particularly stubborn. For hard water stains, vinegar is your best friend. Try soaking a vinegar-soaked cloth or paper towels directly on the stains for several hours, or even overnight. The acidity of the vinegar will help to dissolve the mineral deposits. You can also try pouring a cup or two of vinegar directly into the toilet bowl and letting it sit for several hours before scrubbing. For extremely stubborn stains, you might need to use a pumice stone specifically designed for cleaning toilets, but be very careful not to scratch the porcelain.
Q: Can I use bleach instead of the ingredients listed in the recipe?
A: While bleach is a powerful disinfectant, we strongly discourage using it in conjunction with other cleaning agents, especially vinegar, as it can create harmful and potentially toxic fumes. This DIY method is designed to be a safe and natural alternative to harsh chemicals like bleach. Bleach can also be corrosive and damaging to your plumbing over time. If you’re concerned about disinfecting, consider using hydrogen peroxide, which is a safer and more environmentally friendly option.
Q: What kind of dish soap should I use?
A: A mild, clear dish soap is recommended. Avoid using dish soaps that contain harsh chemicals or abrasive ingredients, as these could potentially damage your toilet bowl. A simple, unscented dish soap is usually the best choice.
Q: How do I clean the toilet tank using this DIY method?
A: While this recipe primarily focuses on cleaning the toilet bowl, you can also use a diluted version of the cleaning solution to clean the toilet tank. Turn off the water supply to the toilet, flush the toilet to empty the tank, and then pour in a mixture of vinegar and water (about a 1:1 ratio). Let it sit for several hours or overnight, then scrub the tank with a brush and flush the toilet several times to rinse. This will help to remove mineral deposits and buildup in the tank.
Q: Is this DIY method septic-safe?
A: Yes, the ingredients used in this DIY method – baking soda, vinegar, and mild dish soap – are generally considered safe for septic systems. Unlike harsh chemicals like bleach, these ingredients won’t disrupt the balance of bacteria in your septic tank. However, it’s always a good idea to use these cleaning agents sparingly and avoid flushing large quantities of them down the toilet at once.
Q: What if I don’t have baking soda? Can I use something else?
A: Baking soda is a key ingredient in this DIY method due to its mild abrasive and deodorizing properties. If you don’t have baking soda on hand, you could try using borax as a substitute, although it’s slightly stronger and should be used with caution. However, baking soda is generally the preferred option for its gentler cleaning action.
Q: How do I prevent stains from returning?
A: To prevent stains from returning, it’s important to maintain a regular cleaning schedule. Cleaning your toilet bowl at least once a week with this DIY method will help to prevent the buildup of stains and odors. You can also try using a toilet bowl cleaner tablet that contains natural ingredients to help keep your toilet bowl clean between cleanings. Additionally, addressing any underlying issues that may be contributing to staining, such as hard water, can help to prevent stains from recurring.
Q: My toilet bowl has a ring around the water line that I can’t seem to remove. What can I do?
A: That ring is often caused by mineral deposits from hard water. For this stubborn ring, try making a paste of baking soda and vinegar. Apply the paste directly to the ring and let it sit for at least 30 minutes, or even longer for tougher stains. Then, scrub vigorously with a toilet brush. If the ring persists, you may need to use a pumice stone specifically designed for cleaning toilets. Wet the pumice stone thoroughly before using it to avoid scratching the porcelain. Be patient and persistent, and you should be able to remove the ring over time.
Leave a Comment