

Bottle garden cabbage: Sounds intriguing, right? I’m so excited to share this incredibly fun and surprisingly effective DIY project with you! Forget those sprawling gardens that require acres of land and hours of back-breaking labor. We’re going miniature, sustainable, and utterly charming.
The concept of container gardening, in general, has roots stretching back centuries. Think of the Hanging Gardens of Babylon, one of the Seven Wonders of the Ancient World! While we’re not quite aiming for that level of grandeur, the spirit of bringing nature into confined spaces remains the same. And the bottle garden, a more modern adaptation, takes this idea to a whole new level of resourcefulness.
Why should you try this bottle garden cabbage trick? Well, for starters, it’s perfect for anyone with limited space – apartment dwellers, balcony gardeners, or even those who simply want a unique and eye-catching addition to their kitchen windowsill. But beyond the aesthetic appeal, growing cabbage in a bottle offers several practical advantages. It’s a fantastic way to recycle plastic bottles, reducing waste and giving them a new lease on life. Plus, it allows for better control over soil conditions and pest management, leading to healthier and more productive plants. I think you’ll find it’s a rewarding experience from start to finish!
DIY Bottle Garden for Cabbage: A Fun and Sustainable Project
Hey there, fellow gardening enthusiasts! Ever thought about growing your own cabbage in a recycled plastic bottle? It’s a fantastic way to reuse materials, save space, and enjoy fresh, homegrown veggies. I’m going to walk you through the entire process, step-by-step, so you can create your own thriving bottle garden for cabbage. Let’s get started!
Materials You’ll Need
Before we dive in, let’s gather all the necessary supplies. This will make the whole process smoother and more enjoyable.
* Large Plastic Bottle: A 2-liter soda bottle or a similar size works perfectly. Make sure it’s clean and free of any sticky residue.
* Cabbage Seeds or Seedlings: You can start from seeds or purchase small cabbage seedlings from your local nursery. I personally prefer seedlings for a quicker start.
* Potting Soil: Use a good quality potting mix that’s well-draining. This is crucial for healthy cabbage growth.
* Scissors or Utility Knife: For cutting the plastic bottle. Be careful!
* Drill or Nail: To create drainage holes.
* Watering Can or Spray Bottle: For watering your cabbage.
* Optional: Small pebbles or gravel for drainage.
* Optional: Twine or rope for hanging the bottle garden.
* Optional: Gloves to keep your hands clean.
Preparing the Bottle
This is where we transform the humble plastic bottle into a cozy home for our cabbage.
1. Clean the Bottle: Thoroughly wash the plastic bottle with soap and water. Rinse it well to remove any soap residue. This is important to prevent any chemicals from harming your cabbage.
2. Cut the Bottle: There are a couple of ways to cut the bottle, depending on how you want to set up your garden.
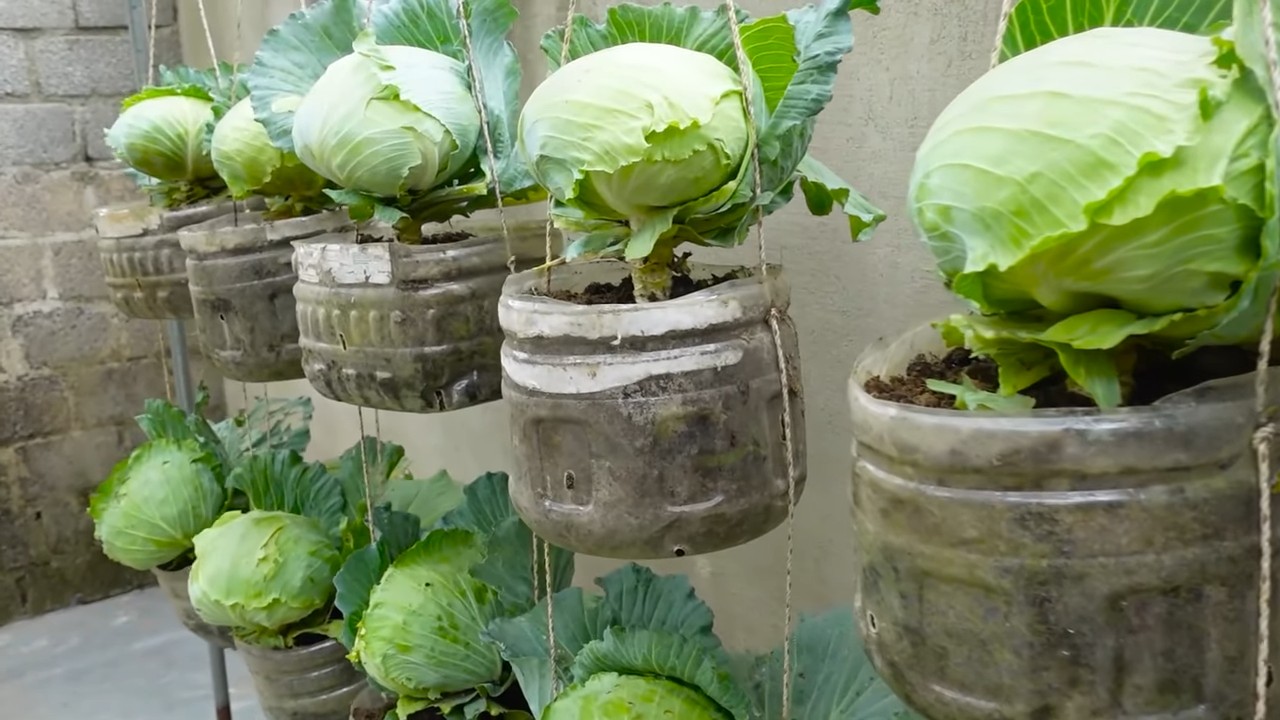
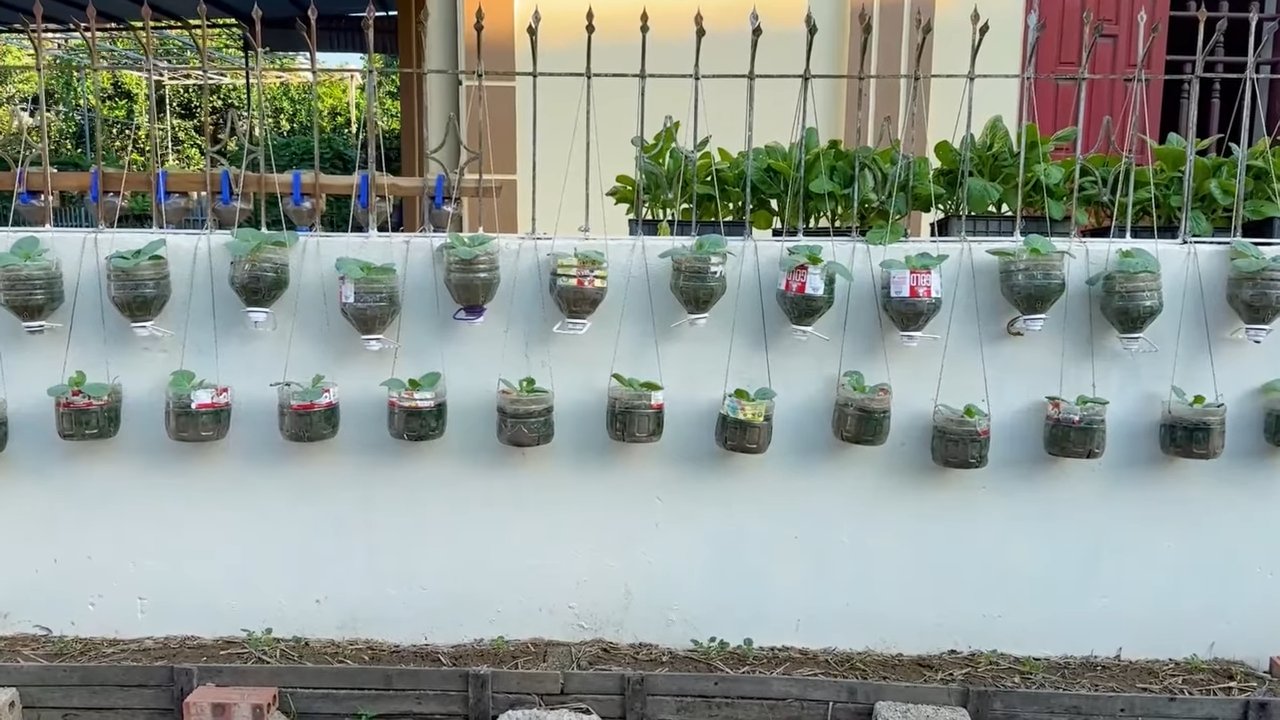
* Option 1: Horizontal Cut (Hanging Garden): Cut the bottle horizontally, about two-thirds of the way up from the bottom. This creates a larger opening for planting and allows you to hang the bottle.
* Option 2: Vertical Cut (Standing Garden): Cut the bottle vertically, almost all the way through, leaving a small hinge at the bottom. This creates a clamshell-like opening. This is good if you want to keep the bottle standing.
I usually go with the horizontal cut for a hanging garden because it looks really cool!
3. Create Drainage Holes: Using a drill or nail, carefully create several drainage holes in the bottom of the bottle. These holes are essential to prevent waterlogging, which can rot the roots of your cabbage. I usually make about 5-6 holes.
4. Smooth the Edges (Optional): If the cut edges of the bottle are sharp, you can smooth them down with sandpaper or cover them with tape to prevent any accidental cuts.
Planting Your Cabbage
Now for the fun part – planting your cabbage!
1. Add Drainage Layer (Optional): If you’re using pebbles or gravel, place a layer of them at the bottom of the bottle. This will further improve drainage and prevent the soil from clogging the drainage holes.
2. Fill with Potting Soil: Fill the bottle with potting soil, leaving about an inch or two of space at the top. Gently pat down the soil to remove any air pockets.
3. Plant the Seeds or Seedlings:
* From Seeds: Sow the cabbage seeds according to the instructions on the seed packet. Usually, this involves making small holes in the soil, placing a few seeds in each hole, and covering them with a thin layer of soil.
* From Seedlings: Carefully remove the cabbage seedling from its container. Gently loosen the roots and place the seedling in the center of the bottle. Fill in around the seedling with potting soil, making sure the top of the root ball is level with the soil surface.
I find that seedlings give me a head start, so I usually opt for those.
4. Water Thoroughly: Water the soil thoroughly until water drains out of the drainage holes. This will help settle the soil and provide the cabbage with the moisture it needs to get started.
Caring for Your Cabbage
Caring for your cabbage is crucial for its growth and development. Here’s what you need to do:
1. Sunlight: Cabbage needs at least 6 hours of sunlight per day. Place your bottle garden in a sunny location, such as a windowsill, balcony, or patio. If you don’t have enough natural sunlight, you can supplement with a grow light.
2. Watering: Water your cabbage regularly, especially during hot and dry weather. The soil should be consistently moist, but not waterlogged. Check the soil moisture by sticking your finger into the soil. If the top inch feels dry, it’s time to water.
3. Fertilizing: Cabbage is a heavy feeder, so it needs regular fertilization. Use a balanced liquid fertilizer, diluted according to the instructions on the label. Fertilize every 2-3 weeks.
4. Pest Control: Keep an eye out for pests, such as aphids, cabbage worms, and slugs. If you notice any pests, you can remove them by hand or use an organic insecticide. I prefer using neem oil, which is a natural and effective pest control solution.
5. Support (Optional): As your cabbage grows, it may need some support to prevent it from falling over. You can use a small stake or trellis to support the plant.
6. Rotation: Rotate the bottle garden regularly to ensure that all sides of the cabbage receive equal sunlight. This will promote even growth.
Hanging Your Bottle Garden (If Applicable)
If you opted for the horizontal cut, you can hang your bottle garden.
1. Drill Holes for Hanging: Drill two small holes on opposite sides of the bottle, near the top.
2. Thread Twine or Rope: Thread twine or rope through the holes and tie a knot to secure it.
3. Hang Your Garden: Hang your bottle garden in a sunny location. Make sure the hanging structure is strong enough to support the weight of the bottle, soil, and cabbage.
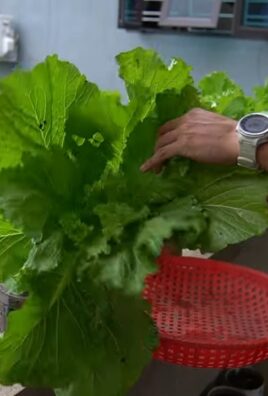
Harvesting Your Cabbage
The moment you’ve been waiting for!
1. Check for Maturity: Cabbage is usually ready to harvest when the head is firm and compact. The size of the head will vary depending on the variety of cabbage you’re growing.
2. Harvesting: Use a sharp knife to cut the cabbage head from the stem. Leave a few outer leaves on the stem, as these can continue to produce small side shoots.
3. Enjoy Your Harvest: Enjoy your fresh, homegrown cabbage in salads, soups, stews, or any other dish you like.
Troubleshooting
Even with the best care, you might encounter some problems. Here are a few common issues and how to address them:
* Yellowing Leaves: This could be a sign of overwatering, underwatering, or nutrient deficiency. Adjust your watering schedule and fertilize regularly.
* Slow Growth: This could be due to insufficient sunlight, poor soil, or pest infestation. Move your bottle garden to a sunnier location, use a good quality potting mix, and check for pests.
* Pest Infestation: Treat the infestation with an organic insecticide, such as neem oil.
* Root Rot: This is caused by overwatering. Make sure your bottle garden has good drainage and avoid overwatering.
Tips for Success
Here are a few extra tips to help you succeed with your bottle garden:
* Choose the Right Cabbage Variety: Some cabbage varieties are better suited for container gardening than others. Look for compact varieties that don’t require a lot of space.
* Use High-Quality Potting Soil: Don’t skimp on the potting soil. A good quality potting mix will provide your cabbage with the nutrients it needs to thrive.
* Don’t Overcrowd: If you’re planting multiple cabbage plants in the same bottle, make sure they have enough space to grow. Overcrowding can lead to stunted growth and disease.
* Monitor Regularly: Check your bottle garden regularly for signs of pests, diseases, or nutrient deficiencies. The sooner you catch a problem, the easier it will be to fix.
* Have Fun! Gardening should be enjoyable. Don’t be afraid to experiment and try new things.
Why This Works: The Science Behind the Bottle Garden
You might be wondering, “Why does this actually work?” Well, let’s break down the science a bit.
* Recycling and Sustainability: First and foremost, you’re giving a plastic bottle a new life, reducing waste and promoting sustainability. That’s a win for the environment!
* Controlled Environment: The bottle acts as a mini-greenhouse, providing a slightly warmer and more humid environment than the surrounding air. This can help
Conclusion
So, there you have it! Transforming a simple plastic bottle into a thriving mini-garden for your cabbage is not just a fun project; it’s a sustainable, space-saving, and incredibly rewarding way to grow your own fresh produce. We’ve walked you through the steps, highlighting the ease and accessibility of this DIY trick. But why is this a must-try?
Firstly, it’s about reclaiming and repurposing. In a world grappling with plastic waste, finding creative ways to reuse these materials is crucial. This bottle garden project gives discarded plastic a new lease on life, turning potential landfill fodder into a vibrant ecosystem. Secondly, it democratizes gardening. You don’t need acres of land or expensive equipment to enjoy the satisfaction of growing your own food. This method is perfect for apartment dwellers, urban gardeners, or anyone with limited space. Imagine the joy of harvesting fresh, crisp cabbage right from your windowsill!
Beyond the practical benefits, this project is also incredibly educational. It’s a fantastic way to teach children about plant life cycles, sustainability, and the importance of reducing waste. They can actively participate in the process, from planting the seeds to watering and observing the growth. It’s a hands-on learning experience that fosters a deeper appreciation for nature.
But the beauty of this DIY trick lies in its adaptability. While we’ve focused on cabbage, the possibilities are endless. You can experiment with other leafy greens like lettuce, spinach, or kale. Herbs like basil, mint, or parsley also thrive in bottle gardens. Consider adding companion plants like marigolds to deter pests and attract pollinators. You can even create a tiered system by stacking multiple bottle gardens on top of each other, maximizing your vertical growing space.
For a more visually appealing garden, consider painting the bottles with vibrant colors or decorating them with creative designs. This adds a personal touch and transforms your bottle garden into a unique piece of art. You can also experiment with different types of soil and fertilizers to optimize growth. Remember to research the specific needs of the plants you choose to grow.
We encourage you to embrace this DIY trick and embark on your own bottle garden adventure. It’s a simple, sustainable, and incredibly rewarding way to connect with nature and enjoy fresh, homegrown produce. Don’t be afraid to experiment, adapt, and personalize the process to suit your own needs and preferences.
Most importantly, we want to hear about your experiences! Share your photos, tips, and challenges in the comments section below. Let’s create a community of bottle garden enthusiasts and inspire others to embrace this sustainable and rewarding practice. Let us know what worked for you, what didn’t, and any creative variations you came up with. Together, we can learn and grow (literally!) and make a positive impact on the environment. So, grab a bottle, some soil, and some seeds, and get ready to experience the joy of growing your own cabbage in a bottle garden!
Frequently Asked Questions (FAQ)
What kind of plastic bottle is best for a bottle garden?
Ideally, you should use a clear, food-grade plastic bottle. Two-liter soda bottles or larger water bottles work well. Avoid bottles that have contained harsh chemicals, as these may contaminate the soil. Make sure to thoroughly clean the bottle with soap and water before using it. The clarity of the bottle is important for allowing sunlight to reach the plant. Recycled bottles are the best option for sustainability.
How often should I water my cabbage bottle garden?
The frequency of watering depends on several factors, including the size of the bottle, the type of soil, the climate, and the stage of growth of the cabbage. Generally, you should water when the top inch of soil feels dry to the touch. Avoid overwatering, as this can lead to root rot. Ensure that the bottle has adequate drainage holes to prevent waterlogging. A good rule of thumb is to check the soil moisture every day or two and water accordingly. During hotter months, you may need to water more frequently.
What type of soil should I use for growing cabbage in a bottle?
A well-draining potting mix is essential for growing cabbage in a bottle garden. Avoid using garden soil, as it can be too heavy and compact, hindering drainage and root growth. A good potting mix should contain a blend of peat moss, perlite, and vermiculite. You can also add compost to enrich the soil with nutrients. Consider using a soil mix specifically formulated for vegetables. The right soil will provide the necessary nutrients and support for healthy cabbage growth.
How much sunlight does my cabbage bottle garden need?
Cabbage requires at least six hours of direct sunlight per day to thrive. Place your bottle garden in a sunny location, such as a windowsill, balcony, or patio. If you don’t have access to enough natural sunlight, you can supplement with artificial grow lights. Rotate the bottle garden regularly to ensure that all sides of the plant receive adequate sunlight. Insufficient sunlight can lead to leggy growth and reduced yields.
How do I fertilize my cabbage bottle garden?
Cabbage is a heavy feeder and requires regular fertilization to support healthy growth. Use a balanced liquid fertilizer diluted to half strength. Apply the fertilizer every two to three weeks, following the instructions on the product label. You can also add compost tea to the soil to provide additional nutrients. Avoid over-fertilizing, as this can damage the plant. Look for fertilizers specifically formulated for vegetables.
How do I protect my cabbage bottle garden from pests?
Bottle gardens are generally less susceptible to pests than traditional gardens, but they can still be affected by aphids, slugs, and caterpillars. Regularly inspect your plants for signs of infestation. You can remove pests by hand or use organic pest control methods, such as neem oil or insecticidal soap. Companion planting with marigolds or basil can also help deter pests. Ensure good air circulation around the plants to prevent fungal diseases.
Can I grow other vegetables in a bottle garden besides cabbage?
Yes, you can grow a variety of vegetables in bottle gardens, including lettuce, spinach, kale, herbs, and even small tomatoes or peppers. Choose plants that are well-suited to container gardening and have shallow root systems. Consider the size of the bottle and the space requirements of the plant. Research the specific needs of each plant to ensure optimal growth.
How do I transplant my cabbage seedlings into the bottle?
When your cabbage seedlings have developed a few sets of true leaves, they are ready to be transplanted into the bottle garden. Gently remove the seedlings from their original container, being careful not to damage the roots. Dig a small hole in the soil in the bottle garden and place the seedling in the hole. Cover the roots with soil and gently firm the soil around the base of the plant. Water thoroughly after transplanting.
What do I do if my cabbage plant outgrows the bottle?
If your cabbage plant outgrows the bottle, you can either transplant it into a larger container or harvest the leaves as needed. If you choose to transplant, select a pot that is at least twice the size of the bottle. Gently remove the plant from the bottle and transplant it into the new pot, being careful not to damage the roots. Water thoroughly after transplanting. Alternatively, you can harvest the outer leaves of the cabbage plant as they mature, allowing the plant to continue growing in the bottle.
How long does it take to grow cabbage in a bottle garden?
The time it takes to grow cabbage in a bottle garden depends on the variety of cabbage, the growing conditions, and the size of the bottle. Generally, it takes about 60 to 80 days from planting to harvest. You can start harvesting the outer leaves of the cabbage plant when they are large enough to eat. The entire head of cabbage can be harvested when it is firm and compact.
Leave a Comment